Showing posts with label Lawn Fawn. Show all posts

Thursday, July 24, 2025

Christmas in July 2025 {BYSHC} Linky Party ~ Nautilus Swirl Stencil ~ A Colorful Life Designs

 Hello there crafty friend!
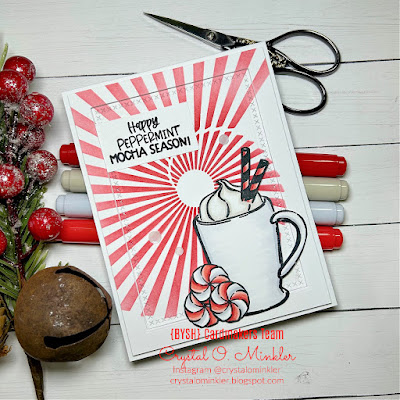
I'm back with another card I made for the Christmas in July 2025 {BYSHC} Linky Party! I've been so inspired by the cards shared over at the Linky Party... I just HAD to get inky! I saw a fab card by sweet Holly Brown not too long ago and I immediately thought it would be fun to use the same stencil but for a Christmas card.


Voila! I think it's peppermint perfection!! Haha! I used the awesome Nautilus Swirl Stencil from our amazing Sponsor A Colorful Life Designs for my fun background. I blended over the stencil using Candied Apple Distress Ink. I focused the blending in the center and lightened the blends with a softer touch around the edges.


I trimmed the panel to 4 x 5-1/4" and die cut it using the Large Cross-Stitched Rectangle Stackables from Sponsor Lawn Fawn. I adhered the die cut piece directly to the white A2 top fold card and then added iCraft 3D Foam Tape Jumbo Roll (white) from our lovely Sponsor Therm O Web to the outer portion making it into a fun frame. It gives some really fun dimension to the card.


I stamped the cute cup and peppermints from the retired Peppermint Mocha Season stamp set from Sponsor Not 2 Shabby using the fabulous Pressure Pal from our awesome Sponsor Twiddler's Nook to get an even pressure on my Misti while stamping. This tool really comes in handy when my hands are hurting. I colored the fun images with Copic markers. I fussy cut each of the images on the line, colored the edges with a Memento Tuxedo Black marker, and then adhered them together. I added foam tape to the portions of the images that laid in the center of the card and then I used iCraft UltraBond Adhesive from Therm O Web for the handle and bottom portion that sat on the frame. The sentiment is also from the same stamp set. I finished off the card with some White Glossy Card Bling from A Colorful Life Designs. 


I hope you'll stop by the Christmas in July 2025 {BYSHC} Linky Party to check out all the wonderful Holiday inspiration being shared! I've been inspired by so many of the cards! I sure hope you'll stop by and check it out! Have an ink-tastic day!

Thanks so much for stopping by!

Inky Hugs,
Crystal

Thursday, July 10, 2025

Felix the Fox ~ Preview Day 2 ~ The Greeting Farm

 Hello there crafty friend!
It's Day 2 of previews at The Greeting Farm for the July release. I am loving the super cute foxes in the FELIX THE FOX stamp set!! They are all SO cute!


I inked up just the one fox for my card, but I used a bunch of the other stamps in the set. I stamped all the images with Memento Tuxedo Black ink and colored them up with Copic markers. I added white dots to the red mushroom with a Sakura White Gelly Roll pen.

Here's a quick list of the Copic markers I used:
Fox: E95, E97, E09, R00, R20, W0, W2, W3, N2, N4, N6
Shorts: BV02, BV34, BV08
Log: E25, E57, E29 
Bushes / Grass: YG11, BG34, BG49
Tree: E25, E57, E29, Y11, Y15, YR15
Falling Leaves: Y11, Y15, YR15, R20, R14, R27
Mushrooms: W1, W2, W3, R20, R14, R27
Blue Bird: YR16, B000, B91, B93, E000, E00, E21


I paired up the cute fox with a few scraps of paper I have from Lawn Fawn. I don't actually know the name of these papers. I adore the colors though... they inspired my whole color scheme.


I fussy cut all of the colored images and colored the edges with a Memento Tuxedo Black marker. I adhered all the images on the yellow pattern paper. I adhered the trimmed sentiment to the bottom of the panel and then popped up the panel and sentiment with foam tape.


This card was so much fun to make! Be sure to stop by the TGF blog to see all the makes from the design team. The release goes live in the store on the 15th at 12am EST.

Thanks so much for stopping by!

Inky Hugs,
Crystal


Tuesday, July 1, 2025

{BYSHC} Sketch Challenge 59 ~ Build-A-Snow Globe ~ Lawn Fawn

Hello there crafty friend!
It's time for a new sketch challenge over in the Build Your Stash Holiday Cardmakers Facebook group! Today I'm sharing a fun Christmas card featuring a bunch of fun products from our fabulous Sponsor, Lawn Fawn! Lawn Fawn has generously offered up a $25 gift card as a prize for the {BYSHC} Sketch Challenge 59 this month! Woohoo!!


I started my card with a fun background of pretty holiday papers. I used the retired Knit Picky 6x6 Paper Pack {alternate Knit Picky Winter 6x6 Paper Pack}. I love these papers and I'm so glad that they released another paper pack with fun colors. I don't know about you, but I have a bunch of dies that I bought with good intentions to create cards with but it seems I never reach for them. So for this month's challenge, I've played with some of those dies and I'm so excited! I used the wonderful Build-A-Snow Globe dies. I love snow globes!!


I created a fun scene for my snow globe using the exclusive Nutty or Nice? stamps from the STAMPtember set created with Simon Says Stamp. This is one of my favorite stamp sets! I use it a lot. I just adore these squirrels! The trees are from the snow globe dies. The hills are die cut using the Stitched Hillside Borders

Here's a quick list of the Copic markers I used:
Squirrels: W0, W1, W3, W5
Green Scarves: YG11, G24, G46
Santa Hat: C0, C1, R20, R14, R27
Acorn Present: E21, E25, E57, R20, R14, R27
Sky: B000, B00 


The little bow and greenery are die cut from New Leaf and Pure Poppy card stock from Papertrey Ink using dies from the Christmas Garland dies. And then the circles are die cut using dies from the Large Cross-Stitched Circle Stackables dies. I adhered all of my layers to a white A2 top fold card base. The little circles are popped up on the card with foam tape.


Here's a look at {BYSHC} Sketch Challenge 59 for the month of July. If you're interested in seeing a bit more inspiration for this sketch, check out the amazing inspiration from the design team over on the {BYSH} Cardmakers blog!


Thanks so much for stopping by!
See ya next time.

Inky hugs,
Crystal


{Please note that comment moderation is ON. Your lovely comment will appear shortly.}

Friday, May 9, 2025

Spring into Christmas 2025 {BYSHC} Linky Party ~ Purrs & Cocoa ~ Not 2 Shabby

 Hello there crafty friend!
I'm sneaking in one last card for the Spring into Christmas 2025 {BYSHC} Linky Party! I had one more stamped image colored up from Spring Break and thought I'd make a quick card using a past Tawny Owl Paperie Inky Inspiration Sketch.


I stamped the adorable cocoa kitty from the Purrs & Cocoa stamp set from Sponsor Not 2 Shabby using Memento Tuxedo Black ink and colored it up with Copic markers. I fussy cut the cocoa kitty leaving a white border around the edges.

Here's a list of the Copic markers I used:
Kitty: RV10, R20, N0, N2, N4
Marshmallows: C00, C2
Cocoa: E21, E23, E25
Mug: R20, R14, R27
Tree: YG11, G24, G46


I paired up the cute kitty with the retired Knit Picky 6x6 Paper Pad from Sponsor Lawn Fawn. I die cut the background layer using the largest die from the Scallops & Rectangles {nesting dies} from Sponsor Unity Stamp Co. I trimmed the banner layer and green paper. I cut a fishtail for the one end and then used a corner rounder punch for the green paper.


My card was inspired by TOP Inky Inspiration Sketch 4. I love the CAS vibe of the sketch! I was going to leave my background white for more of a CAS card, but decided to use up some of my older papers. I've had these Lawn Fawn papers for years now. Time to finish it up!


I adhered all of my layers using iCraft UltraBond Adhesive from Sponsor Therm O Web and then adhered the panel to a white A2 top fold card base. I popped up the cocoa kitty using 3D Foam Squares, also from Therm O Web. I finished off the card with three confetti pieces from the Hologram Red Card Bling from Sponsor A Colorful Life Designs.


I have had SO much fun playing along with the Spring into Christmas 2025 {BYSHC} Linky Party! I hope that you'll stop by the Linky Party and check out the cards that have been linked up. Lots of fabulous inspiration!! Don't forget the Linky Party ends at 11:59pm PST tonight. Get those entries in! Have an ink-tastic day!


Thanks so much for stopping by!
See ya next time.

Inky Hugs,
Crystal


{Please note that comment moderation is ON. Your comment will appear shortly.}

Wednesday, May 7, 2025

Spring into Christmas 2025 {BYSHC} Linky Party ~ Holly Jolly Elf ~ Rachelle Anne Miller Stamps

 Hello there crafty friend!
I'm back with another fun holiday card for the Spring into Christmas 2025 {BYSHC} Linky Party! My card today features a cute digi stamp from the Holly Jolly Elf digital stamp from our wonderful Sponsor Rachelle Anne Miller Stamps.


I combined and resized the cute deer and elf digi stamp and the sentiment in a Word Document and then printed it off. I colored up the cuties with Copic markers.

Here's a quick list of the Copic markers I used:
Skin: E000, E00, E11, R00, R20
Hair: E21, E23
Elf Hat / Clothes: R20, R14, R27, BG10, BG01, BG34
Deer: E21, E23, E25, N2, N4, N6
Deer Collar: R20, R14, R27, Y11, Y15, Y28


I created a fun scene for the deer and elf using papers from the retired Snow Day Remix 6x6 paper pack from Lawn Fawn. I used the sentiment papers for my background layer that measures 4 x 5-1/4". I die cut the snowy papers using a die from the BIG Scallops & Rectangles {nesting dies} from Sponsor Unity Stamp Co. I also die cut the printed digi stamp and sentiment using the same die. I trimmed the panel just above the sentiment and after I colored the reindeer and elf, I fussy cut them leaving a white border. 


My card was inspired by {BYSHC} Sketch #34. This is a simple sketch that's great for scene cards. Another fun past sketch from the Build Your Stash Holiday Cardmakers group.


I die cut a scrap of white card stock using the same rectangle die and then I die cut it again using the Stitched Hillside Borders from Sponsor Lawn Fawn. I adhered the hill and sentiment layers to the snowy paper and used a piece of red grosgrain ribbon to cover the edge between the papers. I wrapped it around the back of the card and then covered the back of the panel with a bunch of 3D Foam Squares from Sponsor Therm O Web.


I hope you'll stop by the Spring into Christmas 2025 {BYSHC} Linky Party to check out all the wonderful Holiday inspiration being shared! I've been inspired by so many of the cards! I sure hope you'll stop by and check it out! Have an ink-tastic day!


Thanks so much for stopping by!
See ya next time.

Inky Hugs,
Crystal


{Please note that comment moderation is ON. Your comment will appear shortly.}

Saturday, May 3, 2025

Spring into Christmas 2025 {BYSHC} Linky Party ~ Holiday Grumplings ~ Taylored Expressions

 Hello there crafty friend!
I'm back for Day 2 of the Spring into Christmas 2025 {BYSHC} Linky Party with a grumpy holiday card! It was so much fun checking out the inspiration shared yesterday for the start of the Linky Party. So many beautiful cards! Today I'm sharing a card using a funny stamp from return Sponsor Taylored Expressions called Holiday Grumplings.


I inked up one of the cute critters from the retired Holiday Grumplings stamp set from our fab Sponsor Taylored Expressions. His grumpy face just makes me smile!! LOL! I stamped him with Black Amalgam ink and colored  him up with Copic markers. I decided he needed a hat so I also stamped the top of the cute snowman bear in the set and just fussy cut the hat after I colored it.


I used the retired coordinating Holiday Grumplings die set to die cut the fox. I cleaned up the edges of my fussy cutting by coloring the edges black with a Memento Tuxedo Black marker.
Here's a quick list of the Copic markers I used for this hilarious stamp:

Fox: N2, N4, N6, W00, W1, W3, E11, E15, E09, C00, C2
Hat: R20, R14, R27, C00, C2
Bell: Y11, Y28 


I paired up the grumpy fox with the retired Snow Day Remix paper pack from Sponsor Lawn Fawn. I die cut the polka dot paper using the retired Stitched Bracket Stacklets from Taylored Expressions. I adhered all my layers together using iCraft UltraBond Adhesive from our wonderful Sponsor Therm O Web. I die cut the sentiment using a circle die from the Stitched Circle Stacklets from Taylored Expressions. I added a bunch of iCraft 3D Foam Squares from Therm O Web to pop up the sentiment.


My card design was inspired by {BYSHC} Sketch 1. I went WAY back in the sketches! I used the measurements directly from the sketch for my card. The only thing I changed up was I used the red snowflake scrap from my papers and I used scraps for my background rather than just one piece of pattern paper. I love this sketch!


Before you leave, be sure to stop by Taylored Expressions, Lawn Fawn, and Therm O Web! I love all of our wonderful Sponsors!! And if you haven't already, stop by the Spring into Christmas 2025 {BYSHC} Linky Party to check out all the wonderful Holiday inspiration being shared!! Have a fantastic day!


Thanks so much for stopping by!
See ya next time.

Inky Hugs,
Crystal


{Please note that comment moderation is ON. Your comment will appear shortly.}

Monday, October 21, 2024

Falling for the Holidays 2024 {BYSHC} Linky Party ~ Flurries of Love ~ Pink & Main

 Hello there crafty friend!
It's day 4 of the Falling for the Holidays 2024 {BYSHC} Linky Party!! I'm having so much fun seeing all the wonderful entries in the linky party! Today I'm adding another cute card to my Christmas stash! This time I played with the super cute Flurries of Love stamp set from Sponsor Pink & Main that was an exclusive stamp for STAMPtember over at Simon Says Stamp. It was just too cute for me pass up! If you love this stamp set, check out Hello Winter over at Pink & Main... some super adorable and cute snowmen stamps! Just saying!


I paired up the cute Flurries of Love with the Knit Picky 6x6 Petite Paper Pad from our Sponsor Lawn Fawn! These pretty papers aren't available anymore. But they do have some similar papers called Knit Picky Winter Petite Paper Pack. I love these pretty papers! I've had them for quite awhile and thought it would be fun to use some of the scraps for the paper scrap quilting technique that Jenni Shamblin shared for our last linky party. It's a great technique for scrap papers.


I had hoped to share a video for this technique but time has not been on my side. But the basic idea is to adhere strips of pattern paper diagonally to a piece of copy paper leaving a little space in between the paper strips. I used a 8-1/2 x 5-1/2" piece of copy paper and just went all the way across with my strips of paper. I used 1/2" strips of pattern paper for the card I shared earlier this month for the Friends of Unity Blog Hop. But for this card I used 3/4" strips of pattern paper and then I cut the paper into 3.4" strips. And then I adhered the strips again to a piece of copy paper leaving a bit of white space between the strips. I then die cut the panel using the largest die from the Scallops & Rectangles {nesting dies} from our lovely Sponsor Unity Stamp Co. All of my papers layers are adhered using the iCraft UltraBond Adhesive from Sponsor Therm O Web. 


I stamped the cute images using Memento Tuxedo Black ink and colored them up with my Copics. I die cut the images using the coordinating dies and then adhered them to a white stitched circle that I die cut using a die from the Scallops & Circles {nesting dies} from Unity. I also die cut a red mat using a die from that set from Pure Poppy card stock from Papertrey Ink. I then added foam tape called iCraft 3D Foam Tape Jumbo Roll from Therm O Web to the back of the circles and popped the focal image up on the card. To finish off the card I added a bit of red bling from the Hologram Red Card Bling from Sponsor A Colorful Life Designs. I just love how this card turned out! 

Here's a quick list of the Copic markers I used: 
Snowman: C00, C2, R00, R20, YR15
Snowman Hat: N2, N4, N6, R20, R14, R46
Scarves: YG11, G24, G46
Penguin: C00, C2, N2, N4, N6, R00, R20
Penguin Hat: C00, C2, R20, R14, R46
Mug: R20, R14, R46, G00, G02, G05, G16
Hearts: R14


If you haven't already, stop by the Falling for the Holidays 2024 {BYSHC} Linky Party to check out all the wonderful Holiday inspiration being shared!! So much amazing inspiration! You can't help but be inspired to make a card or two! I sure hope you'll join in the fun! Have an ink-tastic week!

Thanks so much for stopping by!
See ya next time.

Inky Hugs,
Crystal


{Please note that comment moderation is on. Your lovely comment will appear once approved.}

Saturday, August 24, 2024

Happy Birthday To You ~ Chunky Chevron Stencil ~ A Colorful Life Designs

 Hello there crafty friend!
We just celebrated our eldest son's 25th birthday and I wanted to quick share the card I made for him. I used the awesome Chunky Chevron Stencil from A Colorful Life Designs. I am a huge fan of their stencils! All so awesome and unique!


I started this card with a 4-1/4 x 5-1/2" card front of Lemon Lime Twist card stock from Stampin' Up. I laid the fun Chunky Chevron Stencil over the top of the card stock and secured it in place with some washi tape. I then blended Crushed Olive and Mowed Lawn Distress Inks over the stencil.


I shifted the stencil to fill the empty spaces and blended Black Soot Distress Ink over the stencil. I die cut the panel using the Deckle & Stitches Nesting Dies from Unity. I then adhered the panel to a black A2 top fold card base turned on its side for a landscape card. I didn't actually plan to make a landscape card. When I went looking through my Lawn Fawn dies, I realized I didn't have the giant happy birthday die. I just have the Giant Happy Birthday To You die which is too big for a portrait card. 


I die cut Lemon Lime Twist card stock twice using the Giant Happy Birthday To You die and I die cut it one more time from True Black card stock from Papertrey Ink. I adhered the Lemon Lime Twist die cuts together and then adhered them offset to the black die cut. I love the dimension this gives to the sentiment. Hope you're having a wonderfully inky weekend friends!

Thanks so much for stopping by!
See ya next time.

Inky hugs,
Crystal


{Please note that comment moderation is on. Your lovely comment will appear once approved.}

Friday, June 28, 2024

{BYSHC} Sketch Challenge 46 ~ Eat, Sleep & Be Merry ~ Lawn Fawn

Hello there crafty friend!
I'm back with one last card for the {BYSHC} Sketch 46 over in the Build Your Stash Holiday Cardmakers Facebook group! Today I'm sharing a sweet Christmas card featuring the super cute sloth from the exclusive Eat, Sleep & Be Merry stamp from our awesome sponsor, Lawn Fawn! This stamp set was a collaboration with Simon Says Stamp for the 2021 STAMPtember event. 


Unfortunately, it's not available anymore but I'm super excited to finally ink up my stamp set. I know I'm not the only one with uninked stamp sets in their stash. I love inking up some of these sets for our challenges. I stamped the cute sloth, a gift and a couple of ornaments using Memento Tuxedo Black Ink and then colored them all up with Copic markers.

Here's a quick list of the Copic markers I used:
Sloth: W00, W2, W4, W6, W8
Branch: E55, E57, E59
Red: R20, R14, R46
White: C00, C1, C3


I die cut the sloth using a die from the Large Cross-Stitched Circle Stackables dies from Lawn Fawn. I also die cut the gift and ornaments using the coordinating Eat, Sleep & Be Merry die set. I paired up the cute sloth with pretty papers called Knit Picky 6x6 Petite Paper Pack. Looks like Lawn Fawn discontinued those papers but they do have the Knit Picky Winter 6x6 Petite Paper Pack. I adhered the pattern paper to a white A2 top fold card base turned on its side for a landscape card.


I stamped the sentiment on a scrap of white card stock using Candied Apple Distress Ink. I trimmed up the sentiment cutting a fishtail at one end. I adhered it to the circle and then I added foam tape to the back of both pieces and popped them up on the card. I like to use a thin foam tape from Scrapbook Adhesive. It gives a bit of dimension but it's not too bulky to mail the card in a regular A2 envelope. 


Here's a look at {BYSHC} Sketch Challenge 46 for the month of June. I am really loving this sketch! I am also loving all the entries for this month's challenge. I hope you'll join us and play along with the sketch. There's just a few days left to play along! If you're interested in seeing a bit more inspiration for this sketch, check out the amazing inspiration from the design team over on the {BYSH} Cardmakers blog! Lots of creative and sweet inspiration this month from the design team.


Thanks so much for stopping by!
See ya next time.

Inky hugs,
Crystal


{Please note that comment moderation is ON. Your lovely comment will appear shortly.}

Friday, June 14, 2024

{BYSHC} Sketch Challenge 46 ~ Winter Skies ~ Lawn Fawn

Hello there crafty friend!
I'm back with more inspiration for the {BYSHC} Sketch 46 over in the Build Your Stash Holiday Cardmakers Facebook group! Today I'm sharing a sweet Christmas card featuring the adorable Winter Skies stamp from our awesome sponsor, Lawn Fawn! Lawn Fawn has generously offered up a $25 gift card as a prize for the {BYSHC} Sketch Challenge 46 this month! So amazing!!


This month's sketch is so simple! I think it makes for a pretty quick card. I couldn't help myself I had to ink smoosh again. It's just so therapeutic creating a background just by smooshing some ink. I used Tumbled Glass, Wilted Violet, Chipped Sapphire and Black Soot Distress Inks for a pretty winter sky. I then ink blended a bit of the Chipped Sapphire Distress Ink over the background and ink smooshed some more Wilted Violet Distress Ink. It pairs up perfectly with the adorable Winter Skies stamp from Lawn Fawn. I dried the background completely with a Wagner Precision Heat Tool and then splattered white acrylic paint on the panel.


I die cut my ink smooshed panel using the Forest Borders dies. And then I placed the die back in the negative space of the panel and die cut a card front of Stampers Select White Card Stock. By lining up those two pieces of card stock at the top, I was able to line up the card stock and background so they'll fit back together like a puzzle and make just one layer on the card. I hope that makes sense. I'm trying to keep my layers minimal for some cards so I don't have to worry about extra postage when I mail them. The other option would be to just die cut the white card stock piece and adhere it over the ink smooshed background. Super easy, but it adds that partial layer. Before adhering the pieces together onto a white A2 top fold card base, I ran the ink smooshed background through my Big Shot with the Stitched Windy Backdrop die. You can see some of the fun stitches on the left side of the card. It's kind of hard to see them in the photos though. It's such a fun touch in person though!


I stamped the adorable bears on a scrap of white card stock. I colored them up with my Copic markers. I then die cut them using the coordinating die from the Winter Skies Lawn Cuts. I set the bears aside and stamped the sentiment from the Winter Skies onto my card front. I used an acetate grid sheet over the card to check the position and adjusted until I was happy. I added foam tape to the back of the bears and popped them up on the card. I like to use a thin foam tape from Scrapbook Adhesive. It gives a bit of dimension but it's not too bulky to mail the card in a regular A2 envelope. 

Here's a quick list of the Copic markers I used:
Left Bear: E53, E55, E57, E59
Right Bear: E51, E53, E55, E57
Scarf: B000, B02, B04, V01, V05, V06


Here's a look at {BYSHC} Sketch Challenge 46 for the month of June. I am really loving this sketch! I am also loving all the entries for this month's challenge. I hope you'll join us and play along with the sketch. If you're interested in seeing a bit more inspiration for this sketch, check out the amazing inspiration from the design team over on the {BYSH} Cardmakers blog! Lots of creative and sweet inspiration this month from the design team.


Thanks so much for stopping by!
See ya next time.

Inky hugs,
Crystal


{Please note that comment moderation is ON. Your lovely comment will appear shortly.}

Saturday, June 1, 2024

{BYSHC} Sketch Challenge 46 ~ Cheery Deer ~ Lawn Fawn

Hello there crafty friend!
It's time for a new sketch challenge over in the Build Your Stash Holiday Cardmakers Facebook group! Today I'm sharing a sweet Christmas card featuring the adorable deer die from our amazing sponsor, Lawn Fawn! Lawn Fawn has generously offered up a $25 gift card as a prize for the {BYSHC} Sketch Challenge 46 this month! So awesome!!


This month's sketch is pretty simple! I think it'll be a great one to make multiple cards with. Of course, that does depend on what your focal image is for the card. LOL! I chose the adorable Cheery Deer dies from our amazing sponsor Lawn Fawn. And this adorable die is really fun to work with but it's also a bit time consuming. I did have some leftover die cuts in with my dies from the last card I made using this die so that was cool. And then I just used scraps of card stock to cut the other pieces I needed. I used Kraft, Berry Sorbet, Tropical Teal, Pure Poppy and True Black card stock from Papertrey Ink along with Close to Cocoa, Chocolate Chip and Pretty in Pink card stock from Stampin' Up.


I paired up the adorable deer with the beautiful Perfectly Plaid Christmas 6x6 Petite Paper Pack. Sadly, I can't find these papers on the website. I adhered the plaid pattern paper to the front of a white A2 top fold card turned on its side. I trimmed another piece of Stampers Select White card stock from Papertrey Ink to 4-1/4 x 5-1/2" and die cut it using a die from the Stitched Hillside Borders dies.


I stamped the sentiment from the Winter Wavy Sayings stamp set using my Mini Misti so I could bend the sentiment to fit along the stitched edge. I used an acetate grid sheet over the card to check the position and adjust until I was happy. It's not perfect but it's handmade so I'm happy with it. I die cut a piece of vellum using a die from the Large Cross-Stitched Circle Stackables. I adhered the deer to the vellum and then added glue just behind the deer to adhere it to the card. This way no glue showed through the vellum. I added a cute enamel dot to the deer's nose to finish this one off.


Here's a look at {BYSHC} Sketch Challenge 46 for the month of June. I am loving this sketch! I can't wait to see what everyone does with it. I hope you'll join us and play along with the sketch. If you're interested in seeing a bit more inspiration for this sketch, check out the amazing inspiration from the design team over on the {BYSH} Cardmakers blog! Lots of creative and sweet inspiration this month from the design team.


Thanks so much for stopping by!
See ya next time.

Inky hugs,
Crystal


{Please note that comment moderation is ON. Your lovely comment will appear shortly.}