Showing posts with label Birthday. Show all posts

Monday, August 25, 2025

Inky Paws Challenge #243 ~ Sketch Challenge {Week 4}

Hello there crafty friend!
 There's just a few more days to play along with the Inky Paws Challenge #243 - Sketch Challenge! You have until this coming Friday, August 29th to get your entries in for the challenge and a chance to win a $20 store credit to Newton's Nook Designs!


This has been such a fun sketch! I hope you have a chance to play along with us if you haven't already! There's just a few days left to play!


I decided to make a birthday card for my last card. I actually started by picking my papers first for this one. I wanted three pattern papers that all had a white background so I chose the above three papers from the Birthday Party 6x6 Paper Pad. I used the Card Layout 4 Die as a guide to cut my papers out. Once I had the papers cut, I secured the die to the papers using washi tape and ran it through my Big Shot. I then die cut the frame from white card stock and adhered all of the pieces to a white A2 top fold card base.


I pulled out the fun Birthday Postage Sampler Stamp Set and inked up a few images to coordinate with the pattern papers I had chosen. I colored each of them with some Copic markers to coordinate with the colors in the papers and then I die cut them using the coordinating dies from the Birthday Postage Sampler Die Set.

Here's a quick list of the Copic markers I used:
Present: YR20, YR15, R20, R14
Balloons: Y11, Y15, YG11, YG03, Colorless Blender
Cupcake: Y11, Y15, Y38, BG000, BG10, BG15, E11, E25


I die cut three circles from white card stock using a die from the Circle Frames Die Set. I added foam tape to the back of each image and popped them up on the circles and then I adhered the circles to the card. I stamped the sentiment, trimmed it and then adhered it to the card, as well.


Now it's your turn to get your paws inky with your Newton's Nook Designs products and create a project using the fun sketch. Be sure to link up to the Inky Paws Challenge! Can't wait to see your projects!

Thanks so much for stopping by!

Inky Hugs,
Crystal

Thursday, August 21, 2025

Frightfully Good Birthday ~ Holidays Are a Nightmare ~ Kindred Stamps

Hello there crafty friend! 
I was asked to make a custom birthday card with a Nightmare Before Christmas theme. I adore Nightmare Before Christmas so this was not a hard task and I had just the stamp set to use. I used the retired Holidays Are a Nightmare stamp set from Kindred Stamps.


I started with my background. I knew that I wanted a black and white card... almost grayscale actually. So I ink smooshed a piece of white card stock with Black Soot Distress Ink. To tame down some of the white in the background I decided to scrape my ink pad across the panel. I did this from both directions all the way across the panel. I really like the added texture it gives to the background. I trimmed it down and adhered it to a black A2 top fold card.


I wanted to include the hill so I roughly drew it with pencil on black card stock and cut it out. I die cut a frame for my little scene using two nesting dies. I wanted a simple moon so I just die cut two circles. If I made this again, I'd probably do with out the mat for the moon. I thought it would make the moon stand out a bit more but I don't think it was completely necessary. I added some splatters to the moon and adhered the hill and moon to the frame.


I stamped the fun characters from Holidays Are a Nightmare and colored them with just a few Copic markers: N0, N2, N4. I fussy cut them on the line and colored the edges with a Memento Tuxedo Black marker. TIP: Be sure to color the edges with a brush tip and do it from the back of the image just in case your marker slips. I adhered Sally and Jack to the card and then popped up Zero with foam tape.


The sentiment was fun to put together for a birthday card. I masked the 'Have a Frightfully Good Holiday Season' by covering 'Holiday Season' with a post-it note when I inked up the stamp. I removed the post-it note and stamped. This took a few times to get a nice crisp sentiment but it was worth it. I die cut birthday two times using the retired Chic Script Salutations {die set} from Unity. I die cut the shadow from white card stock so the sentiment would pop. I added foam tape to the back of the sentiment and popped them up. Such a fun card to make! If you need a custom card made, let me know!

Thanks so much for stopping by!

Inky hugs,
Crystal

Wednesday, August 13, 2025

Birthday Girl Anya ~ Preview Day 3 ~ The Greeting Farm

 Hello there crafty friend!
It's the final day of previews at The Greeting Farm for the August release! Today we're introducing BIRTHDAY GIRL ANYA... today's super sweet stamp set includes the adorable Anya with a cute kitty and a cake and some other cute accessory stamps! All so fun!


I stamped Anya, the cake, the table, and kitty with Memento Tuxedo Black ink and colored them with Copic markers. Fussy cut each of them on the line and then colored the edges with a Memento Tuxedo Black marker making the edges nice and neat.

Here's a quick list of the Copic markers I used:
Skin: E000, E00, E11
Freckles: E33
Hair: Y21, E33, E35
Hair Accessories: YG21, YG11, RV10, RV02, RV14, YR20, YR15, B000, B00
Dress: B000, B00, RV10, RV02
Kitty: C0, C2, R00, R20
Gift Bag: B000, B00
Cake: YG21, YG11, YG03, YR20, YR15, RV10, RV02, RV14
Table Cloth: RV10, RV02
Table: C0, C2


I paired up Anya with some old papers from Stampin' Up that's been in my stash for quite awhile. I think the party theme of the papers really worked nicely with these stamps. I die cut the background layer with the largest die from the Postage Stamp {nesting dies} and the garland paper was die cut using a die from the Scallops & Rectangles {nesting dies}, both from Unity.


I stamped and trimmed the sentiment and adhered it directly to the card. I popped up the kitty with foam tape. And then I finished off the card with three rhinestones from the Frosty Rhinestones from Gina Marie Designs.


The release goes live in the store tomorrow the 15th at 12am EST! Woohoo! Be sure to come back tomorrow for the release Blog Hop!! One lucky winner will receive a $50 gift card to The Greeting Farm. All you have to do is comment on the hop! Yay!

Thanks so much for stopping by!

Inky Hugs,
Crystal


Monday, July 28, 2025

Inky Paws Challenge #242 ~ Color Challenge {Week 4}

Hello there crafty friend!
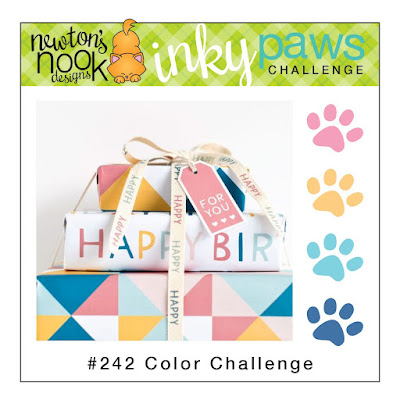
 There's just a few more days to play along with the Inky Paws Challenge #242 - Color Challenge! You have until this coming Friday, August 1st to get your entries in for the challenge and a chance to win a $20 store credit to Newton's Nook Designs!


I hope you're having fun with this color combo... Cotton Candy Pink, Orange Sherbet, Turquoise, and Royal Blue!! I couldn't help but make more birthday cards using products from the new release!


The new Card Layout 3 Die makes easy work of a fun background. I thought I'd use two pieces of patter paper and make two cards from the backgrounds I created. Easy peasy! I die cut pattern papers from the Birthday Time 6x6 Paper Pad. The colors in these papers are just PURR-fect for this challenge!


I stamped two adorable cats from the Cat Birthday Party Stamp Set. Colored them with Copic markers and then die cut them with the coordinating Cat Birthday Party Die Set


Here's a quick list of the Copic markers I used for my first card:
Cats: R00, R20, N2, N4, N6, C0, C2
Orange:YR20, YR15
Pink: RV10, RV52
Turquoise: BG000, BG01
Royal Blue: B02, B24, B28
Cake: E21, E23


I stamped the fun balloons and birthday cake from the Birthday Postage Sampler Stamp Set. I colored them up and then die cut them with the coordinating Birthday Postage Sampler Die Set.


I die cut the 'Happy Birthday' sentiment from pattern paper using the Happy Birthday Die. I die cut shadows from white card stock and adhered them together. And then I adhered all of the fun images to the card.


Now it's your turn to get your paws inky with your Newton's Nook Designs products and create a project using the color combo of Cotton Candy Pink, Orange Sherbet, Turquoise, and Royal Blue. Be sure to link up to the Inky Paws Challenge! Can't wait to see your projects!


Thanks so much for stopping by!

Inky Hugs,
Crystal

Monday, July 21, 2025

Inky Paws Challenge #242 ~ Color Challenge {Week 3}

Hello there crafty friend!
 Sharing some more inspiration for the Inky Paws Challenge #242 - Color Challenge! You have until Friday, August 1st to get your entries in for the challenge and a chance to win a $20 store credit to Newton's Nook Designs!


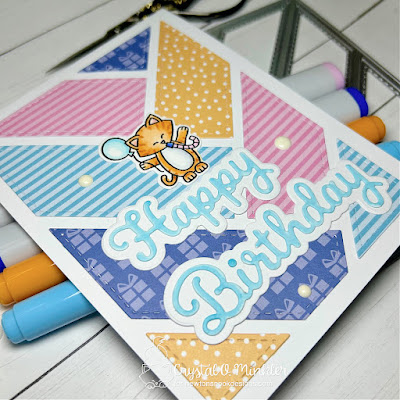
Have you seen the new release over at Newton's Nook Designs? I am loving all of the fun new birthday goodies and just had to play with some to share with you today. Our colors for the challenge are Cotton Candy Pink, Orange Sherbet, Turquoise, and Royal Blue!! 


I used the awesome new Card Layout 3 Die for a fun background for my card. I love this new die!! I paired it up with the fabulous new Birthday Time 6x6 Paper Pad. The colors in these papers are just PURRFECT for this month's Color Challenge!


I die cut the sentiment from white card stock using the new Happy Birthday Die. I Copic colored the 'Happy' and 'Birthday' with BG000 and BG01. 


I adhered the sentiment to the card and got to thinking it would be fun to add a little something on top of the sentiment so I stamped the cute kitty from the Cat Birthday Party Stamp Set. I colored it up with Copic markers and die cut it using the coordinating Cat Birthday Party Die Set. And then I finished off the card with a few white enamel dots.

Here's a quick list of the Copic markers I used:
Cat: YR20, YR15, YR27, C0, C2, R00, R20
Balloon: BG000, BG01
Noisemaker: B02, B24, B28, RV10, RV52


Now it's your turn to get your paws inky with your Newton's Nook Designs products and create a project using the color combo of Cotton Candy Pink, Orange Sherbet, Turquoise, and Royal Blue. Be sure to link up to the Inky Paws Challenge! Can't wait to see your projects!

Thanks so much for stopping by!

Inky Hugs,
Crystal

Friday, July 18, 2025

Happy Birthday NND! ~ 12 Year Celebration ~ Newton's Nook Designs

Hello there crafty friend! 
We're celebrating 12 AMAZING Years of Newton's Nook Designs products with a fun Instagram Hop! Yay! I'm sharing details for my cards below. 


Be sure to stop by the Instagram Hop for a chance to win a $25 voucher to Newton's Nook Designs!


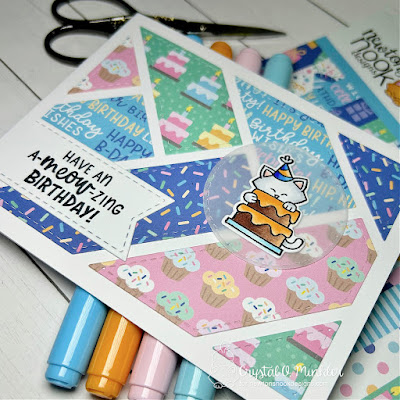
I stamped the cute kitty from the Cat Birthday Party stamps and die cut it using the coordinating Cat Birthday Party dies. I mat it with a die cut circle from vellum card stock using a die from the Circle Frames Die Set.

Here's a quick list of the Copic markers I used:
Kitty: C0, C2, R00, R20
Hat: B02, B24, B28, RV10, RV52, C0, C2
Cake: E21, E25, E29, YR20, YR15
Plate: BG000, BG01


I paired up the adorable Cat Birthday Party stamp with the sweet Birthday Time 6x6 Paper Pad. I die cut the pattern papers from the Birthday Time 6x6 Paper Pad using the Card Layout 3 die. I cut individual pieces of the pattern paper to fit each of the spots and die cut them. I didn't die cut a frame and just adhered the pieces to a white A2 top fold card base that I turned on the side for a landscape card.


I die cut a piece of white card stock using the banner die from the Frames & Tags Die Set and then stamped the sentiment. I trimmed the sentiment and adhered it to the card. I adhered the kitty to the vellum and then adhered the vellum to the card only applying glue behind the kitty.


My second card was pretty quick and easy. I stamped the cute cupcake and present from the Birthday Postage Sampler stamps, along with another cute kitty from the Cat Birthday Party stamps on leftover pieces I had die cut using the Postage Stamp Layout die

Copic markers used:
Cupcake: RV10, RV52, BG000, BG01, G000, G21, YR20, YR15
Present: RV10, RV52, G000, G21
Kitty: YR20, YR15, R00, R20, C0, C2
Kitty's Cupcake: Y06, BG000, BG01, B02, B24, B28


I die cut a piece of pattern paper from the Birthday Time 6x6 Paper Pad using the large postage stamp die from the Framework Die Set. Adhered it to a white A2 top fold card base and then adhered my birthday postage pieces.


I stamped the sentiment on a scrap of white card stock, trimmed it and adhered it directly to the card. Be sure to check out the Instagram Hop to see all the fabulous inspiration from the design teams and guests.


Thanks so much for stopping by!

Inky hugs,
Crystal

Monday, July 7, 2025

Inky Paws Challenge #242 ~ Color Challenge {Week 1}

Hello there crafty friend!
It's time for a new Inky Paws Challenge! We're playing with a fun mix of colors this month for a Color Challenge! I sure hope that you'll join us and play along with your Newton's Nook Designs products! Don't forget... our challenges are a whole month long so there's lots of time to play along! Yay! You have until Friday, August 1st to get your entries in for the #242 Color Challenge and a chance to win a $20 store credit to Newton's Nook Designs!


Our beautiful colors are... Cotton Candy Pink, Orange Sherbet, Turquoise, and Royal Blue!! Love this pretty combination of colors!


I stamped the beautiful coffee themed heart from the Heartfelt Coffee Stamp Set with Memento Tuxedo Black ink and colored up all the coffee cups with Copic markers. 

Here's a quick list of the Copic markers I used for the kitty and heart:
White: C0, C2
Cotton Candy Pink: RV10, RV52
Orange Sherbet: YR20, YR15
Turquoise: BG000, BG01, BG05
Royal Blue: B02, B24, B28
Coffee: E21, E25
'BREW': RV10, RV52


I die cut the heart using a die from the Heart Frames Die Set, but the scrap of white card stock wasn't big enough. Poor planning on my part! LOL! So I trimmed around the stitching on the heart and adhered it to another heart that I die cut from another piece of white card stock. 


I made a fun background using three of the colors and the Plaid Stencil Set. I blended
Kitsch Flamingo and Spiced Marmalade Distress Inks over the first stencil in the set. And then I blended Broken China Distress Ink over the second stencil to finish off the pattern. I really like how it turned out. I popped up the heart and the sentiment using foam tape.


Now it's your turn to get your paws inky with your Newton's Nook Designs products and create a project using the color combo of Cotton Candy Pink, Orange Sherbet, Turquoise, and Royal Blue. Be sure to link up to the Inky Paws Challenge! Can't wait to see your projects!

Thanks so much for stopping by!

Inky Hugs,
Crystal

Saturday, July 5, 2025

~ Friends of Unity July 2025 Blog Hop ~

Hello there crafty friend!
It's time for our Friends of Unity Blog Hop!! This month's cue is a lot of fun! 


I love getting inky with a fun mixed media card. I did struggle a bit getting going with these but once I did some ink smooshing I was on a roll! I can't be the only one who finds ink smooshing so relaxing. I love it! It makes a bad day so much better.


I ink smooshed my background for this one using Twisted Citron and Peacock Feathers Distress Ink leaving a good amount of white space. I added a little bit of Squeezed Lemonade but it's really not noticeable. I partially inked up A Faithful Letter background stamp with Memento Tuxedo Black ink.


The pretty little butterflies are from the retired {...With Her Own Wings}. I just inked up a handful of the butterflies for the corners. I die cut the background using the largest die from the Scallops & Rectangles {nesting dies} and then I adhered it to a white A2 top fold card base. I finished off the background with some black acrylic paint spatters.   


The butterflies are from the Paper Wings stamps. I colored them with Copic markers and fussy cut them on the line except around the antennae where I left a white border. The butterflies are adhered to the card on their bodies and antennae. I folded up the wings for some dimension. The sentiment is from the Extended Celebration stamps. I trimmed it and adhered it to the card. I finished off the card with a few pearl embellishments I think I got from a Unity order.


My second card also has some ink smooshing. Ink smooshing is my go-to mixed media technique. This time I used Twisted Citron and Wild Honey Distress Inks. I wanted to use colors that I normally wouldn't put together. For some reason these colors made me want to work with a chicken stamp so I grabbed the fun new Still Peckin' Fabulous


 And then I stamped the fun Chicken Wire background stamp.... which is retired. Bummer! Maybe you have it in your stash. I stamped it with Vintage Photo Distress Ink. I also stamped the squiggly lines from the stamps called Never with the same ink. I heat embossed the circle trio with clear embossing ink and Penny embossing powder from Brutus Monroe. I love the texture and shine it gives the card.


I stamped the fun chicken and colored it up with Copic markers. I heat embossed the sentiment with a white pigment ink and white embossing powder on a dark brown card stock. I fussy cut the chicken and adhered it to the sentiment and then I added foam tape to the back of both and popped them up on the card. Voila!

Here's a quick list of the Copic markers I used:
Chicken / Eyes: C0, C2, C3
Beak: Y11, YR20, YR15, YR27
Waddle: R20, R14, R27
Hat: YG11, YG03, YG63, B00, B02
Present: YR20, YR15, YR68, B00, B02
Balloon: Y11, YR20, YR15, YR68

Now before we get to the hopping, I chose a lucky winner from the comments on last month's hop to win a fun prize and the lucky winner is...


... Wilma DeG!! Congratulations, Wilma!!
Please email me at crystalominkler@gmail.com to claim your prize. 
Please claim the prize before July 30th, 2025. 

Well, that's it for me this time! It's a short hop this month with just six of us sharing our makes. Be sure to hop along and enjoy some more inspiration! I can't wait to see how our friends were inspired by this month's cue. I will be doing another fun giveaway this month!! Be sure to hop along and comment for a chance to win. {When you comment please leave your name just in case it posts as anonymous.} I'll announce the winner next month! 


Let's get to the hopping...

Crystal <--- you're here

up next ---> Jenni


Thanks so very much for supporting our little hop!
We appreciate you so much!!

Inky Hugs,
Crystal


Tuesday, June 3, 2025

Tawny Owl Paperie Inky Inspiration Sketch 33 ~ Pissy Party ~ Unity Stamp Co.

 Hello there crafty friend!
Today I'm sharing some inspiration for the Tawny Owl Paperie Inky Inspiration Sketch Challenge 33 in the Tawny Owl Paperie Inky Inspiration Facebook group. I inked up the super sassy and cute kitty from the Pissy Party stamps. I love this cat!


I stamped the kitty and sentiment with Amalgam Black ink on Stampers Select White card stock and colored the kitty up with Copic Markers. I die cut the kitty using a circle die from the Scallops & Circles {nesting dies}

Here's a list of the Copic Markers I used:
Kitty: C0, C2, R00, R20, Colorless Blender
Eyes: Y11, BG10
Hat: R20, R14, R27
Cupcake: Y11, Y15, YG11, YG03, BG000, BG10, BG15
Ground: BG000, BG10, BG15


Here's a look at the fun sketch for Tawny Owl Paperie Inky Inspiration Sketch Challenge 33. The sketch, as always, is meant to inspire not require. So let the sketch lead in your design, but don't feel limited by it. 


I paired up the pissy kitty with the awesome Oh Hey! It's Your Day! {paper pack}. The bottom layers {polka dots and numbers} are adhered to a white A2 top fold card base. I also slipped a cute scalloped edge in there that I had punched out of Pure Poppy card stock from Papertrey Ink using an old punch from Stampin' Up.


I adhered the sentiment to the circle focal image and adhered that to the plaid banner. I then covered the entire back with foam tape and popped it up on the card. I finished off the card with a few red enamel dots from my stash. I'm having so much fun with this sketch! I hope you can find time to play along. Have an ink-tastic week!

Thanks so much for stopping by!
See ya next time.

Inky Hugs,
Crystal


{Please note that comment moderation is on. Your lovely comment will appear once approved.}