Showing posts with label Sketch. Show all posts

Tuesday, September 16, 2025

Tawny Owl Paperie Inky Inspiration Sketch 35 ~ November Girl ~ Unity Stamp Co.

 Hello there crafty friend!
Today I'm sharing some inspiration for the Tawny Owl Paperie Inky Inspiration Sketch Challenge 35 in the Tawny Owl Paperie Inky Inspiration Facebook group. I inked up an oldie but a goodie stamp from my stash... the beautiful November Girl from Unity.


I had stamped this beauty probably last year but the project I wanted to use her for went in a different direction. She was perfect for my card today though. I used paper scraps from my stash to make my background. These papers are from the plaid papers I used earlier in the month for this card... HERE. I thought I'd use some of the scraps for my card today.


Here's a look at the fun sketch for Tawny Owl Paperie Inky Inspiration Sketch Challenge 35. The sketch, as always, is meant to inspire not require. So let the sketch lead in your design, but don't feel limited by it. I used the measurements on the sketch for my card today.


I colored up November Girl with similar colors to the papers but with a pop of blue and teal. I had fun coloring this one with my Copic markers.

Here's a list of the Copic Markers I used:
Skin: E000, E00, E11
Hair: C0, C5, C7
Bird: Y11, Y15, B000, B91
Sprig: R14, G82, G94
Hat / Mittens / Boots: E21, E23, E25
Jacket: BG10, BG70, BG72, BG75
Sweater: Y15, Y38
Jeans: B91, B93, B95, B97
Pumpkins: YR20, YR15, YR68, UR27, BG000, BG01, BG72, E21, E25, G82, G94
Scarf: YR20, YR15, R14, R37


I stamped the sentiment, trimmed each of the words and adhered them to the card. I fussy cut November Girl and popped her up with foam tape. And then I finished off the card with brown enamel dots.

Thanks so much for stopping by!

Inky Hugs,
Crystal

Tuesday, September 9, 2025

Tawny Owl Paperie Inky Inspiration Sketch 35 ~ Hexes & Hugs ~ Unity Stamp Co.

 Hello there crafty friend!
Today I'm sharing some inspiration for the Tawny Owl Paperie Inky Inspiration Sketch Challenge 35 in the Tawny Owl Paperie Inky Inspiration Facebook group. I inked up the cute yet grumpy monster from the Hexes & Hugs stamps from Unity for a fun Halloween card.


I had this cute monster stamped and fussy cut already on my desk from a project that didn't happen. Sooo... I thought I'd use it for a Halloween card. I started with my background. I pulled out the Haunted Hues {paper pack} and cut some layers for my card. I adhered them all together and decided to flip the sketch to see how it would look. 


Here's a look at the fun sketch for Tawny Owl Paperie Inky Inspiration Sketch Challenge 35. The sketch, as always, is meant to inspire not require. So let the sketch lead in your design, but don't feel limited by it. I used the measurements on the sketch for my card today and as I mentioned above, I flipped the sketch.


I colored up the witch monster and the crescent moon with Copic markers and used a Memento Tuxedo Black marker to color the edges of my fussy cutting. Doing this neatens up the fussy cutting. I die cut a circle from black card stock using a die from the Scallops & Circles {nesting dies}. I popped up the circle on the card with foam tape.

Here's a list of the Copic Markers I used:
Witch Monster: B000, B91, B93
Eyes: Y11
Hair: N2, N4, N6
Hat: YR20, YR15, YR68, N2, N4, N6, Y15
Dress: YR20, YR15, YR68
Broom: E11, E25
Pumpkin: YG11, YG03
Moon: Y11, Y15


I stamped the sentiment, trimmed it and adhered it to the card. Another Halloween card for my stash! I'm having so much fun with this sketch! I hope you can find time to play along. Have an ink-tastic week!

Thanks so much for stopping by!

Inky Hugs,
Crystal

Tuesday, September 2, 2025

Tawny Owl Paperie Inky Inspiration Sketch 35 ~ Spore the Love ~ Unity Stamp Co.

 Hello there crafty friend!
Today I'm sharing some inspiration for the Tawny Owl Paperie Inky Inspiration Sketch Challenge 35 in the Tawny Owl Paperie Inky Inspiration Facebook group. I inked up the super cute 'shroom from the Spore the Love stamps from Unity. It's also available in the July 2025 KOM called Feelin' Fall the Things.


As been my habit of late, I started with the background for this card. I just received the Spore the Love Coordinating {paper pack} in an order and I couldn't wait to use them! Since it's a new paper pack I didn't use scraps... but now that I've cut into these papers, I do have some scraps. Haha! 


Here's a look at the fun sketch for Tawny Owl Paperie Inky Inspiration Sketch Challenge 35. The sketch, as always, is meant to inspire not require. So let the sketch lead in your design, but don't feel limited by it. I used the measurements on the sketch for my card today.


Since I cut into the Spore the Love Coordinating {paper pack} it was only natural that I ink up the adorable 'shroom from the Spore the Love stamps! I LOVE this cutie!! I stamped the mushroom with Black Amalgam ink and colored it up with Copic markers. I fussy cut the 'shroom leaving a white border and popped it up on the card with foam tape.

Here's a list of the Copic Markers I used:
'Shroom: W0, W2, W3, YR14, E17
Flowers: Y11, Y15, YR20, YR23, YR15
Greenery: BG10, BG72


I stamped the sentiment, trimmed it and popped it up on the card with foam tape. And then I finished off the card with a few enamel dots from my stash. I'm having so much fun with this sketch! I hope you can find time to play along. Have an ink-tastic week!

Thanks so much for stopping by!

Inky Hugs,
Crystal

Tuesday, August 26, 2025

Tawny Owl Paperie Inky Inspiration Sketch 35 ~ Halloween Scraps Cards

 Hello there crafty friend!
I hope you're having a great day! Today I'm sharing my first card for the Tawny Owl Paperie Inky Inspiration Sketch Challenge 35 in the Tawny Owl Paperie Inky Inspiration Facebook group. I inked up a couple fun Halloween stamps in my stash.


And I found some fun Halloween papers in my stash {from my days DTing with Scrapping for Less... way back when - sadly, they are retired} that I think I'm going to try to use up over the next couple of weeks. There wasn't a lot left. I used the larger pieces for these two cards.


For my first card I inked up a cute kitty stamp from Sunny Studio Stamp called Scaredy Cat. This cute stamp came in the kit that the papers came in so I thought I'd use it. It's really cute and it looks like it's on sale along with the coordinating dies over at Sunny Studio Stamps.


I fussy cut the kitty on the line {except around the whiskers} and then colored the edges with a black marker. I popped up the cat and the sentiment on the card with foam tape. I finished off the card with a few glitter enamel dots that had also come in the kit.

Here's a list of the Copic Markers I used: 
Cat: C0, C2, N0, N2, N4, N6, R00, R20
Cat Eyes: YG11, YG09
Pumpkin: YR20, YR15, YR68
Pumpkin Face: Y11, Y15


Here's a look at the fun sketch for Tawny Owl Paperie Inky Inspiration Sketch Challenge 35. The sketch, as always, is meant to inspire not require. So let the sketch lead in your design, but don't feel limited by it. I came up with this card design when I was using up scraps. You can check out the original card here... February Scraps Cards. I'm excited to use up some scraps!


And for my second card, I inked up the adorable gnome witch from the Witch Way stamps from Unity Stamp Co. She's one of my favorite Halloween stamps. I inked her up with Black Amalgam ink and then colored her with Copic markers. I fussy cut this one too coloring up the black edges with a Memento Tuxedo Black marker and avoiding the white edges of her curls.

Here's a quick list of the Copics I used for the gnome witch:
Skin: E000, E00, E11
Hair: C0, C2
Hat: YG11, YG09, V12, V15, V17
Dress: YR20, YR15
Shoes: N0, N2, N4, N6
Cauldron: V12, V15, V17, N2, N4
Broom: E11, E25, N2, N4


I popped up the gnome witch and sentiment again with foam tape. And then I finished off the card with some green enamel dots that were also in that old SFL kit. I think this will be a really fun sketch to play with for the next four weeks! Lots of possibilities and we can use up some scraps! I hope you can find time to play along. I can't wait to see what you create. Have an INKredible week!

Thanks so much for stopping by!

Inky Hugs,
Crystal

Monday, August 25, 2025

Inky Paws Challenge #243 ~ Sketch Challenge {Week 4}

Hello there crafty friend!
 There's just a few more days to play along with the Inky Paws Challenge #243 - Sketch Challenge! You have until this coming Friday, August 29th to get your entries in for the challenge and a chance to win a $20 store credit to Newton's Nook Designs!


This has been such a fun sketch! I hope you have a chance to play along with us if you haven't already! There's just a few days left to play!


I decided to make a birthday card for my last card. I actually started by picking my papers first for this one. I wanted three pattern papers that all had a white background so I chose the above three papers from the Birthday Party 6x6 Paper Pad. I used the Card Layout 4 Die as a guide to cut my papers out. Once I had the papers cut, I secured the die to the papers using washi tape and ran it through my Big Shot. I then die cut the frame from white card stock and adhered all of the pieces to a white A2 top fold card base.


I pulled out the fun Birthday Postage Sampler Stamp Set and inked up a few images to coordinate with the pattern papers I had chosen. I colored each of them with some Copic markers to coordinate with the colors in the papers and then I die cut them using the coordinating dies from the Birthday Postage Sampler Die Set.

Here's a quick list of the Copic markers I used:
Present: YR20, YR15, R20, R14
Balloons: Y11, Y15, YG11, YG03, Colorless Blender
Cupcake: Y11, Y15, Y38, BG000, BG10, BG15, E11, E25


I die cut three circles from white card stock using a die from the Circle Frames Die Set. I added foam tape to the back of each image and popped them up on the circles and then I adhered the circles to the card. I stamped the sentiment, trimmed it and then adhered it to the card, as well.


Now it's your turn to get your paws inky with your Newton's Nook Designs products and create a project using the fun sketch. Be sure to link up to the Inky Paws Challenge! Can't wait to see your projects!

Thanks so much for stopping by!

Inky Hugs,
Crystal

Monday, August 18, 2025

Inky Paws Challenge #243 ~ Sketch Challenge {Week 3}

Hello there crafty friend!
 Sharing some more inspiration for week 3 of the Inky Paws Challenge #243 - Sketch Challenge! You have until Friday, August 29th to get your entries in for the challenge and a chance to win a $20 store credit to Newton's Nook Designs!


Have you played along with us yet? I sure hope you do. This is a super fun sketch. So fun that I turned it upside down. I wanted the brown to ground my images.


 I made a fun Fall card using the sweet Autumn Read Stamp Set. I die cut the cute stacks of books using the coordinating dies from the Autumn Read Die Set.


I adhered the stack of books together and then popped them up on the card with foam tape. I also popped up the sentiment that I had heat embossed with white pigment ink and white embossing powder.
Here's a quick list of the Copic markers I used:
Pumpkins / Mug: Y11, YR20, YR15, E000, E11, E25
Yellows: Y000, Y11, YR23
Orange: YR20, YR15
Browns: E000, E11, E25
Blues: BG000, BG72
White: C0, C2


I used the fantastic Card Layout 4 Die to die cut my papers this time. If you don't have this die in your stash and you're not quite sure how to cut the pieces, you can check out my blog post from last week to see the measurement guide I shared for this sketch. I used three fun pieces of pattern paper from the Autumn Meows 6x6 Paper Pad. I traced around the shapes using the die as a guide and then cut out the papers. And then I was able to die cut the three pieces of pattern paper. I die cut a piece of Kraft card stock to cut out the frame. I adhered all of the pieces for my background to a Kraft A2 top fold card base. I finished off the card with a few glittery enamel dots from my stash.


Now it's your turn to get your paws inky with your Newton's Nook Designs products and create a card using this month's sketch. Be sure to link up to the Inky Paws Challenge! Can't wait to see your projects!


Thanks so much for stopping by!

Inky Hugs,
Crystal

Monday, August 11, 2025

Inky Paws Challenge #243 ~ Sketch Challenge {Week 2}

 Hello there crafty friend!
 Have you played along with the Inky Paws Challenge 243 - Sketch Challenge yet?! I'm a little late to the party myself after a fun road trip with my family. Luckily, there's still lots of time to play along! You have until Friday, August 29th to get your entries in for this fun challenge and a chance to win a $20 store credit to Newton's Nook Designs!


This fun sketch is perfect for any season. Today I'm adding to my Halloween stash with not one, but three, sweet Halloween cards. I had to make up for missing last week. Not really, but I couldn't help myself! LOL


I started all three cards by first cutting my pattern papers. I chose three pieces of pattern paper from the Halloween Meows 6x6 Paper Pad that all had a white background. I have found this tip to be handy in keeping a card background balanced. I made myself a guide for the measurements {below}.


First I cut each of the pattern papers down to 4 x 5-1/4". I then measured 1/2" from the top right corner down and made a mark. I then measured 3-1/4" from the top left corner down and made another mark. Using a ruler I drew a line connecting the two tick marks. And then I measured across that line from the left 1-3/4" and made a mark. I measured 7/8" from the bottom right corner towards the left side and made one last mark. Using a ruler, I drew a line connecting those two tick marks. I cut the top line first and then the bottom line {as noted on the guide}.


Cutting the three pieces of pattern paper gave me enough pieces to make 3 cards. I cut three pieces of copy paper down to 3-3/4 x 5 and adhered the pattern papers together on that paper making sure to line up the edges just right. I did have one or two spots that didn't line up perfectly so I just trimmed off those edges in my paper trimmer. 


I stamped all three adorable stamps from the Newton's Boo-tiful Night Stamp Set with Memento Tuxedo Black ink. I colored them up with Copic markers and then die cut them using the coordinating Newton's Boo-tiful Night Die Set.

Here's a quick list of the Copic markers I used for my first card:
White Kitty: C00, C2, R00, R20
Pumpkin: YR20, YR21, YR15, YR68
Pumpkin Faces: Y11, Y15
Pumpkin Stems: E51, E53, E25


I adhered the pattern paper backgrounds to three top fold card bases of Orange Zest card stock from Papertrey Ink. I added foam tape to the back of the kitties with pumpkins on my first two cards. I heat embossed the sentiments on the same Orange Zest card stock using my favorite combo of products. I prepped the card stock with the TE Anti-Static Powder Tool and stamped the sentiments with Sugar Cube White Pigment ink, both from Taylored Expressions. I then sprinkled the wet ink with Alabaster White Embossing Powder from Brutus Monroe and melted the powder with a Wagner Precision Heat Tool. Once the embossed sentiments had cooled I wiped off the anti-static powder with a microfiber cloth.


I trimmed the sentiments and adhered them directly to the cards.
Copic markers I used for my second card:
White Kitty: C00, C2, R00, R20
Bird: N0, N2, N4, N6, YR15
Pumpkin: YR20, YR21, YR15, YR68
Faces: Y11, Y15
Stem: E51, E53, E25


For my last card, I wanted the kitty to 'fly' on the card. So I die cut the moon from white card stock using a die from the Spooky Sky Die Set. I used the residual ink on my yellow blending brush to add a hint of yellow to the moon and then I used N4, C2 and C0 Copic markers to add some depth to the craters on the moon. I die cut vellum using a die from the Circle Frames Die Set to bring the focus to the little scene I created.


The moon and kitty are adhered to the vellum and then I applied glue just behind the images so no glue showed through the vellum. This also adds a touch of dimension as the edges of the vellum are raised a bit. I just love this fun trio of cards!

Copic markers I used for my third card:
Orange Kitty: YR20, YR15, YR27, C0, C2, R00, R20
Hat: N0, N2, N4, N6, YR21, YR15, YR68
Broom: E51, E33, E53, E25, E57, N2, N4, N6


Now it's your turn to get your paws inky with your Newton's Nook Designs products and create a project using the sketch. Be sure to link up to the Inky Paws Challenge! Can't wait to see your projects!


Thanks so much for stopping by!

Inky Hugs,
Crystal

Tuesday, August 5, 2025

Tawny Owl Paperie Inky Inspiration Sketch 34 Extended ~ Review

 Hello there crafty friend!
I've been out of town visiting my dearest and best friends so I thought I'd share a fun review of the cards I've made for the Tawny Owl Paperie Inky Inspiration Sketch Challenge 34 Extended so far since I didn't get a chance to make another card. You can click on each of the links below the cards for more information.


The card that inspired the sketch. Ween Party Crew.


Here's a look at the fun sketch for Tawny Owl Paperie Inky Inspiration Sketch Challenge 34 Extended. The sketch, as always, is meant to inspire not require. So let the sketch lead in your design, but don't feel limited by it.


And last week I shared Spectrum Gardenia
I'll be back next week with more inspiration for this fun sketch. Have an ink-tastic week!

Thanks so much for stopping by!

Inky Hugs,
Crystal

Tuesday, July 29, 2025

Tawny Owl Paperie Inky Inspiration Sketch 34 Extended ~ Spectrum Gardenia ~ 49 and Market

 Hello there crafty friend!
It's been a busy summer and I'm having so much fun with TOPII Sketch 34 that I've decided to extend this challenge for a few extra weeks. Today I'm sharing more inspiration for the Tawny Owl Paperie Inky Inspiration Sketch Challenge 34 Extended in the Tawny Owl Paperie Inky Inspiration Facebook group. Absolutely no stamping or coloring for this card!


I used papers from the Spectrum Gardenia 12 x 12 Collection from 49 and Market. The white distressed background paper measures 5-1/2 x 4-1/4". The orange strips measure 3/4 x 


Here's a look at the fun sketch for Tawny Owl Paperie Inky Inspiration Sketch Challenge 34 Extended. The sketch, as always, is meant to inspire not require. So let the sketch lead in your design, but don't feel limited by it. I turned the sketch today and moved the sentiment.


And the cluster of ephemera is from the coordinating Spectrum Gardenia Ephemera Bits pack. I wrote 'Love' on the tab and stapled it to the ephemera using the Tim Holtz Idea-ology Tiny Attacher Mini Stapler. The sentiment is adhered directly to the ephemera piece and the butterfly was popped up with foam tape.


I adhered the four orange strips to the card and popped up the large ephemera piece with foam tape. I'm having a blast with this sketch! Now there's more time to play along... I hope you'll join in the fun! Have an ink-tastic week!

Thanks so much for stopping by!

Inky Hugs,
Crystal

Tuesday, July 8, 2025

Tawny Owl Paperie Inky Inspiration Sketch 34 ~ September 2024 KOM Wander and Wonder ~ Unity Stamp Co.

 Hello there crafty friend!
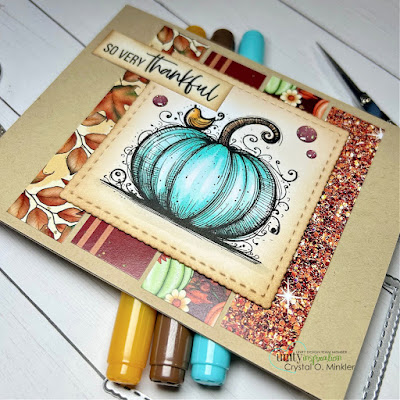
Today I'm sharing some fun inspiration for the Tawny Owl Paperie Inky Inspiration Sketch Challenge 34 in the Tawny Owl Paperie Inky Inspiration Facebook group. I found this sweet stamp already inked up and sitting on my desk so I thought I'd color it up. It's from the September 2024 Kit of the Month called Wander and Wonder from Unity.


My process:
  • The pumpkin was stamped with Black Amalgam ink and colored with Copic markers
  • Die cut with a square die from the Scallops & Squares {nesting dies}
  • The papers are scraps from the Autumn Vibes Paper Pad from Not 2 Shabby
  • I trimmed the lengths of the scraps to 3-7/8" and 4"
  • Adhered the scraps to a Kraft A2 top fold card turned on it's side for a landscape card
  • Trimmed the sentiment and distressed the edges of the sentiment and pumpkin square with Vintage Photo Distress Ink
  • Adhered the sentiment to the pumpkin square
  • Added foam tape to the back of the sentiment and the pumpkin square and popped it up on the card
  • Finished it off with a few glitter enamel dots


Here's a look at the fun sketch for Tawny Owl Paperie Inky Inspiration Sketch Challenge 34. The sketch, as always, is meant to inspire not require. So let the sketch lead in your design, but don't feel limited by it. I adjusted my design this time by turning it.


Copic Markers used:
Pumpkin: BG000, BG11, BG01, BG15, E21, E25
Bird: YR20, YR23, YR15
Ground: W0, W1


I am so ready for Fall and the cooler temperatures it brings. I hope you can find time to play along with the sketch challenge. Have an INKtastic week!

Thanks so much for stopping by!

Inky Hugs,
Crystal