Showing posts with label #inkypawschallenge. Show all posts

Monday, September 15, 2025

Inky Paws Challenge 244 ~ Fall Halloween Theme Challenge {Week 3}

Hello there crafty friend!
 Sharing some more inspiration for week 3 of the Inky Paws Challenge #244 - Fall/Halloween Theme Challenge! You have until Friday, September 26th to get your entries in for the challenge and a chance to win a $20 store credit to Newton's Nook Designs!


My daughter and I are already trying to figure out when we'll decorate for Halloween. So it seemed only right to make a Halloween card for this weeks inspiration post.


I stamped the adorable kitty with the stack of jack-o-lanterns from the Newton's Boo-tiful Night Stamp Set. I die cut it using the coordinating dies from the Newton's Boo-tiful Night Die Set. And then I colored it up with my Copic markers.

Copic markers used:
Kitty: C0, C2, R00, R20
Jack-o-lanterns: YR000, YR21, YR15, RV10, RV02, RV14, Y11, Y08, E21, E25
Crow: N2, N4, N6


I also stamped the Spiderweb Oval Stamp Set on white card stock and die cut it using a die from the Oval Frames Die Set. I blended Black Soot Distress Ink around the edges keeping it darker around the edge and lightening my touch into the center. I die cut three bats using the bat die from the Newton's Boo-tiful Night Die Set.


I trimmed the argyle papers from the Halloween Party 6x6 Paper Pad to 4 x 5-1/4" and adhered it to a white A2 top fold card base. I adhered the oval to the card along with the bats. And then I popped up the kitty and the sentiment with foam tape.


Now it's your turn to get your paws inky with your Newton's Nook Designs products and create a card using this month's fun Fall/Halloween theme. Be sure to link up to the Inky Paws Challenge! Can't wait to see your projects!


Thanks so much for stopping by!

Inky Hugs,
Crystal

Monday, September 8, 2025

Inky Paws Challenge 244 ~ Fall Halloween Theme Challenge {Week 2}

 Hello there crafty friend!
 Have you played along with the Inky Paws Challenge 244 - Fall/Halloween Theme Challenge yet?! You have until Friday, September 26th to get your entries in for this fun challenge and a chance to win a $20 store credit to Newton's Nook Designs!


I am loving this fun theme challenge! I hope you have some time to play along with us.


I started with a fun background for my card. I chose the beautiful Autumn 6x6 Paper Pad. I had some scraps so it was perfect to use with the Card Layout 3 Die. Rather than die cut the whole outer frame I just die cut the strips separately and adhered them to the card base.


After I die cut each of the papers, I placed them back in the die and secured them with some washi tape as seen in the photo above.


I carefully turned the die over and added glue dots to two of the paper strips. I then centered the die over my card base and pressed those two strips to the card base.


I removed the washi tape and adhered two more paper strips. I repeated these steps until I had the background complete.


 Once I was done with the background, I stamped a bunch of the cute images from the Cozy Home Stamp Set. I colored each of the them with Copic markers that were either neutral or similar to the colors in the papers. And then I die cut them using the coordinating Cozy Home Die Set

Here's a quick list of the Copic markers I used:
Chair: YR20, YR15, YR27, E21, E23, E25
Pillow / Blanket: G12, G07
Table: E21, E23, E25
Books: Y11, Y15, YR23, E21, E23, G12, G07, BG01, BG72, R14, R39, C0, C2
Mug: R14, R37, R39
Dog: E21, E23, C0, C2, N2, N4, N6
Cat: C0, C2, R00, R20


I'm playing along with the Atlantic Hearts Sketch Challenge 646.


I adhered all of my scene elements together and then I added foam tape to the back and popped them up on the card. I stamped the sentiment, trimmed it and popped it up on the card, too. I love the cozy scene... I'm really loving that orange chair too! Lol.


Now it's your turn to get your paws inky with your Newton's Nook Designs products and create a project using the fun theme. Be sure to link up to the Inky Paws Challenge! Can't wait to see your projects!

Thanks so much for stopping by!

Inky Hugs,
Crystal

Monday, September 1, 2025

Inky Paws Challenge 244 ~ Fall Halloween Theme Challenge {Week 1}

 Hello there crafty friend!
Who's up for a new challenge?! It's time to get our paws inky with a fun theme challenge! I always love the theme challenges! So many possibilities! You have until Friday, September 26th to get your entries in for the #244 Fall/Halloween Theme Challenge and a chance to win a $20 store credit to Newton's Nook Designs!


This is probably my most favorite challenge... I love everything Fall! And Halloween is definitely a favorite around our house! Can't wait to see all the fun entries for this challenge!


I started with my background for this card. I secured the Falling Leaves Stencil over a card front of Kraft card stock using iCraft Pixie Tape. Starting in the bottom right corner I blended Mustard Seed, Carved Pumpkin, Barn Door, and Vintage Photo Distress Inks. To get a nice blend I went over each color a couple of times until I was happy with the blend.


I die cut the background using the postage stamp die from the Framework Die Set and adhered the panel to a Kraft A2 top fold card base. Next, I stamped the adorable kitty from the Newton's Reading List Stamp Set. I also stamped the smaller stack of books with the coffee cup from the Autumn Reads Stamp Set. By combining these two stamp sets I was able to achieve a Fall theme.

Here's a quick list of the Copic markers I used:
Kitty: YR20, YR21, YR15, YR27, R00, R20, C0, C2
Collar: R20, R14, R27, Y15, Y28
Coffee Cup: YR20, YR15, YG03, G94, E51, E25
Leaves: Y11, Y15, YG03, G94, E11, E25, YR20, YR15
Books: Y11, Y15, E51, E11, E25, YG03, G94, YR20, YR21, YR15, R20, R14, R27, C0, C2, C3, C5


Once I had the images colored, I die cut them using the coordinating dies from the Newton's Reading List Die Set and the Autumn Reads Die Set. I stamped the fun book title for the yellow book using Memento Tuxedo Black ink. I did look through all of my Fall stamps and couldn't find one to fit on the book so I decided to stamp a sentiment from the Autumn Reads Stamp Set. I popped up the kitty and the sentiment on the card with foam tape. Doesn't this book loving kitty just look so cozy?!


Now it's your turn to get your paws inky with your Newton's Nook Designs products and create a project using this fun theme. Be sure to link up to the Inky Paws Challenge! Can't wait to see your projects!

Thanks so much for stopping by!

Inky Hugs,
Crystal

Monday, August 25, 2025

Inky Paws Challenge #243 ~ Sketch Challenge {Week 4}

Hello there crafty friend!
 There's just a few more days to play along with the Inky Paws Challenge #243 - Sketch Challenge! You have until this coming Friday, August 29th to get your entries in for the challenge and a chance to win a $20 store credit to Newton's Nook Designs!


This has been such a fun sketch! I hope you have a chance to play along with us if you haven't already! There's just a few days left to play!


I decided to make a birthday card for my last card. I actually started by picking my papers first for this one. I wanted three pattern papers that all had a white background so I chose the above three papers from the Birthday Party 6x6 Paper Pad. I used the Card Layout 4 Die as a guide to cut my papers out. Once I had the papers cut, I secured the die to the papers using washi tape and ran it through my Big Shot. I then die cut the frame from white card stock and adhered all of the pieces to a white A2 top fold card base.


I pulled out the fun Birthday Postage Sampler Stamp Set and inked up a few images to coordinate with the pattern papers I had chosen. I colored each of them with some Copic markers to coordinate with the colors in the papers and then I die cut them using the coordinating dies from the Birthday Postage Sampler Die Set.

Here's a quick list of the Copic markers I used:
Present: YR20, YR15, R20, R14
Balloons: Y11, Y15, YG11, YG03, Colorless Blender
Cupcake: Y11, Y15, Y38, BG000, BG10, BG15, E11, E25


I die cut three circles from white card stock using a die from the Circle Frames Die Set. I added foam tape to the back of each image and popped them up on the circles and then I adhered the circles to the card. I stamped the sentiment, trimmed it and then adhered it to the card, as well.


Now it's your turn to get your paws inky with your Newton's Nook Designs products and create a project using the fun sketch. Be sure to link up to the Inky Paws Challenge! Can't wait to see your projects!

Thanks so much for stopping by!

Inky Hugs,
Crystal

Monday, August 18, 2025

Inky Paws Challenge #243 ~ Sketch Challenge {Week 3}

Hello there crafty friend!
 Sharing some more inspiration for week 3 of the Inky Paws Challenge #243 - Sketch Challenge! You have until Friday, August 29th to get your entries in for the challenge and a chance to win a $20 store credit to Newton's Nook Designs!


Have you played along with us yet? I sure hope you do. This is a super fun sketch. So fun that I turned it upside down. I wanted the brown to ground my images.


 I made a fun Fall card using the sweet Autumn Read Stamp Set. I die cut the cute stacks of books using the coordinating dies from the Autumn Read Die Set.


I adhered the stack of books together and then popped them up on the card with foam tape. I also popped up the sentiment that I had heat embossed with white pigment ink and white embossing powder.
Here's a quick list of the Copic markers I used:
Pumpkins / Mug: Y11, YR20, YR15, E000, E11, E25
Yellows: Y000, Y11, YR23
Orange: YR20, YR15
Browns: E000, E11, E25
Blues: BG000, BG72
White: C0, C2


I used the fantastic Card Layout 4 Die to die cut my papers this time. If you don't have this die in your stash and you're not quite sure how to cut the pieces, you can check out my blog post from last week to see the measurement guide I shared for this sketch. I used three fun pieces of pattern paper from the Autumn Meows 6x6 Paper Pad. I traced around the shapes using the die as a guide and then cut out the papers. And then I was able to die cut the three pieces of pattern paper. I die cut a piece of Kraft card stock to cut out the frame. I adhered all of the pieces for my background to a Kraft A2 top fold card base. I finished off the card with a few glittery enamel dots from my stash.


Now it's your turn to get your paws inky with your Newton's Nook Designs products and create a card using this month's sketch. Be sure to link up to the Inky Paws Challenge! Can't wait to see your projects!


Thanks so much for stopping by!

Inky Hugs,
Crystal

Monday, August 11, 2025

Inky Paws Challenge #243 ~ Sketch Challenge {Week 2}

 Hello there crafty friend!
 Have you played along with the Inky Paws Challenge 243 - Sketch Challenge yet?! I'm a little late to the party myself after a fun road trip with my family. Luckily, there's still lots of time to play along! You have until Friday, August 29th to get your entries in for this fun challenge and a chance to win a $20 store credit to Newton's Nook Designs!


This fun sketch is perfect for any season. Today I'm adding to my Halloween stash with not one, but three, sweet Halloween cards. I had to make up for missing last week. Not really, but I couldn't help myself! LOL


I started all three cards by first cutting my pattern papers. I chose three pieces of pattern paper from the Halloween Meows 6x6 Paper Pad that all had a white background. I have found this tip to be handy in keeping a card background balanced. I made myself a guide for the measurements {below}.


First I cut each of the pattern papers down to 4 x 5-1/4". I then measured 1/2" from the top right corner down and made a mark. I then measured 3-1/4" from the top left corner down and made another mark. Using a ruler I drew a line connecting the two tick marks. And then I measured across that line from the left 1-3/4" and made a mark. I measured 7/8" from the bottom right corner towards the left side and made one last mark. Using a ruler, I drew a line connecting those two tick marks. I cut the top line first and then the bottom line {as noted on the guide}.


Cutting the three pieces of pattern paper gave me enough pieces to make 3 cards. I cut three pieces of copy paper down to 3-3/4 x 5 and adhered the pattern papers together on that paper making sure to line up the edges just right. I did have one or two spots that didn't line up perfectly so I just trimmed off those edges in my paper trimmer. 


I stamped all three adorable stamps from the Newton's Boo-tiful Night Stamp Set with Memento Tuxedo Black ink. I colored them up with Copic markers and then die cut them using the coordinating Newton's Boo-tiful Night Die Set.

Here's a quick list of the Copic markers I used for my first card:
White Kitty: C00, C2, R00, R20
Pumpkin: YR20, YR21, YR15, YR68
Pumpkin Faces: Y11, Y15
Pumpkin Stems: E51, E53, E25


I adhered the pattern paper backgrounds to three top fold card bases of Orange Zest card stock from Papertrey Ink. I added foam tape to the back of the kitties with pumpkins on my first two cards. I heat embossed the sentiments on the same Orange Zest card stock using my favorite combo of products. I prepped the card stock with the TE Anti-Static Powder Tool and stamped the sentiments with Sugar Cube White Pigment ink, both from Taylored Expressions. I then sprinkled the wet ink with Alabaster White Embossing Powder from Brutus Monroe and melted the powder with a Wagner Precision Heat Tool. Once the embossed sentiments had cooled I wiped off the anti-static powder with a microfiber cloth.


I trimmed the sentiments and adhered them directly to the cards.
Copic markers I used for my second card:
White Kitty: C00, C2, R00, R20
Bird: N0, N2, N4, N6, YR15
Pumpkin: YR20, YR21, YR15, YR68
Faces: Y11, Y15
Stem: E51, E53, E25


For my last card, I wanted the kitty to 'fly' on the card. So I die cut the moon from white card stock using a die from the Spooky Sky Die Set. I used the residual ink on my yellow blending brush to add a hint of yellow to the moon and then I used N4, C2 and C0 Copic markers to add some depth to the craters on the moon. I die cut vellum using a die from the Circle Frames Die Set to bring the focus to the little scene I created.


The moon and kitty are adhered to the vellum and then I applied glue just behind the images so no glue showed through the vellum. This also adds a touch of dimension as the edges of the vellum are raised a bit. I just love this fun trio of cards!

Copic markers I used for my third card:
Orange Kitty: YR20, YR15, YR27, C0, C2, R00, R20
Hat: N0, N2, N4, N6, YR21, YR15, YR68
Broom: E51, E33, E53, E25, E57, N2, N4, N6


Now it's your turn to get your paws inky with your Newton's Nook Designs products and create a project using the sketch. Be sure to link up to the Inky Paws Challenge! Can't wait to see your projects!


Thanks so much for stopping by!

Inky Hugs,
Crystal

Monday, July 28, 2025

Inky Paws Challenge #242 ~ Color Challenge {Week 4}

Hello there crafty friend!
 There's just a few more days to play along with the Inky Paws Challenge #242 - Color Challenge! You have until this coming Friday, August 1st to get your entries in for the challenge and a chance to win a $20 store credit to Newton's Nook Designs!


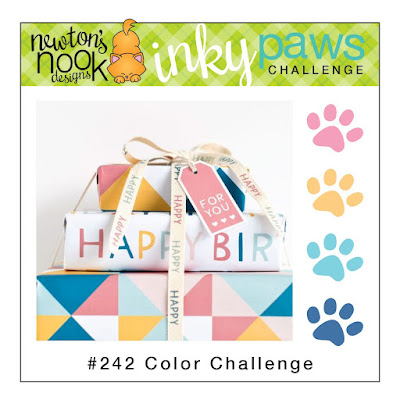
I hope you're having fun with this color combo... Cotton Candy Pink, Orange Sherbet, Turquoise, and Royal Blue!! I couldn't help but make more birthday cards using products from the new release!


The new Card Layout 3 Die makes easy work of a fun background. I thought I'd use two pieces of patter paper and make two cards from the backgrounds I created. Easy peasy! I die cut pattern papers from the Birthday Time 6x6 Paper Pad. The colors in these papers are just PURR-fect for this challenge!


I stamped two adorable cats from the Cat Birthday Party Stamp Set. Colored them with Copic markers and then die cut them with the coordinating Cat Birthday Party Die Set


Here's a quick list of the Copic markers I used for my first card:
Cats: R00, R20, N2, N4, N6, C0, C2
Orange:YR20, YR15
Pink: RV10, RV52
Turquoise: BG000, BG01
Royal Blue: B02, B24, B28
Cake: E21, E23


I stamped the fun balloons and birthday cake from the Birthday Postage Sampler Stamp Set. I colored them up and then die cut them with the coordinating Birthday Postage Sampler Die Set.


I die cut the 'Happy Birthday' sentiment from pattern paper using the Happy Birthday Die. I die cut shadows from white card stock and adhered them together. And then I adhered all of the fun images to the card.


Now it's your turn to get your paws inky with your Newton's Nook Designs products and create a project using the color combo of Cotton Candy Pink, Orange Sherbet, Turquoise, and Royal Blue. Be sure to link up to the Inky Paws Challenge! Can't wait to see your projects!


Thanks so much for stopping by!

Inky Hugs,
Crystal

Monday, July 21, 2025

Inky Paws Challenge #242 ~ Color Challenge {Week 3}

Hello there crafty friend!
 Sharing some more inspiration for the Inky Paws Challenge #242 - Color Challenge! You have until Friday, August 1st to get your entries in for the challenge and a chance to win a $20 store credit to Newton's Nook Designs!


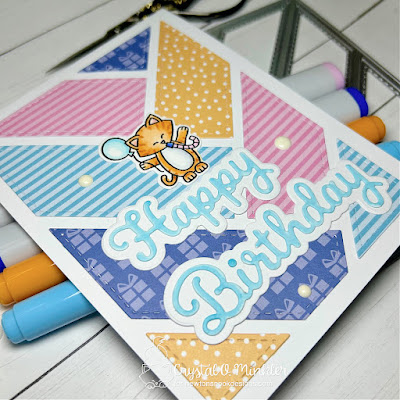
Have you seen the new release over at Newton's Nook Designs? I am loving all of the fun new birthday goodies and just had to play with some to share with you today. Our colors for the challenge are Cotton Candy Pink, Orange Sherbet, Turquoise, and Royal Blue!! 


I used the awesome new Card Layout 3 Die for a fun background for my card. I love this new die!! I paired it up with the fabulous new Birthday Time 6x6 Paper Pad. The colors in these papers are just PURRFECT for this month's Color Challenge!


I die cut the sentiment from white card stock using the new Happy Birthday Die. I Copic colored the 'Happy' and 'Birthday' with BG000 and BG01. 


I adhered the sentiment to the card and got to thinking it would be fun to add a little something on top of the sentiment so I stamped the cute kitty from the Cat Birthday Party Stamp Set. I colored it up with Copic markers and die cut it using the coordinating Cat Birthday Party Die Set. And then I finished off the card with a few white enamel dots.

Here's a quick list of the Copic markers I used:
Cat: YR20, YR15, YR27, C0, C2, R00, R20
Balloon: BG000, BG01
Noisemaker: B02, B24, B28, RV10, RV52


Now it's your turn to get your paws inky with your Newton's Nook Designs products and create a project using the color combo of Cotton Candy Pink, Orange Sherbet, Turquoise, and Royal Blue. Be sure to link up to the Inky Paws Challenge! Can't wait to see your projects!

Thanks so much for stopping by!

Inky Hugs,
Crystal