Showing posts with label scene card. Show all posts

Monday, September 15, 2025

Inky Paws Challenge 244 ~ Fall Halloween Theme Challenge {Week 3}

Hello there crafty friend!
 Sharing some more inspiration for week 3 of the Inky Paws Challenge #244 - Fall/Halloween Theme Challenge! You have until Friday, September 26th to get your entries in for the challenge and a chance to win a $20 store credit to Newton's Nook Designs!


My daughter and I are already trying to figure out when we'll decorate for Halloween. So it seemed only right to make a Halloween card for this weeks inspiration post.


I stamped the adorable kitty with the stack of jack-o-lanterns from the Newton's Boo-tiful Night Stamp Set. I die cut it using the coordinating dies from the Newton's Boo-tiful Night Die Set. And then I colored it up with my Copic markers.

Copic markers used:
Kitty: C0, C2, R00, R20
Jack-o-lanterns: YR000, YR21, YR15, RV10, RV02, RV14, Y11, Y08, E21, E25
Crow: N2, N4, N6


I also stamped the Spiderweb Oval Stamp Set on white card stock and die cut it using a die from the Oval Frames Die Set. I blended Black Soot Distress Ink around the edges keeping it darker around the edge and lightening my touch into the center. I die cut three bats using the bat die from the Newton's Boo-tiful Night Die Set.


I trimmed the argyle papers from the Halloween Party 6x6 Paper Pad to 4 x 5-1/4" and adhered it to a white A2 top fold card base. I adhered the oval to the card along with the bats. And then I popped up the kitty and the sentiment with foam tape.


Now it's your turn to get your paws inky with your Newton's Nook Designs products and create a card using this month's fun Fall/Halloween theme. Be sure to link up to the Inky Paws Challenge! Can't wait to see your projects!


Thanks so much for stopping by!

Inky Hugs,
Crystal

Sunday, September 14, 2025

Release Day Blog Hop ~ Holiday Anya 13 with Amelia the Bunny ~ The Greeting Farm


The September 2025 New Release is now available for purchase in The Greeting Farm Store! This month we introduced 3 new stamp sets. Our first stamp set called WICKED ANYA 2 features a cute witch with wand ready to add a little hocus-pocus to your projects. Next, we have AMELIA THE BUNNY, a heartwarming set with three delightful bunny illustrations to remind you comfy days are here. Lastly, we introduced HOLIDAY ANYA 13, a festive holiday stamp set with Anya bundled up in a cozy coat with her adorable penguin friend. (PLEASE NOTE: one sentiment in this set contains a small typo so it is discounted. But no worries, you will receive the corrected version as a downloadable digital file!


I paired up the cute penguin from HOLIDAY ANYA 13 with one of the adorable bunnies from AMELIA THE BUNNY for a cute holiday card. 


I stamped all the images using Memento Tuxedo Black ink. I colored them up with Copic markers and then I fussy cut them all on the line and colored the edges with a black marker to make the fussy cutting nice and neat.

Here's a quick list of the Copic markers I used:
Bunny: C0, C2, R00, R20, BG000, BG01
Penguin: C0, C2, N2, N4, N6, R00, R20, YR20, YR15, B00, B02, B28
Ice: B000, B00
Tree: RV10, RV02, RV14, Y11, Y15, B000, B00, B28, B29, E21, E25, E18
Gifts: RV10, RV02, RV14, B000, B00, B02, B28, B29


I paired up the two friends with some fun papers in my stash. I used these fun colors as inspiration to color my images. I die cut the papers using the BIG Scallops & Rectangles {nesting dies} from Unity. I popped up the friends, sentiment and the tree with foam tape and then finished off the card with a few raindrop embellies.


To celebrate this release we are having a short BLOG HOP! One lucky fan will win a $50.00 Gift Certificate to The Greeting Farm Store!! You have until September 18th 12pm CST/1pm EST to leave your comments on each Designer's Blog. Then head back to The Greeting Farm Blog to let us know you completed the hop. **Remember to qualify for the prize you MUST leave a comment on each Designer's Blog AND The Greeting Farm Blog letting us know you completed the hop.

NOTE: Comments on The Greeting Farm Blog are admin approved so it may take a day for your comment to be visible. Please only comment once, and use the same name on all the blogs when leaving a comment. Do not pick the Anonymous option (otherwise we won't be able to verify that it's you). We will announce the random winner later in the week on the Blog and in our Facebook Group: The Greeting Farm Fan Page.

TGF Design Team:

This is a short hop, and definitely worth playing along! If you want to grab your favorites now, you can purchase the new stamps HERE. We will have more cards featuring the New Release from our Design Team Leaders starting on the 16th so be sure to stop by The Greeting Farm Blog to see more inspiration.

Happy Hopping!

Thanks for stopping by!

Inky hugs!
Crystal

Monday, September 8, 2025

Inky Paws Challenge 244 ~ Fall Halloween Theme Challenge {Week 2}

 Hello there crafty friend!
 Have you played along with the Inky Paws Challenge 244 - Fall/Halloween Theme Challenge yet?! You have until Friday, September 26th to get your entries in for this fun challenge and a chance to win a $20 store credit to Newton's Nook Designs!


I am loving this fun theme challenge! I hope you have some time to play along with us.


I started with a fun background for my card. I chose the beautiful Autumn 6x6 Paper Pad. I had some scraps so it was perfect to use with the Card Layout 3 Die. Rather than die cut the whole outer frame I just die cut the strips separately and adhered them to the card base.


After I die cut each of the papers, I placed them back in the die and secured them with some washi tape as seen in the photo above.


I carefully turned the die over and added glue dots to two of the paper strips. I then centered the die over my card base and pressed those two strips to the card base.


I removed the washi tape and adhered two more paper strips. I repeated these steps until I had the background complete.


 Once I was done with the background, I stamped a bunch of the cute images from the Cozy Home Stamp Set. I colored each of the them with Copic markers that were either neutral or similar to the colors in the papers. And then I die cut them using the coordinating Cozy Home Die Set

Here's a quick list of the Copic markers I used:
Chair: YR20, YR15, YR27, E21, E23, E25
Pillow / Blanket: G12, G07
Table: E21, E23, E25
Books: Y11, Y15, YR23, E21, E23, G12, G07, BG01, BG72, R14, R39, C0, C2
Mug: R14, R37, R39
Dog: E21, E23, C0, C2, N2, N4, N6
Cat: C0, C2, R00, R20


I'm playing along with the Atlantic Hearts Sketch Challenge 646.


I adhered all of my scene elements together and then I added foam tape to the back and popped them up on the card. I stamped the sentiment, trimmed it and popped it up on the card, too. I love the cozy scene... I'm really loving that orange chair too! Lol.


Now it's your turn to get your paws inky with your Newton's Nook Designs products and create a project using the fun theme. Be sure to link up to the Inky Paws Challenge! Can't wait to see your projects!

Thanks so much for stopping by!

Inky Hugs,
Crystal

Thursday, August 14, 2025

Release Day Blog Hop ~ Maddox the Dog ~ The Greeting Farm


The August 2025 New Release is now available for purchase in The Greeting Farm Store! This month we introduced 3 new stamp sets. EMOJI COUPLE is an extra fun set featuring a studious Anya and Ian, along with Emoji signs so you can personalize your projects with feelings. Next, we showcased MADDOX THE DOG which comes with a studious pup carrying a stack of books, a helpful dog holding a letter, and a cheerful standing canine full of charm. Lastly, we are ready to celebrate in style with BIRTHDAY GIRL ANYA, who is dressed in a beautiful 2-tier ruffle dress with flowers in her hair ready to bring a graceful touch to all your birthday cards. 


I am LOVING the cute pups from the MADDOX THE DOG stamp set... just THE cutest!! I made a simple card with the standing pup and the single flower.


I stamped the adorable pup and flower using Memento Tuxedo Black ink. I colored them up with Copic markers. I fussy cut the pup on the line and colored the edges with a black marker to make the fussy cutting nice and neat. I fussy cut the flower leaving a white border. I've found this to work better with images that have just a single line.

Here's a quick list of the Copic markers I used:
Dog: C0, C2, C3, C5, N2, N4, N6
Shirt Y11, Y15, Y38
Flower: R20, R14, R27, YG11, G07


I paired up the pup with some fun papers from my stash called Magic and Wonder 6x6 Paper Pad from Echo Park Paper Co. I kept my card simple with an easy past sketch from Tawny Owl Paperie Inky Inspiration.


To celebrate this release we are having a short BLOG HOP! One lucky fan will win a $50.00 Gift Certificate to The Greeting Farm Store!! You have until August 18th, 12pm CST/1pm EST to leave your comments on each Designer's Blog. Then head back to The Greeting Farm Blog to let us know you completed the hop. **Remember to qualify for the prize you MUST leave a comment on each Designer's Blog AND The Greeting Farm Blog letting us know you completed the hop.

NOTE: Comments on The Greeting Farm Blog are admin approved so it may take a day for your comment to be visible. Please only comment once, and use the same name on all the blogs when leaving a comment. Do not pick the Anonymous option (otherwise we won't be able to verify that it's you). We will announce the random winner later in the week on the Blog and in our Facebook Group: The Greeting Farm Fan Page.

TGF Design Team:

This is a short hop, and definitely worth playing along! If you want to grab your favorites now, you can purchase the new stamps HERE. We will have more cards featuring the New Release from our Design Team Leaders starting on the 19th so be sure to stop by The Greeting Farm Blog to see more inspiration.

Happy Hopping!

Inky hugs!
Crystal

Thursday, July 24, 2025

Jingle All the Way ~ Minkie Jingle ~ The Greeting Farm

 Happy Christmas in July crafty friend!
Today I'm sharing some fun holiday inspiration with a fab mix of clear stamps and digital stamps from The Greeting Farm. The adorable Minkies are putting on a Christmas play and everyone's invited!


This was such a fun card to design. I stamped the adorable Minkies from the Minkie Jingle stamp set and a couple Minkies from the Minkie Christmas stamp set. I colored them up with Copic markers, fussy cut them all on the line, and colored the edges of the fussy cutting with a black marker. While I was fussy cutting, I also cut out the windows on the bus. I wanted some of the background to show through.


I created a fun stage for this production using the table from the Build a Craft Room digi stamp set and the trees from the Happy Winter digi stamp set.

Here's a quick list of the Copic markers I used:
Skin: E000, E00, E11
Hair: Y11, E21, E23 
Mouths: R000, R20
Black: N2, N4, N6
Red: R20, R14, R27
Green: YG11, G24, G46
Brown: E21, E23, E25, E57, E29
White: C00, C2
Bus: BG000, BG01, BG72, C00, C2
Star: Y11, Y08
Reindeer Bell: Y08, Y28
Stage: E21, E23, E25, N2, N4, N6


I ink smooshed a fun background using Frayed Burlap and Stormy Sky Distress Inks and then I blended Chipped Sapphire over portions of the panel and Black Soot Distress Ink around the edges. I dried the background with a heat tool and spattered it with white acrylic paint. Once the spatters were dry, I trimmed the panel to 6-3/8 x 4-3/8" and adhered it to a 7 x 5" card base of black card stock.


I'm playing along with the Christmas in July 2025 {BYSHC} Linky Party and I'm so happy that The Greeting Farm has joined us for this event as one of our fabulous Sponsors! Today is the last day to participate so grab your Christmas or wintry stamps and papers and create a brand new card or tag (or any paper project really) to enter in the fun. The linky party closes at 11:59pm PDT. You can check it out at the link above.


I stamped the sentiment, trimmed it, and adhered it to the card. I wrapped the tree with a bit of burlap string for a bit of texture. I had a blast making this card! I hope I've inspired you to get inky!

Thanks so much for stopping by!

Inky Hugs,
Crystal

Monday, July 14, 2025

Release Day Blog Hop ~ Flowers Anya ~ The Greeting Farm


The July 2025 New Release is now available for purchase in The Greeting Farm Store! This month we introduced 3 new stamp sets. In our first set called FLOWERS ANYA, Anya and her two sweet puppies are wishing you a day full of flowers. Our next set FELIX THE FOX has 3 adorable fox images and all the elements to create an fabulous scene. Lastly, we introduced two big Anya's ready to send your recipient love and well wishes from the MISS ANYA WITH LOVE set. 


These pups from the Flowers Anya stamp set are just THE cutest!! I created a little scene for them using die cut pattern papers for my grass. I used scraps of pattern paper for my background. They all measure 1/2" or less in width and I trimmed them all to 3-3/4" long.


I stamped the adorable puppies, hat, flower pot and bone using Memento Tuxedo Black ink. I colored them up with Copic markers. I fussy cut all of the images on the line and colored the edges with a black marker to make the fussy cutting nice and neat.

Here's a quick list of the Copic markers I used:
Dogs: E30, E21, E25, N2, N4, N6
Hat: Y11, Y15, E31, RV10, RV02, YG11, G94
Bone: C0, C2, R20, R14
Flowers: R20, R14, B00, B93, B97, YG11, G94
Barrel: E21, E57, E59, N2, N4, N6
Flower Pot / Flower: E57, E59, YG11, G94, R20, R14
Sky: B0000, B000


Inspiration for my card comes from the Tawny Owl Paperie Inky Inspiration Sketch 34. I host a fun sketch challenge in the Tawny Owl Paperie Inky Inspiration Facebook group each month. The sketch, as always, is meant to inspire not require. So let the sketch lead in your design, but don't feel limited by it. I adjusted my take on the sketch by turning the paper scraps and my oval focal panel. I'd love for you to join in the fun and play along with the sketch!


I popped up the oval scene using foam tape. I messed up the sentiment when I stamped it on the card. Oopsies... it happens! So I stamped the sentiment on a scrap, trimmed it and popped it up on the card with foam tape. Not exactly what I planned but it still works!


To celebrate this release we are having a short BLOG HOP! One lucky fan will win a $50.00 Gift Certificate to The Greeting Farm Store!! You have until July 18th, 12pm CST/1pm EST to leave your comments on each Designer's Blog. Then head back to The Greeting Farm Blog to let us know you completed the hop. **Remember to qualify for the prize you MUST leave a comment on each Designer's Blog AND The Greeting Farm Blog letting us know you completed the hop.

NOTE: Comments on The Greeting Farm Blog are admin approved so it may take a day for your comment to be visible. Please only comment once, and use the same name on all the blogs when leaving a comment. Do not pick the Anonymous option (otherwise we won't be able to verify that it's you). We will announce the random winner later in the week on the Blog and in our Facebook Group: The Greeting Farm Fan Page.

TGF Design Team:

This is a short hop, and definitely worth playing along! If you want to grab your favorites now, you can purchase the new stamps HERE. We will have more cards featuring the New Release from our Design Team Leaders starting on the 17th so be sure to stop by The Greeting Farm Blog to see more inspiration.

Happy Hopping!

Inky Hugs,
Crystal

Monday, June 23, 2025

Inky Paws Challenge 241 ~ Sunny Days Theme Challenge {Week 4}

Hello there crafty friend!
 There's just a few more days to play along with the Inky Paws Challenge #241 - Sunny Days Theme Challenge! You have until this coming Friday, June 27th to get your entries in for the challenge and a chance to win a $20 store credit to Newton's Nook Designs!


This has been such a fun challenge! I hope you have a chance to play along with us if you haven't already! There's just a few days left to play!


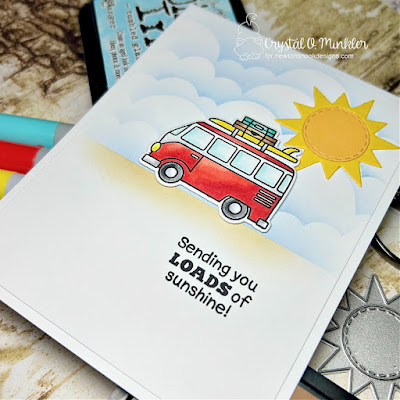
I'm sharing a CAS card today featuring the awesome bus from the Beach Bound Stamp Set. It's die cut using the coordinating die from the Beach Bound Die Set. I stamped it with Memento Tuxedo Black ink and colored it with Copic markers.

Here's a quick list of the Copic markers I used:
Bus: C0, C2, R20, R14, R27
Windows: BG000, BG10
Tires: N0, N2, N4, N6, C0, C2
Headlight / Surf Board: Y11, Y15
Suitcases: BG000, BG10, BG15, E21, E25, C0


I blended a simple background using the edge of a piece of card stock for my ground. I used the residue ink from my brown blending brush to lightly blend my ground. And then I blended some clouds over the Clouds Stencil with Tumbled Glass Distress Ink.


This fun scene card just needed a sun to finish it off so I die cut a sun from a couple yellow card stocks using the sun die from the Sky Scene Builder Die Set. I adhered the sun to the card, popped up the bus with foam tape and then stamped the sentiment on the card. Love how quickly this one came together!


Now it's your turn to get your paws inky with your Newton's Nook Designs products and create a project using the fun sketch. Be sure to link up to the Inky Paws Challenge! Can't wait to see your projects!


Thanks so much for stopping by!
See ya next time.

Inky Hugs,
Crystal


{Please note that comment moderation is on. Your lovely comment will appear once approved.}

Sunday, June 8, 2025

Happy Wishes ~ Truckload of Blooms ~ Unity Stamp Co.

Hello there crafty friend! 
Have you seen the hidden gems on sale over at Unity?! These beauties are on sale up to 70% OFF!! I am a huge fan of old trucks so I wanted to color up and share the beautiful truck from Truckload of Blooms. I LOVE this gorgeous stamp!!


Here's a list of the Copic markers I used:
Truck: R20, R14, R27, R37, C0, C2, C3
Tires: N0, N2, N4, N6
Leaves / Grass: YG11, G14, YG17
Yellow Flowers: Y11, Y15
Coral Flowers: R12, R22, R05, RV10
Sunflower: Y11, Y15, YR15, E21, E25, E29
Ground: C0, C2, C3
Sky: BG000, BG10


I stamped the sentiment above the truck and then I die cut the panel using the largest die from the Scallops & Rectangles {nesting dies}


I wrapped the corners with some ivory burlap string. I tied a bow using two pieces of the string and then I adhered it to the string using a glue dot. I adhered the panel to a Kraft A2 top fold card base that I turned on the side for a landscape card.

Thanks so much for stopping by!
See ya next time.

Inky hugs,
Crystal

{Please note that comment moderation is on. Your lovely comment will appear shortly.}

Monday, June 2, 2025

Inky Paws Challenge 241 ~ Sunny Days Theme Challenge {Week 1}

 Hello there crafty friend!
Who's up for a new challenge?! It's time to get our paws inky with a fun theme challenge! I always love the theme challenges! So many possibilities! You have until Friday, June 27th to get your entries in for the #241 Sunny Days Theme Challenge and a chance to win a $20 store credit to Newton's Nook Designs!


I am SO excited to see all the fun entries for this challenge!


I started with my background for this card. I blended some Vintage Photo Distress Ink using the edge of the hill stencil from the Hills & Grass Stencil. I traced the edge of the hill on a scrap of card stock, I cut the edge and used it to mask the hill and then I was able to blend my sky with Tumbled Glass Distress Ink. I blended a little bit of Salty Ocean Distress Ink for an illusion of water. I blended some white pigment ink over the clouds from the Petite Clouds Stencil for my sky.


I die cut the panel using the largest die from the Frames & Flags Die Set. I adhered my panel to a Kraft A2 card base. You can't have a sunny day without a sun... so I die cut a cute sun using the sun die from the Sky Scene Builder Die Set.


Now that my background was ready, I stamped a bunch of images from the Summer Moments Stamp Set. So many cute images to play with! I inked them up with Memento Tuxedo Black ink and colored them up with Copic markers. I die cut all of the images using the coordinating dies from the Summer Moments Die Set. I adhered all of the images to my background. I stamped, trimmed and adhered the sentiment to finish it off.

Here's a quick list of the Copic markers I used:
Skin: E000, E00, E11
Hat: E00, E53, BG000, BG10, BG15
Book: C0, C2, C3
Yellow Towels: Y11, Y15
Striped Towel: C0, C2, Y11, Y15, BG10, BG15, RV10, RV02, RV04
Flip Flops: RV10, RV02, RV04
Shells: RV10, RV02, RV04, BG000, BG10
Sand Dollar: E00, E11
Bag: C0, C2, C3, BG000, BG10, BG15
Suntan Lotion: E11, E04
Sunglasses: C0, C2, C3, RV02, RV04
Sand on the Background: E11, E04


Now it's your turn to get your paws inky with your Newton's Nook Designs products and create a project using this fun theme. Be sure to link up to the Inky Paws Challenge! Can't wait to see your projects!


Thanks so much for stopping by!
See ya next time.

Inky Hugs,
Crystal


{Please note that comment moderation is on. Your lovely comment will appear once approved.}

Thursday, May 22, 2025

Thank You Sew Much ~ Seamstress Anya ~ The Greeting Farm

 Hello there crafty friend!
Today I'm sharing a simple scene card featuring the adorable Seamstress Anya digi stamp from The Greeting Farm!


I combined and resized a few of the stamps from the Seamstress Anya digi stamp in a Word Document. I printed it off on white card stock and colored it up with Copic markers. 


Here's a quick list of the Copic markers I used for the scene:
Skin: E000, E00, E21
Hair: E70, E71, E74, E77
Dress / Shoes / Barrettes: RV10, RV02, RV04
Cardigan: C00, C2, C4
Measuring Tape: Y11, Y15
Table: E21, E25
Chair: E21, E25, BG10, BG01, BG34
Sewing Kit: YG11, G94, V000, V12
Thread: R20, R14, E21, E25
Sewing Machine: BG10, BG01, BG34, C00, C2, V000, V12
Cloth: V000, V12
Pin Cushion: R20, R14, YG11, G14
Window: C00, C2, C4
Curtains: Y11, Y15
Wall: B000
Floor: E43, E81
Scene in Window: B00, B02, YG11, G12, G14, RV10, RV02, RV04


I trimmed the panel to 5-3/8" x 4-1/8" and adhered it to a white A2 top fold card base that I turned on the side for a landscape card.


 I hope I've inspired you to get inky with your digi stamps!

Thanks so much for stopping by!
See ya next time.

Inky Hugs,
Crystal

{Please note that comment moderation is on. Your lovely comment will appear once approved.}