Showing posts with label Echo Park Paper. Show all posts

Thursday, August 14, 2025

Release Day Blog Hop ~ Maddox the Dog ~ The Greeting Farm


The August 2025 New Release is now available for purchase in The Greeting Farm Store! This month we introduced 3 new stamp sets. EMOJI COUPLE is an extra fun set featuring a studious Anya and Ian, along with Emoji signs so you can personalize your projects with feelings. Next, we showcased MADDOX THE DOG which comes with a studious pup carrying a stack of books, a helpful dog holding a letter, and a cheerful standing canine full of charm. Lastly, we are ready to celebrate in style with BIRTHDAY GIRL ANYA, who is dressed in a beautiful 2-tier ruffle dress with flowers in her hair ready to bring a graceful touch to all your birthday cards. 


I am LOVING the cute pups from the MADDOX THE DOG stamp set... just THE cutest!! I made a simple card with the standing pup and the single flower.


I stamped the adorable pup and flower using Memento Tuxedo Black ink. I colored them up with Copic markers. I fussy cut the pup on the line and colored the edges with a black marker to make the fussy cutting nice and neat. I fussy cut the flower leaving a white border. I've found this to work better with images that have just a single line.

Here's a quick list of the Copic markers I used:
Dog: C0, C2, C3, C5, N2, N4, N6
Shirt Y11, Y15, Y38
Flower: R20, R14, R27, YG11, G07


I paired up the pup with some fun papers from my stash called Magic and Wonder 6x6 Paper Pad from Echo Park Paper Co. I kept my card simple with an easy past sketch from Tawny Owl Paperie Inky Inspiration.


To celebrate this release we are having a short BLOG HOP! One lucky fan will win a $50.00 Gift Certificate to The Greeting Farm Store!! You have until August 18th, 12pm CST/1pm EST to leave your comments on each Designer's Blog. Then head back to The Greeting Farm Blog to let us know you completed the hop. **Remember to qualify for the prize you MUST leave a comment on each Designer's Blog AND The Greeting Farm Blog letting us know you completed the hop.

NOTE: Comments on The Greeting Farm Blog are admin approved so it may take a day for your comment to be visible. Please only comment once, and use the same name on all the blogs when leaving a comment. Do not pick the Anonymous option (otherwise we won't be able to verify that it's you). We will announce the random winner later in the week on the Blog and in our Facebook Group: The Greeting Farm Fan Page.

TGF Design Team:

This is a short hop, and definitely worth playing along! If you want to grab your favorites now, you can purchase the new stamps HERE. We will have more cards featuring the New Release from our Design Team Leaders starting on the 19th so be sure to stop by The Greeting Farm Blog to see more inspiration.

Happy Hopping!

Inky hugs!
Crystal

Tuesday, August 12, 2025

Maddox the Dog ~ Preview Day 2 ~ The Greeting Farm

 Hello there crafty friend!
It's Day 2 of previews at The Greeting Farm for the August release. MADDOX THE DOG is probably the cutest set of pup stamps and the accessory stamps are just too much fun! I am in love!


I inked up just the one pup for my card, but I used a bunch of the other stamps in the set. I stamped all the images with Memento Tuxedo Black ink and colored them up with Copic markers. 

Here's a quick list of the Copic markers I used:
Dog: N0, N2, N4, N6, C0, C2, R00, R20
Shirt: R12, R22, R05
Mailbox: YR20, YR23, BG000, BG34, E11, E25
Package: E11, E25
Envelopes: C0, C2
Grass / Leaves: BG000, BG34
Flowers: Y11, Y06, Y15, Y28, Y38
Mouse: N0, N2, N4, N6, R00, R20


I paired up the cute pup and my simple scene with the I'd Rather Be Crafting 6x6 Paper Pad from Echo Park Paper Co. I used the pattern papers for all of my layers. Including the fun envelope that I created for my background. The base of the envelope measures 4-1/2 x 3-1/4". The green bottom flap measured 4-1/2 x 2-1/8" and then I trimmed the center to the bottom corners making a triangle. I did the same thing with the top flap, only I used a corner rounder punch for the point.


I fussy cut all of the colored images and colored the edges with a Memento Tuxedo Black marker. I adhered all the images on the bottom of the envelope creating a bit of a scene. I popped up the trimmed sentiment using foam tape. And then I finished off the card with a few white enamel dots from my stash.


Such a fun card to make! Be sure to stop by the TGF blog to see all the makes from the design team. The release goes live in the store on the 15th at 12am EST.

Thanks so much for stopping by!

Inky Hugs,
Crystal


Wednesday, July 9, 2025

Flowers Anya ~ Preview Day 1 ~ The Greeting Farm

 Hello there crafty friend!
It's the first day of previews at The Greeting Farm for the amazing July release! This is a really fun release!! Be sure to check out The Greeting Farm blog each day this week!


I stamped Anya, the cute little flower pot, and the butterfly with Memento Tuxedo black ink and colored the images up with Copic Markers. I fussy cut them all on the line and colored the edges of the fussy cutting with a Memento Tuxedo Black marker making the fussy cutting all nice and neat. 

Here's a quick list of the Copic markers I used:
Skin: E000, E00, E11, E04
Hair: E31, E33, E37, E39
Bow / Dress / Shoes: R20, R14, R27
Pink Flowers: RV10, RV02, Y11, Y15
Red Flowers: R20, R14, Y15
Blue Flowers: B000, B00, B93, B97
Leaves: YG11, G94
Flower Pot: B00, B93, B97
Butterfly: B0000, B000


I made a fun background using the My Favorite Summer 6x6 Paper Pad from Echo Park Paper Co. The dark blue papers that cover the card measure 4-1/4 x 5-1/2". The yellow striped papers measure 4 x 5-1/4". The floral paper measures 4 x 1-3/4" and the dark blue mat for the floral paper measures 4-1/4 x 2".


I adhered all of my layers together and then adhered them to a white A2 top fold card base. I adhered the butterfly to the card. I adhered the little flower pot to the bottom of Anya's flower bouquet and then I popped them both up with foam tape. I stamped the sentiment, trimmed it and popped it up on the card, as well, with foam tape.


This darling new Anya is just too cute! Release goes live in the store on the 15th at 12am EST.

Thanks so much for stopping by!

Inky Hugs,
Crystal


Tuesday, April 15, 2025

Tawny Owl Paperie Inky Inspiration Sketch 31 ~ Caffeinated Girls ~ Angie Blom Digital Designs

 Hello there crafty friend!
Today I'm also sharing another card for the Tawny Owl Paperie Inky Inspiration Sketch 31 in the Tawny Owl Paperie Inky Inspiration Facebook group. I felt like playing with some digi stamps so I looked through my files and found the gorgeous Caffeinated Girls from Angie Blom Digital Designs. Love the images in this fab set!


I combined and resized a few different images and a sentiment from the Caffeinated Girls digital stamp set in a Word Document. I printed it off and started coloring. Sadly, I started coloring before I picked my papers so the greens in my coloring were a little off. Otherwise, it works really well with the papers I found in my stash.

Here's a list of the Copic Markers I used:
Skin: E000, E00, E11
Hair: YR20, E34
Sweater: R00, R32, YG11, YG03, G99
Cup: C00, C2, BG10, BG72
Coffee Cup Background: C00, C2, E000, E21, E25, R00, R11, R12, R14, R21, R27, BG10, BG72, YG03, YG67


Here's a look at the fun sketch for Tawny Owl Paperie Inky Inspiration Sketch 31. The sketch, as always, is meant to inspire not require. So let the sketch lead in your design, but don't feel limited by it. I'd love for you to join in the fun and play with us in the Tawny Owl Paperie Inky Inspiration Facebook group.


I paired up this girl with the Coffee paper pad from Echo Park Paper Co. I've had these papers forever! Mostly just scraps leftover now so it was perfect for this card and I love how the colors worked so well with my coloring. 


I finished off this cute card with a few enamel dots from the coordinating Coffee enamel dots from Echo Park Paper Co. I just love how this turned out! I hope you can find time to play along with the sketch challenge. I can't wait to see what you create. Have an ink-tastic week!

Thanks so much for stopping by!
See ya next time.

Inky Hugs,
Crystal


{Please note that comment moderation is on. Your lovely comment will appear once approved.}

Tuesday, April 8, 2025

Tawny Owl Paperie Inky Inspiration Sketch 31 ~ Winnie the Pooh ~ Echo Park Paper Company

 Hello there crafty friend!
Today I'm sharing a few quick cards for the Tawny Owl Paperie Inky Inspiration Sketch 31 in the Tawny Owl Paperie Inky Inspiration Facebook group. No stamping for these cards! Just some cute papers and ephemera from Echo Park Paper Company.


It was so easy and fun to put these three cards together!


Here's a look at the fun sketch for Tawny Owl Paperie Inky Inspiration Sketch Challenge 31. The sketch, as always, is meant to inspire not require. So let the sketch lead in your design, but don't feel limited by it.


I used the measurements from the sketch for all three cards. The papers and ephemera are both called Winnie the Pooh. I added a simple mat using pattern paper for the ephemera on my first card. Otherwise, it was just getting lost in the background.


I just had to use the map papers for a card! I adhered it to a Kraft A2 top fold card base. All of the ephemera pieces are popped up on the cards with foam tape.


Pooh bear always needs some honey so I made a fun honey themed card for my last one. I sure hope you can find time to play along with the sketch. Have an ink-tastic week!

Thanks so much for stopping by!
See ya next time.

Inky Hugs,
Crystal


{Please note that comment moderation is on. Your lovely comment will appear once approved.}

Friday, March 14, 2025

{BYSHC} Sketch Challenge 55 ~ Winter Cardinals Set 2 ~ Pink & Main

Hello there crafty friend!
I'm back with a little inspiration for the {BYSHC} Sketch Challenge 55 hosted in the Build Your Stash Holiday Cardmakers Facebook group! Today I'm sharing another sweet holiday card featuring an adorable stamp from our lovely Sponsor, Pink & Main!


This time I've inked up the cutest little cardinal from the Winter Cardinals Set 2. I absolutely adore cardinals and was tickled to see that there are two full sets of these adorable birds! Of course, I needed them both! I stamped the cute bird using Memento Tuxedo Black ink and colored it up with Copic markers. I die cut the cardinal using the coordinating Winter Cardinals Set 2 Dies.

Here's a quick list of the Copic markers I used:
Red: R20, R14, R27
White: C00, C2
Beak / Feet: YR15
Scarf: YG11, G24, G46
Lantern: N0, N2, N4
Candle: Y11, Y15, Y17


I paired up this cutie with the same papers I used last time... the Santa Claus Lane 6x6 Paper Pad from Echo Park Paper Co. Only this time I die cut my background layer using the Cloudy Frames Dies. Unfortunately, it looks like those dies are retired. I went back and forth on my paper choices for that background layer and just decided to keep both pieces together. The light green layer behind the cardinal is also from this paper pad.


I stamped the sentiment also from the Winter Cardinals Set 2. And I was pleasantly surprised to see a coordinating die for the sentiment included in the Winter Cardinals Set 2 Dies. Yay! I adhered all of my layers to a black A2 top fold card base.


Here's a look at {BYSHC} Sketch Challenge 55 for the month of March. If you're interested in seeing a bit more inspiration for this sketch, check out the amazing inspiration from the design team over on the {BYSH} Cardmakers blog! The design team, as always, rocked this sketch!


Thanks so much for stopping by!
See ya next time.

Inky hugs,
Crystal


{Please note that comment moderation is ON. Your lovely comment will appear shortly.}

Saturday, March 1, 2025

{BYSHC} Sketch Challenge 55 ~ Sugar and Spice Holidays ~ Pink & Main

Hello there crafty friend!
It's time for a new sketch challenge over in the Build Your Stash Holiday Cardmakers Facebook group! Today I'm sharing a sweet Christmas card featuring an adorable stamp from our wonderful Sponsor, Pink & Main! Pink & Main has generously offered up a $25 gift certificate as a prize for the {BYSHC} Sketch Challenge 55 this month! So fabulous!!


I inked up one of the cute gingerbreads from the Sugar and Spice Holidays stamp set. Isn't that ginger just the cutest?! I love the little snowman cup he's holding! I stamped him with Memento Tuxedo Black ink and colored him up with Copic markers. I brightened the white of the icing using a Sakura White Gelly Roll pen.

Here's a quick list of the Copic markers I used:
Gingerbread: E21, E23, E25
Cheeks / Nose: R20, R14
White Icing: C00, C2
Ear Muffs / Scarf: YG11, G24, G46
Cup: C00, C2, YR15, N0, N2, N4


I paired up the cute gingerbread with the Santa Claus Lane 6x6 Paper Pad from Echo Park Paper Co. I had colored the image prior to picking out papers and was tickled to find these papers. They work perfectly!


I used the measurements from the sketch for my card. I added a super easy hill of snow by just cutting a bump in a scrap of card stock. I die cut the cute gingerbread using the coordinating Sugar and Spice Holidays Dies. I adhered all my layers together and then popped up the focal image using foam tape.


Here's a look at {BYSHC} Sketch Challenge 55 for the month of March. If you're interested in seeing a bit more inspiration for this sketch, check out the amazing inspiration from the design team over on the {BYSH} Cardmakers blog!


Thanks so much for stopping by!
See ya next time.

Inky hugs,
Crystal


{Please note that comment moderation is ON. Your lovely comment will appear shortly.}

Friday, August 25, 2023

{BYSHC} Sketch Challenge 36 ~ Christmas Magic ~ Echo Park Paper Co.

 Hello there crafty friend!
I'm sharing one last Christmas card for the {BYSHC} Sketch Challenge 36 for the Build Your Stash Holiday Cardmakers Facebook group. This month's sketch is really great for the paper packs that have cut-aparts in them. I made four pretty quick cards using the Echo Park Paper 6x6 Paper Pad called Christmas Magic.


I cut down two pattern papers to 4-1/4 x 5-1/2" - for my first two cards that's the plaid and the green pattern papers. I cut them both again at the two inch mark and adhered them to two white A2 top fold card bases.


I then cut a couple little strips of pattern paper to adhere across the card base and trimmed off the excess. I adhered the cut apart directly on the card for the first card with the gifts. For the reindeer card I added foam tape to the back of this cut apart and popped it up on the card.


Just like the first two cards, I used two pattern papers for my last two cards. I cut them down to 4-1/4 x 5-1/2" and then cut off 2" from both. I then adhered them to card bases.


And this time I adhered Santa directly to the card and the house cut-apart was popped up using a bunch of foam tape.


Four really quick cards!! I'll definitely be using this sketch again with the cut-aparts in my paper packs. Loving it!


Here's a look at {BYSHC} Sketch 36 for the month of August!
There's still a few days to play along with the sketch! The challenge ends on August 31st. I hope you'll join in the fun and start building your stash of holiday cards. If you're interested in seeing a bit more inspiration for this sketch, check out the amazing inspiration from the design team over on the {BYSH} Cardmakers blog!


Thanks so much for stopping by!
See ya next time.

Inky hugs,
Crystal


{Please note that comment moderation is ON. Your lovely comment will appear shortly.}

Wednesday, February 1, 2023

{BYSHC} Sketch Challenge 30 ~ Destination Christmas ~ Newton's Nook Designs

 Hello there crafty friend!
It's time for a new sketch challenge over in the Build Your Stash Holiday Cardmakers! Today I'm sharing a sweet Christmas card using the adorable Destination Christmas stamp set from Newton's Nook Designs!! I also paired it up with super cute papers from Echo Park Paper Co. called Gnome for Christmas. The car stamp worked so well with the papers... it was a must to pair them up!


This month's sketch has a few layers that don't require mats if you use coordinating papers from the same paper pack that also contrast a bit. I used the car papers for my background... it's the busiest paper with repetitive images. And then I used the snowflakes to contrast the brown snowflakes in the car paper. And it also compliments the red in my focal image. And then the darker green paper contrasts both papers and brings your eye to the white focal piece. I know some have shared with me that they struggle with pairing up papers so I hope that this helps a bit in how I chose my papers for layering.


Here's a quick list of the Copic markers I used for the cute car stamp:

Tree ~ YG11, G24, G46, E51, E55, E57
Car ~ R20, R14, R37, E51, E55, E57, E59
Tires / Bumpers ~ N0, N1, N4, N6
Window ~ N0, N1


I die cut the cute car and sentiment with the scalloped stitched circle die from the Circle Frames die set, also from Newton's Nook Design. I added foam tape to the back of the circle and popped it up on the card. I think this one turned out pretty cute! What do you think?


Here's a look at {BYSHC} Sketch 30 for the month of February!
I hope you'll join us and play along with the sketch! If you're interested in seeing a bit more inspiration for this sketch, check out the amazing inspiration from the design team over on the {BYSH} Cardmakers blog!


Thanks so much for stopping by!
See ya next time.

Inky hugs,
Crystal


{Please note that comment moderation is ON. Your lovely comment will appear shortly.}

Friday, January 27, 2023

{BYSHC} Sketch Challenge 29 ~ Gnome Christmas and a Bonus Card ~ The Greeting Farm

Hello there crafty friend!
I'm back with not one, but TWO Christmas cards to finish off the {BYSHC} Sketch Challenge 29 for the Build Your Stash Holiday Cardmakers!! Last month I got the super cute Gnome for Christmas paper pad from Echo Park Paper Co. and I thought it would be just too cute paired up with the adorable Gnome Christmas stamp set from The Greeting Farm.


What do you think? It almost looks like a snow globe the way I cut the sentiment. Complete accident, but I think I might try it again for a future card! I used two cute papers from the Gnome for Christmas paper pad... a cute green gingham and, of course, the gnome paper. I adhered those to an Old Olive piece of card stock from Stampin' Up measuring 4 x 5-1/4". I then adhered the paper layers to a card front of Pure Poppy card stock from Papertrey Ink measuring 4-1/4 x 5-1/2". And then I adhered the layers to a white A2 top fold card base. I actually created both cards at the same time since I was in the zone and set them aside.


I stamped the adorable gnomes and the holly with berries on a scrap of white card stock using Memento Tuxedo Black ink. This is my favorite ink to use on clear stamps because it cleans off very nicely. I then colored up the gnomes with the following Copic markers:

Skin ~ E000, E00, E11, E04
Hair / Beard ~ C00, C2
Holly & Berries ~ YG11, YG91, YG95, YG97, R20, R14, R37
Candy Cane ~ C00, C2, R20, R14, R37
Girl Gnome's Clothes ~ R20, R14, R37, YG11, YG91, YG95, YG97
Guy Gnome's Clothes ~ YG11, YG91, YG95, YG97
Shoes ~ N0, N1, N4, N6


I fussy cut the gnomes and cleaned up the edges of the images by coloring them with a Memento Tuxedo marker. I die cut a white piece of card stock using the stitched scalloped circle die from the Scallops & Circles {nesting dies} from Unity Stamp Co. And then I adhered the gnomes to the circle. I stamped the sentiment, trimmed the top and bottom, and then cut fishtails on both sides. As I mentioned above, it was a complete accident that it looks kind of like a snow globe but I love it! I cut a scrap of Pure Poppy card stock to be thinner than the white card stock and cute fishtails on it too. I adhered the sentiment and red layer together and then adhered the gnome circle to the bottom of the sentiment. I then added a bunch of foam tape and popped up the whole thing on my card. I used the thinner foam tape from Scrapbook Adhesives so my card won't be too bulky. 


If you've played with this sketch, you know that it's easy to make two cards when you cut two different pattern papers for the triangles. So, I have a bonus card to share using a cut apart from the Gnome for Christmas paper pad.


I popped up the cut apart using the same thin foam tape I used on my first card. I finished off the card by adding a few green enamel dots from my stash. 


This card may need a non-machinable postage stamp to mail but it was screaming for those enamel dots... had to happen! :)


Here's a look at {BYSHC} Sketch 29 for the months of December-January!
There's just a few more days to join us and play along with the sketch for a chance to win a prize! If you're interested in seeing a bit more inspiration for this sketch, check out the amazing inspiration from the design team over on the {BYSH} Cardmakers blog!


Thanks so much for stopping by!
See ya next time.

Inky hugs,
Crystal


{Please note that comment moderation is ON. Your lovely comment will appear shortly.}

Saturday, October 1, 2022

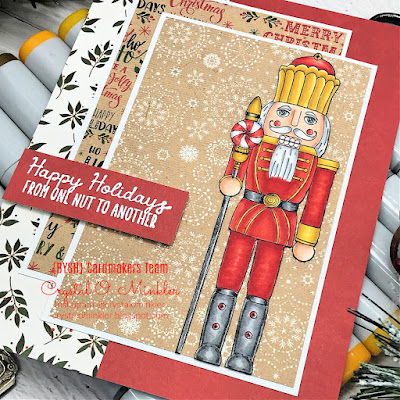
{BYSHC} Sketch Challenge 27 ~ Nut Cracker Holiday ~ Unity Stamp Co.

 Hello there crafty friend!
It's time for a new sketch challenge over at Build Your Stash Holiday Cardmakers and I have a cute Christmas card to share using a punny stamp from Unity Stamp Co. called Nut Cracker Holiday. This detailed nutcracker stamp was so fun to color up all festive and I just love that punny sentiment!


I paired the Nut Cracker Holiday stamp up with the beautiful My Favorite Christmas 6x6 paper pad from Echo Park Paper Co. I couldn't find a paper in my stash with just the right colors but I think this one coordinates nicely. Yes, that means I colored before looking for my pattern paper... it happens sometimes! 


You'll see the sketch down below in my blog post but I've altered it just a bit to work with my nutcracker. He's a little taller than the focal piece in the sketch calls for so I made my panels 2-3/4 x 4-1/4" and they are both mat with white card stock measuring 2-7/8 x 4-3/8". It takes up a bit more room on the card front but I think it still works nicely with this sketch design.


Here's a list of the Copic markers I used for the Nutcracker:

Skin / Eyes ~ E000, E00, E11, E04, B000, B00, B02
Hair / Facial Hair ~ C00, C2, C3
Clothes / Scepter ~ Y15, Y35, Y28, R20, R14, R27, N0, N1, N3, N5


Here's a look at {BYSHC} Sketch 27 for the month of October!
I hope you'll join us and play along with the sketch! If you're interested in seeing a bit more inspiration for this sketch, check out the amazing inspiration from the design team over on the  {BYSH} Cardmakers blog! I'll be back next week with my weekly Christmas card using this fun new sketch!


Thanks so much for stopping by!
See ya next time.

Inky hugs,
Crystal


{Please note that comment moderation is ON. Your lovely comment will appear shortly.}