Showing posts with label #byshcsketchchallenge29. Show all posts

Monday, July 21, 2025

Christmas in July 2025 {BYSHC} Linky Party ~ Christmas Cookie Gnomies ~ Crafty Stamp Co.

 Hello there crafty friend!
It's day 4 of the Christmas in July 2025 {BYSHC} Linky Party!! I'm adding not one, but two sweet cards to my Christmas stash! This time I played with the super cute Christmas Cookies Gnomies from our BRAND NEW Sponsor Crafty Stamp Co.


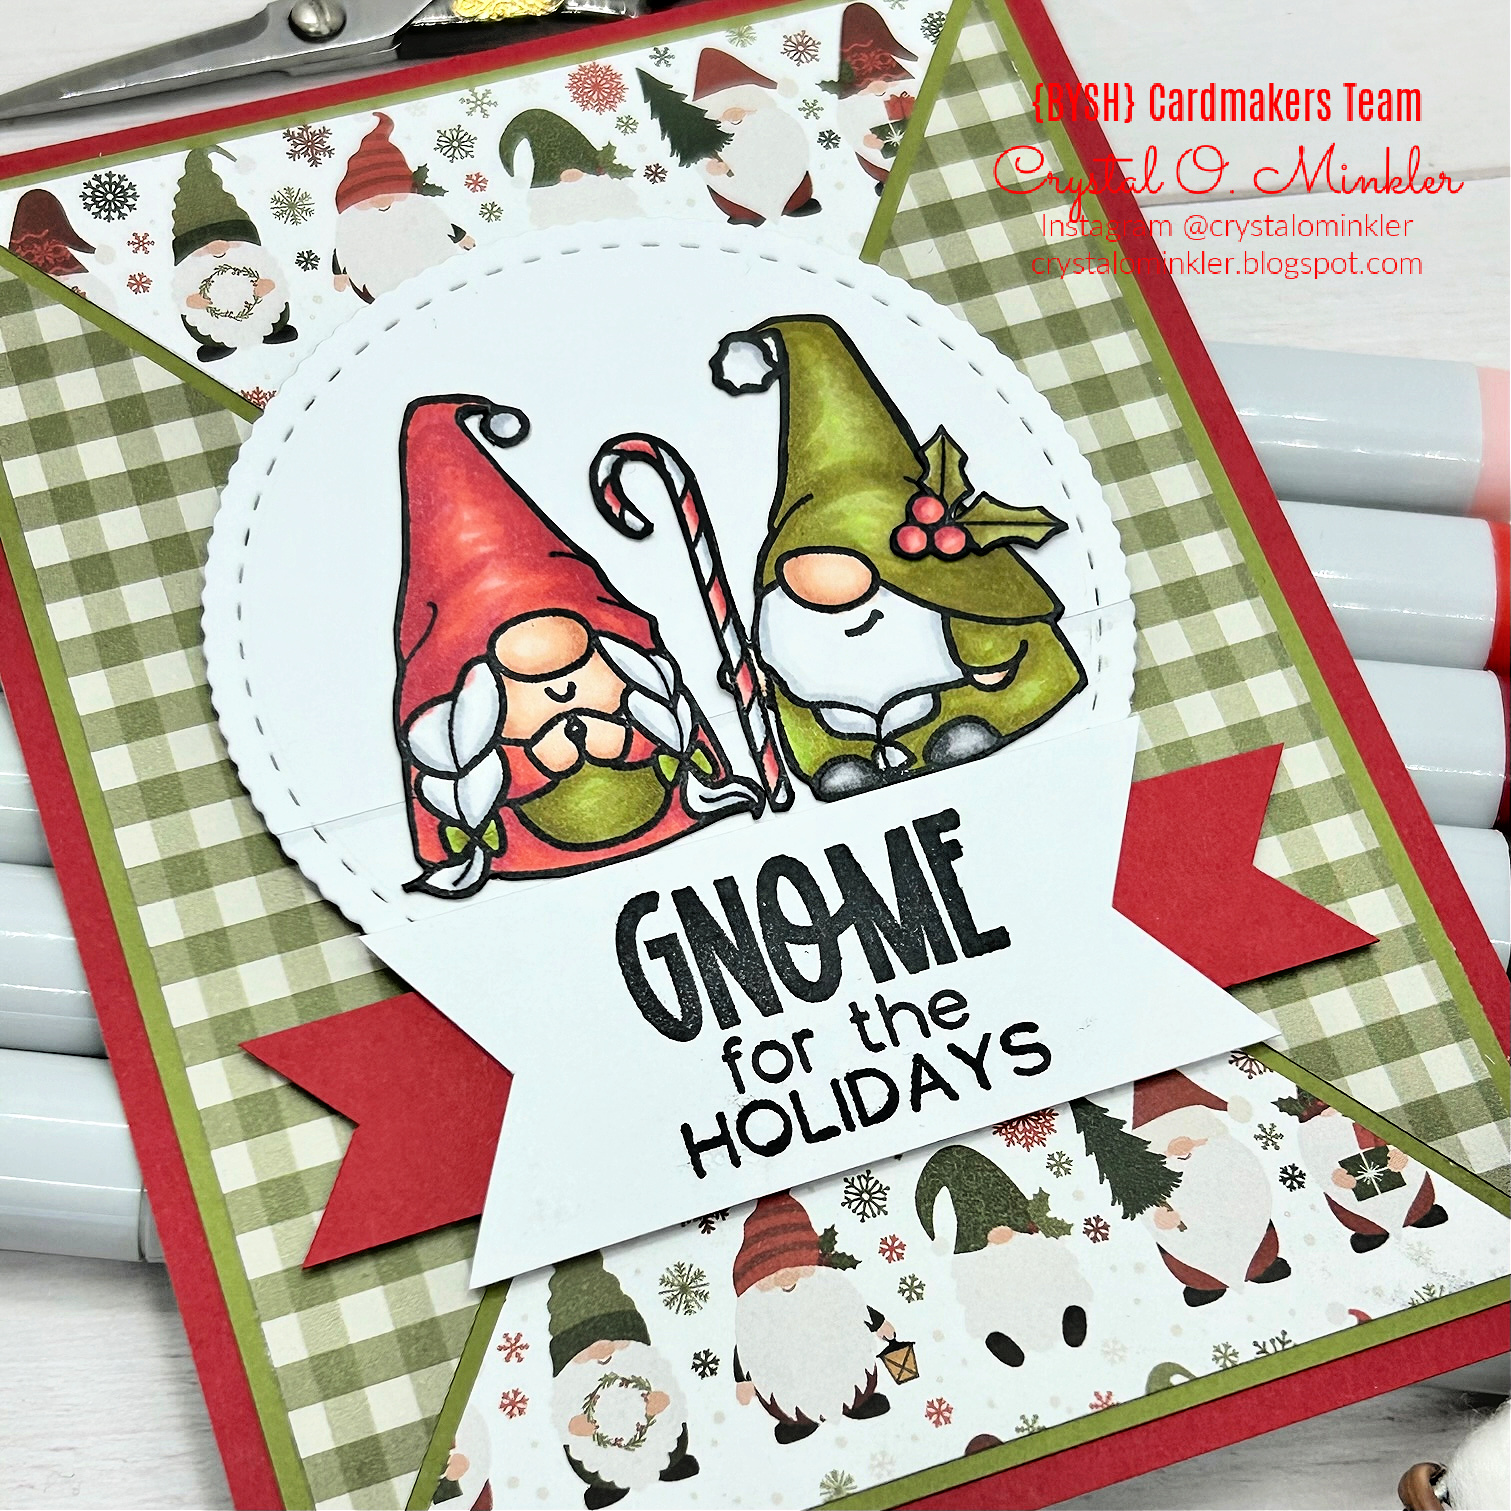
I paired up the gnomies with the Gingerbread Christmas 6x6 Paper Pad also from our new Sponsor Crafty Stamp Co.! Love these yummy papers! 


Inspiration for my card came from one of our past sketches... BYSHC Sketch 29. I love using the past sketches and this one is a big favorite and great for a TWOfer!


The blue glittery background paper measures 4-1/4 x 5-1/2" and it's adhered to a white A2 top fold card base. The red pattern paper layer measures 3-3/4 x 5". And then the colorful cookies and dots papers measure 3-1/2 x 4-3/4". If you'd like to see how I cut my triangles you can check out this VIDEO to see how I do it for this sketch.


I adhered all of my background layers using the iCraft UltraBond Adhesive from Sponsor Therm O Web. The sentiments are heat embossed with my favorite combo of products. I prepped the card stock with the TE Anti-Static Powder Tool and then stamped the sentiment with Sugar Cube Pigment White ink, both from Taylored Expressions. I then dusted the wet ink with Alabaster White Embossing Powder from Brutus Monroe and melted it with a Wagner Precision Heat Tool.

Copic markers I used:
Skin: E000, E00, E11
Mustache / Beard: C0, C2
Clothes: B000, B00, BG000, BG11
Shoes: N2, N4, N6
Gingerbread Cookie: E21, E23, E25, C0, C2, R20, R14, R27
Icing Bag: R20, R14, R27


I die cut two circles from vellum card stock using a die from the X Stitched Circle dies from Sponsor Gina Marie Designs. Looks like it's not available right now on the website... bummer.


I popped up the gnomies on the vellum circles using iCraft 3D Foam Tape Jumbo Roll (white) from Sponsor Therm O Web and then I adhered the circles to the card by just applying glue to the back of the gnomes.

Copic markers I used:
Skin: E000, E00, E11
Mustache / Beard: C0, C2
Clothes: R20, R14, R27, YG11, G24, G46
Shoes: N2, N4, N6
Stocking / Mitten Cookies: E21, E23, E25, C0, C2, B000, B00, BG000, BG11


If you haven't already, stop by the Christmas in July 2025 {BYSHC} Linky Party to check out all the wonderful Holiday inspiration being shared!! So much amazing inspiration! You can't help but be inspired to make a card or two! Heehee. Have an ink-tastic week!

Thanks so much for stopping by!

Inky Hugs,
Crystal

Saturday, December 21, 2024

Unity Advent Calendar 2024 Day 21 ~ Unity Stamp Co.

Hello there crafty friend!
It's Day 21 of the 2024 Advent Calendar from Unity!! Just a few days left! I know it's a very busy time and just getting busier as we get closer and closer to Christmas. I hope you've had some down time maybe playing along with the Advent Calendar or just gazing at the pretty lights on your Christmas tree. I love the early morning hours just enjoying our Christmas tree.


Today's stamp is the most adorable elephant ever. I stamped her with Black Amalgam ink. I then die cut her with a circle die from the Scallops & Circles {nesting dies}. Here's a quick list of the Copic markers I used: R00, R20, R85, N0, N2, N4, G00, G43.

You can check out my video revealing the Advent Calendar Day 21 stamp and my process in making this card here... Unity Advent Calendar 2024 Day 21 | Unity Stamp Co.


Inspiration for my card came from the {BYSHC} Sketch 29! Such a fun sketch... I love it! 


Another Spring-inspired card! I used the measurements from the sketch for this one. Easy Peasy!


I paired up the cute elephant with the The Secret of Change {paper pack}. The sweet sentiment is from the Well, Hello {itty bitty} stamps.

I'll be back tomorrow for Day 22 of the 2024 Advent Calendar from Unity!
Have an inkredible day!


Thanks so much for stopping by!
See ya next time.
 
Inky Hugs,
Crystal


{Please note that comment moderation is on. Your lovely comment will appear once approved.}

Thursday, May 23, 2024

Light Up the World ~ Echo of Kindness ~ Unity Stamp Co.

Hello there crafty friend! 
The birthday celebration continues over at Unity with Whit's Birthday Sale!! And another amazing release, of course! Woohoo! I don't know about you but I was super excited to see a new Angie Girl!! Isn't she just darling!? And my daughter is always making hearts with her fingers like this. This girl could totally be her. I love it!


I stamped the girl and sentiment from the beautiful new Echo of Kindness stamps using Black Amalgam ink from Gina K Designs onto Stampers Select White Card Stock from Papertrey Ink. I colored up the girl with my Copic markers. I die cut the girl with a die from the Stacked Baroque die set from Tim Holtz and Sizzix. I added these cool dies to my stash awhile ago and just found them in the wrong place... lol! So I thought I'd use them for this card. Aren't they perfect with this sketch? I also die cut a piece of True Black card stock from Papertrey Ink using the slightly larger die from the same die set.


I trimmed the four pattern papers from the gorgeous Enveloped in Love {paper pack} from Unity to 4 x 5-1/4" and then I used a ruler and pencil to cut my angles. I basically did the same measurements and cuts that I used in this video... Cutting & Assembling Papers for {BYSHC} Sketch 29. I then adhered the papers to a True Black card front measuring 4-1/4 x 5-1/2". And as I often do, I adhered the panel to a Stampers Select White Card Stock A2 top fold card base.

Here's a quick list of the Copic markers I used:

Skin: E000, E00, E11
Hair: E70, E71, E74, E77
Dress / Hair Tie: R000, R11, R32, R43


Inspiration for my card came from the {BYSHC} Sketch 29. It's not just a fabulous sketch for Christmas cards! LOL! This is an absolute favorite of mine! It always makes for a lovely card.


I die cut the sentiment using a die from the Scalloped & Stitched Sentiment Nesting Dies from Unity. I softened the brightness of the white card stock by blending with my brown blending brush. I didn't add any ink to it so it would stay light. I adhered the sentiment to the girl and added foam tape to the back of both. Popped it up on the card for a bit of dimension. I added a few black enamel dots from my stash to finish off the card. I love how this turned out! Hope you have an ink-tastic day! 

Thanks so much for stopping by!
See ya next time.

Inky hugs,
Crystal

{Please note that comment moderation is on. Your lovely comment will appear shortly.}

Friday, April 21, 2023

Spring into Christmas 2023 {BYSHC} Linky Party ~ Gingerbread Hugs ~ Not 2 Shabby

Hello there crafty friend!
I'm so excited to share my first card for the Spring into Christmas 2023 {BYSHC} Linky Party hosted by the Build Your Stash Holiday Cardmakers Facebook group!! This is our third annual Spring Linky Party. Though it has Spring in the name the linky party is focused on Christmas and wintry holiday cards. It's a great way to get ahead on those holiday cards to relieve some of the stress later on in the year during the holidays. I am super excited to get a jump on my Christmas card stash and I sure hope that you'll join in the fun. 


For my first card I'm featuring the super adorable Gingerbread Hugs stamp set from our wonderful return Sponsor Not 2 Shabby. I just adore this sweet mug filled with Christmas goodies and baubles. I paired this sweet stamp up with the wonderful Plaids for Christmas 6x6 paper pad also from Not 2 Shabby. There's just something about plaid with Christmas! I love it! I adhered all my layers to a white A2 top fold card base using the iCraft UltraBond Adhesive from our wonderful Sponsor Therm O Web.


Here's a quick list of the Copic Markers I used:

Gingerbreads ~ E21, E23, E25, E27, R20, R14, R27
Candies / Mug ~ R20, R14, R27, C00, C1, C3, YG11, G24, G46
Stars ~ Y11, Y15 
Red Bauble ~ R20, R14, R27


I die cut the colored image with the coordinating dies from the Gingerbread Hugs Shabby Snips dies from Not 2 Shabby. I stamped the sentiment with Sugar Cube Pigment ink from returning Sponsor Taylored Expressions and then heat embossed some white embossing powder giving the sentiment a raised and shiny look on the dark brown card stock. I popped up both the sentiment and the gingerbread focal piece with lots of thin foam tape.

Though I didn't record my whole process in making this card, I did record and share a video on my YouTube channel of how I cut the pattern paper and adhered it to the mats. You can check it out here... Cutting & Assembling Papers for {BYSHC} Sketch 29.


As mentioned in the video, my card was inspired by one of our past sketches... Sketch 29! This sketch has definitely become a favorite! Have you visited the Build Your Stash Holiday Cardmakers Facebook group? We host a fun sketch challenge each month to inspire our holiday cardmaking all year long. I love revisiting the sketches and will likely be sharing a few during the Linky Party.


Yay!! I'm also a Sponsor for the Spring into Christmas 2023 {BYSHC} Linky Party!! I have a wonderful prize set aside for one lucky winner. I usually share a picture of the prize but this time I thought I'd make it a surprise... and I'm waiting on one or two more goodies that I plan on adding to the prize so I didn't want to share just some of the goodies. LOL! For a chance to win my fun prize make a Christmas card and link it up to the linky party blog post on the Build Your Stash Holiday Cardmakers blog. 

Before you leave, be sure to stop by Sponsor Not 2 Shabby... they are having a new quarterly release tomorrow, but you can always stop by and check out all the amazing products on the site now. And if you haven't already, stop by the Spring into Christmas 2023 {BYSHC} Linky Party to check out all the wonderful Holiday inspiration from our Sponsors and the {BYSHC} Design Team!! I'm so excited to continue building my stash of holiday cards for 2023... I hope you'll join in the fun and play along! Let's build our stash of holiday cards this week!!


Thanks so much for stopping by!
See ya next time.

Inky Hugs,
Crystal


{Please note that comment moderation is ON. Your comment will appear shortly.}

Friday, January 27, 2023

{BYSHC} Sketch Challenge 29 ~ Gnome Christmas and a Bonus Card ~ The Greeting Farm

Hello there crafty friend!
I'm back with not one, but TWO Christmas cards to finish off the {BYSHC} Sketch Challenge 29 for the Build Your Stash Holiday Cardmakers!! Last month I got the super cute Gnome for Christmas paper pad from Echo Park Paper Co. and I thought it would be just too cute paired up with the adorable Gnome Christmas stamp set from The Greeting Farm.


What do you think? It almost looks like a snow globe the way I cut the sentiment. Complete accident, but I think I might try it again for a future card! I used two cute papers from the Gnome for Christmas paper pad... a cute green gingham and, of course, the gnome paper. I adhered those to an Old Olive piece of card stock from Stampin' Up measuring 4 x 5-1/4". I then adhered the paper layers to a card front of Pure Poppy card stock from Papertrey Ink measuring 4-1/4 x 5-1/2". And then I adhered the layers to a white A2 top fold card base. I actually created both cards at the same time since I was in the zone and set them aside.


I stamped the adorable gnomes and the holly with berries on a scrap of white card stock using Memento Tuxedo Black ink. This is my favorite ink to use on clear stamps because it cleans off very nicely. I then colored up the gnomes with the following Copic markers:

Skin ~ E000, E00, E11, E04
Hair / Beard ~ C00, C2
Holly & Berries ~ YG11, YG91, YG95, YG97, R20, R14, R37
Candy Cane ~ C00, C2, R20, R14, R37
Girl Gnome's Clothes ~ R20, R14, R37, YG11, YG91, YG95, YG97
Guy Gnome's Clothes ~ YG11, YG91, YG95, YG97
Shoes ~ N0, N1, N4, N6


I fussy cut the gnomes and cleaned up the edges of the images by coloring them with a Memento Tuxedo marker. I die cut a white piece of card stock using the stitched scalloped circle die from the Scallops & Circles {nesting dies} from Unity Stamp Co. And then I adhered the gnomes to the circle. I stamped the sentiment, trimmed the top and bottom, and then cut fishtails on both sides. As I mentioned above, it was a complete accident that it looks kind of like a snow globe but I love it! I cut a scrap of Pure Poppy card stock to be thinner than the white card stock and cute fishtails on it too. I adhered the sentiment and red layer together and then adhered the gnome circle to the bottom of the sentiment. I then added a bunch of foam tape and popped up the whole thing on my card. I used the thinner foam tape from Scrapbook Adhesives so my card won't be too bulky. 


If you've played with this sketch, you know that it's easy to make two cards when you cut two different pattern papers for the triangles. So, I have a bonus card to share using a cut apart from the Gnome for Christmas paper pad.


I popped up the cut apart using the same thin foam tape I used on my first card. I finished off the card by adding a few green enamel dots from my stash. 


This card may need a non-machinable postage stamp to mail but it was screaming for those enamel dots... had to happen! :)


Here's a look at {BYSHC} Sketch 29 for the months of December-January!
There's just a few more days to join us and play along with the sketch for a chance to win a prize! If you're interested in seeing a bit more inspiration for this sketch, check out the amazing inspiration from the design team over on the {BYSH} Cardmakers blog!


Thanks so much for stopping by!
See ya next time.

Inky hugs,
Crystal


{Please note that comment moderation is ON. Your lovely comment will appear shortly.}

Friday, January 13, 2023

{BYSHC} Sketch Challenge 29 ~ Christmas Trimmings ~ Newton's Nook Designs

Hello there crafty friend!
It feels so good to be back in my studio making Christmas cards. I've been on a bit of break this month trying to get some things done around the house and for our homeschool year. I was missing my studio though and making Christmas cards makes me so happy. I'm so happy to be building my stash of holiday cards again. Without further adieu... my first Christmas card of 2023!


This sweet stamp is the Christmas Trimmings stamp set from Newton's Nook Designs that is actually retiring and is only $5.99 for the whole set!! What a crazy deal!! I just love the cute girls in this set and all the little accessories included! I thought the girl with the tree would be perfect for the {BYSHC} Sketch Challenge 29 from the Build Your Stash Holiday Cardmakers group. I've paired up these cute stamps with the Meowy Christmas 6x6 paper pad. I chose one of the double sided papers that wasn't pet related since I wasn't using a pet stamp. I adhered my pieces to a 4 x 5-1/4" piece of white card stock and then adhered it to a card front of Cherry Cobbler card stock from Stampin' Up. I adhered the card front to a white A2 top fold card base measuring 4-1/4 x 11"; scored at 5-1/2".


I stamped the girl/tree along with a bunch of presents and the star using Memento Tuxedo Black ink. This is my most favorite ink to use with clear stamps because it wipes off nice and clean. I also recommend rubbing the stamp with your finger or a white eraser before inking it up. Manufacturing leaves a bit of a film on the clear stamps and a good rub will take that off. I die cut each of the pieces using the coordinating dies (unfortunately, it looks like these are sold out). I adhered the presents to the tree and each other. I then adhered my little scene to a stitched circle die cut from Vellum card stock that I die cut using the Circle Frames dies from Newton's Nook Designs.


Here's a quick list of the Copic Markers I used to color up all my stamped images (the list looks long, but I used the same markers for multiple things):

Skin ~ E000, E00, E11
Hair ~ E70, E74, E79
Hat ~ C00, C2, R20, R14, R37
Dress ~ RV10, RV21, RV14, R20, R14, R37
Shoes ~ R20, R14, R37
Tree ~ YG11, G24, G46, E70, E74, E79
Tree Skirt ~ R20, R14, R37, YG11, G14
Star / Ornaments ~ Y11, Y15, R20, R14, R37, B000, B02
Red / Green Presents ~ YG11, G14, R20, R14, R37
Pink / White Rectangle Present ~ RV10, RV21, C00, C2, B000, B02
Pink / White Square Present ~ RV10, RV21, RV14, C00, C2
Blue / Yellow Present ~ B000, B02, Y11, Y15


Here's a look at {BYSHC} Sketch 29 that's been extended through January!
I hope you'll join us and play along with the sketch! If you're interested in seeing a bit more inspiration for this sketch, check out the amazing inspiration from the design team over on the {BYSH} Cardmakers blog


To finish off the card, I adhered the vellum circle to the card front. I used liquid glue that I applied just behind the stamped images so none of it shows through the vellum. I also added some thin foam tape behind the trimmed sentiment to pop it up on the card. This card turned out so cute! Not bad for my first Christmas card of 2023! Well, I'll be back in two weeks with one more card using the {BYSHC} Sketch Challenge 29.


Thanks so much for stopping by!
See ya next time.

Inky hugs,
Crystal


{Please note that comment moderation is ON. Your lovely comment will appear shortly.}

Friday, December 30, 2022

{BYSHC} Sketch Challenge 29 ~ Gingerbread Kisses ~ Not 2 Shabby

 Hello there crafty friend!
I'm back with more inspiration for the {BYSHC} Sketch Challenge 29!! I wanted to share a bit of news regarding the sketch and also my plans for next year, but I'll share that down below so please read through this to the end of this blog post! I am just tickled to see that so many are loving this sketch! The card I'm sharing today literally took me just 10 minutes. And that was just because I couldn't decide on the right pink card stock to coordinate with the pattern paper! LOL


The beautiful ephemera and pattern papers I used today are from Not 2 Shabby and they're called Gingerbread Kisses. I'm just smitten with the colors in these papers!! I just checked the website and it looks like the pattern paper pad is out of stock but the Gingerbread Kisses ephemera is in stock!! Woohoo!


The pattern paper is double sided so the candy canes are on the other side of this gorgeous glitter paper. I cut the pattern paper to 3-3/4 x 5" and then drew a line lightly with my pencil from the top right corner to the bottom left corner. I then cut the opposite corner to corner leaving a pencil marking for me to cut the leftover pieces. I hope that makes sense. I've showed how to cut these in my video here... Advent Calendar Day 9 | {BYSHC} Sketch Challenge 29 | Unity Stamp Co. But rather than draw two lines corner to corner I've started just doing the one and then cutting the opposite corners.


I adhered the pattern paper to a piece of white card stock measuring 4 x 5-1/4". I then adhered the panel to a card front of Pretty Pink card stock from Stampin' Up measuring 4-1/4 x 5-1/2" and adhered it to a white A2 top fold card base. I popped up the ephemera with foam tape. There isn't a sentiment included in the ephemera... or at least I don't think there is. I actually didn't look through it. LOL... the cute gingerbread house was on the top so I grabbed it. I did remember I had a cute gingerbread sentiment in a Not 2 Shabby stamp set so I went looking for it and found it! It's the Peppermint Mocha Season stamp set. I love this sentiment!!

Here's a look at {BYSHC} Sketch 29 for the month of December!
I hope you'll join us and play along with the sketch! If you're interested in seeing a bit more inspiration for this sketch, check out the amazing inspiration from the design team over on the {BYSH} Cardmakers blog

Now, about that news regarding the sketch... I've decided to extend the {BYSHC} Sketch Challenge 29 through the month of January. December has been so busy and I know some have mentioned that they didn't get to play with the sketch yet. I'm also really enjoying this sketch and I'd like to make a couple more cards with it. So with that said the December challenge will be extended through to January 31st. I hope that you'll get to play along with us!

And regarding my plans for next year... December was SO crazy busy for me that I've decided to take January off. I have a handful of DT obligations that I'll be sharing this month but as far as {BYSHC} I'll only be sharing 2 cards. My plan for 2023 is to share just 3 cards for each sketch. I made so many Christmas cards last year that I still have a bunch left over so I'm decreasing my goal for 2023 to just 75. I figure 3 cards a month plus the ones that I make for the linky parties, I should be set! Well, that's it for me today. I'll be sharing another card for this sketch on January 13th.


Thanks so much for stopping by!
See ya next time.

Inky hugs,
Crystal


{Please note that comment moderation is ON. Your lovely comment will appear shortly.}

Friday, December 23, 2022

{BYSHC} Sketch Challenge 29 ~ Christmas Wishin' ~ Unity Stamp Co.

 Hello there crafty friend!
Christmas Day is just two days away!! Once December starts it just seems to zip by so fast! I colored up this beautiful snow globe stamp from the Christmas Wishin' stamps from Unity awhile ago but just hadn't used it... until now! I think it's perfect for the {BYSHC} Sketch Challenge 29. I also saved time and used the pattern papers left over from the cute car card I shared a couple weeks ago. A combination of the Krafty Season {paper pack} and Krafty Deck the Halls {paper pack} from Unity.


I love snow globes! I have a small collection of them and love to display them for Christmas on our fireplace mantle. The sweet snow globe from the Christmas Wishin' stamps was definitely a must have for my stamp collection.


I colored up this cute snow globe with the following Copic Markers:

Snowman ~ B0000, B000, YR15, YR68, R20, R14, R27, C00, C2
Snow / Snow Globe ~ B0000, B000
Tree ~ YG11, G24, G46, R20, R14, R27, Y06, Y15, Y35
Presents ~ R20, R14, R27, Y06, Y15, Y35
Snow Globe Base ~ E53, E55, E57, E59


I fussy cut the snow globe and popped it up on the card with foam tape. If you're in need of a pretty quick card and have a stamped and/or colored image already in your stash, this may be the sketch to try! Ephemera is also a great focal piece for this sketch. I think this turned out pretty cute. My only wish is that I had embossed my sentiment in white so it would be more visible on the card.


Here's a look at {BYSHC} Sketch 29 for the month of December!
I hope you'll join us and play along with the sketch! If you're interested in seeing a bit more inspiration for this sketch, check out the amazing inspiration from the design team over on the {BYSH} Cardmakers blog!


Thanks so much for stopping by!
See ya next time.

Inky hugs,
Crystal


{Please note that comment moderation is ON. Your lovely comment will appear shortly.}

Friday, December 16, 2022

{BYSHC} Sketch Challenge 29 ~ Advent Calendar Day 16 ~ Unity Stamp Co.

Hello there crafty friend!
It's Day 16 of the Unity 2022 Advent Calendar! I've teamed up with Echo and Sandhya to do a little reveal and project on our YouTube channels using the fantastic Advent Calendar from Unity Stamp Co!! Please be sure to subscribe to our channels so you don't miss a day of this fun series!


Day 16 ~ a cute stack of books!!


I paired it up with the Cozy Textiles {paper pack}, also from Unity. And colored it up with the following Copic markers: 

Skin ~ E000, E00, E11
Hair ~ E43, E44, E49
Jacket ~ RV0000, RV10, RV21, RV91, RV93, RV95
Jeans ~ B91, B95
Book ~ C00, C2
Bean Bag ~ B91, B95, B97, B99
Stack of Books ~ Y000, Y11, RV0000, RV10, RV91, RV93, B91, B95, B97


Here's a look at {BYSHC} Sketch 29 that inspired my card.


I also used the Scallops & Circles {nesting dies}, also from Unity. And the little snowflake is from the Winter Sidekick Side-Order Thinlit/Texture Fades from Sizzix and Tim Holtz. 
The pretty girl and sentiment are from the Friends Family Graciousness October 2020 Whit Kit.

Check out my process video here... Unity Advent Calendar Day 16.


I'll be back on Monday with Day 19 of the Advent Calendar reveal and a pretty card! *So sorry for the delay... I'll be posting Day 19 through Day 21 on Wednesday.


Thanks so much for stopping by!
See ya next time.


Inky Hugs,
Crystal


{Please note that comment moderation is ON. Your comment will appear shortly.}

Friday, December 9, 2022

{BYSHC} Sketch Challenge 29 ~ Advent Calendar Day 9 ~ Unity Stamp Co.

 Hello there crafty friend!
It's Day 9 of the Unity 2022 Advent Calendar and I'm also sharing inspiration for the {BYSHC} Sketch Challenge 29!! I've teamed up with Echo and Sandhya to do a little reveal and project on our YouTube channels using the fantastic Advent Calendar from Unity Stamp Co!! Please be sure to subscribe to our channels so you don't miss a day of this fun series!


Day 9 ~ the cutest little car! 
I paired it up with the Krafty Deck the Halls {paper pack} and the Krafty Season {paper pack}, both from Unity. And colored it up with the following Copic markers: R20, R14, R27, C00, C3, N2, N4, N6


I die cut the car with the smallest stitched circle die from the Scallops & Circles {nesting dies}. I then mat it with a Kraft and a white layer of die cut circles using the same dies. These dies are perfect for these Advent Calendar stamps!


Here's a look at {BYSHC} Sketch Challenge 29 that inspired my card.


I am really loving this month's sketch!! I share tips in my video below on how to cut the papers just right for this sketch. This time I used a sweet sentiment from the Shakin' Things Up stamps which happens to be the freebie stamp with a $55 purchase over at Unity for their Year End Clearance Sale!


I'll be back on Monday with inspiration for Day 12 of the Advent Calendar! 
Come join along in the fun and start building your stash of holiday cards! You can join us here... Build Your Stash Holiday Cardmakers.


Thanks so much for stopping by!
See ya next time.

Inky Hugs,
Crystal


{Please note that comment moderation is ON. Your comment will appear shortly.}