Showing posts with label #timholtz. Show all posts

Thursday, May 23, 2024

Light Up the World ~ Echo of Kindness ~ Unity Stamp Co.

Hello there crafty friend! 
The birthday celebration continues over at Unity with Whit's Birthday Sale!! And another amazing release, of course! Woohoo! I don't know about you but I was super excited to see a new Angie Girl!! Isn't she just darling!? And my daughter is always making hearts with her fingers like this. This girl could totally be her. I love it!


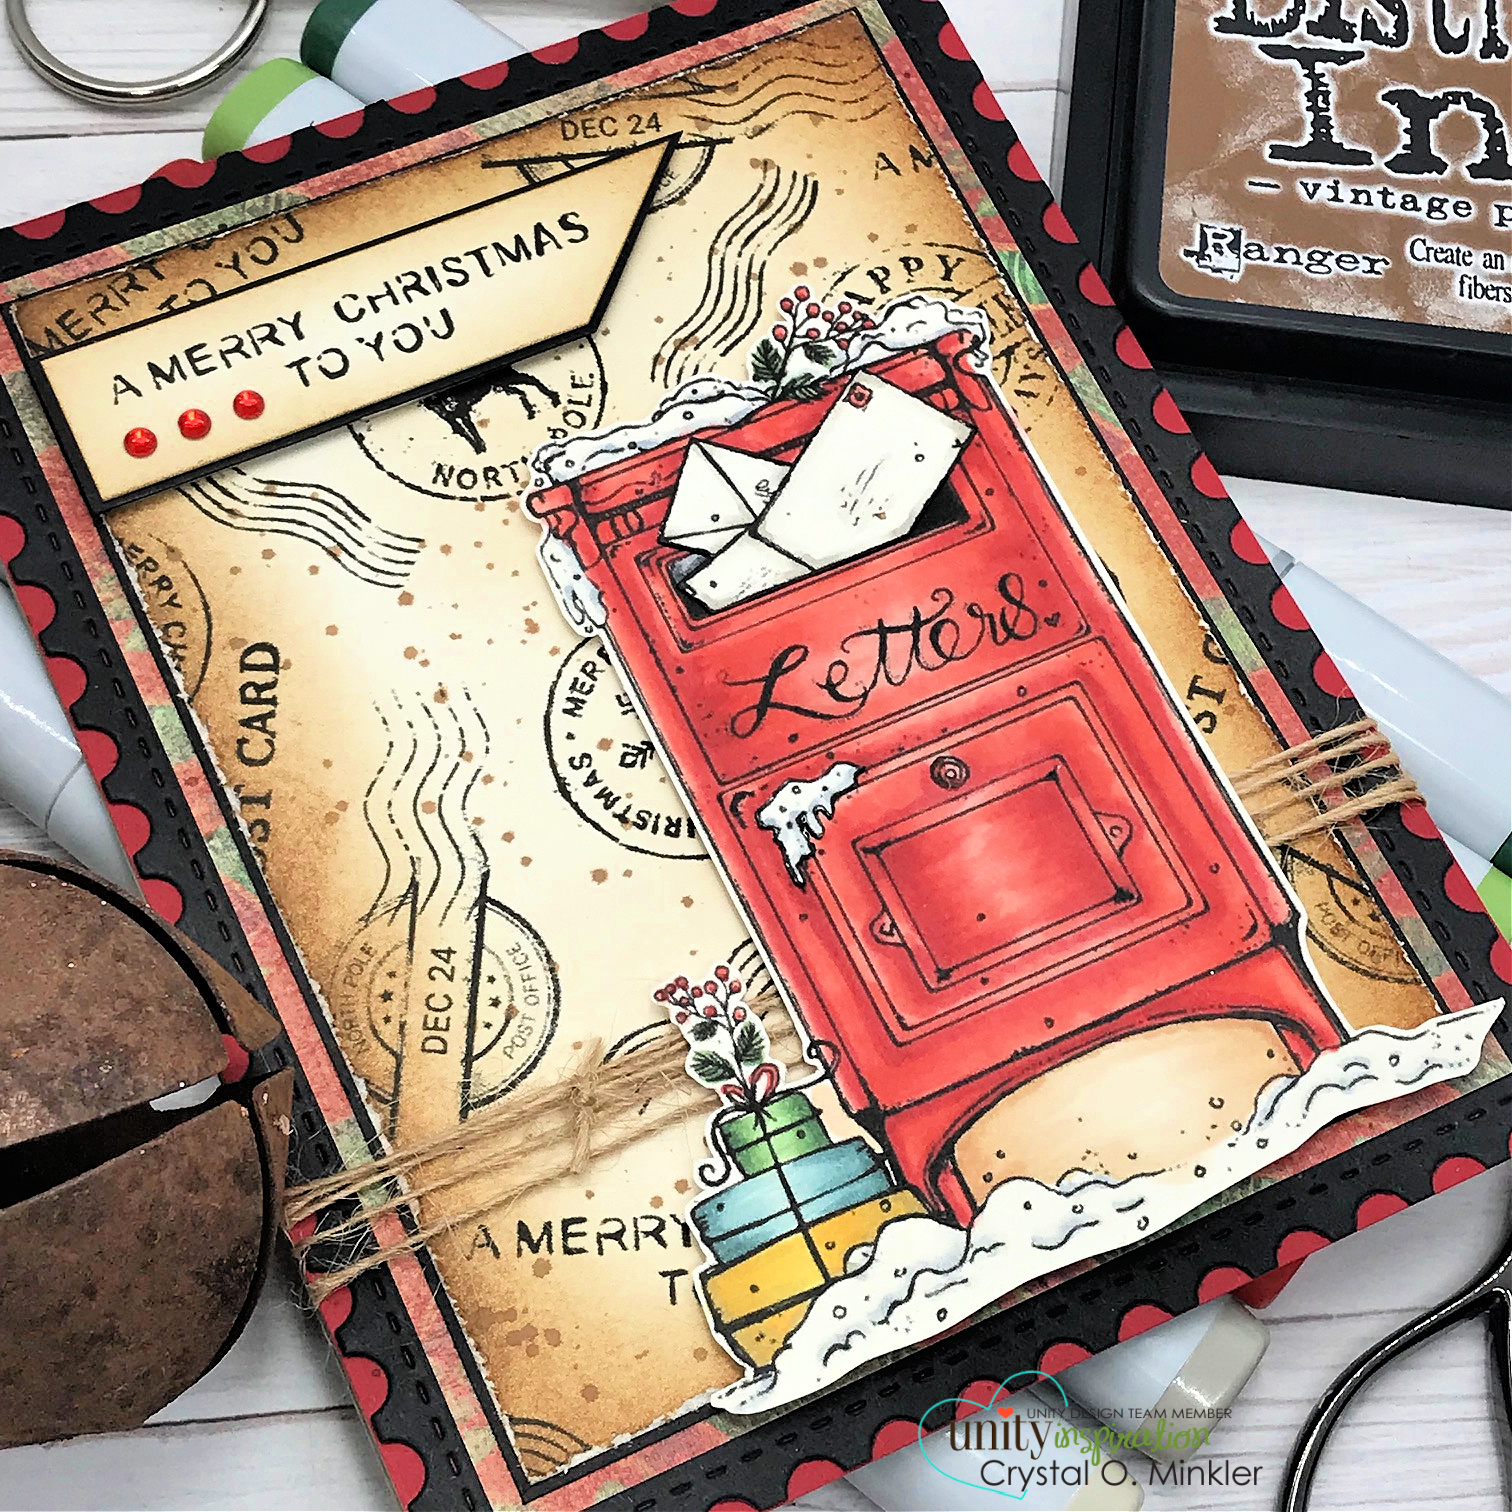
I stamped the girl and sentiment from the beautiful new Echo of Kindness stamps using Black Amalgam ink from Gina K Designs onto Stampers Select White Card Stock from Papertrey Ink. I colored up the girl with my Copic markers. I die cut the girl with a die from the Stacked Baroque die set from Tim Holtz and Sizzix. I added these cool dies to my stash awhile ago and just found them in the wrong place... lol! So I thought I'd use them for this card. Aren't they perfect with this sketch? I also die cut a piece of True Black card stock from Papertrey Ink using the slightly larger die from the same die set.


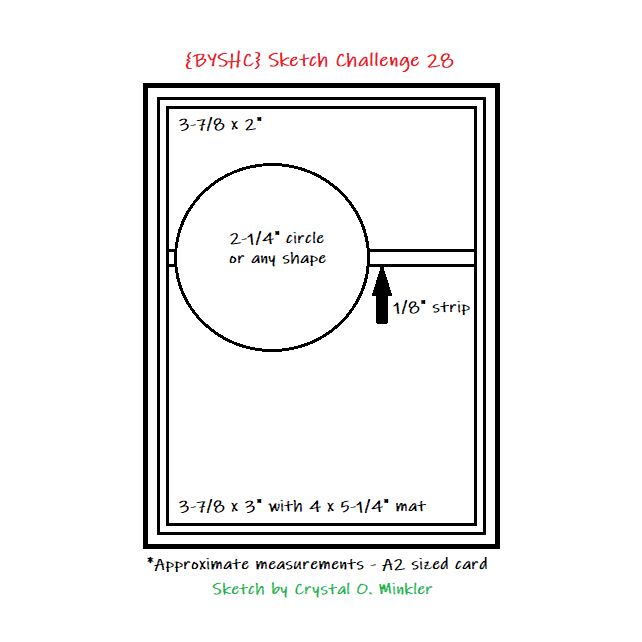
I trimmed the four pattern papers from the gorgeous Enveloped in Love {paper pack} from Unity to 4 x 5-1/4" and then I used a ruler and pencil to cut my angles. I basically did the same measurements and cuts that I used in this video... Cutting & Assembling Papers for {BYSHC} Sketch 29. I then adhered the papers to a True Black card front measuring 4-1/4 x 5-1/2". And as I often do, I adhered the panel to a Stampers Select White Card Stock A2 top fold card base.

Here's a quick list of the Copic markers I used:

Skin: E000, E00, E11
Hair: E70, E71, E74, E77
Dress / Hair Tie: R000, R11, R32, R43


Inspiration for my card came from the {BYSHC} Sketch 29. It's not just a fabulous sketch for Christmas cards! LOL! This is an absolute favorite of mine! It always makes for a lovely card.


I die cut the sentiment using a die from the Scalloped & Stitched Sentiment Nesting Dies from Unity. I softened the brightness of the white card stock by blending with my brown blending brush. I didn't add any ink to it so it would stay light. I adhered the sentiment to the girl and added foam tape to the back of both. Popped it up on the card for a bit of dimension. I added a few black enamel dots from my stash to finish off the card. I love how this turned out! Hope you have an ink-tastic day! 

Thanks so much for stopping by!
See ya next time.

Inky hugs,
Crystal

{Please note that comment moderation is on. Your lovely comment will appear shortly.}

Tuesday, December 13, 2022

CAS Envelope Card ~ Greetings this Season ~ Unity Stamp Co.

 Hello there crafty friend!
Sharing a quick CAS card... today is the last day for the awesome Year End Clearance Sale over at Unity! As a cardmaker, I really love when stamps feature cardmaking images and an envelope filled with poinsettias is so gorgeous!! I couldn't wait to ink up the gorgeous Greetings this Season stamps!


I created this CAS card simply by running a card front measuring 4-1/4 x 5-1/2" through my Big Shot with the Brickwork 3D Embossing Folder from Sizzix and Tim Holtz. I trimmed it to approximately 4-1/4 x 4-1/8" and adhered it to a white A2 top fold card base.


Here's a quick list of the copic markers I used to color up this gorgeous envelope:

Envelope ~ C00, C2, C3
Poinsettias ~ R20, R14, R27, Y06, Y15, Y28
Pine Needles ~ YG03, YG63
Holly ~ YG11, G24, G46
Berries ~ R20, R14, R27


I fussy cut the envelope leaving a white border. I also trimmed the sentiment. I then popped up both on my card with foam tape. Very CAS and pretty easy to make! Head on over to Unity to check out the Year End Sale!! There's a few new releases and some items are as low as 75% off!! Woohoo!


Thanks so much for stopping by!
See ya next time.

Inky Hugs,
Crystal


{Please note that comment moderation is on. Your lovely comment will appear once approved.}

Thursday, November 24, 2022

Mixed Media Background ~ November Challenge ~ Unity Stamp Co.

 Hello there crafty friend!
Today I'm sharing one last card for the November Build Your Holiday Stash Challenge in the Unity Show & Tell. A beautiful mixed media card featuring the wonderful Good Tidings to You stamp! 


Sometimes it just feels good to get inky... know what I mean?! The mixed media background for this card was so fun to create. A bit of heat embossing, some oxide ink smooshing and I finished it off with dry embossing with an embossing folder.


The background was also die cut with the largest dies from the Scallops & Rectangles {nesting dies}. And then adhered to a kraft A2 top fold card base.


The poinsettia was stamped with Black Amalgam ink and then colored with the following Copic markers:

Poinsettia ~ RV10, RV21, RV14, RV29, Y11, Y15, Y28
Leaves ~ YG11, YG23
Pine Needles ~ YG11, G24, G46
Tiny Leaves ~ YG11, G24


The beautiful sentiment is the recently released Greetings of the Season {die set}. I die cut it from green card stock three times and then once from pink card stock. The 'merry' is three layers of green card stock adhered together and then adhered to the kraft outline die cut. The 'christmas' is two bottom layers of green card stock and then a pink layer on top. Such a fun way to mix it up!

You can check out my video for this card here... Mixed Media Background | November Challenge | Unity Stamp Co.


Have you played along with this month's challenge? If you do be sure to share your cards in the Unity Show & Tell group and also add them to the November challenge album in the group to be entered for a prize!! See you back here next Thursday... I'll be sharing one last card for the Build Your Holiday Stash challenge!

Thanks so much for stopping by!
See ya next time.

Inky Hugs,
Crystal


{Please note that comment moderation is on. Your lovely comment will appear once approved.}

Friday, November 18, 2022

{BYSHC} Sketch Challenge 28 ~ STAMPtember 2020 ~ Tim Holtz & Simon Says Stamp

 Hello there crafty friend!
Today I'm sharing my weekly Christmas card using the {BYSHC} Sketch 28 and I'm pretty excited that I finally inked up one of these snarky kitties. This hilarious kitty is from the STAMPtember 2020 stamp set from Tim Holtz and Simon Says Stamp. I just love him and the sentiment!


I still had the Paper Stash - Christmas papers from Tim Holtz and Idea-ology on my desk so I just used a couple pieces from those papers. Isn't this plaid amazing... or is it flannel with those line details in the pattern?! Well, in either case I love it and it was perfect with this kitty.


I do kind of wish I'd gone with a grey for the cat but I think the orange is a nice contrast. Here's a list of the Copic markers I used:

Kitty ~ YR30, YR21, YR15, YR68, YR24, W00, W3; C00, C3 {eyes}
Lights ~ C00, C3, R20, R14, R37


I die cut kitty with one of the awesome recently released Scallops & Circles {nesting dies} from Unity Stamp Co. I popped up the circle and the heat embossed sentiment with foam tape.


I added drops of Glossy Accents to the lights for some shine. So fun! Well, that's it for me this week. 


Here's a look at {BYSHC} Sketch 28 for the month of November!
I hope you'll join us and play along with the sketch! If you're interested in seeing a bit more inspiration for this sketch, check out the amazing inspiration from the design team over on the {BYSH} Cardmakers blog! Have a wonderful week!


Thanks so much for stopping by!
See ya next time.

Inky hugs,
Crystal


{Please note that comment moderation is ON. Your lovely comment will appear once approved.}

Thursday, November 17, 2022

Copic Colored Vintage Poinsettia ~ November Challenge ~ Unity Stamp Co.

 Hello there crafty friend!
Today I'm sharing inspiration for the November Build Your Holiday Stash Challenge in the Unity Show & Tell. Today I have a card featuring the gorgeous, newly released Vintage Poinsettia stamp from Unity Stamp Co! 


Vintage for me almost always means kraft card stock is required. Copic coloring on kraft gives the image muted tones which I also think has a nice vintage vibe. A bit of distressing around the edges with some Vintage Photo and Ground Espresso Distress ink along with distressed edges from a pair of scissors or a paper distresser completes the vintage look.


To give the card a bit more dimension I stamped two poinsettias. I colored just the middle and smallest part of the flower on the one that was my top layer. And then I colored the biggest bottom part of the flower on the other stamped poinsettia giving the middle petals just a bit of color because the outer edges would be visible once the top layer was popped up with foam tape.


Here's a quick list of the Copic markers I used to color up this beautiful poinsettia on kraft card stock:

Red ~ R20, R14, R37, R59
Green ~ YG11, G24, G46
Yellow ~ Y06, Y15, Y28


I fussy cut both portions of the poinsettia. Cleaned up the edges by coloring them with black marker and popped up my top layer with foam tape. I adhered all my layers onto a kraft A2 top fold card base. And to finish it off, I added some Glitter Gloss Aqua Shimmer to the center of the poinsettia along with a few dots of white gel pen.

You can check out my video for this card here... Copic Colored Vintage Poinsettia | November Challenge | Unity Stamp Co.


Have you played along with this month's challenge? If you do be sure to share your cards in the Unity Show & Tell group and also add them to the November challenge album in the group to be entered for a prize!! See you back here next Thursday... I'll be sharing one last card for the Build Your Holiday Stash challenge!


Thanks so much for stopping by!
See ya next time.
 
Inky Hugs,
Crystal


{Please note that comment moderation is on. Your lovely comment will appear once approved.}

Tuesday, September 27, 2022

Snail Mail Vintage Style Card ~ Making Spirits Bright with Christmas Express ~ Unity Stamp Co.

 Hello there crafty friend!
I don't know about you but as a cardmaker there's just something about postage style stamps and envelopes and mailboxes! I just adore them and love to use them in my cards! I especially love when they are Christmas themed and Unity just released two stamps... Making Spirits Bright and Christmas Express!! Both are a Must Have!!! Oh my gosh! 


The Christmas Express stamps just scream to be part of a background... I used a bunch of the stamps to create my background. This could easily be a full sheet that you could cut into four card fronts and make multiple cards from!


I went with a vintage style card which was easy to achieve with just a bit of distressing with some Vintage Photo Distress ink and the Paper Distressing tool from Tim Holtz to rough up the edges. I also added a bit of splatter with the Vintage Photo Distress ink. I mat that background layer with a slightly larger piece of True Black card stock. Under that is a layer of pretty pattern paper from the Old World Winter paper pack from The Paper Studio... it adds a bit more color and interest to the card. I die cut a piece of True Black card stock from Papertrey Ink with the Postage Stamp {nesting die} from Unity and adhered my layers on top of that. For my last layer I kept going back and forth between red and kraft... but with the mailbox being red I think the Pure Poppy card stock {Papertrey Ink} really helped to make the mailbox pop on the card.  


I wrapped the layers five times with {Natural} May Arts Burlap string and tied a little knot to the left. I fussy cut the Copic colored image leaving a skinny white border. I tend to fussy cut a white border when the image has small details that are harder to cut around like the leaves and berries. And I've also found that it helps the image to pop a bit more on the card. To add to the dimension of the image I did use foam tape to pop the mailbox on the card. I stamped the cute sentiment and distressed it with a bit of Vintage Photo Distress ink and mat it with black card stock. I also popped it up on the card with foam tape.


Here's a quick list of the Copic markers I used to color up the mailbox:

Mailbox ~ R20, R14, R27; N2, N5 {slot}
Snow ~ C00, C3
Letters ~ W00, W1, W3
Leaves ~ YG11, G24, G46
Berries ~ R20, R14, R27
Gifts ~ YG11, G24, G46 {green}; BG70, BG72, BG75 {blue}; Y15, Y35, Y28 {yellow}
Under Mailbox {to coordinate with the distressed edges} ~ E30, E31, E33


I'm sharing a new sketch based on my card today in my Tawny Owl Paperie Inky Inspiration Facebook group. It's similar to a sketch I shared a couple months ago but this one has layers and I've added string/twine. If you're liking this sketch, I hope you'll give it a try and share your card or project in the group.


To finish off the card I added a few red rhinestones from the Rainbow Bling rhinestones from Gina Marie Designs. I really like how this turned out! Head over to Unity and check out all the fab new releases... if you love Christmas stamps this release is one that you don't want to miss!! 


Thanks so much for stopping by!
See ya next time.

Inky hugs,
Crystal


{Please note that comment moderation is on. Your lovely comment will appear shortly.}

Friday, May 6, 2022

{BYSHC} Sketch Challenge 22 ~ Christmas Cookies ~ Tim Holtz

 Hello there crafty friend!
I'm back with my weekly Christmas card using the current sketch over at the Build Your Stash Holiday Cardmakers Facebook group and this time I'm using some very neglected Tim Holtz products in my stash. As I've mentioned here and there, I'm still slowly unpacking my studio and I reorganized my pattern papers last week. Woohoo!! Now I know what is where and can find what I need more easily! YAY! I was also tickled pink to find my Tim Holtz Christmas papers! I set them aside to make a future card... while I was cleaning off my desk I found the super cute Christmas Cookies dies from Tim Holtz that my sweet and awesome friend, Robyn, gave me for Christmas. Thanks, Robyn!! It was just natural to use these adorable dies with the papers I had set aside.


First I decided I wanted to use the cute snowflake cookie... so I looked through all the pretty papers in the Tim Holtz 8x8" Christmas Paper Stash paper pad and chose two papers. There's just something about plaid for Christmas!! Love the pretty colors in this plaid paper!! I also chose the snowflakes to kinda coordinate with the snowflake cookie.


I cut my pattern papers and adhered them to a True Black card front measuring 6-1/2 x 3-1/2". I also cut a 1/8" strip of True Black card stock from Papertrey Ink and adhered it over the spot where the two pattern papers meet. I adhered the card front to a 6-1/2 x 7" white card base scored at 3-1/2".


I set the card aside and die cut the snowflake cookie. I die cut the cookie base two times from Crumb Cake card stock from Stampin' Up. I colored around the edge of the cookie base with E35 and then blended it with E51. It made the edge a bit darker than I had wanted but I still used it. I die cut the light blue frosting three times from Soft Sky card stock from Stampin' Up. I colored around the edge with BG000 and BG0000. I die cut the snowflake from Stampers Select white card stock from Papertrey Ink four times. I wanted the snowflake to be raised even more than the frosting. I colored the edge of the snowflake with just a tiny bit of C00 and C2. I ended up adding back some white with a Sakura white gelly roll pen.


I adhered all the layers of the cookie together... it's so cute and looks just like a yummy cookie! LOL!
Now I did plan to add some Glossy Accents to the frosting but totally forgot to do that before I took photos so just imagine it's all glossy and shiny and delicious looking!! The sentiment is a Tim Holtz Idea-ology Christmas Remnant Rubs that I applied over a scrap of True Black card stock. This was basically a sentiment sticker that you peel the back off of and use the little stick and rub it on. I've had these in my stash forever and just now finally used one. It's very easy to use and super cute! I trimmed the sentiment and adhered the left side to the bottom of the snowflake cookie and then popped up both the sentiment and cookie with foam tape. Cute!!


Here's a look at the fun {BYSHC} Sketch 22 for the month of May!
I hope you'll join us and play along with the sketch! If you're interested in seeing a bit more inspiration for this sketch, check out the amazing inspiration from the design team over on the  {BYSH} Cardmakers blog! I'll be back next Friday with my regular weekly Christmas card using this fun sketch!


Thanks so much for stopping by!
See ya next time.

Inky hugs,
Crystal


{Please note that comment moderation is ON. Your lovely comment will appear shortly.}