Showing posts with label poinsettia. Show all posts

Saturday, August 2, 2025

~ Friends of Unity August 2025 Blog Hop ~

Hello there crafty friend!
It's time for our Friends of Unity Blog Hop!! This month's cue is a lot of fun! 


Technique is such a broad scope for a cue... it took me a while to figure out what I wanted to make. I decided to play with my Distress Crayons again. It's been awhile.


I masked my 4-1/4 x 5-1/2" panels with iCraft Removable Pixie Tape from Therm O Web. And then I colored the masked off area with three distress crayons. For my first card, I chose Fossilized Amber, Mustard Seed, and Spiced Marmalade. I used a baby wipe to blend those colors and then removed the tape. I swiped my white pigment ink pad across the raised part just to add a touch of white.


I wanted to add some texture to my panels so I ran this one through my Big Shot with the Dot Matrix embossing folder from Tim Holtz/Sizzix. I paired up this fun background with an adorable bee from the  July 2025 Uniquely Unity Bee-Hold stamps. The die cut hexagons are cut out using the Hexagon Frames from Newton's Nook Designs.

Copic markers used: Y11, Y15, B000, C0, C2


I masked off my second panel at a diagonal. For this one I used Picked Raspberry, Spun Sugar, and Kitsch Flamingo distress crayons. I blended them with a baby wipe and then ran this one through my Big Shot with the Tattered Poinsettia embossing folder also from Tim Holtz/Sizzix.


I paired up my second panel with the beautiful Seasons of Life stamp. The sentiment is from Deck the Halls. I fussy cut the girl and adhered her and the sentiment to the card.

Copic markers used for this card:
Skin: E000, E00, E11
Hair: Y11, E43, E44
Hat / Scarf / Mittens: G000, G82, C0, C2
Coat: E21, E33, E25, R20, R22


I've kinda been on a roll with the Christmas cards so... I made another! For this one I masked the paper horizontally and I used Peacock Feathers, Salvaged Patina, and Mermaid Lagoon distress crayons. And I used a snowflake embossing folder that I believe is Tim Holtz but there's no brand name on it so I'm not sure.


I paired up this fun wintry background with the awesome Sending Christmas Smiles stamps. I adore this snowman! I fussy cut him and adhered him to the card. 

Here's a quick list of the Copic markers I used:
Snowman: C0, C2
Nose: Y11, YR20, YR15, YR68
Arm: E00, E59
Hat: N2, N4, N6
Scarf / Hat Band: R20, R14, R27

Now before we get to the hopping, I chose a lucky winner from the comments on last month's hop to win a fun prize and the lucky winner is...


... Becca Yahrling!! Congratulations, Becca!!
Please email me at crystalominkler@gmail.com to claim your prize. 
Please claim the prize before September 3rd, 2025. 

Well, that's it for me this time! It's a short hop this month with just six of us sharing our makes. Be sure to hop along and enjoy some more inspiration! I can't wait to see how our friends were inspired by this month's cue. I will be doing another fun giveaway this month!! Be sure to hop along and comment for a chance to win. {When you comment please leave your name just in case it posts as anonymous.} I'll announce the winner next month! 


Let's get to the hopping...

Crystal <--- you're here

up next ---> Jenni


Dawn


Thanks so very much for supporting our little hop!
We appreciate you so much!!

Inky Hugs,
Crystal


Tuesday, July 22, 2025

Christmas in July 2025 {BYSHC} Linky Party ~ Tawny Owl Paperie Inky Inspiration Sketch 34 ~ Poinsettia Die ~ Jaded Blossom

 Hello there crafty friend!
It's day 5 of the Christmas in July 2025 {BYSHC} Linky Party!! I'm adding another sweet card to my Christmas stash! This time I played with the wonderful Poinsettia Die from Sponsor Jaded Blossom. I'm also sharing inspiration for the Tawny Owl Paperie Inky Inspiration Sketch Challenge 34 in the Tawny Owl Paperie Inky Inspiration Facebook group. 


I die cut my poinsettia pieces from the Sparkling Christmas Wishes 6x6 Paper Pad from our Sponsor Not 2 Shabby! Love these pretty papers! I adhered all of my pieces together using the iCraft UltraBond Adhesive from Sponsor Therm O Web. 


Here's a look at the fun sketch for Tawny Owl Paperie Inky Inspiration Sketch Challenge 34. The sketch, as always, is meant to inspire not require. So let the sketch lead in your design, but don't feel limited by it.


My strips of dry embossed kraft card stock can be seen a bit better in this photo. I ran scraps of kraft card stock through my Big Shot with the retired Know the Ropes Embossing Folder from Sponsor Taylored Expressions. Trimmed them up and adhered them for a CAS design. I love the texture it adds to the card.


The wonderful sentiment from the Winter Cardinal stamp set from Sponsor Pink & Main is heat embossed, trimmed and adhered directly to the card. I finished off the card with one White Glossy Card Bling from Sponsor A Colorful Life Designs in the center of the poinsettia. I just love how this card turned out!


If you haven't already, stop by the Christmas in July 2025 {BYSHC} Linky Party to check out all the wonderful Holiday inspiration being shared!! So much amazing inspiration! You can't help but be inspired to make a card or two! Have an ink-tastic week!

Thanks so much for stopping by!

Inky Hugs,
Crystal

Friday, November 8, 2024

Merriest Season of All ~ Poinsettia Comfort ~ Unity Stamp Co.

Hello there crafty friend! 
I'm back with a second card today! I'm sharing a pretty CAS holiday card for the Brown Thursday Instagram Hop that the Unity Design Team is having in celebration of Brown Thursday! Head over to IG and check it out... there's prizes!!


The beautiful Poinsettia Comfort stamp is stamped with Black Amalgam ink from Gina K. Designs. I colored it up with my Copic markers.

Here's a quick list of the Copic markers I used:
Pink: RV10, RV11, Colorless Blender
Green: G0000, G00, G12
Yellow: Y11, Y15
Outline: C00, C1


I paired up poinsettia with the pretty Getting Cozy {paper pack}. You may be wondering... the papers in that pack are white, aren't they?! Yes, they are! I colored the edge of the pattern paper with the RV11 Copic marker. 


The poinsettia panel is die cut using the largest die from the Postage Stamp {nesting dies}. All my layers are adhered to a white A2 top fold card base that's turned on the side for a landscape card. Well, that's it for me today! I hope you have a wonderful day!

Thanks so much for stopping by!
See ya next time.

Inky hugs,
Crystal

{Please note that comment moderation is on. Your lovely comment will appear shortly.}

Wednesday, September 11, 2024

Membership Wednesday ~ September 2024 KOM Wander and Wonder ~ Unity Stamp Co.

  Hello there crafty friend!
Today I'm sharing a vintage style holiday card featuring the awesome poinsettia stamp from the September 2024 Kit of the Month membership from Unity called Wander and Wonder. I love to color poinsettias!! And I was so excited to find the background piece in my stash of 'maybe later' panels.


I started this card by stamping the lovely poinsettia and sentiment on white card stock with Black Amalgam ink. I then Copic colored the beautiful poinsettia. I actually recorded my coloring for this one and have a short video sharing that with you all {below}. 

Here's a quick list of the Copic markers I used:
Pinks: RV0000, RV00, RV10, RV11, RV14
Greens: YG11, G24, G46
Yellows: YG21, Y15, Y35


Once I was happy with my coloring I fussy cut the poinsettia on the line and distressed the edges just a bit with Vintage Photo Distress Ink. I trimmed the sentiment and then distressed it a bit with the same blending brush. I wanted to keep it light so I didn't add any more ink to the brush.


 I set aside the poinsettia and looked through my background panels that didn't work out for another project and went into my 'maybe later' container. I found a kraft panel from last year that I had blended over the Burlap Stencil using the Tsukineko's Champagne ink, both from the October 2023 Whit Kit. It was perfect for my card! I ink smooshed the panel with some Kitsch Flamingo and Vintage Photo Distress Inks. I then die cut the panel using the largest die from the Deckle & Stitches Nesting Dies from Unity. I distressed the edges of the panel using Vintage Photo Distress Ink and then splattered the panel with some watered down Ground Espresso Distress Ink. I adhered the sentiment to the poinsettia and then added a bunch of foam tape to the back of both and popped them up on the card.
 

Here's a quick look at this month's Kit of the Month membership! So in love with this month's KOM!!

Well, that's it for me today! I hope you've been inspired to play with your membership stamps! 
Hope you have an inkredible day!


Thanks so much for stopping by!
See ya next time.

Inky Hugs,
Crystal


{Please note that comment moderation is on. Your lovely comment will appear once approved.}

Wednesday, July 24, 2024

Christmas in July 2024 {BYSHC} Linky Party ~ Sketched Poinsettia ~ Waffle Flower

 Hello there crafty friend!
I couldn't help myself I'm back again today to share another card I made for the Christmas in July 2024 {BYSHC} Linky Party! I've been so inspired by the cards shared over at the Linky Party... I just HAD to make another card! 


I stamped the beautiful poinsettia from the Sketched Poinsettia Stamp Set from our lovely Sponsor Waffle Flower. I used the awesome Sketched Poinsettia Coloring Stencil to color the beautiful poinsettia. I blended Candied Apple and Fired Brick for the leaves; Mustard Seed and Spiced Marmalade with a touch of Vintage Photo for the center of the flower; and Twisted Citron, Pine Needles and Crushed Olive Distress Oxide inks.


I'm also playing along with the Color Hues Challenge today! Red and Green are so perfect for a Christmas card! This fun challenge is open until July 29th, if you want to play along! 


 I die cut the poinsettia using the Sketched Poinsettia Matching Die and set it aside. I stamped the sentiment from the Sketched Poinsettia Stamp Set using Memento Tuxedo Black ink. And then die cut it using the coordinating die. I used the fabulous Pressure Pal from our awesome Sponsor Twiddler's Nook when I stamped the poinsettia and the sentiment in my mini misti.


The fun background was created with iCraft Easy-Tear 1/4" Tape and Deco Foil Color Harmony Transfer Foil Multi-Pack, Shades of Green from our awesome Sponsor Therm O Web. I laid stripes of the tape across a 4-1/4 x 5-1/2" piece of white card stock. And then I laid a piece of Electric Lime foil over the tape with the shiny green facing up. No need for a laminator for these fabulous foils! I just used my bone folder to press the foil into the tape. I went over the whole panel a couple of times from both directions and pulled up the foil. It was perfect! I love it! 


I die cut the foiled background using the Frayed Edge Stacklets dies from Sponsor Taylored Expressions. I adhered the poinsettia and sentiment to the foiled panel using iCraft UltraBond Adhesive from Therm O Web. And then I popped up the whole panel onto a white A2 top fold card base using iCraft 3D Foam Tape Jumbo Roll (white) also from Therm O Web. Such a quick and fun card to make!


I hope you'll stop by the Christmas in July 2024 {BYSHC} Linky Party to check out all the wonderful Holiday inspiration being shared! It's all been so awesome! I sure hope you'll stop by and check it out! Have an ink-tastic day!


Thanks so much for stopping by!
See ya next time.

Inky Hugs,
Crystal


{Please note that comment moderation is ON. Your comment will appear shortly.}

Monday, December 11, 2023

Advent Calendar Day 11 ~ Unity Stamp Co.

Hello there crafty friend!
It's Day 11 of the 2023 Advent Calendar from Unity!! I'm revealing the Advent Calendar stamp on my YouTube channel each day and also have a short blog post. Did you get the Advent Calendar? Which is your favorite stamp so far? Today's stamp is so beautiful... it may just be my favorite one yet!


A beautiful poinsettia stamp is the next Advent Calendar stamp! I stamped the poinsettia on white card stock using Black Amalgam ink and colored it using just a few Copic markers: Y15, Y38, R20, R14, R46. I adhered it to a fun circle I die cut using a die from the Scallops & Circles {nesting dies}.


Inspiration for today's card comes from the {BYSHC} Sketch Challenge 25. My pattern paper strips are a bit wider at 1-1/2" and the die cut circle is approximately 2-1/4".  I kinda wish I had used the smallest die from the Scallops & Circles {nesting dies}.


I paired today's Advent Calendar stamp with two fabulous pattern papers... the gorgeous Festive Christmas {paper pack} and the equally beautiful Getting Cozy {paper pack}. Such beautiful papers and I think they look so nice together!!


I stamped the sentiment from the Winter Cheer and Deer stamps with Pure Poppy ink from Papertrey Ink. Trimmed it up and adhered it directly to the circle that I popped up with foam tape.

You can check out my video revealing the Advent Calendar Day 11 stamp and my process in making this card here... Advent Calendar Day 11 | Unity Stamp Co.


Advent Calendars are still available if you didn't order one yet. I'll be back tomorrow for Day 12 of the 2023 Advent Calendar from Unity! Have an ink-tastic day!


Thanks so much for stopping by!
See ya next time.
 
Inky Hugs,
Crystal


{Please note that comment moderation is on. Your lovely comment will appear once approved.}

Wednesday, November 29, 2023

Membership Wednesday ~ November 2023 Whit Kit Merry Everything Poinsettia ~ Unity Stamp Co.

 Hello there crafty friend!
I'm back with one more card featuring the gorgeous November 2023 Whit Kit called Merry Everything Poinsettia from Unity! Pretty sure I mentioned this last time but I have to repeat myself... this kit is Gorgeous!


I played a bit with the papers, stamps and the embossing folder!! All so fun! I trimmed a piece of the red snowflake paper down to 4-1/4 x 5-1/2" and then I placed it in the embossing folder and ran it through my Big Shot. I then die cut the paper using the second largest die from the Scallops & Rectangles {nesting dies}. I mat it with a slightly larger piece of gold foil paper from Stampin' Up measuring 3-3/4 x 5". I also cut a little 1/8" strip and adhered that across the paper.


I adhered the panel to a 4-1/4 x 5-1/2" piece of the plaid pattern paper from the kit. I then adhered the entire panel to a white A2 top fold card base measuring 4-1/4 x 11"; scored at 5-1/2". I set the card aside and stamped the solid poinsettia using Candied Apple Distress Oxide on white card stock. I then ink thumped the edges using the Lumberjack Plaid Distress Oxide ink. If you're not familiar with ink thumping, I shared this technique for Technique Tuesday. You can check out the video for that here... Ink Cube Thumping Technique. I used oxides this time but it's the same technique. 


I used an acetate grid to place the loopy flower just where I wanted it. I applied some anti-static powder over the dried red poinsettia and then stamped it with Wow Clear Embossing Ink. I applied some gold embossing powder from my stash. It's from Stampin' Up... I think it's called Gold Glory. I don't know. It's been in my stash for years! I melted the ep with my heat tool and fussy cut the poinsettia. The white in the background was too white so I distressed the edges of the poinsettia with Vintage Photo Distress Ink. I stamped the sentiments with the same technique except on Vintage Cream card stock from Papertrey Ink. It coordinates perfectly with the coloring I added using Vintage Photo on the poinsettia. I trimmed up the sentiments and adhered them to the card. To finish it up, I added foam tape to the back of the poinsettia and popped it up on the card.


Here's a look at the wonderful Whit Kit for November!! It's such a gorgeous kit! I've had so much fun playing with it! That's it for me today! Next week I'll be sharing a card featuring the awesome new December 2023 Whit Kit on my Instagram. You'll probably be surprised to hear that it's another beautiful kit! LOL! I'll be back here on the blog in two weeks with inspiration for one of the fab December memberships. Not quite sure at this point which one I want to play with first. {Of course, they are ALL amazing!!} Until then, have an ink-tastic day!

Thanks so much for stopping by!
See ya next time.

Inky Hugs,
Crystal


{Please note that comment moderation is on. Your lovely comment will appear once approved.}

Saturday, December 3, 2022

~ Friends of Unity December 2022 Blog Hop ~

 Hello there crafty friend!
It's the first Saturday of December and you know what that means... it's time for our Friends of Unity Blog Hop!! But today is not just a regular monthly blog hop... it's our 5th Anniversary of hopping!! Can you believe that?! 5 years has gone by so fast!! We've shared so many wonderful cards and projects over the last 5 years and added so many new friends!! I'm so grateful to my friends that help make this hop amazing each month and I'm also very grateful to the friends that come and hop along with us. All your love and comments each month mean so much to us. We appreciate you all!! I'll try to keep my blog as short and sweet as possible but be sure to read to the end because there's an amazing giveaway you don't want to miss out on. First, let's get to the cue...


... Glitter & Glitz!! The perfect cue for a 5th anniversary celebration!! I had fun with this cue!


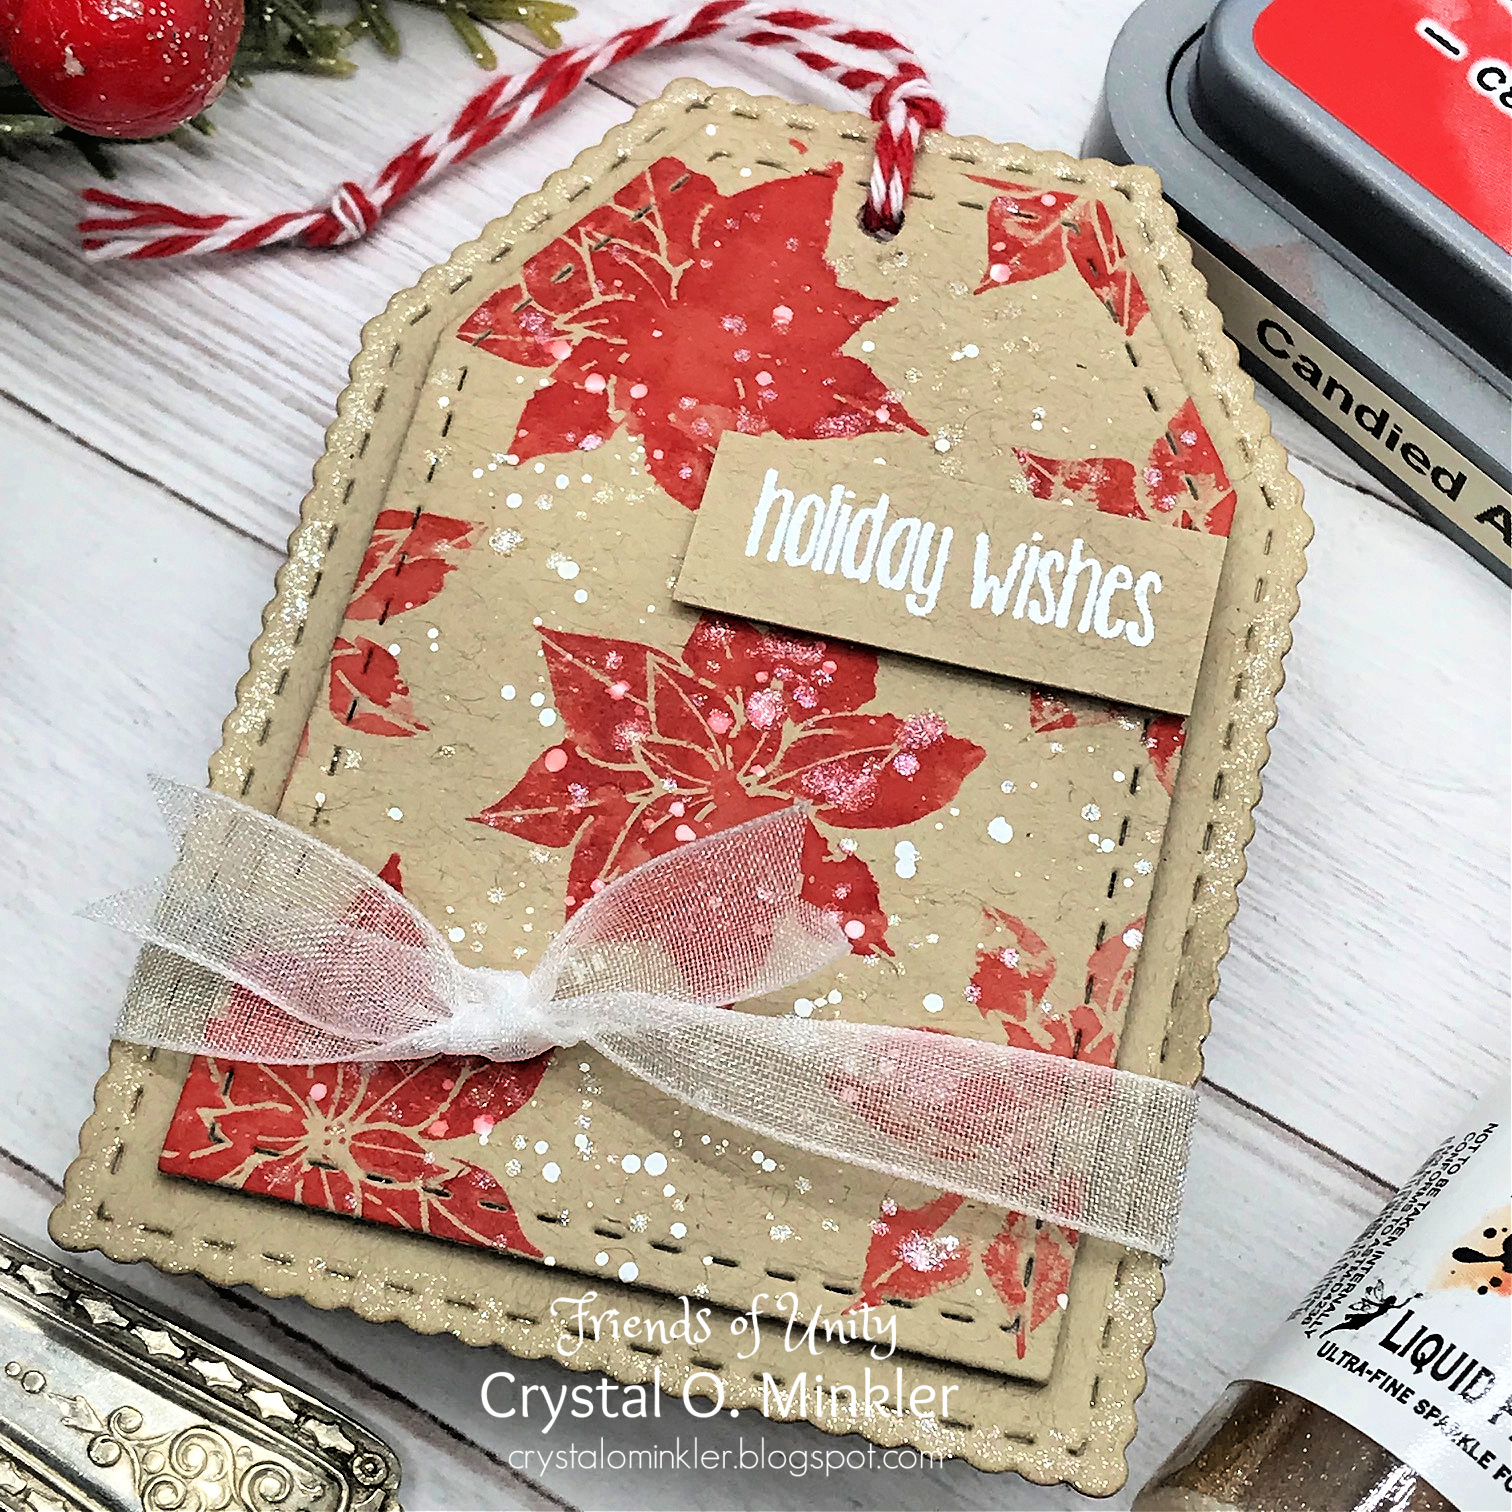
My first project is a cute tag using the Advent Calendar Day 3 stamp!! How sweet is this beautiful poinsettia! I just love it! Did you get the Advent Calendar? It's so fun opening each little door... I just love it! There's still some in stock... just saying!!!


I inked up the stamp with Candied Apple Distress Oxide ink, spritzed it with a bit of water and stamped it on a piece of Kraft card stock that I had die cut with the smallest tag die from the Make a Tag die set {looks like it's currently out of stock}. I did a mix of first and second generation stamping - which basically means that I inked up my stamp and stamped directly on the paper {first generation stamping} and without reinking the stamp, I stamped it again leaving a lighter impression of the stamp {second generation stamping}.


I used my heat tool to dry the tag. I added a bunch of white acrylic paint splatters. And then I went nuts with some Liquid Pixie Dust splatters. Just two drops on my palette with a spritz of water went a loooong way!! It's so gorgeous in person... I think you can see some of the shine on that center poinsettia. I had some of the Liquid Pixie Dust left over so I brushed some along the edge of the larger tag. I popped the smaller tag up on the larger tag with some foam tape, tied an organdy ribbon around it and cut fish tails on the ends. And then I stamped the sentiment from the Poinsettia Wishes Itty Bitty stamp... I masked it and only partially stamped the sentiment with Sugar Cube pigment ink and then heat embossed Alabaster White Embossing powder. I trimmed it and then popped it up on the tag, too. To finish off the tag, I punched a hole in the top with my Crop-a-Dile and added some twine. So pretty!


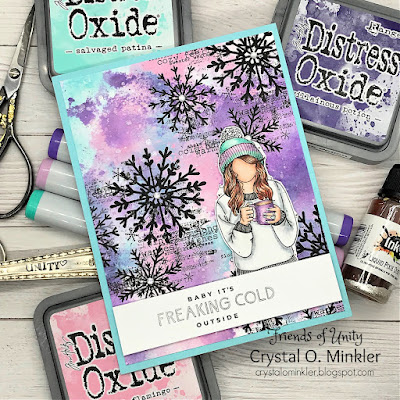
My second project is a card I made using a couple new releases from the Cyber Week Sale!! Have you guys been enjoying all the releases for Brown Thursday/Black Friday and Cyber Week?! OMG!! SO many new and amazing stamps! I want them ALL!! LOL Anywho, for this card I ink smooshed Kitsch Flamingo, Salvaged Patina and Villainous Potion Distress Oxide inks on Stampers Select White card stock from Papertrey Ink. I dried my background completely with a heat tool. I then stamped the gorgeous new snowflake clusters from the December 2022 Sentiment Kit called Shake Your Flakes with Ranger Jet Black Archival ink. And then I went nuts splattering it with some Liquid Pixie Dust. I love this stuff!!! 


I set the background aside to dry and stamped the beautiful new Angie Girl and sentiment from the Freaking Cold stamps with Black Amalgam ink from Gina K. Designs. I colored the girl up with the following Copic Markers:

Skin ~ E000, E00, E11, E04
Hair ~ E95, E97, E08, E09
Sweater ~ C00, C2, C3
Hat ~ BG0000, BG10, BG23, BG34, BG13, V000, V12, V17, C2, C3
Mug ~V000, V12, V15, V17, E21, E27
Rings / Nails ~ BG0000, BG23, BG34, C3


I fussy cut the girl leaving some of the dots and hearts around the outline. I trimmed up the sentiment so it would fit across the background. It measures about 7/8 x 4". I then adhered the bottom portion of the girl to the sentiment. I added lots of foam tape to the back of both and set them aside.


I trimmed the background to 4 x 5-1/4" and adhered it to a card front of Cool Caribbean card stock from Stampin' Up. I then adhered the panel to a white A2 top fold card base. I removed the backing from the foam tape and popped up the sentiment and girl on the card. And to finish it off I added five rhinestones to the centers of the snowflakes. I love using purples and blues for winter cards and I think it really works with this sentiment. Doesn't she look cold?! LOL

To celebrate 5 years of hopping with our friends we got to thinking that it would be fun to share our favorite card from the past five years... well, I couldn't pick just one. I had about a dozen saved. I was able to narrow it down to five which I thought was reasonable for a 5 year anniversary. So here are my five favorites in no particular order...


Do you have a favorite card that I've made over the past five years?! I would love to hear which one is your favorite. Be sure to share in the comments which card has been your favorite for a chance to win a fun giveaway. I'll choose one lucky winner for this giveaway and announce the winner next month. 


Now before we get to the hopping, I chose a lucky winner from the comments on last month's hop to win a fun prize package and that lucky winner is...


... Jenni S!! Congratulations, Jenni!!
Please email me at crystalominkler@gmail.com to claim your prize. 
Prize must be claimed within two weeks. 

That's it for my cards this month! AND in addition to the giveaway I mentioned above, I'm having another giveaway!!! Woohoo!! I will be announcing the winner for both my giveaways next month for our January 2023 blog hop!!

Thank you all so much for your continued support of our little hop for these 5 fantastic years!!! I really, truly do appreciate each and every one of your sweet comments! 

A few of my friends are having giveaways on their blogs too, so be sure to hop and comment on each of our blogs!! And now the amazing giveaway that I mentioned at the beginning of my blog post... Angela has generously offered (3) $25 Unity gift cards to giveaway for our 5 year anniversary celebration!!! How amazing is that?! If you'd like a chance to win one of these gift cards be sure to hop and comment on EACH of our blogs... three winners will be randomly chosen from the comments and they could be chosen from any of the blogs participating in the hop, not just mine!! So be sure to hop and comment by December 10th!! The winners for the (3) $25 Unity gift cards will be announced here on my blog and on the Unity Show & Tell Facebook group on December 11th. On a side note, as you hop along and comment, I wanted to recommend using Google Chrome as your browser. We've been having issues for awhile now with some hoppers only being able to comment as Anonymous and if you use Google Chrome you should be able to log in and comment as you hop. If you're still only able to comment as anonymous PLEASE add your name to the comment. I will only choose winners with a name included if not signed in with a google account. I hope this helps some of you. I know that it's been very frustrating!


Let's get to the hopping...


Crystal <--- you're here

up next ---> Eileen


Thanks so very much for supporting our little hop!
We appreciate you!!

See ya next time.

Inky Hugs,
Crystal


{Please note that comment moderation is ON. Your comment will appear shortly.}