Showing posts with label #foiling. Show all posts

Wednesday, July 24, 2024

Christmas in July 2024 {BYSHC} Linky Party ~ Sketched Poinsettia ~ Waffle Flower

 Hello there crafty friend!
I couldn't help myself I'm back again today to share another card I made for the Christmas in July 2024 {BYSHC} Linky Party! I've been so inspired by the cards shared over at the Linky Party... I just HAD to make another card! 


I stamped the beautiful poinsettia from the Sketched Poinsettia Stamp Set from our lovely Sponsor Waffle Flower. I used the awesome Sketched Poinsettia Coloring Stencil to color the beautiful poinsettia. I blended Candied Apple and Fired Brick for the leaves; Mustard Seed and Spiced Marmalade with a touch of Vintage Photo for the center of the flower; and Twisted Citron, Pine Needles and Crushed Olive Distress Oxide inks.


I'm also playing along with the Color Hues Challenge today! Red and Green are so perfect for a Christmas card! This fun challenge is open until July 29th, if you want to play along! 


 I die cut the poinsettia using the Sketched Poinsettia Matching Die and set it aside. I stamped the sentiment from the Sketched Poinsettia Stamp Set using Memento Tuxedo Black ink. And then die cut it using the coordinating die. I used the fabulous Pressure Pal from our awesome Sponsor Twiddler's Nook when I stamped the poinsettia and the sentiment in my mini misti.


The fun background was created with iCraft Easy-Tear 1/4" Tape and Deco Foil Color Harmony Transfer Foil Multi-Pack, Shades of Green from our awesome Sponsor Therm O Web. I laid stripes of the tape across a 4-1/4 x 5-1/2" piece of white card stock. And then I laid a piece of Electric Lime foil over the tape with the shiny green facing up. No need for a laminator for these fabulous foils! I just used my bone folder to press the foil into the tape. I went over the whole panel a couple of times from both directions and pulled up the foil. It was perfect! I love it! 


I die cut the foiled background using the Frayed Edge Stacklets dies from Sponsor Taylored Expressions. I adhered the poinsettia and sentiment to the foiled panel using iCraft UltraBond Adhesive from Therm O Web. And then I popped up the whole panel onto a white A2 top fold card base using iCraft 3D Foam Tape Jumbo Roll (white) also from Therm O Web. Such a quick and fun card to make!


I hope you'll stop by the Christmas in July 2024 {BYSHC} Linky Party to check out all the wonderful Holiday inspiration being shared! It's all been so awesome! I sure hope you'll stop by and check it out! Have an ink-tastic day!


Thanks so much for stopping by!
See ya next time.

Inky Hugs,
Crystal


{Please note that comment moderation is ON. Your comment will appear shortly.}

Sunday, July 21, 2024

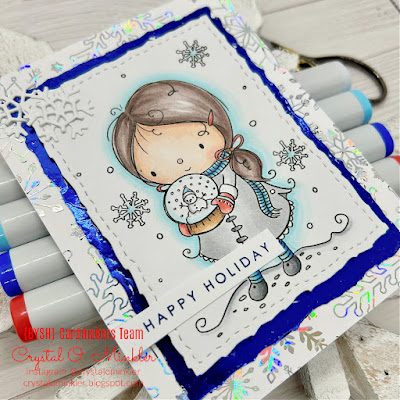
Christmas in July 2024 {BYSHC} Linky Party ~ Snowglobe Christmas ~ RAM Stamps

 Hello there crafty friend!
It's day 3 of the Christmas in July 2024 {BYSHC} Linky Party!! I'm excited to share another sweet card that I've made to add to my Christmas stash! This time I played with the adorable Snowglobe Christmas Digital Stamp from our fabulous Sponsor RAM Stamps. Such a sweet and adorable digital stamp!


I really enjoyed coloring the adorable Snowglobe Christmas Digital Stamp up with my Copic markers. I used neutrals and blues to coordinate with my blue and silver background. If you visited yesterday and saw my Day 2 card, this is one of the other digital images I printed off. I like to have three or four digital images on a sheet before I print it off. This way I'm less likely to waste card stock. Once I was happy with my coloring, I die cut the panel using a die from the Deckle & Stitches Nesting Die Set from our lovely Sponsor Unity Stamp Co.

Here's a quick list of the Copic markers I used:
Skin: E000, E00, E11
Hair: E70, E71, E74, E77
Hair Clip / Ribbon: R20, R14
Scarf / Tights: B000, B00, B02, B04, B28
Coat: C00, C1, C3, N0, N1, N2, N3, N4, N6
Gloves: R20, R14, B000, B02
Shoes: N0, N2, N4, N6
Snowglobe: C00, C1, C3, B0000, B000, G24, E51, E55, E57
Snow: N0, N1, N3
Snowflakes: B0000, B000
Outline: B0000, B000, B00


I used a retired Deco Foil Toner Card Front called Snow Many Flakes by Unity and Therm O Web for my snowflake layer. I trimmed a piece of Silver Shattered Glass Deco Foil Transfer Sheet and laid it on top of the card front foil facing up. I ran it through my laminator after it was heated up a few minutes after the green light came on. I've found my laminator does better if it has those extra couple of minutes. Such a quick and easy background it created! And beautiful! Love these foils! For my blue layer I wanted to try something a little different. I wanted some texture on my foil so I die cut a piece of white card stock using the slightly larger die from the one I used for the main panel. And then I applied some Deco Foil Transfer Gel Duo with a palette knife along the edges of the die cut card stock. I didn't apply it evenly. I left bumps and layers in the transfer medium to give texture to the foils. I let the transfer medium dry and placed a piece of Deep Blue Deco Foil Transfer Sheet over the tacky panel and ran it through my laminator since it was on. I could have ran it through my Big Shot to apply the foil since the Deco Foil Transfer Gel Duo works both ways.


All of my layers and the die cut snowflakes are adhered using iCraft UltraBond Adhesive from Sponsor Therm O Web. I used the Sizzix Sidekick Side-Order Winter Set from Tim Holtz for the snowflakes. They were in my stash of precut die pieces... so handy! I added foam tape called iCraft 3D Foam Tape Jumbo Roll (white), also from Therm O Web, to the back of the main panel and popped it up on the card. I stamped the Happy Holiday sentiment from the Wishing You Mini stamp set from our wonderful Sponsor Gina K. Designs. I inked it up using Chipped Sapphire Distress Ink on white card stock. Trimmed up the sentiment, added a small piece of foam tape to the left end and then glued the rest of the sentiment to the card. For one final touch on the card, I added some glittery goodness to the snowglobe using a Nuvo Glitter Gloss Aqua Shimmer pen. I wish it showed up in the photos... it's really pretty in person!


If you haven't already, stop by the Christmas in July 2024 {BYSHC} Linky Party to check out all the wonderful Holiday inspiration being shared!! I have so many wonderful ideas for future cards! So inspiring! I hope you have an ink-redible day!


Thanks so much for stopping by!
See ya next time.

Inky Hugs,
Crystal


{Please note that comment moderation is ON. Your comment will appear shortly.}