Showing posts with label #decofoil. Show all posts

Wednesday, July 24, 2024

Christmas in July 2024 {BYSHC} Linky Party ~ Sketched Poinsettia ~ Waffle Flower

 Hello there crafty friend!
I couldn't help myself I'm back again today to share another card I made for the Christmas in July 2024 {BYSHC} Linky Party! I've been so inspired by the cards shared over at the Linky Party... I just HAD to make another card! 


I stamped the beautiful poinsettia from the Sketched Poinsettia Stamp Set from our lovely Sponsor Waffle Flower. I used the awesome Sketched Poinsettia Coloring Stencil to color the beautiful poinsettia. I blended Candied Apple and Fired Brick for the leaves; Mustard Seed and Spiced Marmalade with a touch of Vintage Photo for the center of the flower; and Twisted Citron, Pine Needles and Crushed Olive Distress Oxide inks.


I'm also playing along with the Color Hues Challenge today! Red and Green are so perfect for a Christmas card! This fun challenge is open until July 29th, if you want to play along! 


 I die cut the poinsettia using the Sketched Poinsettia Matching Die and set it aside. I stamped the sentiment from the Sketched Poinsettia Stamp Set using Memento Tuxedo Black ink. And then die cut it using the coordinating die. I used the fabulous Pressure Pal from our awesome Sponsor Twiddler's Nook when I stamped the poinsettia and the sentiment in my mini misti.


The fun background was created with iCraft Easy-Tear 1/4" Tape and Deco Foil Color Harmony Transfer Foil Multi-Pack, Shades of Green from our awesome Sponsor Therm O Web. I laid stripes of the tape across a 4-1/4 x 5-1/2" piece of white card stock. And then I laid a piece of Electric Lime foil over the tape with the shiny green facing up. No need for a laminator for these fabulous foils! I just used my bone folder to press the foil into the tape. I went over the whole panel a couple of times from both directions and pulled up the foil. It was perfect! I love it! 


I die cut the foiled background using the Frayed Edge Stacklets dies from Sponsor Taylored Expressions. I adhered the poinsettia and sentiment to the foiled panel using iCraft UltraBond Adhesive from Therm O Web. And then I popped up the whole panel onto a white A2 top fold card base using iCraft 3D Foam Tape Jumbo Roll (white) also from Therm O Web. Such a quick and fun card to make!


I hope you'll stop by the Christmas in July 2024 {BYSHC} Linky Party to check out all the wonderful Holiday inspiration being shared! It's all been so awesome! I sure hope you'll stop by and check it out! Have an ink-tastic day!


Thanks so much for stopping by!
See ya next time.

Inky Hugs,
Crystal


{Please note that comment moderation is ON. Your comment will appear shortly.}

Monday, August 15, 2022

Membership Monday ~ August 2022 BOM Autumn Bounty ~ Unity Stamp Co.

 Hello there crafty friend!
I just love the colors of Fall!! So warm and inviting! I was curious to see what they would look like ink smooshed on Kraft card stock. And I had a fun idea for some layers and dimension for a card using the gorgeous new Autumn Bounty background stamp. This stamp is the current Background of the Month stamp... a wonderful Membership at Unity Stamp Co. If you love background stamps, this membership is for you! A wonderful deep red rubber background stamp delivered to your door each month!! Yes, please! I can't wait for mine to arrive each month!


I used Mustard Seed, Carved Pumpkin, Seedless Preserves, Peacock Feathers, and Vintage Photo Distress Oxide inks for my ink smooshing on Kraft card stock from Papertrey Ink. The Kraft card stock from Papertrey Ink is 110lb and holds up really well with ink smooshing.


I stamped the Autumn Bounty background stamp three times on three pieces of Kraft card stock. I trimmed one to 4 x 5-1/4" for my bottom layer. I trimmed the second one for my middle layer measuring 3-1/8 x 2-5/8". I mat both layers on True Black card stock also from Papertrey Ink. 


For the sentiment I used a new Adhesive Transfer sentiment from the {Blooming Friendship} Deco Foil Adhesive Transfers by Unity, a collaboration with Therm O Web. I applied the Adhesive Transfer sentiment to a piece of True Black card stock and trimmed it up. I added a couple layers of scrap under the right side of the sentiment so it would lay flat and adhered it to the card. All done... and I really low how this turned out! You can check out my process video for this card here... Membership Monday | Ink Smooshing with Layers | August 2022 BOM Autumn Bounty | Unity Stamp Co. 


Such an amazing new background stamp! I'm anxious to also ink it up and color with my Copic markers, too! You can check out the Background of the Month membership over at Unity Stamp Co. I'll be back next Monday with a card using the beautiful new August 2022 Uniquely Unity membership!


Thanks so much for stopping by!
See ya next time.

Inky Hugs,
Crystal


{Please note that comment moderation is ON. Your lovely comment will appear shortly.}

Thursday, March 31, 2022

Nature of Friendship Happy Day ~ New Adhesive Transfer Sentiments ~ Unity & ThermoWeb

 Hello there crafty friend!
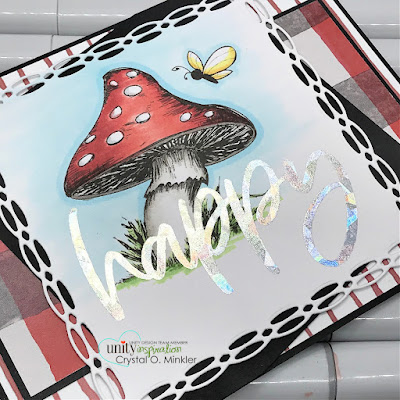
I couldn't help but play a bit more with the new amazing Adhesive Transfers from Unity and ThermoWeb!! I made one more card to share using the new beautiful Nature of Friendship stamp along with the big beautiful happy sentiment from the Adhesive Transfers Sentiment 1 pack.


It's always a good idea to pick out your pattern papers before you color but for this one I didn't. LOL... I knew I wanted to go with a red mushroom, though. Those dots just call for a red mushroom! I colored up the stamps with the following Copic Markers:

Mushroom Cap ~ R20, R14, R27, W1, W5, C00, C2
Mushroom Stem ~ W0, W1, W3, W5
Grass ~ YG23, YG17
Butterfly ~ Y11, Y06, Y35
Background ~ B0000, B00


Once all the coloring was done, I ran the colored image through my big shot with the happy Adhesive Transfer sentiment and then ran it through again with the Silver Shattered Glass Deco Foil Transfer Sheets. So easy peasy and beautiful!!


I die cut the colored and foiled panel with the Double Roped Square dies from Gina Marie Designs. Now, I had to start digging through my pattern papers. I wasn't sure what I was going to go with until I saw the Let Your Soul Wander {paper pack}... I remembered the black and red plaid paper and bam! 


I kinda wish I hadn't done such a bright blue in the background but it is what it is! Although it does actually work with the shine off of the amazing foils so I guess it's okay. I do love that shine from the pretty foils! If you've been hesitant to get into the foiling thing... it's time to try them! These Adhesive Transfers are seriously a game changer! Head over to Unity and check them out!


Thanks so much for stopping by!
See ya next time.


Inky Hugs,
Crystal


{Please note that comment moderation is ON. Your lovely comment will appear shortly.}

Thursday, November 11, 2021

Holly Jolly Holidays ~ Non-Traditional Christmas Colors Challenge ~ Unity Stamp Co.

Hello there crafty friend!
Today I'm sharing another wonderful Holiday card using a fun color combo for the Non-Traditional Christmas Colors Challenge over at the Unity Show & Tell Facebook group! This week I've used another one of my favorite color combos... Kraft, White & Red! 


The recent release of the beautiful Ornamental Pine Bundle got me hooked on playing with foils so I just had to do a bit of foiling for my card. I used the beautiful Snow Many Flakes Deco Foil Toner Card Front along with Red Deco Foil Transfer Sheets.


The top layer of snowflakes has a bit of Vintage Photo Distress Oxide ink blended on it before I ran it through my laminator with the red foil. I die cut the center with a Wonky Stitched die. 


I stamped Ember Girl with Gina K. Black Amalgam ink and colored her up with the following Copic markers:

Skin ~ E000, E00, E11
Hair ~ E23, E25, E50
Hat / Mittens / Coat ~ C00, C2, R000, R14, R20, R27
Jeans ~ B91, B95, B97
Sweater ~ E23, E50
Boots ~ N1, N3, N6
Tree ~ G000, G24, G46, Y06, Y35, E23, E25


I blended some Candy Apple Distress Oxide inks on another Snow Many Flakes toner card front and used the red foils again. I used a another stitched oval die to cut out my center layers and also to cut out the toner card front that I inserted in the negative space left behind.


I fussy cut Ember Girl and used a Memento Tuxedo black marker to clean up the edges where I fussy cut on the line. I adhered her to the card using liquid glue. I then stamped the sentiment from the gorgeous November 2021 Sentiment Kit called Cherished Holly with the Candy Apple Distress Oxide ink. This sentiment kit just may be my new favorite for Holiday cards!! 


 I popped up the sentiment with foam tape to finish off this card.
I sure hope that you are inspired to grab your Unity holiday stamps and get inky for this challenge! I'm really enjoying the cards being shared so far and some of the color combinations being shared are amazing!! I'll see you all back here next Thursday with another fun Holiday card and color combo!


Thanks so much for stopping by!
See ya next time.


Inky Hugs,
Crystal


{Please note that comment moderation is ON. Your lovely comment will appear shortly.}