Showing posts with label Distressing. Show all posts

Wednesday, September 10, 2025

Membership Wednesday ~ September 2025 KOM Harvest to Holiday ~ Unity Stamp Co.

Hello there crafty friend!
Happy Membership Wednesday! Today I'm sharing a quick Fall card featuring the gorgeous HUGE pumpkin from the September 2025 Kit of the Month membership called Harvest to Holiday from Unity Stamp Co. 


I stamped the script sentiment included in the kit several times on the left side of a piece of Kraft card stock. I then stamped the the pumpkin and the 'Fall Blessings' sentiment. I trimmed the panel to 4-1/2 x 4-1/2".


I ink smooshed the panel keeping the top right corner mostly free of ink. I used Spiced Marmalade, Carved Pumpkin, Abandoned Coral, and Gathered Twigs Distress Inks. Once I was happy with the ink smooshing, I dried the panel with a Wagner Precision Heat Tool. I colored the stem with a few Copic markers: E11, E25, E18.


I roughed up the edges of the Kraft layer with a Distress Tool from Tim Holtz. I adhered the panel to a 4-5/8" squared piece of Pumpkin Pie card stock from Stampin' Up. The script on the left side needed something to break it up so I wrapped the panel three times with natural May Arts Burlap String and tied a bow. I covered the back of the panel with foam tape leaving a space for the string and popped it up on a 5" squared piece of Early Espresso card stock, also from SU. The panel is adhered to a 10 x 5" Kraft card base that's scored at 5". I finished off the card with a few enamel dots from my stash.


Here's a quick look at this month's Kit of the Month membership!


Another option is to get this kit separately here... Pumpkin Hearth.

That's it for me today! I hope you've been INKspired to play with your membership stamps! Have a fab day!


Thanks so much for stopping by!

Inky Hugs,
Crystal

Thursday, June 5, 2025

Sister of My Soul ~ Rooted in You {Just Jolande} ~ Unity Stamp Co.

Hello there crafty friend! 
So many amazing new stamps and goodies over at Unity!! I just had to ink up the fun girl from Rooted in You {Just Jolande}. Love her!


I inked up a fun background using a couple blue inks. I die cut the panel with a die from the Deckle & Stitches Nesting dies and distressed the edges a bit with my brown blending brush. I didn't go over my stamping though so the white space behind it would still show through.


I inked up Jolande with Black Amalgam ink on a scrap of white card stock and colored her with Copic markers. I fussy cut her leaving a white border around the edges. And I popped her up on the card with foam tape.
 
Here's a list of the Copic markers I used:
Skin: E000, E00, E21, R00, R20
Hair: E25, E29
Shirt / Shoes: Y15, YR23, YR15
Jeans: B93, B95, B97
Bag: YG11, G94, YG17, Y15, Y28


I adhered the background panel to a Kraft A2 top fold card base and spattered the background with some Vintage Photo Distress Ink. I wrapped the bottom with a few pieces of burlap string that I tied up in a bow. I added a few pieces of washi tape from my stash to finish it off. I just love how this turned out!

Thanks so much for stopping by!
See ya next time.

Inky hugs,
Crystal

{Please note that comment moderation is on. Your lovely comment will appear shortly.}

Saturday, March 8, 2025

Trust the Journey ~ Savannah Girl ~ Unity Stamp Co.

Hello there crafty friend! 
I'm so excited to share a fun card for Unity's March release. I just had to play with the gorgeous new Angie Girl called Savannah Girl. She makes me want to buy a bike and go for a ride!


I was in a vintage chic kinda mood. And just had to play with the Grit & Grace {paper pack} again! I love these papers!! I stamped gorgeous Savannah Girl and colored her up with Copic markers.

Here's a quick list of the Copic markers I used:
Skin: E000, E00, E21
Hair: E43, E44 
Hat: E30, E31, RV10, RV02
Dress: Y11, Y15, RV10, RV02
Bike: RV10, RV02, C00
Basket: E30, E31
Flowers: RV10, RV02, R14, B000, B00, YR15, Y11, Y15


I die cut Savannah Girl using a die from the Big and Little Chain Mini Slimline dies from Gina Marie Designs. I really wanted to add a little something between the layers so I grabbed a white doily from Doodlebug Designs. I grunged it up a bit with my brown and red blending brushes. I didn't add any ink to the brushes... just used the residue ink already on them.


I wrapped the die cut panel with Ivory May Arts Burlap String and made a pretty bow. I adhered all of my layers to a Kraft A2 top fold card base. I adhered the trimmed sentiment to my focal panel and then popped them both us with foam tape. I finished off the card with a few raindrop embellishments. I think this turned out pretty cute.


Thanks so much for stopping by!
See ya next time.

Inky hugs,
Crystal

{Please note that comment moderation is on. Your lovely comment will appear shortly.}

Sunday, March 2, 2025

Set of St. Patrick's Day Cards ~ All the Luck ~ Unity Stamp Co.

Hello there crafty friend! 
I'm a huge fan of St. Patrick's Day cards! I don't know what it is about them, but I love to make them and I love to send them to my friends. So I was super excited to see the March Madness Warehouse Sale over at Unity this weekend. Lots of fun St. Patrick's Day goodies {and lots of other stuff}!!


So I had to make a couple of cards... well, four to be exact! Once I started I just couldn't stop! 


I started with a fun sketch and cut my papers for two cards. My first one features a stamp from the All the Luck stamps. Such a fun stamp! I paired it up with the Clover & Charm {paper pack}. The plaid paper measures 4 x 5-1/4". The shamrock paper is die cut with a die from the Scallops & Squares {nesting dies}. It's tucked under the kraft card stock across the card. And the focal image is popped up on the card with foam tape.


Card number two is very similar. The sentiment is from the Lucky Cuts Ephemera. I distressed the edges of the pattern papers and the ephemera piece. I also popped up the sentiment with foam tape.


Now, I had scraps and I wanted to see what I could do with them. I tore the edge of this beautiful paper and adhered it to a Kraft card base. The sentiment is popped up on the card with foam tape. Super easy peasy! 


And the last card is very similar using two leftover strips. Also adhered to a Kraft A2 top fold card base. The sentiment is popped up with foam tape. A fun set of cards and they actually didn't take very long. 

Thanks so much for stopping by!
See ya next time.

Inky hugs,
Crystal

{Please note that comment moderation is on. Your lovely comment will appear shortly.}

Tuesday, January 14, 2025

Release Day Blog Hop ~ Coffee Couple ~ The Greeting Farm


 The January 2025 New Release is now available for purchase in The Greeting Farm Store! This month we introduced 3 new stamp sets. Our first set called ANYA IN NEW YORK features our fabulous girl touring all the hot spots in the Big Apple. Next, we showcased the cutest critters reading to each other in a set called BOOK LOVER. Lastly, we introduced COFFEE COUPLE featuring Anya and Ian drinking their favorite brew.


I made a fun coffee card with a vintage vibe. I just had to ink up the sweet Anya from the Coffee Couple stamp set! She is just too cute. I paired her up with some fun coffee papers in my stash that I had previously die cut. I distressed the edges with a bit of Vintage Photo Distress Ink and adhered them to a script paper from the same paper pack. I heat embossed the sentiment with white pigment ink and white embossing powder on black card stock. After fussy cutting Anya and coloring the edge of my cutting, I adhered her to the sentiment strip and then popped them both up with foam tape. And finished off the card with some black and white enamel dots.


 Here's a quick list of the Copic markers I used:

Skin: E000, E00, E21, E04, R00, R20
Hair: Y21, YR24, YR18
Dress / Shoes / Hairband: B000, N2, N4, N6
Cup: E0000, E51, RV32, RV17, RV19


To celebrate this release we are having a short BLOG HOP! One lucky fan will take home the entire release! You have until January 18th, 12pm CST/1pm EST to leave your comments on each Designer's Blog. Then head back to The Greeting Farm Blog to let us know you completed the hop. **Remember to qualify for the prize you MUST leave a comment on each Designer's Blog AND The Greeting Farm Blog letting us know you completed the hop.

NOTE: Comments on The Greeting Farm Blog are admin approved so it may take a day for your comment to be visible. Please only comment once, and use the same name on all the blogs when leaving a comment. Do not pick the Anonymous option (otherwise we won't be able to verify that it's you). We will announce the random winner later in the week on the Blog and in our Facebook Group: The Greeting Farm Fan Page

TGF Design Team:

This is a short hop, and definitely worth playing along! If you want to grab your favorites now, you can purchase the new stamps HERE. We will have more cards featuring the New Release from our Design Team Leaders starting on the 16th so be sure to stop by The Greeting Farm Blog to see more inspiration.


Thanks so much for stopping by!
See ya next time.

Inky Hugs,
Crystal


{Please note that comment moderation is on. Your lovely comment will appear once approved.}

Thursday, November 28, 2024

Holiday Two-fer Cards ~ Little Love Deer and Penguin Hugs ~ Unity Stamp Co.

Hello there crafty friend! 
I'm back with two adorable cards featuring goodies from Unity!!! I had a fun idea for a two cards... a two-fer! What's that? Well, it's when you use a sketch that let's you use the papers for two cards. So fun and easy peasy!


So I cut two full 6x6 sheets of pattern paper and all I had left was two thin scraps. I cut the Minty Christmas {paper pack} and Holiday Script {paper pack} papers at 4-1/8 x 5-3/8" for card fronts. I set aside the 5/8 x 6" scraps. The 1-7/8 x 5-3/8" pieces I adhered to the bottom of the card fronts. And then I adhered the card fronts to two Kraft A2 card bases.


I did distress the edges of the Minty Christmas {paper pack} just a little bit to lighten the white in the background. I stamped the sweet deer from Little Love Deer and colored it up with Copic markers. I then die cut the deer using a die from Scallops & Circles {nesting dies} 


I mat the deer circle with a Kraft circle. I also distressed the edges of the sentiment and mat it with Kraft card stock. I added dots of white gel pen to the dots on the deer.

Here's a quick list of the Copic markers I used for the deer:
Deer: E51, E21, E23
Scarf: R00, R20, R14, R27
Ground: C00, C1, C3


I also stamped the adorable Penguin Hugs. Isn't this just the cutest penguin?! Love, love, love! I colored it with Copic markers, too. And distressed the edges just like the other card.

Here's a quick list of the Copic markers I used for the penguin:
Penguin: C00, C1, C3
Scarf: R20, R14, R27, YG11, G24, G46
Mug: R00, R20, R14, R27
Ground: C00, C1


I added foam tape to the back of the deer, penguin and both sentiments and popped them all up on the cards. Voila! Two holiday cards done!

Thanks so much for stopping by!
See ya next time.

Inky hugs,
Crystal

{Please note that comment moderation is on. Your lovely comment will appear shortly.}

Wednesday, October 30, 2024

Membership Wednesday Tags ~ Unity October 2024 KOM Sweet Bliss of Christmas ~ Unity Stamp Co.

  Hello there crafty friend!
Today I'm sharing three pretty holiday tags featuring fantastic stamps from the October 2024 Kit of the Month called Sweet Bliss of Christmas. These were pretty quick to make and so much fun!


The tags are die cut from Kraft card stock from Papertrey Ink using dies from the Scalloped Tags die {looks like they are out of stock}. I also die cut slightly smaller tags from the Festive Christmas {paper pack}. The sweet deer is die cut from the papers. Love it! All of the edges are distressed with Vintage Photo Distress Ink.


I stamped the stockings using Black Amalgam ink from Gina K. Designs. I colored them up with my Copic markers and then fussy cut them leaving a white border around the images. I also distressed the edges with a bit of Vintage Photo Distress Ink.

Here's a quick list of the Copic markers I used:
Poinsettia: R20, R14, R27, Y15
Greenery: YG11, G24, G46
Tree: YG11, G24, G46, E55, E57
Star: Y15
Poinsettia Stocking: C00, C2, R20
Tree Stocking: C00, C2, R20, R14, R27


The sentiments are all heat embossed with my favorite combo. I prepped the Kraft card stock using the TE Anti-Static Powder Tool from Taylored Expressions. Stamped the sentiment using the Sugar Cube White Pigment ink from Taylored Expressions, and added Alabaster White Embossing powder from Brutus Monroe. I then melted the embossing powder using my Wagner Precision Heat Tool. I trimmed them all up and adhered the two with the stockings directly to the tag. The sentiment on the deer tag is popped up with foam tape. I just realized I completely forgot to add the ribbon and twine before taking photos... ooops! I'll likely add white ribbon and some festive red and white twine.


Here's a quick look at this month's Kit of the Month membership! So in love with this month's KOM!!

Well, that's it for me today! I hope you've been inspired to play with your membership stamps! 
Hope you have an ink-tastic day!


Thanks so much for stopping by!
See ya next time.

Inky Hugs,
Crystal


{Please note that comment moderation is on. Your lovely comment will appear once approved.}

Wednesday, September 11, 2024

Membership Wednesday ~ September 2024 KOM Wander and Wonder ~ Unity Stamp Co.

  Hello there crafty friend!
Today I'm sharing a vintage style holiday card featuring the awesome poinsettia stamp from the September 2024 Kit of the Month membership from Unity called Wander and Wonder. I love to color poinsettias!! And I was so excited to find the background piece in my stash of 'maybe later' panels.


I started this card by stamping the lovely poinsettia and sentiment on white card stock with Black Amalgam ink. I then Copic colored the beautiful poinsettia. I actually recorded my coloring for this one and have a short video sharing that with you all {below}. 

Here's a quick list of the Copic markers I used:
Pinks: RV0000, RV00, RV10, RV11, RV14
Greens: YG11, G24, G46
Yellows: YG21, Y15, Y35


Once I was happy with my coloring I fussy cut the poinsettia on the line and distressed the edges just a bit with Vintage Photo Distress Ink. I trimmed the sentiment and then distressed it a bit with the same blending brush. I wanted to keep it light so I didn't add any more ink to the brush.


 I set aside the poinsettia and looked through my background panels that didn't work out for another project and went into my 'maybe later' container. I found a kraft panel from last year that I had blended over the Burlap Stencil using the Tsukineko's Champagne ink, both from the October 2023 Whit Kit. It was perfect for my card! I ink smooshed the panel with some Kitsch Flamingo and Vintage Photo Distress Inks. I then die cut the panel using the largest die from the Deckle & Stitches Nesting Dies from Unity. I distressed the edges of the panel using Vintage Photo Distress Ink and then splattered the panel with some watered down Ground Espresso Distress Ink. I adhered the sentiment to the poinsettia and then added a bunch of foam tape to the back of both and popped them up on the card.
 

Here's a quick look at this month's Kit of the Month membership! So in love with this month's KOM!!

Well, that's it for me today! I hope you've been inspired to play with your membership stamps! 
Hope you have an inkredible day!


Thanks so much for stopping by!
See ya next time.

Inky Hugs,
Crystal


{Please note that comment moderation is on. Your lovely comment will appear once approved.}

Tuesday, September 27, 2022

Snail Mail Vintage Style Card ~ Making Spirits Bright with Christmas Express ~ Unity Stamp Co.

 Hello there crafty friend!
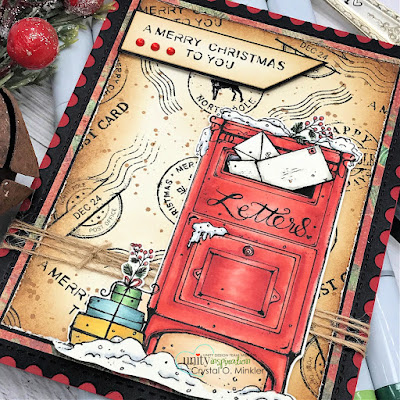
I don't know about you but as a cardmaker there's just something about postage style stamps and envelopes and mailboxes! I just adore them and love to use them in my cards! I especially love when they are Christmas themed and Unity just released two stamps... Making Spirits Bright and Christmas Express!! Both are a Must Have!!! Oh my gosh! 


The Christmas Express stamps just scream to be part of a background... I used a bunch of the stamps to create my background. This could easily be a full sheet that you could cut into four card fronts and make multiple cards from!


I went with a vintage style card which was easy to achieve with just a bit of distressing with some Vintage Photo Distress ink and the Paper Distressing tool from Tim Holtz to rough up the edges. I also added a bit of splatter with the Vintage Photo Distress ink. I mat that background layer with a slightly larger piece of True Black card stock. Under that is a layer of pretty pattern paper from the Old World Winter paper pack from The Paper Studio... it adds a bit more color and interest to the card. I die cut a piece of True Black card stock from Papertrey Ink with the Postage Stamp {nesting die} from Unity and adhered my layers on top of that. For my last layer I kept going back and forth between red and kraft... but with the mailbox being red I think the Pure Poppy card stock {Papertrey Ink} really helped to make the mailbox pop on the card.  


I wrapped the layers five times with {Natural} May Arts Burlap string and tied a little knot to the left. I fussy cut the Copic colored image leaving a skinny white border. I tend to fussy cut a white border when the image has small details that are harder to cut around like the leaves and berries. And I've also found that it helps the image to pop a bit more on the card. To add to the dimension of the image I did use foam tape to pop the mailbox on the card. I stamped the cute sentiment and distressed it with a bit of Vintage Photo Distress ink and mat it with black card stock. I also popped it up on the card with foam tape.


Here's a quick list of the Copic markers I used to color up the mailbox:

Mailbox ~ R20, R14, R27; N2, N5 {slot}
Snow ~ C00, C3
Letters ~ W00, W1, W3
Leaves ~ YG11, G24, G46
Berries ~ R20, R14, R27
Gifts ~ YG11, G24, G46 {green}; BG70, BG72, BG75 {blue}; Y15, Y35, Y28 {yellow}
Under Mailbox {to coordinate with the distressed edges} ~ E30, E31, E33


I'm sharing a new sketch based on my card today in my Tawny Owl Paperie Inky Inspiration Facebook group. It's similar to a sketch I shared a couple months ago but this one has layers and I've added string/twine. If you're liking this sketch, I hope you'll give it a try and share your card or project in the group.


To finish off the card I added a few red rhinestones from the Rainbow Bling rhinestones from Gina Marie Designs. I really like how this turned out! Head over to Unity and check out all the fab new releases... if you love Christmas stamps this release is one that you don't want to miss!! 


Thanks so much for stopping by!
See ya next time.

Inky hugs,
Crystal


{Please note that comment moderation is on. Your lovely comment will appear shortly.}