Showing posts with label #thepaperstudio. Show all posts

Thursday, January 25, 2024

Fun Fold with a Fix ~ Ribbons & Ruffles ~ Unity Stamp Co.

Hello there crafty friend! 
Today I'm sharing a cute fun fold card featuring the adorable new Ribbons & Ruffles stamp from Unity Stamp Co. This stamp is just too cute!! I couldn't wait to play with her and had a spontaneous idea for a fun fold card so I didn't record my whole process, but just the assembling of the card with the fun fold element and, of course, the fix I needed to do to make it work.


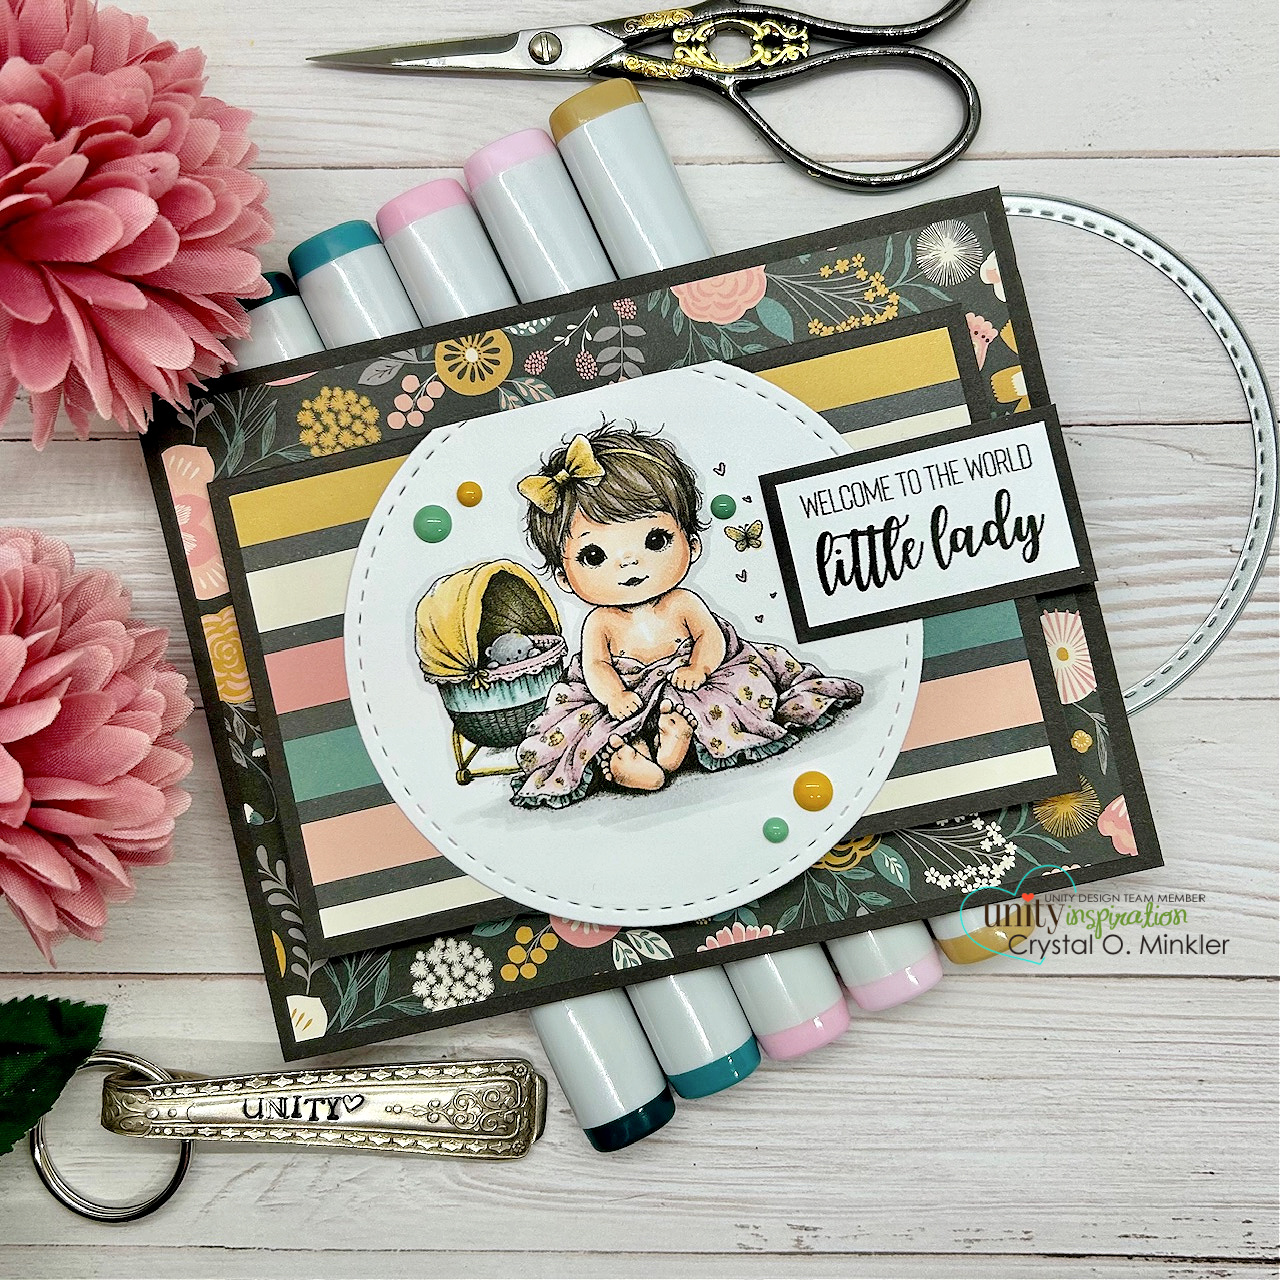
Isn't this sweetie just darling!? So precious and sweet! I could use all the adjectives for this one! LOL! Anywho, as I mentioned above this is a fun fold card but you can't actually see how it works in the photos. So I hope you'll check out my video. But the floral layer is actually just a card front. The fold is in the center... so fun! *wink wink*

You can check out my short video showing the fun fold element of this card and how I had to fix it right here... Fun Fold Card with a Fix | Ribbons & Ruffles | Unity Stamp Co.


I stamped the Ribbons & Ruffles sweetie with Black Amalgam ink on Stampers Select White card stock from Papertrey Ink and colored her up with my Copic markers to coordinate with the pretty papers I had pulled for this card. So happy when I remember to find my papers before actually coloring my image! I die cut the baby girl using the largest stitched circle die from the Scallops & Circles {nesting dies}.

Here's a quick list of the Copic Markers I used:

Skin: E000, E00, E11 
Hair: E70, E87, E74
Blankie: RV91, RV93, Y26
Ribbon: Y23, Y26
Bassinet: Y23, Y26, BG70, BG72, BG75, RV91, RV93
Teddy Bear: N0, N1, N3, N5
Butterfly: Y23, BG72


 I paired up Ribbons & Ruffles with the Hello Darling paper pad from The Paper Studio {Hobby Lobby}. My card stock layers are Smokey Shadow from Papertrey Ink. And the enamel dots that just happened to coordinate with the papers is the Celebrate Autumn Enamel Dots from Echo Park Paper Co. Have an ink-tastic day!

Thanks so much for stopping by!
See ya next time.

Inky hugs,
Crystal

{Please note that comment moderation is on. Your lovely comment will appear shortly.}

Thursday, September 28, 2023

Fall Collab with Teresa ~ Mini-Remix Fall ~ The Greeting Farm

Hello there crafty friend!
I'm back with a second card for my fun collab with my sweet friend, Teresa, from Fresh and Renewed with Teresa. It sure has been fun playing with Fall themed card making goodies that I haven't used before. Shopping your stash is so much fun! I've found some amazing things... oh boy!


I've been having fun the last couple of weeks inking up some cute stamps from The Greeting Farm so I thought I'd look through my collection and find a Fall themed stamp set that I've never inked up before. Surprisingly I only found the one Fall themed stamp set. I did find a few Halloween themed stamps that I should really ink up. They are just too cute!


I had a blast filling up a slimline card last week with all the fun Fall images so I thought I'd do another slimline card. I inked up the Mini-Remix Fall cuties using Memento Tuxedo Black ink. And I had some fun coloring them up with my Copic markers. To save time again, I only share my coloring of one of these cuties in my video {link below}.


I was looking through my slimline dies and noticed that there were a few more slimline dies hiding behind the Gina Marie Designs collection of dies... I was pleasantly surprised to find the Slimline Striped Frame Stand Alone Die Set from Trinity Stamps. No idea when I added this fun die to my collection and I am certain that I've never used it before.


I had so much fun coloring up all these cute images. Here's the list of Copic markers that I used for them all:

Skin: E000, E00, E11, E04
Anya #1: R20, R14, R46, Y11, Y06, Y15, Y38, E21, E23, E51, E55, E57, YR23, YR27, R59
Ian: Y11, Y06, Y15, Y38, YG11, YG03, YG63, E51, E55, E57, E97, E15, E09
Anya #2: YG11, YG03, YG63, E21, E23, R20, R14, R46, B41, C5, C7, C9
Anya #3: Y11, Y06, Y15, Y38, R20, R14, R46, E21, E23, E51, E55, E57, E59, YG11, YG03, YG63, YR31, E43, E44 


I chose stamps and a die that I'd never used before so I had to also choose papers that I hadn't used before. The beautiful Fall Sunflower 8.5 x 11" paper pad from The Paper Studio is absolutely gorgeous. Now this paper pad hasn't been in my collection for very long. I bought it back in June during our vacation to the Lake of the Ozarks. But I've been itching to play with it!!


The beautiful sunflower also hasn't been in my collection for very long. I got it in June at The Craft Lab in Deepwater, MO. I love shopping Amy's store when we have our fun Unity Lover get togethers. She has so many wonderful products. I always find must haves while I'm there! The sunflowers are from 49 and Market and I adhered it using Ranger Multi Medium Matte.

As I mentioned above, to save some time so the video wasn't super duper long, I did most of my coloring off camera. I did record my coloring of Anya #3 though. You can check out the rest of my process in my video... Fall Sunflower Slimline Card | Fall Collab with Teresa | The Greeting Farm.


I sure hope you've enjoyed the card I shared today. I hope you'll give my YouTube channel a visit and then stop by Teresa's YouTube channel, too! As I mentioned above, I'm having a giveaway!! I still haven't put the prize together but I'll be sharing it on my YouTube channel next week when I also announce the winner from the comments on my channel and Teresa's channel!! To be eligible you must comment on each video Teresa and I both share during our whole Fall Collab... this weeks videos and last weeks videos. Hope you have an ink-tastic day!


Thanks so much for stopping by!
See ya next time.

Inky Hugs,
Crystal


{Please note that comment moderation is on. Your comment will appear once approved.}

Friday, July 14, 2023

{BYSHC} Sketch Challenge 35 ~ Christmas Basics Papercrafting Kit ~ The Paper Studio

 Hello there crafty friend!
I'm sharing another Christmas card for the {BYSHC} Sketch Challenge 35 for the Build Your Stash Holiday Cardmakers Facebook group. I made this sweet card while on vacation last month. I've really enjoyed making cards with this fun kit.


I can't get enough of the plaid paper in this kit. It makes a fun backdrop for the other papers. I really love the die cuts in the kit, too. They've been a great size for cardmaking. My only complaint is the shine on them. It's fine in person but taking photos has been difficult.


All my layers are cut per the sketch dimensions. I used a corner rounder for the corners on the green paper. The sentiment and puppy die cuts are both popped up on the card with foam tape.


I finished off the card with a couple red rhinestones that were included in the kit. Super easy peasy card and I think it turned out pretty cute.


Here's a look at {BYSHC} Sketch Challenge #35 for the month of July. I hope you'll join us and play along with the sketch! If you're interested in seeing a bit more inspiration for this sketch, check out the amazing inspiration from the design team over on the {BYSH} Cardmakers blog!


 Next week our Christmas in July 2023 {BYSHC} Linky Party begins... I hope you'll join us for fun, inspiration and lots of prizes! Be sure to use the above graphic in your social media posts if you participate.

Thanks so much for stopping by!
See ya next time.

Inky hugs,
Crystal


{Please note that comment moderation is on. Your lovely comment will appear once approved.}

Saturday, July 1, 2023

{BYSHC} Sketch Challenge 35 ~ Christmas Basics Papercrafting Kit ~ The Paper Studio

Hello there crafty friend!
It's time for a new sketch challenge over in the Build Your Stash Holiday Cardmakers Facebook group! Today I'm sharing a Christmas card using some new goodies that I bought during our vacation. There just happened to be a Hobby Lobby near by so I just HAD to check out it out!! Hee hee!! I found some fun goodies including this neat Christmas Basics Papercrafting Kit from The Paper Studio that was on sale 40% off. Can't beat that!


I took very minimal supplies on vacation and actually forgot a bunch of essentials. LOL! Ohhh... you'd think I was new to papercrafting but really it just wasn't my focus for vacation. Anywho, I only took my Tim Holtz/Tonic Guillotine Comfort Paper Trimmer which wasn't big enough for the 12 x 12" papers in the kit. Sooo... I folded the 12 x 12" papers in half with a really good crease and then I just tore it in half. I was then able to cut it using my trimmer. Easy peasy! 


I also forgot glue! LOL! Seriously! I really only planned to do a bit of coloring if I had a chance. So glue was not on the radar. I got all my papers cut and the design all set and adhered it all together when I got home. I had a lot of fun with the kit. I do wish the ephemera pieces didn't have so much of a shine on them. They were very difficult to get nice photos of... ugh.


Aside from the drama of creating without all my crafty things, I really had a blast putting this card together. And I'm really loving this new sketch!! The design team has done a wonderful job with this sketch too. I hope you'll stop by the {BYSHC} blog and check out their cards.


Here's a look at {BYSHC} Sketch Challenge 35 for the month of July. I hope you'll join us and play along with the sketch! If you're interested in seeing a bit more inspiration for this sketch, check out the amazing inspiration from the design team over on the {BYSH} Cardmakers blog!


Thanks so much for stopping by!
See ya next time.

Inky hugs,
Crystal


{Please note that comment moderation is ON. Your lovely comment will appear shortly.}

Monday, May 1, 2023

{BYSHC} Sketch Challenge 33 ~ A Beautiful Sight ~ Unity Stamp Co.

Hello there crafty friend!
It's time for a new sketch challenge over in the Build Your Stash Holiday Cardmakers! Today I'm sharing a Christmas card with a vintage vibe using a beautiful stamp from Unity Stamp Co. called A Beautiful Sight. I love this pretty stamp!


I paired up this itty bitty stamp with the Old World Winter paper pack from The Paper Studio. It's one of my favorites and I just love the colors in these papers! I distressed the edges a bit with Vintage Photo Distress Ink.


I stamped the tree background with Antique Linen, Evergreen Bough, and Forest Moss Distress Oxide inks. I inked up different sections of the stamp with each color and then stamped it. I repeatedly stamped it until I was happy with the colors.


I wanted the tree to stand out a bit more so I used Antique Linen, Evergreen Bough, and Vintage Photo Distress Crayons to color the tree. It was super easy and I love how the tree pops. I mat a couple of my layers with Kraft card stock. And finished off my top layer by wrapping it a few times with a pretty Ivory burlap string. I tied a pretty bow and the I popped up the top layer with a thin foam tape.


Here's a look at {BYSHC} Sketch Challenge #33 for the month of May. I hope you'll join us and play along with the sketch! If you're interested in seeing a bit more inspiration for this sketch, check out the amazing inspiration from the design team over on the {BYSH} Cardmakers blog!


Thanks so much for stopping by!
See ya next time.

Inky hugs,
Crystal


{Please note that comment moderation is ON. Your lovely comment will appear shortly.}

Tuesday, September 27, 2022

Snail Mail Vintage Style Card ~ Making Spirits Bright with Christmas Express ~ Unity Stamp Co.

 Hello there crafty friend!
I don't know about you but as a cardmaker there's just something about postage style stamps and envelopes and mailboxes! I just adore them and love to use them in my cards! I especially love when they are Christmas themed and Unity just released two stamps... Making Spirits Bright and Christmas Express!! Both are a Must Have!!! Oh my gosh! 


The Christmas Express stamps just scream to be part of a background... I used a bunch of the stamps to create my background. This could easily be a full sheet that you could cut into four card fronts and make multiple cards from!


I went with a vintage style card which was easy to achieve with just a bit of distressing with some Vintage Photo Distress ink and the Paper Distressing tool from Tim Holtz to rough up the edges. I also added a bit of splatter with the Vintage Photo Distress ink. I mat that background layer with a slightly larger piece of True Black card stock. Under that is a layer of pretty pattern paper from the Old World Winter paper pack from The Paper Studio... it adds a bit more color and interest to the card. I die cut a piece of True Black card stock from Papertrey Ink with the Postage Stamp {nesting die} from Unity and adhered my layers on top of that. For my last layer I kept going back and forth between red and kraft... but with the mailbox being red I think the Pure Poppy card stock {Papertrey Ink} really helped to make the mailbox pop on the card.  


I wrapped the layers five times with {Natural} May Arts Burlap string and tied a little knot to the left. I fussy cut the Copic colored image leaving a skinny white border. I tend to fussy cut a white border when the image has small details that are harder to cut around like the leaves and berries. And I've also found that it helps the image to pop a bit more on the card. To add to the dimension of the image I did use foam tape to pop the mailbox on the card. I stamped the cute sentiment and distressed it with a bit of Vintage Photo Distress ink and mat it with black card stock. I also popped it up on the card with foam tape.


Here's a quick list of the Copic markers I used to color up the mailbox:

Mailbox ~ R20, R14, R27; N2, N5 {slot}
Snow ~ C00, C3
Letters ~ W00, W1, W3
Leaves ~ YG11, G24, G46
Berries ~ R20, R14, R27
Gifts ~ YG11, G24, G46 {green}; BG70, BG72, BG75 {blue}; Y15, Y35, Y28 {yellow}
Under Mailbox {to coordinate with the distressed edges} ~ E30, E31, E33


I'm sharing a new sketch based on my card today in my Tawny Owl Paperie Inky Inspiration Facebook group. It's similar to a sketch I shared a couple months ago but this one has layers and I've added string/twine. If you're liking this sketch, I hope you'll give it a try and share your card or project in the group.


To finish off the card I added a few red rhinestones from the Rainbow Bling rhinestones from Gina Marie Designs. I really like how this turned out! Head over to Unity and check out all the fab new releases... if you love Christmas stamps this release is one that you don't want to miss!! 


Thanks so much for stopping by!
See ya next time.

Inky hugs,
Crystal


{Please note that comment moderation is on. Your lovely comment will appear shortly.}

Friday, April 22, 2022

Spring into Christmas 2022 {BYSHC} Linky Party ~ Hey Santa ~ Angie Blom Digital Designs

 Hello there crafty friend!
I'm so excited to share my first card for the Spring into Christmas 2022 {BYSHC} Linky Party!! Just a quick note for those that have played along in the past, we have changed the name for this fun event from a Hop to a Linky Party. I hope that clears up some confusion we've had in the past about our fun event! Now, for my first card featuring the wonderful Hey Santa digital stamp from returning Sponsor Angie Blom Digital Designs. I love this digital stamp SO much! I was excited to finally use him!


I started this card by first resizing the Hey Santa face in a Word Document. I also resized the Merry Christmas sentiment and print both off with a white card stock that works in my printer. Next I chose the beautiful Old World Winter paper pack from The Paper Studio for my paper layers. I cut all my paper layers including kraft card stock mats for the plaid and print pattern paper layers. I then die cut a piece of kraft card stock with the Postage Stamp dies from returning Sponsor Unity Stamp Co. I thought it would be fun to add a pattern paper layer behind Santa to fill up some of the space and also add a bit more green to the card.


I Copic colored the Hey Santa face with the following copic markers:

Skin ~ E000, E00, E11, E04, R000, R20
Hair ~ C00, C2, C4
Hat / Coat ~ C00, C2, C4, R20, R14, R37, R59


I trimmed Santa up and distressed the edges with Vintage Photo Distress Oxide ink to give it a bit of a vintage feel. I adhered Santa to the Postage Stamp die cut and wrapped it with {Ivory} May Arts Burlap string from Unity. I tied three knots along the string for a little interest. I trimmed and distressed the sentiment with the same Vintage Photo ink and then adhered it to the Santa face. I added Scotch 1/2-inch Double Sided Foam Tape to the back of the Postage die cut and the sentiment and popped them both up on the card base. I added a few green enamel dots from the Winterberry collection from My Mind's Eye.


And for a final touch on the card, I added some Ranger Glossy Accents to Santa's glasses. I love the glossy shine!!


I used a variation of our current {BYSHC} Sketch Challenge 21 for my card design today. I hope you'll join in the fun and play along with our sketch challenge. We have new challenges each month in the Build Your Stash Holiday Cardmakers Facebook Group.


Yay!! I'm also a Sponsor for the Spring into Christmas 2022 {BYSHC} Linky Party and this is the fabulous prize package that I am offering for one lucky winner. For a chance to win this fun prize make a Christmas card and link it up to the Spring into Christmas 2022 {BYSHC} Linky Party blog post on the Build Your Stash Holiday Cardmakers blog.


Before you leave, be sure to stop by Angie Blom Digital Designs... Angie is having a wonderful sale on all her Christmas digital stamps!! Woohoo!! I love a great sale! And if you haven't already, stop by the Spring into Christmas 2022 {BYSHC} Linky Party to check out all the wonderful Holiday inspiration being shared!! I'm so excited to get a jump start on my holiday cards for 2022... I hope you'll join in the fun and play along!


Thanks so much for stopping by!
See ya next time.

Inky Hugs,
Crystal


{Please note that comment moderation is ON. Your comment will appear shortly.}