Showing posts with label #thegreetingfarm. Show all posts

Tuesday, June 4, 2024

Tawny Owl Paperie Inky Inspiration Sketch 22 ~ Layla with Lettered ~ The Greeting Farm

 Hello there crafty friend!
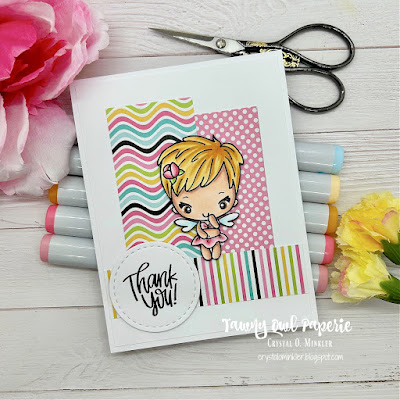
 Today I'm sharing a sweet thank you card for the Tawny Owl Paperie Inky Inspiration Sketch Challenge 22. I recently hurt my back and finally gave in and went to the chiropractor. Boy, am I ever glad that I did! My back is finally feeling better. Not 100% just yet, but improving every day. I wanted to make a thank you card for my sweet chiropractor. She has the cutest little girl so I colored the adorable Layla stamp from The Greeting Farm to look a bit like her.


 I'm still working to finish off the leftover papers I found in my stash in April. I am anxious to get these papers done so I can move on to another leftover pack. This time I was able to use 3 leftover pieces of pattern paper. I just adhered the pieces to my 4 x 5-1/4" panel of Stampers Select White Card Stock from Papertrey Ink. And then adhered the panel to a white A2 top fold card base. 


I stamped the sweet Layla fairy using Memento Tuxedo Black ink onto two separate scraps of white card stock. I colored up the cute fairy with my Copic markers. I also stamped the sentiment from the Lettered stamp set from The Greeting Farm. I die cut the sentiment using the smallest circle die from the Scallops & Circles {nesting dies} from Unity. Fussy cut the fairy on the line and then colored the edges of my cutting using a Memento Tuxedo Black marker making the cutting look all nice and neat.

Here's a quick list of the Copic markers I used: 
Skin: E000, E00, E11, E04
Hair: Y21, YR23, YR14
Eyes: E57, white gel pen
Wings: B0000, B000, B00
Flower: RV0000, RV10, RV11, RV14, YG11, YG23
Top / Skirt: RV0000, RV10, RV11, RV14


Here's a look at the fun sketch for Tawny Owl Paperie Inky Inspiration Sketch Challenge 22 in the Tawny Owl Paperie Inky Inspiration Facebook group. The sketch, as always, is meant to inspire not require. So let the sketch lead in your design, but don't feel limited by it. I didn't add measurements for the pattern paper scraps as I'm sure we all have different sized scraps in our stash. I ended up covering the bottom of the wavy striped and polka dot papers with the bottom strip of striped pattern paper. I felt it was more balanced on the card.


I added foam tape to the back of the sentiment and the fairy and popped them both up on the card. I'm really enjoying this sketch! I hope you all have fun with it, too. Have an ink-tastic week!

Thanks so much for stopping by!
See ya next time.

Inky Hugs,
Crystal


{Please note that comment moderation is on. Your lovely comment will appear once approved.}

Tuesday, February 6, 2024

Tawny Owl Paperie Inky Inspiration Sketch 18 ~ HB2U Anya ~ The Greeting Farm

 Hello there crafty friend!
I'm back sharing another fun birthday card for the Tawny Owl Paperie Inky Inspiration Sketch 18. It feels so good to add another card to my stash of birthday cards! Woohoo! I'm also using up some more of those leftover papers I mentioned last week. This card finishes up the larger scrap pieces of the leftover papers. Next week I'll be sharing a card (or maybe cards) using the rest of the scraps from the pack. I hope you're inspired to not only play along with this month's sketch, but also use up those scraps right along with me!


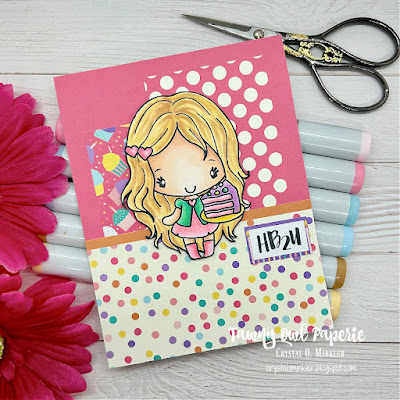
I still had the sweet HB2U Anya stamp set from The Greeting Farm on the my desk so I decided to use it for this card. Isn't she just the sweetest?! Unfortunately, I don't see her on The Greeting Farm website, but there's a whole bunch of other cute Anya stamps in clear photopolymer or digital stamps. I just love the Anya stamps! I stamped Anya with Memento Tuxedo Black ink and colored her up with a handful of Copic markers. I fussy cut Anya on the line and then colored the edges using a Memento Tuxedo Black marker. Here's a quick list of the Copic markers I used to color her up:

Skin: E000, E00, E11
Hair: Y21, E55
Heart Clip / Pink Dress / Boots: RV10, RV13
Sweater: G02, G05, G17, BG11, BG01
Cake: RV10, RV13, Y11, Y15, V12, V15, R20, R14, B0000, B00
Plate: Y11, Y15, Y35


Here's another look at the fun sketch for Tawny Owl Paperie Inky Inspiration Sketch 18. A perfect sketch for those scraps of paper we all have in our stash! The sketch, as always, is meant to inspire not require. So let the sketch lead in your design, but don't feel limited by it. I am loving this sketch! I'm hoping to make at least one more card using the sketch... after I'm done with the 'scraps' cards, that is!


So last week I mentioned that these papers came from an old school card kit from Scrapping for Less that closed up shop about 3 years ago. I don't have the packaging for these papers, but I'm pretty sure they are an older pack called Happy Birthday by Echo Park Paper Co. Not sure if they are available anywhere but I thought I'd share.


The cute little sentiment is also from the HB2U Anya stamp set from The Greeting Farm. I stamped it with the black ink, trimmed it and adhered it to a little scrap of pattern paper as a mat. I popped up Anya with some foam tape. I think she's just the cutest! I hope you're inspired to play along with the sketch... and maybe even use up those paper scraps and/or paper pads! Have a wonderful week!

Thanks so much for stopping by!
See ya next time.

Inky Hugs,
Crystal


{Please note that comment moderation is on. Your lovely comment will appear once approved.}
Tuesday, January 30, 2024

Tawny Owl Paperie Inky Inspiration Sketch 18 ~ Minkie Christmas with HB2U Anya Sentiment ~ The Greeting Farm

 Hello there crafty friend!
Today I'm sharing a new sketch for the Tawny Owl Paperie Inky Inspiration Facebook group. I had fun with this card! Not only am I working to build up my stash of birthday cards, I am also trying to use up leftover papers from my days on the Scrapping for Less Design Team. I have had these leftovers for over 3 years now and they've just been sitting there taking up room. I want to reorganize and use that space for something else so I've resolved to use these leftover papers! I'll be sharing the cards I created throughout the month. Some will be using the TOPII sketches and others will just be ideas I came up with using the scraps. I hope you're inspired to not only play along with this month's sketch, but also use up those scraps right along with me!


Here's my sweet card using the sketch. I also had a fun idea to use stamps that I haven't inked up just yet! I adore the cute Minkie line of stamps from The Greeting Farm. This cutie is actually from the Minkie Christmas stamp set. I thought it would be great for a birthday card! What do you think? I love when stamps can be used for different occasions! I stamped the little Minkie with Memento Tuxedo Black ink and colored her up with a handful of Copic markers. I then die cut her out using a stitched circle die from the Scallops & Circles {nesting dies} from Unity. Here's a quick list of the Copic markers I used to color her up:

Skin: E000, E00, E11
Hair: E55, E57, E59
Mouth: R20, R14
Present: RV10, RV13, B0000, B00
Ground: C1, C3


Here's a look at the fun new sketch for Tawny Owl Paperie Inky Inspiration Sketch 18. A perfect sketch for those scraps of paper we all have in our stash! The sketch, as always, is meant to inspire not require. So let the sketch lead in your design, but don't feel limited by it. I have a few fun ideas for this sketch and I hope to play some more with it during the next few weeks.


So since these papers were in a mini card kit I have no idea where they are from. I would guess Echo Park Paper Co. but really it could be from somewhere else. The point is using those papers in your stash! Let's finish off some paper pads!


The cute little sentiment is from the HB2U Anya stamp set, also from The Greeting Farm {sadly, I don't see this set on the website}. Such a fun card to make! I hope you're inspired to play along with the sketch... and maybe even ink up some stamps that haven't been inked up yet AND let's use up those paper scraps and/or paper pads! Have a wonderful week!

Thanks so much for stopping by!
See ya next time.

Inky Hugs,
Crystal


{Please note that comment moderation is on. Your lovely comment will appear once approved.}

Monday, November 27, 2023

Merry Christmas Card ~ Happy Winter ~ The Greeting Farm

 Hello there crafty friend!
Today I'm wrapping up my guest designing for the month of November for the The Greeting Farm!! This month has seriously flown by! I have a fun holiday card featuring the adorable Happy Winter Digi Set! If you missed my first card as a guest designer for The Greeting Farm, you can check it out here... Fairy Anya. And if you missed seeing my second card for TGF, you can check it out here... Angel Anya.


I had so much fun building a scene for my fairy card earlier this month that I wanted to play some more with my digi stamps. I just happened to get the new Happy Winter Digi Set so I thought this was a perfect opportunity to play. I combined and resized all the digis into a Word Document. I like to play with sizing and then print off a quick draft {an option on my printer to print with less ink} on copy paper. Then I'm able to see if the sizing is right. This one took me a few tries... I had originally had a larger snowman but he just wasn't going to fit without eliminating a tree and I like the balance of the trees on either side of the house so I opted for a tiny snowman. I like to think the kids built him from some of the snowballs.


 Here's a quick list of the Copic markers I used:

Skin / Mouth: E000, E00, E11; R00, R20
Anya's Hair / Ian's Hair: E21, E23; E21, E23, E27
Anya's Clothes: BG70, BG72, BG75, R20, R14, R46, C00, C1
Ian's Clothes: BV20 BV34, BV17, C00, C1, C3
Snow: B000, B60, C00
Snowman Nose: YR15
Snowman Hat / Scarf: R20, R14
Trees: G24, G46
House: Y00, Y11, YR30, YR31, YR24, E74, E77, N0, N1, N3, N5
Sky: B0000, B000


The panel was die cut with the Large Cross-Stitched Rectangle Stackables die from Lawn Fawn. I mat it with a 3-3/8 x 4-5/8" piece of Smokey Shadow card stock from Papertrey Ink. Before I started coloring I found some cute pattern papers in my stash.... the Snowfall Collection from Authentique. I cut two of the papers and adhered them to a white A2 top fold card base. I also cut a 1/8" strip of the Smokey Shadow card stock to adhere as a border between the pattern papers. I used a scrap of the Smokey Shadow card stock to heat emboss my sentiment from the adorable Gingerbread Christmas stamp set. I like to heat emboss with a white pigment ink and white embossing powder. It gives a nice bright white that really pops. Especially on darker card stock. I used the Sugar Cube pigment ink from Taylored Expressions with Alabaster White Embossing powder from Brutus Monroe and I melted the ep with a Wagner Precision Heat tool.


I adhered the sentiment at the bottom of the panel, added a bunch of foam tape to the back of the panel and the sentiment, and then I popped it up on the card. I hope I've inspired you to get inky and have some fun with your digi stamps and papers!

Thanks so much for stopping by!
See ya next time.

Inky Hugs,
Crystal


{Please note that comment moderation is on. Your lovely comment will appear once approved.}

Monday, November 20, 2023

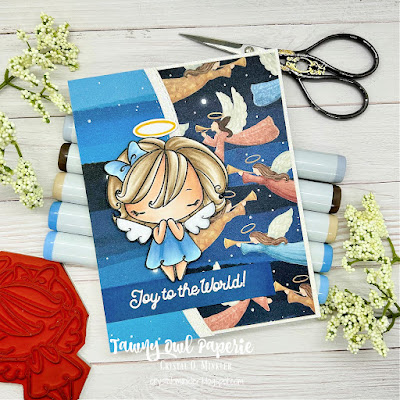
Joy to the World ~ Angel Anya ~ The Greeting Farm

 Hello there crafty friend!
I am super excited and honored to be guest designing for The Greeting Farm for the month of November!! I have a few fun projects to share with you all this month... today I'm sharing a sweet holiday card featuring the adorable Angel Anya! If you missed my first card as a guest designer for The Greeting Farm, you can check it out here... Fairy Anya.


This time I decided to play with some pretty pattern papers along with Angel Anya. A mix of pattern papers from the Star of Bethlehem paper pad from Hobby Lobby with some glitter papers from Stampin' Up called Dazzling Diamonds Glimmer Paper for a fun background.


I stamped the sweet Angel Anya with Memento Tuxedo black ink and colored her up with Copic Markers. Unfortunately, I can't seem to find Angel Anya on the website. But if you'd like to have her you can check out the Farmers Market and submit a request via email... maybe she'll be available for the next Farmers Market. Here's a quick list of the Copic markers I used:

Skin: E000, E00, E11, E04
Hair: E40, E43, E44
Dress / Bow: B000, B91, B93, B95, B97
Wings: C00, C1, C3


I nearly forgot a sentiment for my card but remembered the sweet Peace on Earth stamp set in my collection. I heat embossed the sentiment on Midnight Muse card stock from Stampin' Up using Sugar Cube pigment ink from Taylored Expressions and Alabaster White embossing powder from Brutus Monroe. I trimmed the sentiment and adhered it to the card. Sadly, Peace on Earth also isn't on the website, but again... check out the Farmers Market! It actually looks like there is one coming up later this week so submit your requests asap! {{{OMG... there is not one coming up! It was in August. So sorry for the confusion!!}}}

You can check out my process video here... Sweet Holiday Card | Angel Anya | The Greeting Farm


I fussy cut Angel Anya and colored the edges of my fussy cutting with a Memento Tuxedo Black marker so it looks nice and neat. Added a bunch of foam tape to the back and popped her up on the card. Love the dimension it gives to the card! I hope I've inspired you to get inky and mix your stamps and papers!

Thanks so much for stopping by!
See ya next time.

Inky Hugs,
Crystal


{Please note that comment moderation is on. Your lovely comment will appear once approved.}

Monday, November 6, 2023

Cute Scene Card ~ Anya Reboot with Fairyland~ The Greeting Farm

 Hello there crafty friend!
I am super excited and honored to be guest designing for The Greeting Farm for the month of November!! I have a few fun projects to share with you all this month... starting with an adorable scene card featuring the super cute fairy Anya from the big Anya Reboot stamps! 


I created a fun scene for fairy Anya by combining and resizing a few different digi stamps from the Fairyland Digi Set into a Word Document. I included the snail on the document but kept him separate so I could pop him up on the card.


I stamped the sweet fairy Anya with Memento Tuxedo black ink and colored her up with Copic Markers. I also colored up my scene and the snail. Here's a quick list of the Copic markers I used:

Skin: E000, E00, E11
Hair: YR31, E43, E44
Dress: RV000, RV10, RV21, YG11, G14, G07
Wings: B0000, B00, B02, V000, V12, V15
Mushrooms: W00, W0, W1, W3
Red Mushroom {behind snail}: R20, R14, R46, W0, W1, W3
House: E53, E55, E57, E59, B0000, B000, B00, B02, B04, N0, N1, N3, N5, Y06, Y15
Snail: YG11, YG03, YG63, V000, V12, V15, W0, W1, W3
Grass: YG11, YG03, YG63
Sky: B0000, B000, B00


I trimmed up my panel just slightly smaller than the edging on my die cut panel. Adhered the pieces together and mat them with a purple card front that was adhered to a white card base. I fussy cut the snail and Anya on the line and the colored the edges with a black marker. A nice trick for making fussy cut images look nice and neat. 


I stamped the sentiment from the Lettered stamp set. Trimmed it up and cut a fishtail end. I popped up the snail, Anya, and the sentiment using foam tape. Love the dimension it gives to the card and the whole scene. I hope I've inspired you to get inky and mix up your stamps and digi stamps!

Thanks so much for stopping by!
See ya next time.

Inky Hugs,
Crystal


{Please note that comment moderation is on. Your lovely comment will appear once approved.}
Thursday, September 28, 2023

Fall Collab with Teresa ~ Mini-Remix Fall ~ The Greeting Farm

Hello there crafty friend!
I'm back with a second card for my fun collab with my sweet friend, Teresa, from Fresh and Renewed with Teresa. It sure has been fun playing with Fall themed card making goodies that I haven't used before. Shopping your stash is so much fun! I've found some amazing things... oh boy!


I've been having fun the last couple of weeks inking up some cute stamps from The Greeting Farm so I thought I'd look through my collection and find a Fall themed stamp set that I've never inked up before. Surprisingly I only found the one Fall themed stamp set. I did find a few Halloween themed stamps that I should really ink up. They are just too cute!


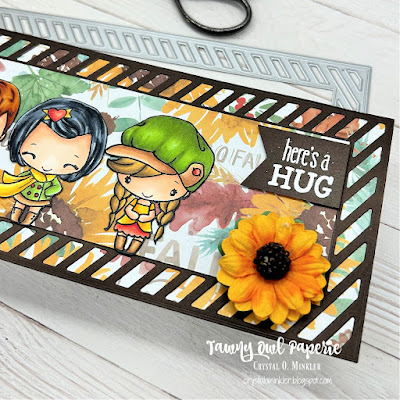
I had a blast filling up a slimline card last week with all the fun Fall images so I thought I'd do another slimline card. I inked up the Mini-Remix Fall cuties using Memento Tuxedo Black ink. And I had some fun coloring them up with my Copic markers. To save time again, I only share my coloring of one of these cuties in my video {link below}.


I was looking through my slimline dies and noticed that there were a few more slimline dies hiding behind the Gina Marie Designs collection of dies... I was pleasantly surprised to find the Slimline Striped Frame Stand Alone Die Set from Trinity Stamps. No idea when I added this fun die to my collection and I am certain that I've never used it before.


I had so much fun coloring up all these cute images. Here's the list of Copic markers that I used for them all:

Skin: E000, E00, E11, E04
Anya #1: R20, R14, R46, Y11, Y06, Y15, Y38, E21, E23, E51, E55, E57, YR23, YR27, R59
Ian: Y11, Y06, Y15, Y38, YG11, YG03, YG63, E51, E55, E57, E97, E15, E09
Anya #2: YG11, YG03, YG63, E21, E23, R20, R14, R46, B41, C5, C7, C9
Anya #3: Y11, Y06, Y15, Y38, R20, R14, R46, E21, E23, E51, E55, E57, E59, YG11, YG03, YG63, YR31, E43, E44 


I chose stamps and a die that I'd never used before so I had to also choose papers that I hadn't used before. The beautiful Fall Sunflower 8.5 x 11" paper pad from The Paper Studio is absolutely gorgeous. Now this paper pad hasn't been in my collection for very long. I bought it back in June during our vacation to the Lake of the Ozarks. But I've been itching to play with it!!


The beautiful sunflower also hasn't been in my collection for very long. I got it in June at The Craft Lab in Deepwater, MO. I love shopping Amy's store when we have our fun Unity Lover get togethers. She has so many wonderful products. I always find must haves while I'm there! The sunflowers are from 49 and Market and I adhered it using Ranger Multi Medium Matte.

As I mentioned above, to save some time so the video wasn't super duper long, I did most of my coloring off camera. I did record my coloring of Anya #3 though. You can check out the rest of my process in my video... Fall Sunflower Slimline Card | Fall Collab with Teresa | The Greeting Farm.


I sure hope you've enjoyed the card I shared today. I hope you'll give my YouTube channel a visit and then stop by Teresa's YouTube channel, too! As I mentioned above, I'm having a giveaway!! I still haven't put the prize together but I'll be sharing it on my YouTube channel next week when I also announce the winner from the comments on my channel and Teresa's channel!! To be eligible you must comment on each video Teresa and I both share during our whole Fall Collab... this weeks videos and last weeks videos. Hope you have an ink-tastic day!


Thanks so much for stopping by!
See ya next time.

Inky Hugs,
Crystal


{Please note that comment moderation is on. Your comment will appear once approved.}

Sunday, September 24, 2023

Friends Warm the Heart ~ Cozy Knit Stencil ~ A Colorful Life Designs

 Hello there crafty friend!
Today I'm so excited to share a fun Winter card as a guest designer for A Colorful Life Designs. Have you checked out the selection of stencils over at A Colorful Life Designs yet? All so AMAZING! There is literally something for every occasion!! Before we get to my card, please use code Crystal10 for 10% OFF your order over at A Colorful Life Designs and tell them Crystal sent you over!


Today I'm sharing a very simple Winter card featuring the Cozy Knit Stencil from A Colorful Life Designs. It makes such a pretty background! I love, love, love this stencil! I blended Tumbled Glass and Wilted Violet Distress Oxide inks over the stencil leaving white space around the edges.


The adorable girl and snowman (and the bunny further down in the pictures) is from the STAMPtember stamp set collaboration from The Greeting Farm and Simon Says Stamp called Warm the Heart. This is an exclusive set that, unfortunately, is no longer available. I'm so glad I was able to get it and super excited that I could play with it already. Here's a quick list of the Copic markers I used to color up these cute images:

Skin: E000, E00, E11, E04, R00, R20
Hair: YR31, E43, E44
Hat: B000, B00, B02, B04, V000, V12, C00, C1, C3
Coat / Button: V000, V12, V15, V17, B000, B00, B02
Pants: B000, B00, B02, B04
Shoes: N0, N1, N3
Snowball: C00, C1, C3
Snowman: C00, C1, C3, YR21, YR15
Snowman Hat: B000, B00, B02, B04, N0, N1, N3, N5
Snowman Buttons: B000, B00, B02, B04
Bunny: W00, W1, W3, R00, R20 V000, V12, V15, C00, C1, C3


Since I did my ink blending directly on the front of my card base, all I had to do was adhere the cute die cut images to the card. I heat embossed the sentiment using Sugar Cube Pigment ink, Alabaster White embossing powder and my heat tool on True Black card stock from Papertrey Ink. I trimmed the sentiment and popped it up on the card using foam tape.

You can check out my process video here... Friends Warm the Heart | Cozy Knit Stencil | A Colorful Life Designs.


 Be sure to head over to A Colorful Life Designs and check out their amazing selection of stencils. And don't forget to use code Crystal10 for 10% OFF your order! Have a wonderful weekend friends!

Thanks so much for stopping by!
See ya next time.

Inky hugs,
Crystal


{Please note that comment moderation is on. Your lovely comment will appear once approved.}

Saturday, September 16, 2023

Hocus Pocus ~ Halftone Circle Stencil ~ A Colorful Life Designs

 Hello there crafty friend!
Today I'm so excited to share another cute Halloween card as a guest designer for A Colorful Life Designs. Have you checked out the selection of stencils over at A Colorful Life Designs yet? All so AMAZING! There is literally something for every occasion!! Before we get to my card, please use code Crystal10 for 10% OFF your order over at A Colorful Life Designs and tell them Crystal sent you over!


Today I'm sharing a very simple Halloween card featuring the Halftone Circle Stencil from A Colorful Life Designs. It makes the perfect background! I can imagine so many different fun images with this stencil. I used a palette knife from my stash and applied Unicorn Horn Glitter Glaze from Brutus Monroe all over the stencil onto a card front of True Black card stock from Papertrey Ink.


The adorable witch is from the Hocus Pocus stamp set from The Greeting Farm. I don't see it currently on their website. But I did find Hallo Witch - she's a fun digital stamp and she's also on a broom. Here's a quick list of the Copic markers I used to color up this cute witch:

Skin: E000, E00, E11, E04
Eyes: YG11, YG23, C00, C1
Mouth: E04, E000
Hair: YR14, YR18, E09, E29
Dress / Boots / Hat: YG11, YG23, YR21, YR15, YR16, N0, N1, N3, N5, N7
Broom: E51, E55, E57, E59, YR21, YR15, YR16
Gecko / Leaves: YG21, YG11, YG23, YG63


I adhered the stenciled background to a white A2 top fold card base measuring 4-1/4 x 11"; scored at 5-1/2". I added foam tape to the back of the fussy cut witch and popped her up on the card. I heat embossed the sentiment using Sugar Cube Pigment ink, Alabaster White embossing powder and my heat tool. I trimmed the sentiment and popped it up on the card also using foam tape.

You can check out my process video here... Hocus Pocus | Halftone Circle Stencil | A Colorful Life Designs.


 Be sure to head over to A Colorful Life Designs and check out their amazing selection of stencils. And don't forget to use code Crystal10 for 10% OFF your order! Have a wonderful weekend friends!

Thanks so much for stopping by!
See ya next time.

Inky hugs,
Crystal


{Please note that comment moderation is on. Your lovely comment will appear once approved.}

Friday, January 27, 2023

{BYSHC} Sketch Challenge 29 ~ Gnome Christmas and a Bonus Card ~ The Greeting Farm

Hello there crafty friend!
I'm back with not one, but TWO Christmas cards to finish off the {BYSHC} Sketch Challenge 29 for the Build Your Stash Holiday Cardmakers!! Last month I got the super cute Gnome for Christmas paper pad from Echo Park Paper Co. and I thought it would be just too cute paired up with the adorable Gnome Christmas stamp set from The Greeting Farm.


What do you think? It almost looks like a snow globe the way I cut the sentiment. Complete accident, but I think I might try it again for a future card! I used two cute papers from the Gnome for Christmas paper pad... a cute green gingham and, of course, the gnome paper. I adhered those to an Old Olive piece of card stock from Stampin' Up measuring 4 x 5-1/4". I then adhered the paper layers to a card front of Pure Poppy card stock from Papertrey Ink measuring 4-1/4 x 5-1/2". And then I adhered the layers to a white A2 top fold card base. I actually created both cards at the same time since I was in the zone and set them aside.


I stamped the adorable gnomes and the holly with berries on a scrap of white card stock using Memento Tuxedo Black ink. This is my favorite ink to use on clear stamps because it cleans off very nicely. I then colored up the gnomes with the following Copic markers:

Skin ~ E000, E00, E11, E04
Hair / Beard ~ C00, C2
Holly & Berries ~ YG11, YG91, YG95, YG97, R20, R14, R37
Candy Cane ~ C00, C2, R20, R14, R37
Girl Gnome's Clothes ~ R20, R14, R37, YG11, YG91, YG95, YG97
Guy Gnome's Clothes ~ YG11, YG91, YG95, YG97
Shoes ~ N0, N1, N4, N6


I fussy cut the gnomes and cleaned up the edges of the images by coloring them with a Memento Tuxedo marker. I die cut a white piece of card stock using the stitched scalloped circle die from the Scallops & Circles {nesting dies} from Unity Stamp Co. And then I adhered the gnomes to the circle. I stamped the sentiment, trimmed the top and bottom, and then cut fishtails on both sides. As I mentioned above, it was a complete accident that it looks kind of like a snow globe but I love it! I cut a scrap of Pure Poppy card stock to be thinner than the white card stock and cute fishtails on it too. I adhered the sentiment and red layer together and then adhered the gnome circle to the bottom of the sentiment. I then added a bunch of foam tape and popped up the whole thing on my card. I used the thinner foam tape from Scrapbook Adhesives so my card won't be too bulky. 


If you've played with this sketch, you know that it's easy to make two cards when you cut two different pattern papers for the triangles. So, I have a bonus card to share using a cut apart from the Gnome for Christmas paper pad.


I popped up the cut apart using the same thin foam tape I used on my first card. I finished off the card by adding a few green enamel dots from my stash. 


This card may need a non-machinable postage stamp to mail but it was screaming for those enamel dots... had to happen! :)


Here's a look at {BYSHC} Sketch 29 for the months of December-January!
There's just a few more days to join us and play along with the sketch for a chance to win a prize! If you're interested in seeing a bit more inspiration for this sketch, check out the amazing inspiration from the design team over on the {BYSH} Cardmakers blog!


Thanks so much for stopping by!
See ya next time.

Inky hugs,
Crystal


{Please note that comment moderation is ON. Your lovely comment will appear shortly.}