Showing posts with label #brutusmonroe. Show all posts

Thursday, October 12, 2023

Fall Collab with Teresa ~ Fall & Halloween Cards and Winner Announced ~ Not 2 Shabby

Hello there crafty friend!
I'm back for the finale of the fun collab with my sweet friend, Teresa, from Fresh and Renewed with Teresa. I have had a blast playing with my Fall themed card making goodies in my stash. I hope that you've enjoyed the cards I shared and the cards Teresa shared on her YouTube.


Today I'm sharing a fun set of cards that I made pretty quick using one of my favorite sketches. It's the perfect sketch to use with fun papers and coordinating ephemera so I went looking through my stash to find some fun ones to play with.


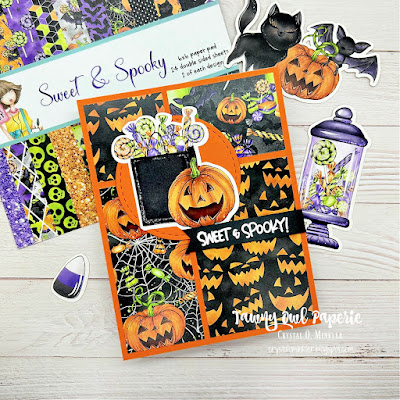
First up is a fun Halloween card using the Sweet & Spooky 6x6 paper pad and Sweet & Spooky ephemera from Not 2 Shabby. I cut my papers to the measurements on the sketch {shared below} and adhered them to a card front of Pumpkin Pie card stock from Stampin' Up. I also die cut a piece of Pumpkin Pie card stock using a stitched circle die from the Scallops & Circles {nesting dies} from Unity. The cute pumpkin ephemera is adhered to the circle and then I added foam tape to the back of the circle and popped it up on the card. The sentiment is heat embossed on True Black card stock from Papertrey Ink. I trimmed it up, cut a fishtail end, and then popped it up on the card. 


Inspiration for my cards today is the Tawny Owl Paperie Inky Inspiration Sketch 3. One of my absolute favorite sketches! This one is so perfect with pretty pattern papers.


My second card is another Halloween card using papers and ephemera from Scrapping for Less {Teresa's old business that closed a few years ago now}. This fun set of papers and ephemera is a favorite of mine and I just HAD to play with it again. I die cut another circle using the same die but this time it's cut from True Black card stock from Papertrey Ink. The sentiment on both cards is from the adorable Spooky Sweet stamp set from Not 2 Shabby {looks like it's no longer available}. The sentiments are also popped up on the cards with foam tape.


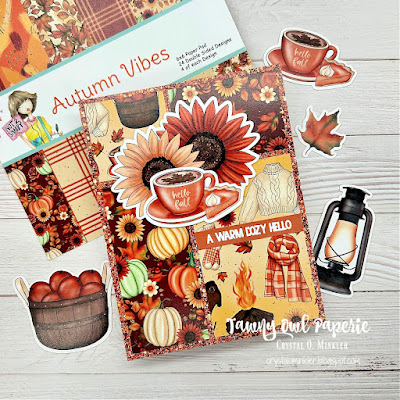
My first Fall themed card using the beautiful Autumn Vibes 6x6 paper pad and coordinating Autumn Vibes ephemera. I used pattern papers for all my layers on this one except for the sentiment. I heat embossed the cute sentiment on Really Rust card stock from Stampin' Up. The sentiment is from the retired Fall Sentiment stamp set from Not 2 Shabby. The ephemera is adhered together and then popped up on the card with foam tape.


And... my last card! Another pretty Fall themed card. This one features the beautiful Give Thanks 6x6 paper pad and coordinating Give Thanks ephemera. For this one I adhered the pretty pattern papers to a card front of Chocolate Chip card stock from Stampin' Up. The sentiment is heat embossed on Melon Mambo card stock from Stampin' Up. The ephemera on this one are also adhered together and popped up on the card with foam tape.

I share all four cards in my video and include my process in making my fourth card. I also added some fun touches inside each of the cards which you can see in the video. AND I share my giveaway and announce the winner! You can check out my video here... Fall & Halloween Cards and Winner Announced | Fall Collab with Teresa | Not 2 Shabby.


I sure hope you've enjoyed all the cards I shared for the Fall Collab with Teresa. I had so much fun using goodies from my stash. I just can't get enough of Fall {& Halloween} cards. I love them! I hope you'll give my YouTube channel a visit and then stop by Teresa's YouTube channel, too! Hope you have an ink-tastic day!


Thanks so much for stopping by!
See ya next time.

Inky Hugs,
Crystal


{Please note that comment moderation is on. Your comment will appear once approved.}

Thursday, September 28, 2023

Fall Collab with Teresa ~ Mini-Remix Fall ~ The Greeting Farm

Hello there crafty friend!
I'm back with a second card for my fun collab with my sweet friend, Teresa, from Fresh and Renewed with Teresa. It sure has been fun playing with Fall themed card making goodies that I haven't used before. Shopping your stash is so much fun! I've found some amazing things... oh boy!


I've been having fun the last couple of weeks inking up some cute stamps from The Greeting Farm so I thought I'd look through my collection and find a Fall themed stamp set that I've never inked up before. Surprisingly I only found the one Fall themed stamp set. I did find a few Halloween themed stamps that I should really ink up. They are just too cute!


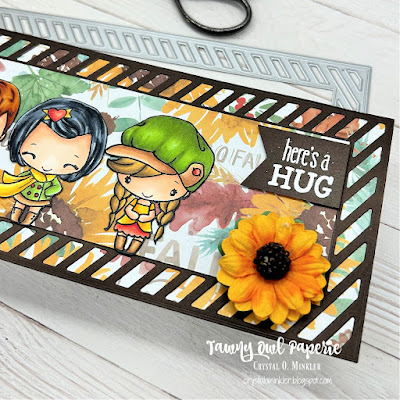
I had a blast filling up a slimline card last week with all the fun Fall images so I thought I'd do another slimline card. I inked up the Mini-Remix Fall cuties using Memento Tuxedo Black ink. And I had some fun coloring them up with my Copic markers. To save time again, I only share my coloring of one of these cuties in my video {link below}.


I was looking through my slimline dies and noticed that there were a few more slimline dies hiding behind the Gina Marie Designs collection of dies... I was pleasantly surprised to find the Slimline Striped Frame Stand Alone Die Set from Trinity Stamps. No idea when I added this fun die to my collection and I am certain that I've never used it before.


I had so much fun coloring up all these cute images. Here's the list of Copic markers that I used for them all:

Skin: E000, E00, E11, E04
Anya #1: R20, R14, R46, Y11, Y06, Y15, Y38, E21, E23, E51, E55, E57, YR23, YR27, R59
Ian: Y11, Y06, Y15, Y38, YG11, YG03, YG63, E51, E55, E57, E97, E15, E09
Anya #2: YG11, YG03, YG63, E21, E23, R20, R14, R46, B41, C5, C7, C9
Anya #3: Y11, Y06, Y15, Y38, R20, R14, R46, E21, E23, E51, E55, E57, E59, YG11, YG03, YG63, YR31, E43, E44 


I chose stamps and a die that I'd never used before so I had to also choose papers that I hadn't used before. The beautiful Fall Sunflower 8.5 x 11" paper pad from The Paper Studio is absolutely gorgeous. Now this paper pad hasn't been in my collection for very long. I bought it back in June during our vacation to the Lake of the Ozarks. But I've been itching to play with it!!


The beautiful sunflower also hasn't been in my collection for very long. I got it in June at The Craft Lab in Deepwater, MO. I love shopping Amy's store when we have our fun Unity Lover get togethers. She has so many wonderful products. I always find must haves while I'm there! The sunflowers are from 49 and Market and I adhered it using Ranger Multi Medium Matte.

As I mentioned above, to save some time so the video wasn't super duper long, I did most of my coloring off camera. I did record my coloring of Anya #3 though. You can check out the rest of my process in my video... Fall Sunflower Slimline Card | Fall Collab with Teresa | The Greeting Farm.


I sure hope you've enjoyed the card I shared today. I hope you'll give my YouTube channel a visit and then stop by Teresa's YouTube channel, too! As I mentioned above, I'm having a giveaway!! I still haven't put the prize together but I'll be sharing it on my YouTube channel next week when I also announce the winner from the comments on my channel and Teresa's channel!! To be eligible you must comment on each video Teresa and I both share during our whole Fall Collab... this weeks videos and last weeks videos. Hope you have an ink-tastic day!


Thanks so much for stopping by!
See ya next time.

Inky Hugs,
Crystal


{Please note that comment moderation is on. Your comment will appear once approved.}
Thursday, September 21, 2023

Happy Fall Slimline Card ~ Fall Collab with Teresa ~ Waffle Flower

Hello there crafty friend!
I'm so excited! Today I'm starting a fun Collab with my sweet friend, Teresa, from Fresh and Renewed with Teresa. We will be sharing a Fall card {or cards} each Thursday for the next couple of weeks. And we're both having a giveaway!! Details for my giveaway are further down in my blog post.


I thought this would be a great time to use products that I haven't used before. I'm a bit of a collector... LOL! Aren't we all! But this year I've been working hard to make my crafty purchases more intentional... buying things that I will use. However, I still have lots and lots of stuff that I added to my collection over the years. I mean I've been making cards now for over 20 years! The collection sure can build over that time. I'm super excited to play with a few of those must have Fall goodies that haven't been touched yet.


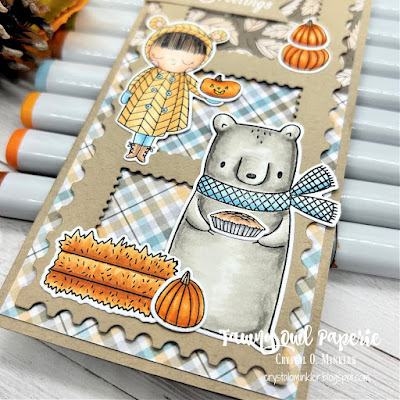
Today I'm sharing a sweet Fall inspired slimline card featuring the adorable Happy Fall Stamp Set and Dies from Waffle Flower. I don't even remember when I got this cute combo. I was looking through my stamps and spotted it... thought it would be perfect for a fun card. 


And right behind my Waffle Flower collection of stamps and dies is my Whimsy Stamps collection. I saw the awesome Slimline Postage Die that I've also never used before. I remember wanting this die so bad and then I never used it. Such a shame. But now I've used it and it was so fun to create a little scene using the different sections of the die.


I don't know why but coloring images for Fall is one of my most favorite things to do! I just love the color combos, I guess. I had so much fun coloring up all these cute images. Here's the list of Copic markers that I used for them all:

Flower Pot: YR31, YR21, Y06, YG03, YG63, N0, N1, N3
Pumpkins: YR21, YR15, YR16, YR27, E21, E23
Mouse: N0, N1, N3, N5, R00, R20, B000, B02
Mug: YR31, YR21, R00, R20, R43
Girl: E000, E00, E11, E04, E21, E23, YR31, YR21, B000, B02
Hay Bale: YR21, YR15, YR16, YR27
Pie: N0, N1, N3, E21, E23
Bear: W00, W1, W3, W5, B000, B02


I chose stamps and a die that I'd never used before so I had to also choose papers that I hadn't used before. I have quite a collection of Fall papers. Again, I love the colors so I'm just drawn to them and I have to have them all. I looked through my stash and found a pretty set of papers that were actually created by Teresa for her little crafty company called Scrapping for Less. She closed down her shop awhile ago now so these aren't available anymore, sadly. But she does still design papers for Not 2 Shabby. If you love pretty papers, head on over there and check them out.


The adorable Happy Fall Stamp Set didn't have a sentiment so I heat embossed a pretty sentiment from the Bountiful Fall stamps from Unity. I stamped it with Sugar Cube pigment ink from Taylored Expressions on a scrap of Kraft card stock and then melted the Alabaster White embossing powder that I had applied to the white ink using my Wagner Precision Heat Tool. Trimmed it up, cut a fishtail on the right side, and popped it up on the card along with the Slimline Postage Die and all the cute critters. 

To save some time so the video wasn't super duper long, I did most of my coloring off camera. I did record my coloring of the sweet girl though. You can check out the rest of my process in my video... Happy Fall Slimline Card | Fall Collab with Teresa | Waffle Flower.


I sure hope you've enjoyed the card I shared today. I hope you'll give my YouTube channel a visit and then stop by Teresa's YouTube channel, too! As I mentioned above, I'm having a giveaway!! I haven't had a chance to put the prize together just yet so I don't have a photo to share but it will be awesome!! I promise!! To be eligible you must comment on each video Teresa and I both share during our whole Fall Collab over the next couple of weeks!


Thanks so much for stopping by!
See ya next time.

Inky Hugs,
Crystal


{Please note that comment moderation is on. Your comment will appear once approved.}

Friday, July 7, 2023

Sending Prayers ~ Peony Ledger ~ Unity Stamp Co.

 Hello there crafty friend!
Today I'm sharing a card I made using the new Peony Ledger stamp from Unity. Love love love this gorgeous stamp by Graciellie Design! If you haven't checked out the new releases or the current sale, be sure to stop by Unity. The sale ends tonight!!


I started this card by stamping the lovely Peony Ledger on a piece of white card stock measuring 4-1/4 x 5-1/2". I then ink smooshed Lost Shadow and Wilted Violet Distress Oxide inks. I just recently got the Lost Shadow so I'm been anxious to play with it! Loving it so far!


I stamped the Peony Ledger a second time on a scrap of white card stock and colored it up with the following Copic markers: YG000, YG20, YG65, Y15, Y35, G0000, G82, YG91, Colorless Blender. I then fussy cut the flower on the line. I colored up the edges of the fussy cut flowers with a Memento Tuxedo Black marker so the edges would look nice. I then paper pieced the flowers over the ink smooshed peonies. I die cut the background using the largest die from the Make a Tag Die Set. I also die cut a piece of True Black card stock from Papertrey Ink.


I tore the left side of the peony tag... right along the edge of the stamped image. I then adhered the peony tag to the black tag. I stamped and fussy cut the sentiment. I also fussy cut a black mat from True Black card stock. I adhered them together and laid them across the top of the tag and then used a piece of washi tape to secure the Make a Tag die to the sentiment. I ran it through my Big Shot to achieve that stitched and scalloped edge. I splattered the tag with some diluted black acrylic paint. Once it was dry, I adhered the sentiment to the tag and wrapped the tag a few times with {Black} May Arts Burlap String.


The background layer was created by stamping the Wood Pile background stamp onto Weathervane card stock from Papertrey Ink with Weathervane ink, also from Papertrey Ink. I also added some black splatters to the background. I put a bunch of foam tape all over the back of the peony tag and popped it up on the card. I then adhered the card front to a white A2 top fold card base.


Head over to Unity to check out all the amazing new releases!! The current sale ends tonight!


Thanks so much for stopping by!
See ya next time.

Inky hugs,
Crystal


{Please note that comment moderation is on. Your lovely comment will appear once approved.}

Monday, June 12, 2023

Love the Story ~ Wrinkle & Our Blooming Story ~ Unity Stamp Co.

 Hello there crafty friend!
Sharing my last card from the fun Instagram Hop for Unity and Brutus Monroe's awesome collaboration of background stamps. This time I'm featuring the Wrinkle background stamp... I've played with this stamp a few times now and can't get enough of it!!


This time I stamped the Wrinkle background very simply using Vintage Photo and Ground Espresso Distress Oxide inks on Kraft card stock from Papertrey Ink. I die cut it with the awesome Deckle & Stitches Nesting dies and adhered it to an Early Espresso card front measuring 4-1/4 x 5-1/2". I then adhered my card front to a white A2 top fold card base measuring 4-1/4 x 11"; scored at 5-1/2".


The gorgeous typewriter stamp from Our Blooming Story was stamped with Black Amalgam ink from Gina K Designs. I colored it up with the following Copic Markers:

Flowers ~ RV10, RV13, RV14, BG11, BG23
Typewriter ~ BG70, BG72, BG75
Typewriter Ribbon ~ C00, C1, C3
Background {behind the flowers} ~ E30, E31 

I fussy cut the typewriter on the line and neatened up the edges by coloring it with a Memento Tuxedo Black marker. 


I stamped and trimmed the sentiment. Colored the heart in a bit with the same Copic Markers I used for the flowers. I then adhered it over the typewriter. I added a bunch of thin foam tape to the back of the typewriter and sentiment and popped it up on the card.


You can see some of the dimension in this photo. I love how this card turned out! And I'm really loving the Wrinkle background stamp. Head over to Unity to check out all the new background stamps and the other fun releases, too!!


Thanks so much for stopping by!
See ya next time.

Inky hugs, Crystal


{Please note that comment moderation is on. Your lovely comment will appear once approved.}
Wednesday, June 7, 2023

Always Find a Way ~ Wrinkle & Mystical Mermaid ~ Unity Stamp Co.

Hello there crafty friend!
Today I'm participating in a fun Instagram hop for a new release and collaboration between Unity Stamp Co. and Brutus Monroe. There's prizes and a whole bunch of inspiration so head over there to check it out. I just wanted to share a bit more information for my cards. First up is my mermaid card... 
 

I actually made the background for this card trying to figure out what colors I wanted to use for my typewriter card. It was not right for the typewriter card. BUT when I looked at it again, I thought it would be fun for a mermaid. It's different, for sure. 


The background was created by first ink smooshing Salty Ocean Distress Oxide ink on a white card front measuring 4-1/4 x 5-1/2". I then inked up the awesome new Wrinkle background stamp with Saltwater Taffy and Kitsch Flamingo Distress Oxide inks and just stamped it right over the inks smooshed card front. I also ink blended the Salty Ocean ink around the edges.


The sentiment and mermaid from the Mystical Mermaid stamps were stamped on white card stock with Black Amalgam ink. I also stamped the mermaid onto the background. I colored up the mermaid on the white card front with the following Copic Markers:

Skin ~ E00, E11
Hair ~ E70, E71,  E74
Tail ~ V000, V12, V15, V17, Y15, YR15, YG11, G14, G05, B00, B02
Rock ~ N0, N2, N4
Jelly Fish (on background) ~ V15
Bottom edge of Rock ~ B02

Once I was done coloring the mermaid, I fussy cut her on the line. Since I had stamped the mermaid on the background I was able to cut away the jelly fish and the dots... I even cut on the line between her hand and the rock and cut the little wisps of hair off. All those details came back when I paper pieced the mermaid to the background. I also cut between the fins. To make the whole piece nice and neat, I colored the edges black with a Memento Tuxedo black marker. All EXCEPT under the rock... there I colored the edge with a B02 copic marker. It helps make the rock look like it's in the water.


I added a bit of glitter to the mermaid's tail and the jelly fish using a Nuvo Glitter Gloss Aqua Shimmer pen. It's very subtle and does not show up in the photos, sadly. This card was so fun to make. I almost set this background aside but I'm glad that I used it. Head on over to the Insta Hop!! You have got to check out all the amazing cards! I'm sharing four cards over there... this one, plus my Father's Day Card from the Friends of Unity blog hop and two more cards. I'll be sharing the last two cards here on my blog soon. Be sure to subscribe to my blog so you don't miss my posts {on the right hand side - just enter your email address}. I'll also be sharing a process video for my Masculine Birthday card from the Insta Hop on my YouTube so be sure to subscribe to my channel {link ^^^ at the top of my blog under the heading}. Ok. Well, that's it for me. Have an inktastic day!!


Thanks so much for stopping by!
See ya next time.

Inky hugs,
Crystal


{Please note that comment moderation is on. Your lovely comment will appear once approved.}

Wednesday, July 27, 2022

Christmas in July 2022 {BYSHC} Linky Party ~ Hipster Christmas ~ Jaded Blossom

 Hello there crafty friend!
I can't believe that it's already day 6 of the Christmas in July 2022 {BYSHC} Linky Party... time is just flying by!! Today I'm sharing a cute mini slimline with the most adorable Hipster Santa stamp that I just HAD to have!!! This cute stamp from the Hipster Christmas stamp set is from NEW Sponsor Jaded Blossom!!! So excited to have Jaded Blossom as a new sponsor for our linky party!!


I paired up this cool Santa stamp with one of my favorite paper packs from Sponsor Brutus Monroe called Candy Stripe. Unfortunately, it looks like this paper has been discontinued. Bummer! It reminds me of the old fashioned candies my Granny always had during the holidays.


I used this fun new sketch from my Tawny Owl Paperie | Inky Inspiration Facebook group. I'd love to invite you to join the Tawny Owl Paperie | Inky Inspiration Facebook group... it's a fun little group that I just started back up. I share monthly sketches and crafty tips... and really enjoy all the cards being shared in the group! I hope that you'll join us and play along with the new August sketch! The sketch is just for fun... no prizes or anything yet. Just a fun way to get our mojos working when we get a little stuck or in a slump. Hope to see you there!


Back to my card... I started by die cutting a piece of Stampers Select white card stock from Papertrey Ink with the Big and Little Chain Mini Slimline die from Sponsor Gina Marie Designs. Now the sketch is designed for an A2 card so I had to do a little bit of figuring and cut my pattern paper pieces for the mini slimline as follows... 1-1/8 x 1-7/8" {top left}; 1-1/2 x 1-7/8" {top right}; 1-1/8 x 3-5/8" {bottom left}; 1-1/2 x 3-5/8" {bottom right}. These fit nicely in the middle of the mini slimline die cut.


I set that aside and stamped the Hipster Santa with Memento Tuxedo black ink... again, my favorite black ink for clear stamps for easy clean up. This time before I inked it up I rubbed the clear stamp with my index finger. Most clear stamps have a little film on them that can distort the image when you ink it and stamp right out of the package. I've found that if I rub my finger over the stamp it removes that film and I get a wonderful crisp image. You can also use a white eraser but mine isn't always handy... unlike my finger!! LOL!


Here's a quick list of the Copic markers I used to color up this stamp:

 Skin ~ E000, E00, E11, E04
Hair ~ C00, C2, C3
Hat ~ C00, C2, C3, R20, R14, R27, YG11, G24, G46
Glasses ~ R20, R14


I die cut a scrap piece of white card stock with the Big and Little Pierced Chain Circle dies from Gina Marie Designs and popped it up on the panel with foam tape. I adhered the panel to a white mini slimline card base measuring 7 x 6-1/2", scored at 3-1/2". I fussy cut Hipster Santa and 'cleaned up' the edges by coloring them with my Memento Tuxedo black marker. I popped up Hipster Santa on the circle die with foam tape. I stamped the fun sentiment with Mowed Lawn Distress Oxide ink and then Twisted Citron Distress Oxide ink and then again with Mowed Lawn... this gave me a very similar green to the greens in the papers. I trimmed up the sentiment, cut a flag on the left side and adhered it to the card. Done! What do you think? Loving the Hipster Santa? I do!!   


Before you leave, be sure to stop by Jaded Blossom to check out their upcoming release which is Autumn inspired but they have lots of fun Christmas goodies too AND lots of fun gnome dies and stamps!! Woohoo!! If you haven't already, stop by the Christmas in July 2022 {BYSHC} Linky Party to check out all the wonderful Holiday inspiration being shared!! So many wonderful cards and tags have been shared so far... I'm so inspired to keep on building my stash of holiday cards! I hope you'll join in the fun and play along!


Thanks so much for stopping by!
See ya next time.

Inky Hugs,
Crystal


{Please note that comment moderation is ON. Your comment will appear shortly.}

Tuesday, July 26, 2022

Christmas in July 2022 {BYSHC} Linky Party ~ Up On the Rooftop ~ Brutus Monroe

 Hello there crafty friend!
I'm back for day 5 of the Christmas in July 2022 {BYSHC} Linky Party and today I'm sharing a sweet card using a stamp from return Sponsor Brutus Monroe called Up On the Rooftop!! Oh my goodness... I just love the detail in this beautiful stamp! One of my many weaknesses when it comes to Christmas stamps is Santa stamps and I just love this one! Sadly, I'm not seeing this stamp on the Brutus Monroe website anymore but I did see a whole bunch of fab new releases for Christmas in July!! 


I stamped the image with Memento Tuxedo Black ink on Stampers Select white card stock from Papertrey Ink. I like to use Memento black ink for clear stamps because it's cleans off very nicely. I did use my Stamp Platform to stamp this image... I find sometimes with clear stamps you have to be sure not to have air bubbles under your stamp otherwise the stamp doesn't give you a clean crisp image. It did take me a few tries to stamp this image but boy was it worth it! Love it!


Here's my quick list of Copic markers that I used to color up this sweet Santa card:

Skin ~ E00, E11, E04
Hair ~ C00, C2
Santa Suit ~ C00, C2, R20, R14, R27
Santa's Bag ~ R20, R14, R27, Y35 {ribbon}
Chimney ~ E23, E19
Trees ~ YG11, G24, G46
House ~ E23, E25
Snow ~ C00, C2, C3
Sky ~ B0000, B00, B91, B93, B95, B97, B99


Once I was done coloring I splattered a bunch of white acrylic paint all over the image for some snow. At first I had only done some in the sky for stars but then I got to thinking it's Christmas... who doesn't love a white Christmas?! So I went a little nuts with the snow. But I think it adds to the card!


I die cut a piece of white card stock with the Wonky Stitched Rectangle die from Gina Marie Designs. I then trimmed the Santa panel to fit just inside the wonky stitched lines of the white layer. I adhered the two layers together and then adhered them to a True Black card front measuring 4-1/4 x 5-1/2". I adhered my entire panel to a white A2 top fold card base and set it aside. I stamped the sentiment on True Black card stock from Papertrey Ink with Clear Embossing ink from Brutus Monroe and melted some Alabaster White embossing powder, also from Brutus Monroe. I trimmed it up and popped it up on the card with foam tape. Done! Love it!


Before you leave, be sure to stop by Brutus Monroe to check out the new Christmas in July release!! Woohoo!! And they also have some beautiful Christmas products in their Clearance section! If you haven't already, stop by the Christmas in July 2022 {BYSHC} Linky Party to check out all the wonderful Holiday inspiration being shared!! I am really enjoying all the wonderful creations... so many beautiful cards and so inspiring! I hope you'll join in the fun and play along! Let's build our stash of holiday cards this week!!


Thanks so much for stopping by!
See ya next time.

Inky Hugs,
Crystal


{Please note that comment moderation is ON. Your comment will appear shortly.}

Sunday, April 24, 2022

Spring into Christmas 2022 {BYSHC} Linky Party ~ Sweet Seasonal Apples ~ Brutus Monroe

 Hello there crafty friend!
I'm back for Day 3 of the Spring into Christmas 2022 {BYSHC} Linky Party! I've been working on my studio this week while we've been on Spring Break from homeschool and I came across the Sweet Seasonal Apples stamp set from returning Sponsor Brutus Monroe... a collaboration stamp with Simon Says Stamp for STAMPtember that I got last year, I believe. Anywho, I just love this snowman candy apple so I thought I'd use him for a cute holiday card.


And I paired up the stamp with the Winter Cabin paper collection, also from Sponsor Brutus Monroe. Unfortunately, it looks like this paper collection is no longer available in the shop, but there's a bunch of other beautiful holiday papers still available in the shop! In fact, I probably shouldn't have looked because paper is my weakness and I think I need a couple paper collections!! LOL!


Each month I print out the sketch challenge and keep them all in a handy file folder. I decided to look through them all for inspiration and thought that Sketch 10 would be great for my card.


I stamped the snowman candy apple with Memento Tuxedo Black ink and colored him up with the following Copic markers:

Candy Apple ~ C00, C2, C3
Nose ~ Y06, YR15, YR68
Hat ~ N0, N2, N3, N5, R20, R14, R27, R39
Stick ~ E35, E39
Bow ~ R20, R14, R27, R39


I trimmed the focal piece and stamped the JOY sentiment. I added a mat of True Black card stock from Papertrey Ink for both the focal piece and the wood slice pattern paper. I added a couple pieces of scrap card stock under the top of the focal piece so that it would lay flat as I adhere it to the card front. I added three red Cozy Flannel Gloss enamel dots from Sponsor Gina Marie Designs. I wrapped the card front with a red grosgrain ribbon simply tying a knot for a faux bow and then I adhered the card front to a white A2 top fold card base.


Have you checked out the Spring into Christmas 2022 {BYSHC} Linky Party? I'm loving all the fabulous inspiration being shared so far! Even if you're not able to play along, I hope that you'll stop by and check out all the sweet inspiration being shared! So many beautiful cards!!


Thanks so much for stopping by!
See ya next time.

Inky Hugs,
Crystal


{Please note that comment moderation is ON. Your comment will appear shortly.}