Showing posts with label #gracielliedesigns. Show all posts

Sunday, July 23, 2023

Christmas in July 2023 {BYSHC} Linky Party ~ Wonderful Winter ~ Graciellie Design

 Hello there crafty friend!
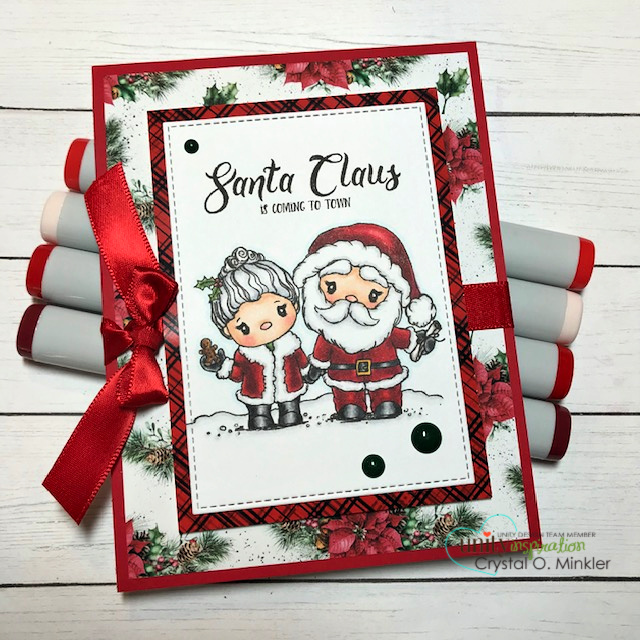
It's day 3 of the Christmas in July 2023 {BYSHC} Linky Party! I'm excited to bring you another sweet card that I've made to add to my Christmas stash! This time I played with the beautiful Wonderful Winter Digital Stamp Set from our return Sponsor Graciellie Design! Love this gorgeous digital stamp!! 


I inserted the digital stamp into a Word Document and resized it for an A2 card design. This is one of the other digital stamps that I combined all on one sheet for the Linky Party and printed it off. I like to fill up a full sheet before printing (if possible). 


Here's a quick list of the Copic markers I used to color up this cute digi stamp:

Poinsettias ~ R20, R17, R27 with gold gel pen in the center
Berries ~ C00, C1, C3
Pitcher ~ N0, N1, N3, N5
Ground ~ YG11, G24, G46


I die cut the panel using the largest die from the Frayed Edge Stacklets dies from Sponsor Taylored Expressions. I adhered the panel to a piece of red glitter pattern paper from the Deck the Owls 6x6 Paper Pad from Sponsor Not 2 Shabby. The beautiful sentiment was die cut using one of the stitched dies from the Scalloped & Stitched Sentiment Nesting Dies from Sponsor Unity Stamp Co. I added some foam tape to the back of the sentiment and popped it up on the card. And I finished off the card with a few red glitter enamel dots from Sponsor Gina Marie Designs.


Before you leave, be sure to stop by Graciellie Design! Gracie has shared an exclusive code - BYSH20 - for 20% OFF her Entire Shop (excludes already marked down items & code may not be used with other codes). How awesome is that!! Also be sure to stop by our other Sponsors... Taylored Expressions, Unity Stamp Co., Not 2 Shabby and Gina Marie Designs. And if you haven't already, stop by the Christmas in July 2023 {BYSHC} Linky Party to check out all the wonderful Holiday inspiration being shared!! The cards are ALL so amazing!! 


Thanks so much for stopping by!
See ya next time.

Inky Hugs,
Crystal


{Please note that comment moderation is ON. Your comment will appear shortly.}

Friday, July 7, 2023

Sending Prayers ~ Peony Ledger ~ Unity Stamp Co.

 Hello there crafty friend!
Today I'm sharing a card I made using the new Peony Ledger stamp from Unity. Love love love this gorgeous stamp by Graciellie Design! If you haven't checked out the new releases or the current sale, be sure to stop by Unity. The sale ends tonight!!


I started this card by stamping the lovely Peony Ledger on a piece of white card stock measuring 4-1/4 x 5-1/2". I then ink smooshed Lost Shadow and Wilted Violet Distress Oxide inks. I just recently got the Lost Shadow so I'm been anxious to play with it! Loving it so far!


I stamped the Peony Ledger a second time on a scrap of white card stock and colored it up with the following Copic markers: YG000, YG20, YG65, Y15, Y35, G0000, G82, YG91, Colorless Blender. I then fussy cut the flower on the line. I colored up the edges of the fussy cut flowers with a Memento Tuxedo Black marker so the edges would look nice. I then paper pieced the flowers over the ink smooshed peonies. I die cut the background using the largest die from the Make a Tag Die Set. I also die cut a piece of True Black card stock from Papertrey Ink.


I tore the left side of the peony tag... right along the edge of the stamped image. I then adhered the peony tag to the black tag. I stamped and fussy cut the sentiment. I also fussy cut a black mat from True Black card stock. I adhered them together and laid them across the top of the tag and then used a piece of washi tape to secure the Make a Tag die to the sentiment. I ran it through my Big Shot to achieve that stitched and scalloped edge. I splattered the tag with some diluted black acrylic paint. Once it was dry, I adhered the sentiment to the tag and wrapped the tag a few times with {Black} May Arts Burlap String.


The background layer was created by stamping the Wood Pile background stamp onto Weathervane card stock from Papertrey Ink with Weathervane ink, also from Papertrey Ink. I also added some black splatters to the background. I put a bunch of foam tape all over the back of the peony tag and popped it up on the card. I then adhered the card front to a white A2 top fold card base.


Head over to Unity to check out all the amazing new releases!! The current sale ends tonight!


Thanks so much for stopping by!
See ya next time.

Inky hugs,
Crystal


{Please note that comment moderation is on. Your lovely comment will appear once approved.}

Saturday, November 20, 2021

Joy Poinsettia Card ~ Paper Poinsettias ~ Unity Stamp Co.

 Hello there crafty friend!
Have you checked out the amazing new releases and sale going on at Unity Stamp Co?! Seriously, this is THE biggest sale of the year going on right now... you have to check it out!! I just had to play with the gorgeous new Paper Poinsettias stamp kit!! I adore poinsettias... they are my absolute favorite flower for the holidays and coloring them is even more fun!


I wanted to do a CAS card but I also wanted to add some texture and dimension with some dies. So I die cut a piece of white card stock with the Falling Snow Background die and another piece of white card stock with the Pleated Lace Rectangles die both from Gina Marie Designs. I adhered the die cut layers and then adhered them to the white A2 top fold card base.


Then it was time to color! I thought I'd add a bit of texture this time with dots. This was a lot of fun to color up! Here's a quick list of the Copic markers I used:

Petals ~ R0000, R14, R20, R37, R59
Center ~Y06, Y15, Y28, Y35


I fussy cut the poinsettia and adhered it to the card. I stamped the joy sentiment from the October 2020 Sentiment kit called Heart of Christmas and die cut it with the newly release coordinating die called Heart of Christmas. I adhered it to the card and I'm so happy with how this one turned out! I hope you'll go check out the amazing sale over at Unity... there's still a few days to shop!


Thanks so much for stopping by!
See ya next time.


Inky Hugs,
Crystal


{Please note that comment moderation is ON. Your lovely comment will appear shortly.} 

Thursday, June 17, 2021

Stamping Through a Stencil ~ Remember to Breathe ~ Unity Stamp Co.

 Hello there crafty friend!
I am back with another card featuring the beautiful new Remember to Breathe stamp from Unity Stamp Co. This beauty is a new Graciellie Design stamp that is now available in red rubber!! I am a huge fan of Graciellie Design stamps and butterflies!! So when I saw this beauty I just knew I had to play with it and had a fun idea to do some stamping through a stencil using the Wonky Stripes Background and Just a Dash Background stamps that released awhile ago that I hadn't gotten a chance to play with until now.


Isn't that just a beautiful butterfly?! I love it! I colored it very simply with three Copic markers: Y06, Y15, Y38 and then I fussy cut it and set it aside to make the background.


What I love about the technique I used is that it doesn't give a complete impression of the stamp... it's more of a imperfect distressed background. I did not plan on doing the additional blending around the oval but since I smudged some of the ink around the edges of the oval that was my 'fix'. The butterfly covers some of the background but I love how you can see the Wonky Stripes Background stamp in the Wilted Violet and Shaded Lilac oxide inks and then the Just a Dash Background in the Amalgam black ink. These two background stamps are made to overlap and it was so fun to finally ink them up!


Here you can see more of the background. Perfectly imperfect! I love it! I hope you do too.
I have a quick video on my YouTube channel sharing my process in creating the background. You can check that out here... Stamping Through a Stencil | Remember to Breathe.


To finish up this card, I added some Nuvo Aqua Shimmer Glitter Gloss to the butterfly and I popped up the sentiment with foam tape. A pretty CAS card with a fun background technique. I hope you're inspired to play with some of your background stamps. Be sure to check out the new release over at Unity Stamp Co. and, of course, there's a fabulous sale going on!!


Thanks so much for stopping by!
See ya next time.

Inky Hugs,
Crystal


{Please note that comment moderation is ON. Your lovely comment will appear shortly.}

Tuesday, June 15, 2021

Ink Smooshed Geometric Background ~ The Best You Can ~ Unity Stamp Co.

 Hello there crafty friend!
It's time for another fun release over at Unity Stamp Co. and I have a pretty card to share with you today!! I used two new releases to create my card... the cool 3D Cube Background stamp and the gorgeous The Best You Can stamp set a new release by Graciellie Design!


What do you think? I like the contrast with the mix of flowers and the geometric design of the background... and who doesn't love ink smooshed backgrounds?! I really love the mix of colors I used for this one, too... Blueprint Sketch and Broken China. Not a combo I would typically use but I think it's awesome together. I started my card by ink smooshing the two Distress Oxide colors and then once that was dry, I stamped over them with the 3D Cube Background stamp with Ranger Archival Jet Black ink. I set that aside and colored up the beautiful magnolias from The Best You Can stamp set. I love florals by Graciellie Design... always SO gorgeous!


We have several magnolia trees in our neighborhood and one right in front of our house. I just love how pretty they are and they smell so good! So I decided to color up these magnolias just like the ones in the front of our house... a simple white beautiful magnolia. I used the following Copic markers to color up the magnolias:

Petals ~ C00, C2, C3
Corolla {center} ~ Y06, Y15, Y38
Stem ~ E33, E37, E47


To keep with the geometric design, I die cut a piece of black card stock with a Geometric Double Frame die by Gina Marie Design. I adhered that to the background that I had trimmed down and mat with a black card front measuring 4-1/4 x 5-1/2". I fussy cut the magnolias and popped them up with foam tape. Then I trimmed the sentiment just leaving it on plain white card stock and popped it up on the card, also with foam tape. To finish off the card, I added a few Simply White Nuvo Gloss Crystal Drops. I sure love how this turned out! I hope you do too! Go check out all the beautiful new releases over at Unity Stamp Co.!! So many pretty new stamps and even new dies!!

I'm linking up my card to the following challenges:


Thanks so much for stopping by!
See ya next time.

Inky Hugs,
Crystal


{Please note that comment moderation is ON. Your lovely comment will appear shortly.}

Saturday, May 1, 2021

~ Friends of Unity May 2021 Blog Hop ~

 Hello there crafty friend!
Welcome to our May 2021 Friends of Unity Blog Hop!! I can't believe that it's already May!! This year just seems to be zipping by! Our hop this month has a fun cue...


Flora & Fauna... which is basically plants and animals.

I decided to focus mainly on plants. I have been wanting to play with the April 2021 Whit Kit called Kindness is Magic ever since it arrived in the mail and I just haven't had time. But I made time so I could color this one up with Copic markers on Kraft... one of my favorite techniques that I should really do more often. I also used a white Prismacolor pencil to color the white daisies.


I used a wonky square die to die cut the focal image and mat it on Hibiscus Burst and Hawaiian Shores card stock from Papertrey Ink. I then adhered it to a Kraft card base measuring 10 x 5", scored at 5". I used the following Copic markers for this card:

Teapot House ~ RV06, RV17, RV21, B00, BG02, BG05
Plants / Flowers ~ G12, G14, G17, YG03, YG23, YG25, YG95, YG97, Y06, Y15, Y38,
YR15, YR20, YR68, R14, R27, V04, V09
Rocks / Ground ~ W00, W1, W3, W5, N2, N5
Background ~ BG000, BG01


It's Unity's 13th birthday and they're celebrating with a fun release and a big Birthday Sale!! This beautiful flower is a part of the fun new release and it's called You Go Girl by Graciellie Design for Unity! Isn't it beautiful?! I love when Unity releases new gorgeous flower stamps designed by Gracie Chavez... they are always so stunning and so fun to color!


My card is a simple design with the flower and sentiment stamped on a white card front. I die cut it with the In & Out Diagonal Stitched Rectangle dies from My Favorite Things. I added some white acrylic paint splatters and wrapped the two corners with some Ivory burlap string.
I used the following Copic markers for this card:

Flower ~ YR15, YR20, YR21, R22, Y06, Y15, Y35
Leaves ~ YG11, YG17, YG23
Background ~ B0000, B000, B00


My last card was a total experiment! Have you ever ink smooshed with black card stock?! I'm sure it's not a new technique, but I've never tried it for myself and I am in love with the result!! I used Peacock Feathers, Cracked Pistachio, and Picked Raspberry Distress Oxide inks. I started with Peacock Feathers and then did a little Cracked Pistachio, but you really can't see the Cracked Pistachio. I thought maybe the bright Picked Raspberry would work well and in real life you can see it pretty well, but it doesn't show too well in the photo. Now the gorgeous stamp on this card is the stunning new May 2021 Uniquely Unity member kit called Strive to Be... isn't it wonderful?! I love it!


I wanted a delicate light flower to contrast the dark background so I did very light coloring with a few pink Copic markers. I still had the white acrylic paint out so I also threw on some more splatter. The flowers and the sentiment are popped up on the card with foam squares. I used the following Copic markers for this card:

Flowers ~RV10, RV14, RV52, Y06, Y15 
Leaves ~ YG11, YG23

Well, that's it for my cards this month... before you head off to the next person in the hop I need to announce my winner from last month's hop.


Congratulations Denise Bryant!!
Congratulations Denise!!!! Please email me at crystalominkler@gmail.com to claim your prize. 
Prize must be claimed within two weeks. 


Please hop along and enjoy some more inspiration from the Friends of Unity. I'm sure that some of my friends are having a giveaway so be sure to comment as you hop along.


Let's get to the hopping...


Crystal <--- you're here

up next ---> Dawn B. 


Thanks so very much for supporting our little hop!
We appreciate you!!

See ya next time.

Inky Hugs,
Crystal


{Please note that comment moderation is ON. Your comment will appear shortly.}


Wednesday, April 28, 2021

Spring into Christmas {BYSHC} Hop ~ Poinsettia Tea Cup ~ Graciellie Design

Hello there crafty friend!
It's day 6 of the Spring into Christmas 2021 {BYSHC} Hop and I have a lovely card featuring one of my favorite digi stamps from Sponsor Graciellie Design called Christmas Cheer!! I was itching to make another mini slimline card... it's been a while! lol I just love making this size of card!


I print off the sentiment and the image separately because I knew I was going to fussy cut the cup and saucer and set it on the fun Cozy Cup Coaster die from The Greetery. I just HAD to have this die when it released and this is the first time that I've used it! Do you do that too? I do it more often than I'd like to admit. Anywho... I colored up the cup and saucer with the following Copic markers:

Poinsettia ~ R11, R14, R29, G000, G12, YG67
Cup / Saucer ~ E30, E31, E35, E50
Hot Chocolate ~ E23, E25, E27, E51


I trimmed down the sentiment layer to 5-3/4 x 3" and mat it with a pretty piece of patterned paper from the Deck the Halls paper pad by Echo Park Paper. I adhered that to a white mini slimline card base measuring 6-1/2 x 6" scored at 3-1/4". I die cut the coaster from another piece of patterned paper in the same paper pad and then adhered it to the card. I fussy cut the Christmas Cheer cup and saucer leaving a skinny border around the image. I added a bit of gold metallic thread to the coaster before adhering the cup and saucer to the card. To finish it off, I added a little white gel pen to the berries. Love it!


There's just a few more days to play along with the Spring into Christmas 2021 {BYSHC} Hop!! I hope you'll join us in building our stash of holiday cards!! Be sure to stop by the {BYSH} Cardmakers blog to check out all the amazing inspiration being shared! So much fun!


Thanks so much for stopping by!
See ya next time.

Inky Hugs,
Crystal


{Please note that comment moderation is ON. Your lovely comment will appear shortly.}

Sunday, April 25, 2021

Spring into Christmas {BYSHC} Hop ~ Book Lover & Coffee Lovers ~ Graciellie Design

Hello there crafty friend!
Any coffee or book lovers out there?! Well, I absolutely love both so I just had to combine the book image from the Book Lovers Digital Stamp with the cup image from the Coffee Lovers Digital Stamp... both from Graciellie Design a Sponsor of the Spring into Christmas 2021 {BYSHC} Hop!!


My card today has more of a wintry feel... warm and cozy for those chilly winter days! Also a rustic woodsy feel with the color palette I pulled from the A Cozy Christmas paper pad by Echo Park Paper that I used for my paper layers on this card. The sentiment is from the Wonderful Winter Digital Stamp set... I actually cropped the sentiment so that it would fit better with my card design. One of the benefits of working with digital stamps, but also very similar to masking a stamp. And speaking of my card design, I used Sketch #2 from our second sketch challenge in the Build Your Stash Holiday Cardmakers Facebook group. This was one of my favorite sketches... there's lots of room for the focal image to shine.


I used the following Copic markers to color up these gorgeous images:

Mug ~ YG11, YG17, YG67, G19, G29 
Whipped Cream ~ C00, C2
Books ~ R21, R56, R89, E53, E55, E57, E59, G19, G29, W00, W2, W3
Ground / Outline ~ E53, E57, W00, W2


Hop on over to the {BYSH} Cardmakers blog to check out all the amazing inspiration being shared and pull out those holiday stamps, papers and goodies... let's build our stash of holiday cards this week!!


Thanks so much for stopping by!
See ya next time.

Inky Hugs,
Crystal


{Please note that comment moderation is ON. Your lovely comment will appear shortly.}

Thursday, January 28, 2021

Love Puppies & Muddy Paws Background | Flap Fold Card | Unity Stamp Co.

 Hello there crafty friend!

Today I'm sharing a sweet card I made for the new release over at Unity Stamp Co.!! Eeep! I adore the sweet pups in the Love Puppies stamp set!! You have got to check them out! Anywho, I made a Flap Fold Card to feature this sweet pup in one of my favorite color combos... kraft, black, white and red!


Those cute little paws on the puppers inspired the Flap Fold for this card. I've been wanting to do one and it just seemed perfect when I saw this cutie! The card base is the same 4-1/4 x 11" size that I would typically use for an A2 card, but I've scored it at 1-3/4 and 7-1/4" to create the fold.


I die cut the Muddy Paw background that was stamped in Black Amalgam ink on the Kraft card stock with the stitched rectangle die from the Blueprints 15 dies from My Favorite Things. I then mat the layer with Real Red card stock measuring 3-3/4 x 5". The sweet pup was also stamped with Black Amalgam ink and then colored with the following Copic markers ~ N0, N1, N2, N3, N6, N10, E34, E37, R000, R14, R27. I fussy cut the pup and set it aside. I stamped the image two more times on scrap card stock and cut inside the lines... I then adhered all those layers together to make the pup a bit more sturdy on the card. 


This is the card when it's setting open. Pretty stinking cute, if you ask me! lol
You can check out how I created this card here... Flap Fold Card | Love Puppies & Muddy Paws!


One more little look at this cutie pie before you go! I just adore this sweet stamp! Be sure to check out the new releases over at Unity!

Thanks so much for stopping by!
See ya next time.

Inky Hugs,
Crystal

Wednesday, July 29, 2020

Christmas in July 2020 Hop ~ Graciellie Design ~ Dreaming of Christmas


Hello there crafty friend!
It's day 5 of the hop and I am on a roll... woohoo!! Today I am featuring our fifth Sponsor for the hop... Graciellie Design!! I adore Graciellie Design's digi stamps and papers, as well as her red rubber stamps and paper pads that are available at Unity. The owner, Gracie Chavez, is a wonderfully talented artist and just the sweetest gal!! I was very excited that she said yes to my invitation to Sponsor this little Hop! Be sure to drop by her shop here ---> Graciellie Design


I had a hard time deciding which digis to use for my card today... but once I saw the cup from the Coffee Lovers digi set and the poinsettia cluster from the Merry Everything digi set, it was pretty much a done deal. The dreaming of Christmas sentiment from the Dreaming Of Christmas digi set was also a done deal because I dream of days where I can enjoy the beautiful Christmas decorations while drinking my coffee. I combined all the digis in a Word document and printed them off. I kept them kind of big... I wanted to make a large 5 x 7" card.


Here's a list of the Copic markers I used:

Cup ~ BG0000, BG000, BG01, BG23, C00, C1, C3
Poinsettias ~ R000, R01, R14, R27, R43, R46, G000, G24, G46
Pinecones ~ E23, E25, E27, E30
Holly ~ G000, G12, G24
Mistletoe ~ C00, C1, C3, G000, G12, G24, G46, G85 
Berries ~ R000, R14, R27
Table ~ E51, E55

I trimmed down the main panel to 4-3/16 x 6". I knew that I wanted to use a kraft card base so all I had to figure out was my paper layer. I debated doing a glitter paper... and then I thought about black, but I didn't want to go dark so I looked through my paper pads of Christmas paper and came across the Tim Holtz Paper Stash Christmas papers and these diagonal stripes papers are perfect! I cut them to 4-1/2 x 6-1/2" and adhered my layers to my card base.


I added a bit of white gel pen to the centers of the poinsettias, the whip cream, the mistletoe, and on the sides of the cup. That finished off my card! I love it!! And I know just who will be getting it! One more done for my stash! Yay!

I hope that you'll check out our Christmas in July 2020 Hop and play along! I've enjoyed seeing all the creations being shared so far... I have all kinds of ideas for more cards. If only there was more time in the day to create! That's it for me today.

Thanks so much for stopping by!
See ya next time.

Inky Hugs,
Crystal

Tuesday, May 19, 2020

Unity Stamp Company ~ Giveaway Winner!!

Hello there crafty friend!!
First, I have to say a huge THANK YOU, THANK YOU, THANK YOU!!!! for all those that subscribed to my YouTube Channel and followed my blog and Instagram... and even those of you who found my Facebook page and followed me there, too!!! I appreciate each and every one of you following me on my crafty journey! And now it's time to announce the winner of my celebration giveaway and that is... 


@karenladd510 on Instagram!! Woohoo!!
Karen, please email me at crystalominkler@gmail.com so I can send you your prize!!

Now, it just wouldn't be right for me to announce the winner and not share at least one card so I wanted to share a card I created for the latest release over at Unity Stamp Company!! It's Whit's birthday and they are celebrating with a Flash Sale. I believe it's still going so head on over there and check out all the fabulous deals!! 


But before you go... here's my card using the new Take Me Home kit designed by Graciellie Designs and available at Unity!! Love this sweet house!! I had so much fun coloring this beauty up!

Well, that's it for me today! 
Thanks again for being awesome and I'll see ya next time.

Inky Hugs,
Crystal

Friday, October 18, 2019

Unity Stamp Company ~ Santa & the Mrs ~ Santa Claus is Coming to Town

Hello there crafty friends!
I'm here with a quick post today. I've had several questions about the adorable Santa & Mrs. Claus card that I posted the other day, so I thought I'd do a quick write up with all the goodies I used for this card. If you haven't heard, Unity is having a awesome sale this weekend with some adorable new stamps and lots of amazing papers!! Check it out here ---> Unity Stamp Co.


Now, for my card... I actually started by coloring this adorable image with the sentiment, both from the same kit called Santa & the Mrs. I used the following Copic markers:

Skin ~ E000, E00, E21, R00, R20
Beard ~ C00, C1, C2
Mrs. Claus' Hair ~ N0, N1, R000, R14, R29, YG03, G46
Clothes/Hat ~ R000 R14, R29, R39, N0, N1, YG03, G46
Boots/Belt/Gloves ~ N0, N1, N2, N5, N7, Y13, Y17
Gingerbread ~ E27, E35, E37
Santa's List ~ W00, W1, W4
Snow ~ C0, C1
Outline of Santa & the Mrs. ~ B0000

I die cut the image and sentiment with a stitched rectangle die. I then mat it with the beautiful red plaid papers from the Holiday Intrigue papers designed by Angie Blom... available at Unity!! I then trimmed a piece of beautiful poinsettia papers from the Rustic Winter Wishes papers by Graciellie Design... also available at Unity... down to 4 x 5-1/4". I mat that with an A2 card front measuring 4-1/4 x 5-1/2". I wrapped it with Pure Poppy Luxe Satin Ribbon from Papertrey Ink and tied it with a beautiful bow. I then popped up the focal piece with foam tape and added a couple green enamel dots (they are a nice pine green color, not black as they appear in the photo) from the Santa's Workshop collection by Carta Bella.


Here's another look at the card. I sure do love how this one turned out!
Go check out the sale over at Unity!!! Lots of fab goodies on sale... get them before the sale ends!!

Thanks so much for stopping by!
See ya next time.

Inky Hugs,
Crystal