Showing posts with label Graciellie Designs. Show all posts

Thursday, June 17, 2021

Stamping Through a Stencil ~ Remember to Breathe ~ Unity Stamp Co.

 Hello there crafty friend!
I am back with another card featuring the beautiful new Remember to Breathe stamp from Unity Stamp Co. This beauty is a new Graciellie Design stamp that is now available in red rubber!! I am a huge fan of Graciellie Design stamps and butterflies!! So when I saw this beauty I just knew I had to play with it and had a fun idea to do some stamping through a stencil using the Wonky Stripes Background and Just a Dash Background stamps that released awhile ago that I hadn't gotten a chance to play with until now.


Isn't that just a beautiful butterfly?! I love it! I colored it very simply with three Copic markers: Y06, Y15, Y38 and then I fussy cut it and set it aside to make the background.


What I love about the technique I used is that it doesn't give a complete impression of the stamp... it's more of a imperfect distressed background. I did not plan on doing the additional blending around the oval but since I smudged some of the ink around the edges of the oval that was my 'fix'. The butterfly covers some of the background but I love how you can see the Wonky Stripes Background stamp in the Wilted Violet and Shaded Lilac oxide inks and then the Just a Dash Background in the Amalgam black ink. These two background stamps are made to overlap and it was so fun to finally ink them up!


Here you can see more of the background. Perfectly imperfect! I love it! I hope you do too.
I have a quick video on my YouTube channel sharing my process in creating the background. You can check that out here... Stamping Through a Stencil | Remember to Breathe.


To finish up this card, I added some Nuvo Aqua Shimmer Glitter Gloss to the butterfly and I popped up the sentiment with foam tape. A pretty CAS card with a fun background technique. I hope you're inspired to play with some of your background stamps. Be sure to check out the new release over at Unity Stamp Co. and, of course, there's a fabulous sale going on!!


Thanks so much for stopping by!
See ya next time.

Inky Hugs,
Crystal


{Please note that comment moderation is ON. Your lovely comment will appear shortly.}

Wednesday, April 28, 2021

Spring into Christmas {BYSHC} Hop ~ Poinsettia Tea Cup ~ Graciellie Design

Hello there crafty friend!
It's day 6 of the Spring into Christmas 2021 {BYSHC} Hop and I have a lovely card featuring one of my favorite digi stamps from Sponsor Graciellie Design called Christmas Cheer!! I was itching to make another mini slimline card... it's been a while! lol I just love making this size of card!


I print off the sentiment and the image separately because I knew I was going to fussy cut the cup and saucer and set it on the fun Cozy Cup Coaster die from The Greetery. I just HAD to have this die when it released and this is the first time that I've used it! Do you do that too? I do it more often than I'd like to admit. Anywho... I colored up the cup and saucer with the following Copic markers:

Poinsettia ~ R11, R14, R29, G000, G12, YG67
Cup / Saucer ~ E30, E31, E35, E50
Hot Chocolate ~ E23, E25, E27, E51


I trimmed down the sentiment layer to 5-3/4 x 3" and mat it with a pretty piece of patterned paper from the Deck the Halls paper pad by Echo Park Paper. I adhered that to a white mini slimline card base measuring 6-1/2 x 6" scored at 3-1/4". I die cut the coaster from another piece of patterned paper in the same paper pad and then adhered it to the card. I fussy cut the Christmas Cheer cup and saucer leaving a skinny border around the image. I added a bit of gold metallic thread to the coaster before adhering the cup and saucer to the card. To finish it off, I added a little white gel pen to the berries. Love it!


There's just a few more days to play along with the Spring into Christmas 2021 {BYSHC} Hop!! I hope you'll join us in building our stash of holiday cards!! Be sure to stop by the {BYSH} Cardmakers blog to check out all the amazing inspiration being shared! So much fun!


Thanks so much for stopping by!
See ya next time.

Inky Hugs,
Crystal


{Please note that comment moderation is ON. Your lovely comment will appear shortly.}

Sunday, April 25, 2021

Spring into Christmas {BYSHC} Hop ~ Book Lover & Coffee Lovers ~ Graciellie Design

Hello there crafty friend!
Any coffee or book lovers out there?! Well, I absolutely love both so I just had to combine the book image from the Book Lovers Digital Stamp with the cup image from the Coffee Lovers Digital Stamp... both from Graciellie Design a Sponsor of the Spring into Christmas 2021 {BYSHC} Hop!!


My card today has more of a wintry feel... warm and cozy for those chilly winter days! Also a rustic woodsy feel with the color palette I pulled from the A Cozy Christmas paper pad by Echo Park Paper that I used for my paper layers on this card. The sentiment is from the Wonderful Winter Digital Stamp set... I actually cropped the sentiment so that it would fit better with my card design. One of the benefits of working with digital stamps, but also very similar to masking a stamp. And speaking of my card design, I used Sketch #2 from our second sketch challenge in the Build Your Stash Holiday Cardmakers Facebook group. This was one of my favorite sketches... there's lots of room for the focal image to shine.


I used the following Copic markers to color up these gorgeous images:

Mug ~ YG11, YG17, YG67, G19, G29 
Whipped Cream ~ C00, C2
Books ~ R21, R56, R89, E53, E55, E57, E59, G19, G29, W00, W2, W3
Ground / Outline ~ E53, E57, W00, W2


Hop on over to the {BYSH} Cardmakers blog to check out all the amazing inspiration being shared and pull out those holiday stamps, papers and goodies... let's build our stash of holiday cards this week!!


Thanks so much for stopping by!
See ya next time.

Inky Hugs,
Crystal


{Please note that comment moderation is ON. Your lovely comment will appear shortly.}

Thursday, January 28, 2021

Love Puppies & Muddy Paws Background | Flap Fold Card | Unity Stamp Co.

 Hello there crafty friend!

Today I'm sharing a sweet card I made for the new release over at Unity Stamp Co.!! Eeep! I adore the sweet pups in the Love Puppies stamp set!! You have got to check them out! Anywho, I made a Flap Fold Card to feature this sweet pup in one of my favorite color combos... kraft, black, white and red!


Those cute little paws on the puppers inspired the Flap Fold for this card. I've been wanting to do one and it just seemed perfect when I saw this cutie! The card base is the same 4-1/4 x 11" size that I would typically use for an A2 card, but I've scored it at 1-3/4 and 7-1/4" to create the fold.


I die cut the Muddy Paw background that was stamped in Black Amalgam ink on the Kraft card stock with the stitched rectangle die from the Blueprints 15 dies from My Favorite Things. I then mat the layer with Real Red card stock measuring 3-3/4 x 5". The sweet pup was also stamped with Black Amalgam ink and then colored with the following Copic markers ~ N0, N1, N2, N3, N6, N10, E34, E37, R000, R14, R27. I fussy cut the pup and set it aside. I stamped the image two more times on scrap card stock and cut inside the lines... I then adhered all those layers together to make the pup a bit more sturdy on the card. 


This is the card when it's setting open. Pretty stinking cute, if you ask me! lol
You can check out how I created this card here... Flap Fold Card | Love Puppies & Muddy Paws!


One more little look at this cutie pie before you go! I just adore this sweet stamp! Be sure to check out the new releases over at Unity!

Thanks so much for stopping by!
See ya next time.

Inky Hugs,
Crystal

Wednesday, July 29, 2020

Christmas in July 2020 Hop ~ Graciellie Design ~ Dreaming of Christmas


Hello there crafty friend!
It's day 5 of the hop and I am on a roll... woohoo!! Today I am featuring our fifth Sponsor for the hop... Graciellie Design!! I adore Graciellie Design's digi stamps and papers, as well as her red rubber stamps and paper pads that are available at Unity. The owner, Gracie Chavez, is a wonderfully talented artist and just the sweetest gal!! I was very excited that she said yes to my invitation to Sponsor this little Hop! Be sure to drop by her shop here ---> Graciellie Design


I had a hard time deciding which digis to use for my card today... but once I saw the cup from the Coffee Lovers digi set and the poinsettia cluster from the Merry Everything digi set, it was pretty much a done deal. The dreaming of Christmas sentiment from the Dreaming Of Christmas digi set was also a done deal because I dream of days where I can enjoy the beautiful Christmas decorations while drinking my coffee. I combined all the digis in a Word document and printed them off. I kept them kind of big... I wanted to make a large 5 x 7" card.


Here's a list of the Copic markers I used:

Cup ~ BG0000, BG000, BG01, BG23, C00, C1, C3
Poinsettias ~ R000, R01, R14, R27, R43, R46, G000, G24, G46
Pinecones ~ E23, E25, E27, E30
Holly ~ G000, G12, G24
Mistletoe ~ C00, C1, C3, G000, G12, G24, G46, G85 
Berries ~ R000, R14, R27
Table ~ E51, E55

I trimmed down the main panel to 4-3/16 x 6". I knew that I wanted to use a kraft card base so all I had to figure out was my paper layer. I debated doing a glitter paper... and then I thought about black, but I didn't want to go dark so I looked through my paper pads of Christmas paper and came across the Tim Holtz Paper Stash Christmas papers and these diagonal stripes papers are perfect! I cut them to 4-1/2 x 6-1/2" and adhered my layers to my card base.


I added a bit of white gel pen to the centers of the poinsettias, the whip cream, the mistletoe, and on the sides of the cup. That finished off my card! I love it!! And I know just who will be getting it! One more done for my stash! Yay!

I hope that you'll check out our Christmas in July 2020 Hop and play along! I've enjoyed seeing all the creations being shared so far... I have all kinds of ideas for more cards. If only there was more time in the day to create! That's it for me today.

Thanks so much for stopping by!
See ya next time.

Inky Hugs,
Crystal

Monday, December 2, 2019

Unity Stamp Company ~ Old Bird

Hey there crafty friends!
It's Cyber Monday and Unity Stamp Co. is having another fabulous release along with a sale... AND an Instagram Hop!! So many fun things all at the same time!! I am loving this Old Bird... a new release and another fun version of this sweet and spunky lady by Tierra Jackson.


I think she's just perfect with the Coffee Lovers {Paper Pack} designed by Graciellie Designs and also available from Unity Stamp Co. I trimmed the sentiment/wood background paper to 4-1/8 x 5-3/8" and die cut the coffee background paper with a stitched hillside border die. I adhered both layers to a Spring Rain card base and set it aside. I colored the Old Bird with the following Copic markers:
Skin ~ E000, E00, E11
Hair ~ C00, C1, B000
Earrings ~ BV000, BV00, BV02
Coat ~ E0000, E21, E23,E25, E27
Shoes ~ N0, N1, N2, N5, N7
Cup ~ C00, C1, C2, C4, B0000, B000
Pigeons ~ C00, C1, C2, C4, BV000, BV00, BV02, YR24


Using a pencil and ruler I drew a line across the colored panel in between each image and got to work fussy cutting. I used a bunch of foam tape to adhere the colored image to the card base. I really love the dimension it gives to the card! 


And that sentiment... lol... perfection!! I love how this turned out and I hope you do too!
Be sure to check out the new releases over at Unity Stamp Co. and all the fabulous inspiration on the Instagram Hop... there's prizes up for grabs on the hop! Just saying! You can start hopping with my Instagram link above{just under my blog header} or click Instagram Hop and it'll take you to the Unity Stamp Company Instagram.


Thanks so much for stopping by!
See ya next time.

Inky Hugs,
Crystal

Monday, July 15, 2019

Growing In Unity ~ Day 1 of My 5 Favorite Things

Hello there crafty friends!
I'm super excited about this week... it's my turn to be the Growing in Unity gal and I am over the moon excited!! I am a Unity addict through and through and being able to share my love of Unity for a whole 5 days... it's just an amazing opportunity!! 

I have been so excited, in fact, that I had so many ideas and then all of sudden my mind went blank on what to share. And then I got to thinking... I could share some of my favorite things about Unity, as well as my favorite products, techniques, or crafty tips... channeling the wonderful Oprah Winfrey, you may say! Lol... so I'm going to share My 5 Favorite Things!

One of my first favorite things about Unity is the gorgeous floral stamps!! There are hundreds of absolutely stunning stamps with all kinds of flowers... literally, if you do a search on the website, over 300 stamp kits come up! Something for everyone!!


One of my absolute favorite flowers is the lovely daisy and this beautiful daisy from Graciellie Design's Be Unstoppable kit is perfect! I thought it would be fun to color it blue but let the color fade out at the tips of the petals... love how it turned out. Sadly, I didn't write down the copic markers I used for this but if I had to take a guess I would say it was B0000 and B24, along with YG11 and YG23 for the leaves. For the center of the flower, I think I used Y11, Y35, and E55.


I die cut the daisy using a Pleated Lace Circle die and popped it up on my already prepared card base of Pacific Point card stock with a beautiful layer of brown patterned paper by Bo Bunny called Penelope Collection that I had adhered a wide Pacific Point ribbon from my stash (can't remember the name of it). To finish off the card I die cut the sentiment with a banner die and mat it on a die cut piece of Pacific Point card stock. I think it turned out pretty.


Now, another favorite thing of mine is to use an easy sketch when making my cards. You'll notice that my two cards today aren't identical, but they use a similar sketch or design with the patterned paper on the card base and the main image die cut with some ribbon accent. 
A great design for a quick and beautiful card!


For this card, I colored the gorgeous tulip from the same Be Unstoppable kit with BG000, BG11, BG23, YG11, G24, and G28. I then die cut it with the Pleated Lace Rectangle die and adhered it directly to a stitched rectangle die cut piece of Stampin' Up Wood Textures patterned paper. I wrapped some White Sheer Organza ribbon around the panel tying just a knot... like a faux bow... and adhered the panel to an Aqua Mist card base. And this time I just popped up the sentiment on the main panel. 

Two lovely cards using one basic design that look very different from each other. 
Love how they turned out! I hope you like them too!

Be sure to leave a comment for a chance to win one of two fabulous grab bags of 25 stamps from Unity Stamp Company!!! Love me some deeply etched red rubber stamps! Oh yeah!!

Come back tomorrow for Day 2 of My 5 Favorite Things!

Thanks so much for stopping by!
See ya next time.

Inky Hugs
~ Crystal

Wednesday, July 3, 2019

Unity Stamp Company ~ Shimmer & Shine Sentiment Kit ~ Hello Sunshine

Hello there!
I have a lovely card to share with you today using the beautiful July 2019 Sentiment kit called Shimmer & Shine from Unity Stamp Company! I love Sunflowers!! They are one of my favorite flowers... now, I say that a lot, but Sunflowers and Daisies are seriously on the top of my list. So when I saw this gorgeous new stamp by Graciellie Design... Omg! I couldn't wait to color it!!


The tricky part in coloring this beauty was that I took it along with me on vacation and I only brought a handful of Copic markers... talk about a challenge!! I used the following Copic markers: 
Stem/Leaf ~ G12, G24, G28
Flower ~ Y06, YR15, YR16, E55, E57, E59


I then fussy cut the flower and popped it up on some pretty paper from my stash... these papers are from Papertrey Ink and I think they're discontinued but they're called Library Ledger, just in case you want to check them out. I trimmed the papers and mat them with Dark Chocolate card stock and then adhered the pieces to a kraft card front measuring 5-3/8 x 4-1/8. I then adhered the entire panel to an Aqua Mist card base... both colors I used coordinate with the papers I used. My final touch was the sentiment that I trimmed down and popped up just slightly covering the bottom of the flower stem.

That's it for me today. I sure hope that you like the card I've shared today.

Thanks so much for stopping by my blog!
See ya next time.

Inky Hugs,
Crystal

Thursday, June 27, 2019

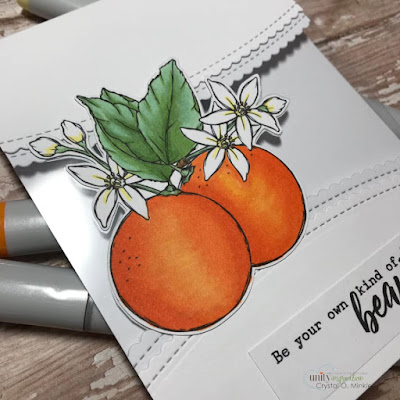
Unity Stamp Company ~ Naturally Beautiful ~ Be Your Own Kind of Beautiful

Hello there crafty friends!
I'm back with another post today for the new Unity Stamp Company release!! Woohoo!!
I love love love the gorgeous stamps in the Naturally Beautiful set by Graciellie Design... and I got to thinking that it would be fun to make a card with some clear card stock so 
I decided to make a clear panel card.


So basically a clear panel card has a layer of clear card stock or acetate that shows through to the inside of the card. I used a pretty stitched scallop border die to cut my white card base and then I cut three addition pieces of white card stock to adhere on either side of my clear card stock.


Here's a close up picture that shows the layer of clear card stock in between the layers of 
white card stock.


Now... back to the gorgeous oranges and blossoms in this stamp kit!! Eeep! Love it!
I colored them with the following Copic marker ~ Y06, Y11, YR15, YR16, G12, G24, G28.
I fussy cut the image and then I traced the shape of the fussy cut image on another piece of white card stock and fussy cut that out, as well. I adhered the beautiful oranges to the front of the card.


And then I flipped it open and adhered the clean white piece over the messy back. I hope this picture gives a good visual for what I mean. I sure had a lot of fun creating this card! I love to work with clear card stock, but I just don't do it enough! I hope this inspires you to pull out that clear card stock or acetate and make a fun card!

I'm sharing more of my cards for the Unity Stamp Company new release this evening on my Instagram as part of a Instagram hop... to check those out you can click on the tab above just under the heading of my blog.

Thanks so much for stopping by my blog!
See ya next time.

Inky Hugs,
Crystal


Saturday, May 25, 2019

Unity Stamp Company ~ Graciellie Designs ~ My Sympathies

Hello crafty friends!
Today I have a couple of cards to share... the kind of cards that are necessary sometimes to make, but not as fun because of the reason for the card. I found myself in need of a couple of sympathy cards so I checked out my favorite sketch challenge blogs and found this one... 


from Freshly Made Sketches #389 ...perfect for a simple sympathy card! 


I pulled out the My Sympathies sentiment kit by Graciellie Designs from Unity Stamp Company and went simple with a little watercoloring and the sentiment embossed on vellum over top... subtle and soft with an offset edged layer.


Here's a close-up of the embossed sentiment.


For my second card, I went with kraft and black... I used Unity Stamp Company's Don't Give Up sentiment kit along with the same sentiment from the first card. A simple and quick card that literally took me... maybe 5 minutes.

If you ever find yourself stuck designing a card, be sure to check out the sketch challenges... Freshly Made Sketches is one of my favorites!

Thanks for checking out my blog post!
See ya next time.

Inky Hugs,
Crystal

Wednesday, May 15, 2019

Unity Stamp Company ~ Time to Refresh ~ Hello Sunshine Girl

Hello there crafty friends!
I am so excited to share this card with you today. The idea for this one has been in my head for awhile but when I tried to put it together I got stuck... does that ever happen to you? Well, I walked away and worked on other projects until I figured out how to finish this beauty off.


I thought it would be fun to pair the flowers from Time to Refresh with the beautiful girl from Hello Sunshine Girl... I colored in three of the flowers and a bunch of leaves, but I only ended up using two. I fussy cut them all out. I then colored in the girl and fussy cut her out. I set all of those images aside and pulled out an impression plate called Sunrise by Papertrey Ink (I don't think it's available anymore, unfortunately). The impression plate is like a mix between a die and an embossing folder... by that I mean that it's a metal plate, but it doesn't cut. It just embosses the paper. Anywho, so I ran a piece of kraft card stock through the Big Shot with the impression plate and then using copic markers, I colored in the embossed portions... isn't that cool!? I love coloring on kraft with copic markers. It gives a muted touch to the coloring... such a fun effect!

I used the following Copic markers on my card:

Skin/lips ~ E000, E21, E51, R11, R14
Hair ~ Y21, E42, E43, E44
Blouse/Skirt ~ V000, V04, V12
Flowers/Sun ~ Y000, Y06, Y13, Y17, Y19
Leaves ~ YG01, YG05, YG23
Bag ~ B91, B95, B97

I adhered all of my layers onto a kraft card base, only popping up the girl with foam tape. I added some white gel pen to the stamens on the flowers, the button on the bag, and just a touch on the sun. I added some simply white gloss dots on the Hello Sunshine Girl's necklace... I did this by dabbing a toothpick in a small glob and then just barely touching the little pearls in her necklace. It gives such a fun dimension to her necklace... love it! I added a few dandelion yellow gloss dots to the card and that finished off my card for today! 


Here's a close up of my card! I sure hope you like it... if you do, please leave me a comment and let me know! I'd love to read your comments!

Thanks so much for stopping by today!
See ya next time.

Inky Hugs,
Crystal

Friday, November 23, 2018

Coffee Loving Cardmakers ~ Graciellie Design ~ Christmas Cheer


Hello! Today is my last day guest designing for Coffee Loving Cardmakers and I wanted to share a card I made using a gorgeous digi stamp set from Graciellie Designs called Poinsettia Tea Cup. I love poinsettias during Christmas time. They are my favorite flower this time of year! I just had to combine this digi image with this sweet sentiment... it made for an easy card, for sure! I am loving using digi stamps!


 I was able to combine the image and the sentiment on a Microsoft Word document and print it off. I colored in the image with the following Copic markers:
Tea ~ E30, E34
Cup/Saucer ~ N2, N5
Poinsettia/Mistletoe ~ R14, R27, R37, R89, Colorless blender, G46


Once that was done, all I needed to do was trim the white card stock to fit on my A2 card base of Smokey Shadow card stock.


I adhered a strip of patterned paper from the Carta Bella Christmas collection that I had die cut with a stitched scallop die from My Favorite Things. I then adhered the panel to the card base. I added a few Nuvo gloss white drops to the flower and some ebony black drops to the card. For some reason the black ones didn't settle right, but I'm not going to let those take away from the overall pretty card. I do love how this turned out! I hope you've been inspired to try out those digi stamps!

Thank you friends for checking out my blog post!
See ya next time.

Inky Hugs!
~ Crystal

Thursday, September 20, 2018

You're Amazing!

Hello! A quick post today for the Inspired By Challenge #38 ~ Fall Foliage.


I was inspired by the fabulous colors in the challenge photo and also the cup or mug (not sure?) in the photo. I wanted to focus on the rich colors of Autumn with reds, oranges and yellows, but also include the browns. I love the rich brown in the scallop background piece poking out from the behind the watercolored washed background. I die cut the Large Scallop Stackers from Dark Chocolate card stock for that piece. 
I ran Canson XL watercolor paper through the big shot with the Papertrey Ink Book Print Impression Plate and then did a watercolor wash with Kuretake Gansai Tambi watercolors. I die cut the piece with the Noted: Simply Stitched A2 Vertical dies also from Papertrey Ink. I adhered those layers to a Kraft card base and then set it aside.


I stamped the Tea Cup Floret by Graciellie Designs (sold by Unity Stamp Company) in Gina K's Black Amalgam ink. I heat set it with my heat tool and then colored it in with the same Kuretake Gansai Tambi watercolors I used on the background, but also used some browns and white for the cup, saucer, and coffee. I added some copper metallic thread to the bottom of the fussy cut image and then popped it up on the card. I stamped the sentiment in VersaMark watermark ink and then heat embossed some fine white embossing powder. I die cut it with a banner die, trimmed it, and adhered it to the card. I am loving how this one turned out!


The Inspired By Challenge just started today so I hope you also get a chance to play along.

Thanks so much for stopping by!

See ya next time.
~ Crystal

Tuesday, May 29, 2018

A Whole Latte Love ~ Graciellie Designs


Hey there! It's Day 5 of the Spring/Summer Coffee Lovers Blog Hop and I am back with my 5th card. For today's card, I'm using a digi stamp from Graciellie Designs that I got during another Coffee Lovers Blog Hop. Isn't it gorgeous!?


I kept this design very simple. I printed the image on the white card stock and then colored it in using copic markers ~ V06, V12, V17, Y06, Y35, YG67, YG93, B0000, B00, B12, N0, N1. I die cut the piece using a Loopy Rectangle die set from Gina Marie Designs. I adhered the piece to a Kraft card base and then stamped the sentiment from STAMPlorations' Latte Love stamp set in the top right corner. I added a few drops of Nuvo Sea Breeze Jewel Drops and called this card done!

Thanks so much for stopping by!

See ya next time.
~ Crystal

Saturday, December 2, 2017

~ Friends of Unity December Blog Hop ~

Hello and welcome to our first Friends of Unity Blog Hop!!


Amber and I were chatting the other day and realized that we had the same idea stirring... let's start a blog hop featuring our favorite stamps from Unity Stamp Company!! Fabulous!!

That conversation quickly turned into a fantastic group of friends - old and new - that are just as excited to hop sharing their love of Unity. Our name was born... Friends of Unity! 

Enough with this silly intro... let's get inky!


I love wreaths! I think I've mentioned that before, but I am really in love with this Cheery Christmas wreath designed by Graciellie Designs for Unity Stamp Co. The detail to this stamp is simply amazing! I really wanted to make this special so I had to go with the No Line Coloring technique. I stamped the image using Simon Says Stamp's Barely Beige ink. I then pulled out my prismacolor pencils and got to coloring. I had a blast blending and layering color... I love these pencils!


Once I had the wreath colored, I went digging through my endless Christmas papers. I found this gorgeous holly and berry paper in a paper pack by The Paper Studio called Pine St. Square. I die cut the paper with a rectangle stitched die and layered it with a scrap of Garden Green card stock from Stampin' Up! I set that aside and pulled out a kraft card base. I blended the edges of the card base with Vintage Photo and Black Soot distress inks. I wrapped some gold thread around the patterned paper several times and then I adhered the patterned paper to the card base. I tied a little bit of gold ribbon round the thread. And then I decided to die cut the wreath using the Mod Square Stax die from My Favorite Things. I blended the edges of this piece with the same distress inks and then I popped up the whole thing on the card base. To finish off my card I wanted a small sentiment so I used the 'Merry Christmas' from the Entwined Poinsettia kit. I stamped it in VersaMark ink and then heat embossed Ultra Fine Antique Gold embossing powder from Simon Says Stamp.

I absolutely love the way this card turned out! I sure hope that you do too!

~ Let's Hop ~

Crystal O. Minkler <--- you're here

up next ---> Wynne Grob

Eileen Mathys

Robyn Jordan

Jeanie Hays

Amber Trubiak

Dawn Fields


Thanks so much for stopping by for our first Friends of Unity blog hop!!

Hope to see you next month for our second hop!
~ Crystal