Showing posts with label Copic. Show all posts

Thursday, March 24, 2022

Free To Fly ~ Butterfly Moment {Slimline} ~ Unity Stamp Co.

 Hello there crafty friend!
I'm so glad you've stopped by! Today I'm sharing a quick mini slimline card using the newly released Butterfly Moment {Slimline} stamp kit from Unity Stamp Co.


I went with a very simple design. I stamped the butterfly and die cut it with the Wonky Stitched Mini Slimline die from Gina Marie Design. I chose a pretty spring color palette of purple, yellow and pink. And outlined the butterfly with some blue to give it dimension on the card.


Here's a quick list of the Copic markers that I used:

Purples ~ V000, V12, V06, V17
Pinks ~ R20, R22
Yellows ~ Y000, Y11, Y06
Outline ~ B0000, B00


I stamped the sentiment and mat it with kraft card stock. I adhered the butterfly panel to a 6-1/2 x 3-1/2" kraft card front and adhered it to a white mini slimline card base measuring 6-1/2 x 7", scored at 3-1/2". To finish off the card, I added a few purple rhinestones from the Spring Bling Rhinestones pack from Gina Marie Designs. 

This beautiful butterfly is just one of the cute mini release stamp kits newly released at Unity this week!! Go check out all the new releases and, of course, there's an awesome sale going on too!

Thanks so much for stopping by!
See ya next time.

Inky Hugs,
Crystal


{Please note that comment moderation is ON. Your lovely comment will appear shortly.}

Friday, June 28, 2019

Polka Dot Orchard ~ Camper Snail ~ Love Is...

Hi there crafty friends!
Today, I am sharing an adorable card using the sweet Camper Snail digi set by Polka Dot Orchard! Eeep! How cute is this snail!!??!! I just love him! 
The Camper Snail digi set is another wonderful set created by Kimberly Wiener. 


To start my card, I resized and cropped the 'Love is...' sentiment and then combined it with the camper snail image on a Word Document so that it would fit on an A2 card. I included some other images on my sheet (I hope to share my other card using these digis next week!) and then printed them off and started coloring! I used the following Copic markers to color the Camper Snail:

Camper ~ E08, E97, E99, N0, N2, N4, G000, G24, Y000, Y06, Y11, B000, B02, B04

Snail ~ G000, G12, G24

Luggage ~ E08, E97, E99, R000, R14, R46, G12, G24, YG09


I kind of lucked out and the colors I used to color the image worked perfectly with the papers from the Simple Stories Travel Notes 6x8 paper pad. I die cut my main panel and adhered it to the fun sentiment paper. I wrapped some kraft twine around the panel a few times and tied a bow. I then adhered my striped paper directly to a white card base and popped up the main panel on the card.


I mentioned above that I cropped the sentiment and this is the other portion of the sentiment... I thought it would be fun to put it inside the card. I die cut it with the same wonky stitched rectangle die and adhered it inside. 


Such a cute card! I love how it turned out! I hope that you like it too.
Polka Dot Orchard has several fun digi sets available... you can check them out here!

Thanks so much for visiting my blog! I'd love to invite you to check out my Instagram and my Facebook crafty page. You can find links for both above just under the heading of my blog.

See ya next time.

Inky Hugs,
Crystal


Thursday, June 27, 2019

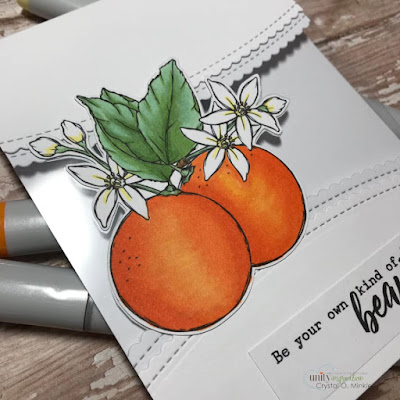
Unity Stamp Company ~ Naturally Beautiful ~ Be Your Own Kind of Beautiful

Hello there crafty friends!
I'm back with another post today for the new Unity Stamp Company release!! Woohoo!!
I love love love the gorgeous stamps in the Naturally Beautiful set by Graciellie Design... and I got to thinking that it would be fun to make a card with some clear card stock so 
I decided to make a clear panel card.


So basically a clear panel card has a layer of clear card stock or acetate that shows through to the inside of the card. I used a pretty stitched scallop border die to cut my white card base and then I cut three addition pieces of white card stock to adhere on either side of my clear card stock.


Here's a close up picture that shows the layer of clear card stock in between the layers of 
white card stock.


Now... back to the gorgeous oranges and blossoms in this stamp kit!! Eeep! Love it!
I colored them with the following Copic marker ~ Y06, Y11, YR15, YR16, G12, G24, G28.
I fussy cut the image and then I traced the shape of the fussy cut image on another piece of white card stock and fussy cut that out, as well. I adhered the beautiful oranges to the front of the card.


And then I flipped it open and adhered the clean white piece over the messy back. I hope this picture gives a good visual for what I mean. I sure had a lot of fun creating this card! I love to work with clear card stock, but I just don't do it enough! I hope this inspires you to pull out that clear card stock or acetate and make a fun card!

I'm sharing more of my cards for the Unity Stamp Company new release this evening on my Instagram as part of a Instagram hop... to check those out you can click on the tab above just under the heading of my blog.

Thanks so much for stopping by my blog!
See ya next time.

Inky Hugs,
Crystal


Friday, May 17, 2019

Scrapping for Less ~ Lawn Fawn ~ Lovable Legends 3 Ways

Hey there crafty friends!
I'm here today with a trio of cards using Lawn Fawn's Lovable Legends stamp set! 
I thought it might be fun to share a trio of cards starting with a simple design and then building from that design to a slightly more involved card design.


My first card started with a simple stenciled background using the Echo Park Good Vibes Stripe stencil along with the Tumbled Glass Distress Oxide ink that I blended over the stencil. Once my background was done, I die cut it with a wonky rectangle die. I then cut a 1" strip of the beautiful Watercolor Foil paper from Pink & Main and fussy cut the little flag end on one side. I adhered it to the panel and then trimmed off the excess. 

I stamped the super cute sentiment directly on the panel and then adhered the entire panel to a white card base. I stamped the bigfoot character three times and decided for my card design... he'd be a cute yeti so I colored him very simply with the following Copic markers ~ N0, N1, N2, B0000, B00, Colorless Blender. I fussy cut my cute yeti and popped him up on the card.
So this is my first card design... pretty simple, right?! But still adorable!!


For my next card, to add a little somethin' somethin' and bring it up a step from simple,  I decided to blend the background using distress oxide inks. I used Tumbled Glass, Stormy Sky, and Salty Ocean Distress Oxide ink. I then blended Tumbled Glass distress oxide ink over the same Good Vibes Stripe stencil that I used on the first card. I love the subtle stripes it made on the background! I die cut the panel with the same wonky rectangle die and adhered it directly on a white card base.

I adhered a strip of the Watercolor Foil paper just like the first card, but this time I stamped the sentiments on scraps of white card stock. I used a banner die to cut out the 'Have An' sentiment and fussy cut the 'Unbelievable Birthday'. I adhered both sentiment directly to the card. I popped up the cute yeti and to finish off this card I added a couple of trees that I stamped from the same set using green inks in my stash. I love how the Watercolor Foil paper breaks up the stripes of the background and the foil in the paper adds a pretty shine for interest.

Are you ready for the third and final card... ?!


Whatcha think?! I'm a little partial to the background on this one because I love splatter!! I created the background the very same as the second card, but I added water and white acrylic paint splatters. I adhered the strip of  Watercolor Foil paper and the top sentiment directly to the card, but I popped up the bottom sentiment using foam tape. I adhered more trees to surround Mr. Yeti... huh, just decided to name him... LOL! I also popped up the two trees on the far right. My final touch to finish this card was to add some random dots to the trees using a white gel pen... almost like snow falling on the trees from the splatter in the background.


Here's a picture showing all of the cards together. I had a bunch of fun making these cards to share with you... I hope that you've enjoyed seeing the different steps in adding interest and dimension to the cards! I hope this inspires you to try different levels of cardmaking!!

Thanks so much for stopping by!
See ya next time.

Inky Hugs,
Crystal

Tuesday, May 14, 2019

Unity Stamp Company ~ Time to Refresh

Hey crafty peeps!
I'm sharing a card I made for the new release and big birthday sale over at Unity Stamp Company
using the gorgeous Time to Refresh kit.


I went with a simple design using patterned paper... these papers are called Vintage Bliss by Simple Stories. So pretty! I decided to use the pink (yup, still on a pink kick!) from the papers to color the flowers. I stamped and colored three flowers, fussy cut them out and adhered them to the card. The center flower is popped up with foam tape.

I used the following Copic markers for this card ~ RV0000, RV10, RV11, R00, Y06, Y19

I stamped the sentiment in the center top portion of the white card base. And to finish off the card, I added some clear wink of stella to the center of the flowers.


I sure wish you could see the beautiful glittery goodness in the center of those flowers.
You'll just have to trust me! :) 

This lovely set is still on sale... go snatch it up before the sale ends...

Thanks so much for checking out my blog post!
See ya next time.

Inky Hugs,
Crystal


Monday, May 6, 2019

Unity Stamp Company ~ Grow & Change

Hey crafty peeps!
So... this is probably my most favorite stamp for the new release!
Love, love, love it!!


You can find this stamp here ---> Grow & Change

Isn't she beautiful!! And those gorgeous flowers! I love it!
I used the colors from the Carta Bella Spring Market papers... such a beautiful bunch of papers!

I used the following Copic markers for this card ~ E0000, E000, E51, B91, B95, B97, 
Y000, Y02, Y15, Y17, N2, N5, R00, R01, R20, R21, E55, E57, E59

I had so much fun with all of these papers and this gorgeous stamp!
Hope you enjoyed this card!

Thanks so much for stopping by!
See ya next time.

Inky Hugs,
Crystal

Friday, April 12, 2019

Scrapping for Less ~ Heffy Doodle ~ Gnome Matter What

Hello crafty peeps! 
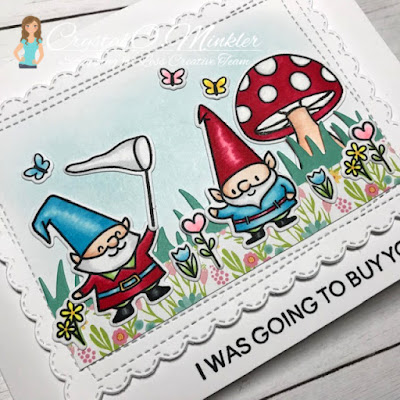
Today, I'm sharing an adorable card using Heffy Doodle's Gnome Matter What stamp set


How cute are these gnomes!?! 
I just adore them! I inked them up along with a bunch of other images from this set using Memento tuxedo black ink and then colored them in using the following Copic markers: Y06, Y35, YG11, YG23, RV000, RV00, RV14, RV21, RV29, E000, E00, E11, N0, N1, N2, N5, N8, B000, B00, B02.

To build my scene I die cut a piece of white card stock using the Memory Box Wrapped Scalloped die and then I blended a little Tumbled Glass distress ink for my sky. I then cut a strip of patterned paper for my 'ground' from the Echo Park Spring Fling paper pad and also die cut the grass from the same paper pad. I adhered the grass to the back of the 'ground' paper and then adhered just the bottom portion of the combined papers to the scene so that I could be free to place things in amongst the grass, like the cute mushroom. I adhered all the images to create my scene and then popped up the focal panel on a white card base. To finish off the front of the card, I stamped my sentiment using my Tim Holtz Stamp Platform. Now, just a little tip... I should have stamped the sentiment before I popped up the focal panel, but because I used the Stamp Platform I was able to stamp the sentiment a few times to get the crisp sentiment I wanted.


The sentiment on the front of the card just keeps you hanging so I just HAD to add to the inside of the card. I combined the patterned papers again to continue the design on the inside of the card. I added another gnome... I colored several since I was on a roll. LOL
And then I stamped the sentiment for the inside of the card. I decided to add the little clock to this gnome's hand to tie in the sentiment... so cute! Now, I got to thinking you could leave the card like this basically saying that the card is the recipient's birthday gift. Or...


You could slide a gift card in there for just a little something... a quick gift idea!


Here's a close up of the scene on the front of the card... I went a little crazy with the flowers, but couldn't help myself! So many cute images to color in this set!

You can find the Heffy Doodle Gnome Matter What stamp set available in the shop!


Thank you friends for checking out my blog post!
See ya next time.

Inky Hugs,
Crystal

Friday, March 22, 2019

The Greeting Farm ~ Lovable Anya ~ HB2U

Hello there! Today, I'm sharing a card I made for my niece's birthday. The whole design and paper choices for this card are because of a challenge my friend, Bobbie Sue, shared and that was a challenge to use up those papers you have sitting around. Well, at first, I didn't like the idea! I am a paper hoarder! I love me some pretty papers! But after packing some of my papers for our move, I realized just how much paper I have and oh my goodness... it's time to let some go! So, I have been working this month, while I still have most of my craft space available, to use up papers in at least two different paper pads. It's really just a tiny bit in the whole scope of my paper hoard, but it's a start! So, I'm feeling pretty good about it!


With all that being said, the papers on my card base are from the Echo Park Everyday Eclectic paper pad. I also used the same cute papers to paper piece Lovable Anya from The Greeting Farm. Isn't she just too cute!?! She reminded me of my niece so I just had to ink her up! I had fun paper piecing all the cute papers to put her outfit together. For the focal image, I started by stamping Lovable Anya on a piece of white card stock and then masked her and stamped the HB2U sentiment from the HB2U Anya stamp set using Berry Sorbet ink from Papertrey Ink. I removed the mask and sadly discovered that the ink seeped through the mask... so plan B... I stamped Lovable Anya again on a scrap piece of white card stock and colored her (and the slice of cake) with the following Copic markers:
Skin ~ E000, E00, R20
Hair ~ E49, E57, E59
Cake ~ W00, W1, W2, R00, R05, R32
Cake Plate ~ G82, Colorless Blender


Once I had Lovable Anya colored and adhered all the paper pieces for her outfit, I fussy cut her out and adhered her to the background piece, along with the cake that I had also fussy cut. I wanted to frame the image so I die cut it twice. First, I had die cut the HB2U background piece before adhering Anya using the Pleated Lace Rectangle die by Gina Marie Designs. I then die cut another one from white card stock and die cut a rectangle out of the middle using a stitched rectangle die. Setting that piece aside for another future project. I adhered the framed piece onto the HB2U background piece using a liquid glue. I popped up the focal image onto the prepared card base. I was going to add an additional sentiment to the front of the card but decided against it since I didn't want to cover the focal image, so I left it as is. I love how this sweet card turned out! What do you think? Let me know below in the comments... I'd love to hear from you.

Thank you friends for checking out my blog post!
See ya next time.
Inky Hugs!
Crystal


Friday, December 28, 2018

Scrapping for Less ~ December 2018 Blog Hop ~ Animals in the Arctic


December’s kit is all about Arctic Animals…Now if you are anything like me, you hate the cold weather, snow, and anything that would mean being cold. However, snow and these cute little critters in this kit are all about fun! So grab your warm beverage, sit back, and hop along with us to see these adorable critters and all the inspiration our designers have to share. Check out the Flavor of the Month page to place your order if you haven’t subscribed. Also, don’t forget to check the A La Carte items (items that are leftover - full packs and such - from putting the kits together, and other items that we have on the website that may coordinate with this kit). Make sure you also put your name in for that Rafflecopter prize!


Hey there! I am loving the theme of this month's kit... Animals in the Arctic! The critters in the stamp sets are all so cute! Let's not waste anymore time and get straight to the cards!


For my first card I used Sketch #2 with Collection One.
I did a mix of layers using the Winter Skies patterned paper by Scrapping for Less along with some Sno Cone card stock. I adhered all of the layers on a white card base. I added a few sequins to the main image and on the card base.


Here's a close up of the watercolored bear. In real life the watercolors coordinate a whole lot better with the colors in the background. You can also see the touches of purple organza ribbon on either side of the bear.


For my second card I used Sketch #4 with Collection Two.
I say I used sketch #4 for this one but it's a loose interpretation... what I mean is, I went rogue! LOL! I kinda sorta used some of the elements of the sketch, but it really had a mind of it's own. ;)  Now you may notice that this card looks kind of similar to my sneak peak card... and that's because I made them at the same time. I just loved this color palette that I pulled from these Alexandra Renke papers included in Collection One so I had to use it for this card too. I trimmed my layers of patterned paper and adhered them to a kraft card stock base. I stamped the adorable penguin with memento tuxedo black ink and colored him in with the following Copic markers:
Penguin ~ C0, C2, C4, C8, R20, YR15, YR27, YR68
Hat/Scarf ~ BG10, BG11, N0, N1, Colorless Blender
Mug ~ B0000, B000, B39, B99, N1


I added some sparkle to the hat and marshmallows using stickles from my stash. I then die cut the image using a wonky square die. I popped it up on the card base and adhered a few die cut snowflakes using the snowflake die from Collection Three. The sentiment was simply stamped, trimmed, and then popped up, as well.


For my third card I used Sketch #1 with Collection Three.
I adhered my layer of grey snowflake patterned paper to a piece of Grape Jelly card stock. I stamped a few snowflakes on the white card base using Wilted Violet and Hickory Smoke Distress Oxide inks. I adhered my grey/purple panel to the card base and then stamped the 'Snow Much Fun' sentiment using Wilted Violet Distress Oxide ink.


I trimmed a small piece of white card stock for my focal scene and stamped the mountains and chunk of ice using Memento Tuxedo black ink. I then stamped the owl and penguin on a scrap piece of white card stock and got to coloring using the following Copic markers:
Mountains ~BV20, BV23, N1
Sky ~ B60
Water/Ice ~ B000, B02, BG0000
Penguin ~ N0, N1, N5, YR15, YR68, V17
Owl ~ C1, YR15, YR68, B02, BG0000
I fussy cut the penguin and owl and adhered them to the scene. I added a few banners cut from the Frosty patterned paper by Pink and Main in the collection. And my last touch was a few sequins here and there.


For my last card I used Sketch #3 with Collection Four.
Now for this card, I flipped the sketch because I wanted to use the Winter Tree Stencil from the Banana Split subscription in my focal panel. I blended Worn Lipstick, Tattered Rose, and Shaded Lilac Distress Oxide inks over the stencil and then set it aside to dry while I stamped and colored the owl and moose. The owl is part of the stamp set included in Collection Four, but the moose is from the Arctic Sentiments set by Scrapping for Less that is in the Banana Split subscription. I colored the images using the following Copic markers:
Owl ~ BV04, BV20, BV31, YR27, YR68
Moose ~ E00, E01, E02, R01, RV95, W5


I fussy cut the images and adhered them to the focal panel that I had mat on Bubblegum card stock. I adhered a few banners on the back of the focal panel and then popped up the panel on the card base. I adhered some snowflakes and sequins all over the card and then realized I didn't have a sentiment yet... so I stamped out the 'Snow Much Fun' sentiment again, trimmed it, and adhered it to the card.
Such a fun kit to play with!! I had a blast creating these cards. I sure hope you've enjoyed them as much as I have.

Here's a look at the Double Dip Subscription.


Here's a look at the Banana Split Subscription.


Next up on the hop is Luci!

After checking out the hop, make sure to join the Rafflecopter back on the SFL blog to have a chance to win an awesome prize!!


Thank you friends for checking out my blog post!
See ya next time.

Inky Hugs!
Crystal

Power Poppy ~ Just One More Christmas Card

Hello! I'm sharing just one more Christmas card today for the CASology challenge - Cue Card: Holly.
I recently got my hands on some Power Poppy stamps and this holly from the Holly Golightly stamp set just had to get inked up!


I wanted to keep the card very CAS so I simply stamped the holly branch and sentiment in the upper center portion of the card front using Memento tuxedo black ink.

I then colored the holly branch using the following Copic markers:
R000, R14, R29, G24, G29, G46, YG63, YG67


I die cut the card front using a Nested Rounded Corner Rectangle Small Stitch die from Rubbernecker Stamps and adhered it to a white card base.


There's still a few days to play along with the CASology challenge. I encourage you to check it out!

Thanks so much for stopping by!
See ya next time.

Inky Hugs!
Crystal

Scrapping for Less ~ Sneak Peek ~ December 2018 Flavor of the Month Card Kit

Hello! Today I'm sharing a Sneak Peek of the December 2018 Flavor of the Month card kit!! Eeep! This kit is so stinking cute! You are going to need it!!


This fabulous shaker card is part of one of the collections and I just HAD to use it to create this sweet card... isn't that little penguin adorable! I just love him with his cup of cocoa! Here's a quick run down of the Copic markers I used:

Penguin ~ C0, C2, C4, C8, R20, YR15, YR27, YR68

Hat/Scarf ~ BG10, BG11, N0, N1, Colorless Blender

Mug ~ B0000, B000, B39, B99, N0, N1


I hope you've enjoyed the week of sneak peeks by the design team! Be sure to join us
 at midnight tonight for the blog hop and full reveal of the Flavor of the Month card kit.

Thanks so much for stopping by!
See ya next time.

Inky Hugs,
Crystal

Friday, December 14, 2018

Scrapping for Less ~ Sunny Studios ~ Have a Foxy Christmas!

Hello! Today, I'm sharing a few Foxy Christmas cards using the same sketch but changing it up with different papers and little foxes!! Oh my goodness, this Foxy Christmas set by Sunny Studios is so stinking cute! I just adore it! And it pairs up so well with the Sunny Studio Holiday Cheer papers!!


To start I chose my papers, pairing the patterned papers that I wanted for each card. I then trimmed each piece down and mat them on a pink card stock and then a green card stock. The strip of patterned paper in the center of the card is only mat on the pink card stock. I adhered all of my layers and then set them aside.


I decided to focus on just the images with a single fox. I chose the three foxes that looked festive with their cute reindeer headband, beanie, and Santa hat and then colored the images to coordinate with the patterned papers.


I stamped each of the foxes onto a piece of white card stock measuring 2 x 2-1/2" using Brutus Monroe Raven Detail Ink. I colored the images with the following Copic markers:

Foxes ~ E09, E18, YR16, YR21, YR27, W00, W1, W3, W8, W10, R20
Headband/Hats ~ YG11, YG13, YG17, E55, E57, N0, N1, R000, R14, R27, RV04, RV17, RV19
Chilly Sky Background ~ B0000, B00, B02

Copic markers are available in the shop for pre-order. 
Here's a link to check it out... Copic Marker Pre-order.


Once I had all these cuties colored, I added some Snowy Marker across the bottom of the card stock and heat set it to make it puffy and that completed my simple scene with a bit of snow.


I then mat each of the foxy focal images onto pink card stock measuring 2-1/8 x 2-5/8" and then mat those onto green card stock measuring 2-1/4 x 2-3/4". I popped these pieces up on the three card fronts and then set them aside.


I stamped the sentiment and holly onto three scraps of white card stock and trimmed them down and fussy cut a flag on one end. I colored the holly using the following Copic markers ~ R000, R14, R27, YG13, YG17. I adhered the sentiment flags to each card front. I then adhered each of the card fronts to a white card base completing the three cards. I just adore how these turned out! This sweet Foxy Christmas set is available in the shop ---> here!

Thanks so much for stopping by!
See ya next time.

Inky Hugs!
~ Crystal

Friday, November 16, 2018

Scrapping for Less ~ My Favorite Things ~ Have a Magical Christmas

Hello crafty friends! Have you ever been inspired to make a card that turns out to be rather involved?! You're not sure how to make the idea work? As you begin, you are thinking to yourself... 
"What have I gotten myself into?!" Well, I thought all of those things as I started this card project, but I persevered and Oh My Goodness! It turned out wonderfully...


What do you think? 

In my mind, I imagined the sweet little Birdie Brown reading my favorite Christmas poem... "T'was the Night Before Christmas"... only instead of the father being woken by St. Nicholas, it was sweet Birdie Brown and St. Nick wasn't going to let her see him so he hides behind the tree. Awww... I still love this poem to this day! 

Anywho, so I decided to pair the Our Story stamp set with the Secret Santa stamp set!!


Now putting this card together, I knew I needed a larger card base so I chose to make one that would fit the larger #10 envelope. So the card base for this card measures 8 x 9-1/4", scored at 4"... so a 4 x 9-1/4" card base. Since I wanted the scene on the top of the card to be Birdie Brown imagining herself in the poem, I needed both the bottom and top scenes to match as best I could. I trimmed the striped paper from the Sunny Studio's Holiday Cheer paper pad to fit both scenes and used a scrap piece of wood patterned paper for the flooring. Now the fun part, I stamped all of the images (some of them two times) on white card stock with Memento tuxedo black ink. I did a combination of paper piecing and Copic coloring for the images being sure to keep everything that would be in both scenes similar in their coloring or paper piecing.

Here's a list of the Copic markers I used:
Tree/Santa ~ G24, G29, G46, YG0000, YG23, R14, R27, R37, R89, B000, B02, RV21, RV34, E000, E51, R20, N0, N1, N3, N5
Cookies/Plate ~ RV21, RV34, E27, E35
Presents ~ RV21, RV34, B000, B02, YG0000, YG23, R14, R27
Dog ~ W00, W1, W3, W5
Birdie Brown ~ E000, E51, R14, R27, R37, E09, E15, E97 
Furniture ~ E55, E57, E59
Book ~ E34, E37, E39


For the top portion of the card, I adhered the patterned papers on a separate piece of white card stock so that I would be able to pop this portion up on the card base. Giving it dimension adds to the scene of the card. I fussy cut the edge of the top portion to give it that bubble imagination look. I also adhered a strip of white card stock underneath to help separate the scenes. I fussy cut each of the pieces out by hand because I didn't want any extra space around the images... that would take up extra space from the card. I also ran my Memento tuxedo black marker around the edges to help keep the edges of the images neat and clean. That's a trick I also do with paper piecing... it helps the paper pieces look neater on the stamped images.


All that remained was adhering all of the pieces that I had fussy cut to build my scenes. I used a liquid glue for that.. I think it gives you a little freedom in adjusting the images if needed since it doesn't dry as quickly. I used two small circle punches to make the little thought bubbles. I then stamped the sentiment but found it was too long to adhere to the card so I trimmed the words up and mounted them on some of the scrap patterned paper. I adhered those on the card and my final touch was some Sprinkled Sugar Stickles that I added to the ornaments on the trees.
I just adore how this card turned out! It sure was a crafty adventure and I hope you enjoyed it!

Thank you friends for checking out my blog post!
See ya next time.

Inky Hugs!
~ Crystal