Showing posts with label gift ideas. Show all posts

Tuesday, February 15, 2022

Book Lovers Gift Idea ~ January 2022 KOM ~ Unity Stamp Co.

 Hello there crafty friend!
I had a fun gift idea for a crafty friend that is also a book lover and I used a stamp from the January 2022 Kit of the Month from Unity Stamp Co. along with elements from the sweet gift that Unity sends along with the Kit of the Month membership. In the January KOM I received a piece of pattern paper, some gold cord, a colorful wood button, a flower wood piece, a little Kraft package and it was all in a small paper bag that I used to package my gift to my friend.


I apologize for the poor quality photo of my project. I was so excited to send off the gift that I made that I forgot to take pictures of the card I made and the packaging... LOL! I did, however, record my process in making this gift and you can check that out here... Book Lovers Gift Idea | January 2022 KOM | Unity Stamp Co.


Here's a list of supplies that I used for this gift:

*** Supplies *** January 2022 Kit of the Month called Found in the Heart Love is in the Pages stamp Scallops & Rectangles {nesting dies} {currently sold out} Cozy Textiles {paper pack} Round Acrylic Block {Ivory} May Arts Burlap string Stampers Select White card stock from Papertrey Ink Copic Markers: E00, E11, E23, E25, E27, E29, E43, E44, E47, C00, C2, R00, R20, RV10, RV21 Tim Holtz Stamp Platform Vintage Photo Distress Ink Wow Clear Embossing ink Tombow Mono Adhesive Liquid glue Ranger Glossy Accents EK Success Cutter Bee Scissors Scor-Buddy from Scor-Pal Tim Holtz Tonic Guillotine Comfort Paper Trimmer Clear Medium Envelopes from Stampin' Up!


That's it for me this time.
Thanks so much for stopping by!
See ya next time.


Inky Hugs,
Crystal

{Please note that comment moderation is ON. Your comment will appear shortly.}

Wednesday, November 10, 2021

Hot Cocoa Pocket Card ~ Coffee With a Heart ~ Unity Stamp Co.

 Hello there crafty friend!
Today I'm sharing a cute Hot Cocoa Pocket card using the awesome new Coffee With a Heart stamp kit from Unity Stamp Co. I love making pocket cards and it's even more fun when it's a gift you can send to a friend!


The design is very simple. The bottom layer is just a 4-1/4 x 5-1/2" piece of pattern paper. The two front papers also measured 4-1/4 x 5-1/2" {these can be cut wider because my pieces didn't quite cover the whole front}. 


I cut the two front papers at a diagonal. I scored the front papers on the longer edge and adhered them to the back of the bottom layer.


I then adhered the two front papers to just the bottom of the card and to each other where they overlapped. I haven't found my tear tape or red tape liner so I just used liquid glue for this and was careful not to put too much glue.


I stamped the pretty heart cup and marshmallows and then I colored them with the following Copic markers:

Cup ~ Y15, YR15, YR21, YR68
Cocoa ~ E23, E27, E50
Marshmallows ~ C00, C2


I trimmed the sentiment and adhered it to the heart mug. I then adhered the sentiment and the bottom portion of the heart mug to the front of the pocket card. I wrapped the card with some twine and tied a pretty bow. This size of pocket card works perfectly with the cocoa packets. I plan to send this to a friend in a little care package. I hope my directions make sense... if you have any questions, please feel free to ask in the comments. I'll do my best to answer any questions you might have.


Thanks so much for stopping by!
See ya next time.


Inky Hugs,
Crystal


{Please note that comment moderation is ON. Your comment will appear shortly.}

Sunday, January 12, 2020

Polka Dot Orchard ~ Anything Goes Card ~ Pocket Card that's a Gift!

Hello there crafty friends!
Today, I'm sharing a cute little gift idea that I made for Christmas gifts using the adorable From Our Gnome to Yours digi set. I made these for Christmas, but I think these could be used any time of the year and for all occasions! 


I did customize the measurements to fit the Starbucks hot cocoa packets that I was including in the pockets. I started with a 8-3/8 x 6-1/8" piece of kraft card stock. I scored it at 1/4", 4-1/4",  and 4-3/8". I creased the scored lines well with my bone folder and then adhered the 1/4" flap to the inside of the pocket using tear tape. With the pocket ready to go, now it was time for the fun part... adding pretty papers and the adorable gnome from the From Our Gnome to Yours digi set.


I cut the patterned paper from Lawn Fawn's Snow Day Remix papers to 3-3/4 x 6" and then used a pencil to lightly mark off my cut points for the diagonal cut on the top portion. Once I had all of those cut, I used those cut off diagonal pieces to add another layer of paper to the pocket. 


I mix matched a bunch of the papers and for this particular pocket, I adhered the bunny paper on the top portion where the gnome would be adhered. On my other pocket cards (sadly, I forgot to take a picture), I adhered the diagonal piece of paper on the bottom portion where the gnome would be adhered. I hope that makes sense.


Now for the cute gnome... I resized and combined the Christmas tree digi with the gnome holding the sign that says "Wishing you a Merry Gnomemas and lots of holiday cheer for a bright year" in a Word document. I was able to fit 9 of these on one full 8-1/2 x 11" sheet of card stock. I printed off a few of these sheets with this little guy on kraft card stock and colored them all with the same prismacolor pencils. I trimmed each of them down and mat them on a piece of white card stock that I had die cut with a small stitched square die.


I adhered the mat gnome panels to the front of the pocket cards with tear tape. I did leave the top of the gnome panel open on some so I could slide in a gift card. It really turned into quite a fun gift idea and even though I assembled over 20 of these, I had so much fun and can't wait to make more!


To finish these off, I added the hot cocoa packets and candy canes... I even added some twine to some of the ones that I sent to family and friends (sadly, I didn't get a picture before sending those off). I sure hope that the family and friends that received them really enjoyed them!

Thanks so much for stopping by!
See ya next time.

Inky Hugs,
Crystal

Friday, December 13, 2019

Polka Dot Orchard ~ He Said Coffee ~ Book It Friday

Hey there crafty friends!
Today, I'm sharing a fun bookmark for Book It Friday with Polka Dot Orchard's fabulous digi set called He Said Coffee. But since we're close to Christmas, I decided to make my bookmark with a Christmas twist!!


What do you think?!
A quick little story behind this bookmark... every year during the holidays I read the same book, 'Twas The Night Before by Jerry B. Jenkins. I've done this since November 2007... over 10 years now. Anyhow, the book is a Christmas love story... filled with magic and wonder of Christmas, along with a couple that fall in love over a cup of coffee... and hot cocoa. I just love it and even though I know the ending and what happens every chapter... I reread it! And now I have this beautiful bookmark to mark my place in my reading of this book each year.


Ok, so on to the details for this bookmark... I started by combining and resizing the Man image from the He Said Coffee digi set along with the snowflake background from the Cozy Brew digi set in Microsoft Word. I then added and resized the sentiment from the He Said Coffee set. I knew I also wanted to use a portion of the Merry Christmas sentiment from the Magic of Christmas digi set so I added that, resized it and then cropped it down to just Christmas. I couldn't find the word "that's" in any of the digi sets so I just typed that with a similar font and added it to the same Word document. Once I had all of these images how I wanted them, I print it out. I then trimmed down my card stock and die cut the main image using the Basic Bookmark 3 by Papertrey Ink.  


And then the fun begins... coloring!! I wanted traditional Christmas colors for this bookmark with some brown tones to bring in the coffee feel. Here's the list of Copic markers I used:

Skin ~ E000, E00, E21
Hair ~ YR30, E30
Eyes ~ B000
Clothes ~ N0, N3, N5, N7, C00, C1, C3
Apron ~ YG11, YG13, G03, G07, G46, R00, R14, R29, R39
Coffee Tin ~ R00, R14, R29, R39, E30, E37
Cup ~ Y02, Y11, Y15, Y35, W1, W4
Coffee Bean Heart ~ R00, R14, R29, R39
Poinsettia ~ R00, R14, R29, YR00, YG11, G07, G46, E37
Snowflakes ~ BG000, BG01
Background ~ E35, E50, E51

I fussy cut the poinsettia and the coffee bean heart and cleaned up the edges of the images with markers... Memento tuxedo black ink for the edges of the poinsettia and just a R00 copic marker for the heart.


Now, it was time to assemble the bookmark. I mat the sentiment pieces with New Leaf card stock from Papertrey Ink trimming them by hand. I adhered those to the bookmark using a liquid glue. So now it reads... "You, me and a cup of Coffee... that's Christmas". Love love love!!


I wrapped the bookmark with gold metallic thread taping down the ends on the back just with scotch tape (I'll be adding more layers). I then adhered the coffee bean heart using mini glue dots. I added a bit of sparkle to the heart using a clear Nuvo Aqua Shimmer pen. I also added some shimmer to the snowflakes but I just couldn't get a good picture to share that.


I adhered the poinsettia from the Poinsettia Greetings digi set using mini glue dots to give it a bit of dimension but not too much since it is a bookmark. I also added a touch of shimmer to the center of the flower using the same Nuvo Aqua Shimmer pen. 


To finish off the bookmark, I die cut two more bookmarks using the same die... one from Real Red card stock and the other Cherry Cobbler card stock. I adhered both layers to the bookmark to make it more durable and I love the different reds... gives the edges some dimension! I added some Cherry Cobbler Sheer Linen Ribbon (retired from Stampin' Up!) and some beautiful eyelash ribbon that my sweet friend and fellow DT member, Bobbie Sue, gifted me a while ago... I have been itching to use this stuff and this bookmark was the perfect opportunity! I tied those off with some green bakers twine (also SU! but I'm not sure what color it is... maybe Garden Green?). And that's it!

Thanks so much for stopping by!
See ya next time.

Inky Hugs,
Crystal

Tuesday, November 19, 2019

Scrapping for Less ~ November 2019 Flavor of the Month Card Kit ~ Special Incentive and a Sneak Peek!!

Hello there crafty friends!!
I'm so excited to share a beautiful project made using the fabulous incentive offered by Scrapping for Less if you sign up for a new Flavor of the Month subscription in November!! And let me tell you... the November 2019 card kit is fabulous!!!


Here's a look at the sweet incentive package you'll receive!


I made a beautiful gift card pouch to share with you today using the products in the incentive package, as well as a couple of items from the November 2019 A Vintage Christmas Card Kit!!! 
A little early sneak peek... woohoo!!!


I won't go into detail though on what exactly is in the card kit... but this month's kit is absolutely gorgeous!! You are going to love it!! And why not sign up now and get this beautiful incentive package with all these wonderful goodies for free!?!?


And because I love to enable and share sneak peeks whenever I can {and Teresa says it's ok, lol}... here's a sneak peek of the gorgeous Christmas papers in the kit this month! Gorgeous!!

You can sign up for your subscription here---> Flavor of the Month subscription! You are not going to want to miss out on this kit!!


Thanks so much for stopping by!
See ya next time.

Inky Hugs,
Crystal


Friday, April 12, 2019

Scrapping for Less ~ Heffy Doodle ~ Gnome Matter What

Hello crafty peeps! 
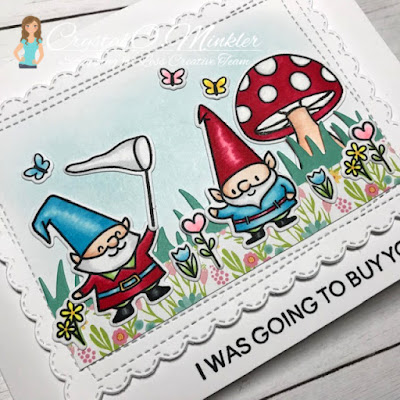
Today, I'm sharing an adorable card using Heffy Doodle's Gnome Matter What stamp set


How cute are these gnomes!?! 
I just adore them! I inked them up along with a bunch of other images from this set using Memento tuxedo black ink and then colored them in using the following Copic markers: Y06, Y35, YG11, YG23, RV000, RV00, RV14, RV21, RV29, E000, E00, E11, N0, N1, N2, N5, N8, B000, B00, B02.

To build my scene I die cut a piece of white card stock using the Memory Box Wrapped Scalloped die and then I blended a little Tumbled Glass distress ink for my sky. I then cut a strip of patterned paper for my 'ground' from the Echo Park Spring Fling paper pad and also die cut the grass from the same paper pad. I adhered the grass to the back of the 'ground' paper and then adhered just the bottom portion of the combined papers to the scene so that I could be free to place things in amongst the grass, like the cute mushroom. I adhered all the images to create my scene and then popped up the focal panel on a white card base. To finish off the front of the card, I stamped my sentiment using my Tim Holtz Stamp Platform. Now, just a little tip... I should have stamped the sentiment before I popped up the focal panel, but because I used the Stamp Platform I was able to stamp the sentiment a few times to get the crisp sentiment I wanted.


The sentiment on the front of the card just keeps you hanging so I just HAD to add to the inside of the card. I combined the patterned papers again to continue the design on the inside of the card. I added another gnome... I colored several since I was on a roll. LOL
And then I stamped the sentiment for the inside of the card. I decided to add the little clock to this gnome's hand to tie in the sentiment... so cute! Now, I got to thinking you could leave the card like this basically saying that the card is the recipient's birthday gift. Or...


You could slide a gift card in there for just a little something... a quick gift idea!


Here's a close up of the scene on the front of the card... I went a little crazy with the flowers, but couldn't help myself! So many cute images to color in this set!

You can find the Heffy Doodle Gnome Matter What stamp set available in the shop!


Thank you friends for checking out my blog post!
See ya next time.

Inky Hugs,
Crystal