Showing posts with label #polkadotorchard. Show all posts

Saturday, July 23, 2022

Christmas in July 2022 {BYSHC} Linky Party ~ Home for the Holidays ~ Polka Dot Orchard

 Hello there crafty friend!
Today I'm sharing a sweet and simple card using the adorable Home for the Holidays digital stamp from returning Sponsor Polka Dot Orchard. I've actually had this sweet digi stamp printed off for awhile but I hadn't gotten around to coloring it or using it for a card. I thought now was the perfect time! 


I had resized the truck digi and the sentiment in a Word Document and print it off on white card stock. I die cut the card front with the largest stitched die from the Scallops & Rectangles {nesting dies} from returning Sponsor Unity Stamp Co. And then I went looking through my Christmas papers... I found some sweet papers that were leftover from my Scrapping for Less Design Team days. I thought they were perfect for this card and even more so since they were designed by returning Sponsor Teresa Russell of Fresh and Renewed with Teresa.


I only have a few scrap pieces left of these papers so I combined two pieces together to cover the front of my white A2 top fold card base (turned on it's side). And then I trimmed a couple scraps and adhered them to the focal piece.


Here's a quick list of the Copic Markers I used to color up this cute digi stamp:

Truck ~ R20, R14, R27 
Windows ~ B0000, B00
Tires ~ N0, N1, N3, N5, N7
Headlights ~ Y11, Y06, Y35
Tree ~ YG11, G24, G46
Ground ~ N0, N3


My inspiration for my card was last month's {BYSHC} Sketch 23... such a simple sketch design! I did change up my little banner flags so they worked with my design.


Before you leave, be sure to stop by Polka Dot Orchard... they're having a wonderful sale on all the Christmas digital stamps!! Woohoo!! I just love a good sale! And if you haven't already, stop by the Christmas in July 2022 {BYSHC} Linky Party to check out all the wonderful Holiday inspiration being shared!! I'm so excited to continue building my stash of holiday cards for 2022... I hope you'll join in the fun and play along! Let's build our stash of holiday cards this week!!


Thanks so much for stopping by!
See ya next time.

Inky Hugs,
Crystal


{Please note that comment moderation is ON. Your comment will appear shortly.}

Saturday, July 16, 2022

Winnie the Pooh: Social Media Hop

 Hello there crafty friend!
Today is a fun day!! I just adore Winnie the Pooh and thought it would be fun to have a hop and here we are... I am super excited to see all the creations shared today from all the Cardmakers!!


Be on the lookout for this graphic as you hop along. We have Cardmakers sharing their creations from all forms of social media... blogs, YouTube, Facebook and Instagram. If you get lost along the way you can head back over here, I have the full list down below. Alrighty... let's get to it!


My first card features the adorable new release - Winnie the Pooh: Weeds Are Flowers from Unity Stamp Co! How sweet is Eeyore?! I just love him! I die cut him at a bit of an angle with the largest die from the X Stitched Square dies from Gina Marie Designs.


I stamped Eeyore with Black Amalgam ink from Gina K Designs and colored him up with the following Copic Markers:

Eeyore ~ B0000, B91, B95, B97
Flower ~ R0000, RV21, YG11, YG23
Ground ~YG11, YG23, YG17
Sky ~ B0000


I paired up Eeyore with the French Kiss paper pad from Doodlebug Design. I thought the cute flowers and blues in the papers coordinated well with the colored focal image. I adhered my paper layers to a white A2 top fold card base and wrapped the front of the card base with some white organdy ribbon tying a pretty bow.


I recently started sharing sketches in my Facebook group called Tawny Owl Paperie Inky Inspiration. Sketch 2 was the perfect inspiration for my sweet Eeyore card. 


For my second card I used the sweetest new Christmas stamp called Winnie the Pooh: Merriest Time from Unity by the amazing Angie Blom. Such a darling stamp for the holidays! I paired him up with papers from the Meowy Christmas paper pad from Newton's Nook Designs.


I stamped Pooh bear with Black Amalgam ink and colored him up with the following Copic Markers:

Winnie the Pooh ~ Y11, Y15
Santa Hat ~ C00, C2, R000, R20, R14
Blue Gift ~ R000, R20, R14, BG000, BG01
Purple Gift ~ V20, V22, V25, Y06, Y15
Honey Pots ~ Y06, Y15, BG000, BG01, R000, R20, R14
Tree ~ YG11, G24, G46, E21, E23, E27
Star / Ornaments ~ Y06, Y15, R000, R20, R14, BG000, BG01


I trimmed the paper to 4-1/4 x 5-1/2" and then used the largest die from the Peekaboo Rectangle dies from Gina Marie Designs to die cut the center of the paper leaving a window for my focal piece. I adhered all the layers together and then adhered them to a white A2 top fold card base. I decided this cute card didn't need any extra ribbons or enamel dots. It's plenty cute just how it is!


My last card features the adorable Ungloomy Christmas digital stamp set from Polka Dot Orchard. Such an adorably sweet digital stamp illustrated by my sweet friend, Jeanie Hays! I resized the Digi in a Word Document and printed him off.


I paired him up with the beautiful Winter Blues paper pack from Ink N' Splatter. I love how it looks like Eeyore's decorating the tree while snow is falling all around him. So fun!


I colored up the image with the following Copic Markers:

Eeyore ~ B00, B91, B95, B97
Christmas Tree ~ YG11, G24, G46, E55, E57
Christmas Star / Lights ~ Y06, Y15, Y35, R20, R14, G000, G14, B000, B00
Ground ~ C00, C2


I die cut a piece of white card stock with the Scalloped Stitched Mini Slimline die from Gina Marie Designs and then trimmed the snowflake papers to fit just inside the stitches. I fussy cut around Eeyore and the tree leaving some of the snow for the ground. I adhered Eeyore to the snowy paper and then I popped up the scalloped stitched panel with lots of foam tape adhering it to a 6-1/2 x 7" mini slimline card base, scored at 3-1/2". I trimmed the sentiment that I had printed along with the image and adhered it to the card using liquid glue and a small piece of foam tape for the far right side so that the sentiment would lay flat. I think it turned out pretty cute!

Well, that's it for me! I tried to keep this short and sweet but still informative. I sure hope that you've enjoyed the cards I shared today and that you are inspired to ink up, or print off, those wonderful Winnie the Pooh stamps!! If you're looking to add some Winnie the Pooh stamps to your collection, you can do a bit of shopping here:


Now let's get to the hopping!!!


Crystal Minkler <--- you're here

up next ---> Lisa Arana


Thanks so much for stopping by!
See ya next time.

Inky hugs,
Crystal


{Please note that comment moderation is ON. Your lovely comment will appear shortly.}

Sunday, February 13, 2022

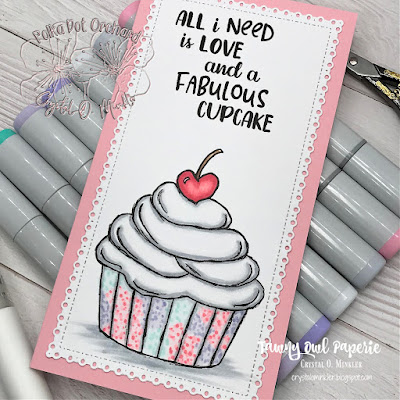
Yummy Mini Slimline ~ Love And A Fabulous Cupcake ~ Polka Dot Orchard

 Hello there crafty friend!
Today I'm sharing a quick and yummy mini slimline for a last minute Valentine's Day card! I used the sweet Love And A Fabulous Cupcake digi stamp set from Polka Dot Orchard for this yummy card.


I started by combining and resizing the digi stamps in this set in a Word Document. When I plan to make a mini slimline I usually turn my images sideways and keep them at the top of the document. I do this for two reasons... first, to keep the images at either end of the paper so I'm not wasting a full sheet of card stock printing it off. And second, so that I can use the rulers that are available in Word to help me get the size just right.


I die cut the image with the beautiful Pleated Lace Mini Slimline die from Gina Marie Designs. And then I got to coloring with the following Copic markers:

Cherry Heart ~ RV0000, RV21, RV14, E21, E23, E25
Icing ~ C00, C2, C3
Cupcake Liners ~ BG0000, BG23, BV0000, BV02, RV0000, RV21, RV14
Grounding ~ C00, C3


I kept this card very simple and just adhered the die cut and colored panel to a pink mini slimline card base measuring 6-1/2 x 7"; scored at 3-1/2". Done... a quick and easy Valentine's Day card!


Here's a look at the cute Love And A Fabulous Cupcake digi stamp set!! Love it! Stop by Polka Dot Orchard to see all the fun Love Day digi stamps! These are great for all those last minute Valentine's Day cards!!


Thanks so much for stopping by!
See ya next time.


Inky Hugs,
Crystal


{Please note that comment moderation is ON. Your comment will appear shortly.}

Friday, December 17, 2021

{BYSHC} Sketch Challenge 17 ~ Extra Sweet Christmas ~ Polka Dot Orchard

 Hello there crafty friend!
I'm back with my weekly Christmas card for the {BYSHC} Sketch Challenge for the month of December... today's card features a sweet new digital stamp set from Polka Dot Orchard called Extra Sweet Christmas!!


What do you think?! Pretty cute, right? I created the background by first ink smooshing Bundled Sage, Mowed Lawn and Rustic Wilderness Distress Oxide inks on a piece of white card stock. I made sure to dry it completely with my heat tool and then I printed the resized background digital snowflakes stamp on the ink smooshed background.


I trimmed the background to 3-11/16 x 4-13/16"and mat it on a 3-7/8 x 5" piece of Real Red card stock. I mat it again on a 4 x 5-1/4" piece of Garden Green card stock and then adhered it to a Real Red card front measuring 4-1/4 x 5-1/2".


I used a leftover piece of the ink smooshed background for my angled strip and adhered it to the background. I used a 1/2" scrap of Garden Green card stock across the background and to cover up where those two pieces meet, I added a skinny strip of Real Red card stock that's 1/8" wide.


Now for the plate of cookies... does it look like a plate of cookies to you? That's what I was going for... I sure hope it does. I resized the snowflakes from the digital stamp set in different sizes and placed them in kind of a circular formation. And then I printed them off. I colored the snowflakes very simply with R14 and R20 Copic Markers. I die cut the snowflakes with two stitched circle dies and colored the edges with C00 and C2 Copic Markers. I die cut an extra outer piece to adhere under the colored piece so it looked a bit more like a plate. I die cut the larger circle one more time and cut it to be a bit smaller so I could adhere my plate layers to it. I then adhered the plate to my card.


I combined and resized the Christmas tree cookies in a Microsoft Word Document. I printed them off along with the sentiment. Time to color! I used the following Copic Markers...

Cookie base ~ E30, E33
Green icing ~ YG11, G14, G24
Stars ~ Y06, Y15
Red & White Candy Garland ~ C00, C2, R14, R20
Red Swirly Garland ~ R14, R20


The sentiment is just trimmed and then adhered to the card... easy peasy!


Here's a look at Sketch 17... join us in the Build Your Stash Holiday Cardmakers Facebook group for inspiration and fun!

I have a short Copic coloring video for the cookies and the snowflakes, if you are interested check it out here... Christmas Tree Cookie Coloring ~ Extra Sweet Christmas Digital Stamp Set.


I hope you'll join us and play along with the sketch! If you're interested in seeing a bit more inspiration for this sketch, check out the {BYSH} Cardmakers blog! I'll be back next Friday with my weekly Christmas card using this month's sketch! Head over to Polka Dot Orchard to check out all the fun new releases!!


Thanks so much for stopping by!
See ya next time.

Inky hugs,
Crystal


{Please note that comment moderation is ON. Your comment will appear shortly.}

Sunday, November 21, 2021

Wishing You a Cozy Day ~ Cozy Kind of Day ~ Polka Dot Orchard

 Hello there crafty friend!
I mentioned the other day that Polka Dot Orchard had just released a bunch of caffeinated goodness and I just couldn't help but play with this sweet new digi set by Jeanie Hays called Cozy Kind of Day! I am mad about plaid and the thermos in this cute digi stamp set are just so fun to play with!


Now since this is a digital stamp set, I blended my background with my inks before I printed them. I blended Candied Apple, Fired Brick and Black Soot Distress Oxide inks on one half of my white card stock.


 I then combined and resized the digital stamps in a Word Document, organizing them so that the thermos background would print first onto my ink blended background.


The line of thermos and sentiment printed on the bottom half of my card stock. I cut my card stock in half and got to coloring up the thermos very simply with my Copic markers.


Here's the list of Copic markers I used:

Thermos 1 ~ N0, N1, N3, R14, R20, R27
Thermos 2 ~ R14, R20, R27, N0, N1, N3, N6
Thermos 3 ~ N0, N1, N3 
Thermos 4 ~ N0, N1, N3, N6
Grounding ~ N0, N1, N2


I die cut the background and the copic colored thermos with dies from the Big & Little Chain Rectangle dies from Gina Marie Designs. I mat my layers on Real Red and True Black card stock and then adhered them all onto a white A2 top fold card base.


Here's a look at the cute Cozy Kind of Day digi stamp set!! Love it! Stop by Polka Dot Orchard to see all the new fun digi stamps that were released! All so fun!


Thanks so much for stopping by!
See ya next time.


Inky Hugs,
Crystal


{Please note that comment moderation is ON. Your comment will appear shortly.}

Wednesday, November 17, 2021

Feeds My Soul ~ Soul Coffee ~ Polka Dot Orchard

Hello there crafty friend!
Today I'm sharing another card for the Fall | Winter Coffee Lovers Hop using a fun sketchy new release that I illustrated for Polka Dot Orchard called Soul Coffee. Speaking of new releases, Polka Dot Orchard has a whole bunch of new awesome coffee themed digital stamps and even some amazing new coasters! If you have a minute you should definitely stop by the shop and check it out.
 

I started by resizing the Soul Coffee image and sentiment in a Word Document and printed them off. I really love this sentiment and it's SO true! LOL


I trimmed a piece of pattern paper from the My Favorite Fall paper pack by Echo Park Paper Co.  and adhered it to the bottom of a Kraft A2 top fold card base. I used a cute x stitch die from My Favorite Things called Basic Stitch Lines dies for the pretty stitched design above the paper.


I set the card aside and colored up the cup with the following Copic markers:

Coffee ~ E21, E23, E25
Steam ~ N0, N2, Colorless Blender
Cup ~ BG11, BG23, YR15, YR21, YR68
Saucer ~ YR15, YR21, YR68


I fussy cut the cup and trimmed the sentiment and adhered both to the card. A simple but pretty Fall inspired coffee card! 


Have you checked out the Fall | Winter Coffee Lovers Hop? I'm loving all the amazing cards being shared! I hope you'll check it out and there's still time to play along. And be sure to stop by Polka Dot Orchard to see all the amazing new releases!!


Thanks so much for stopping by!
See ya next time.


Inky Hugs,
Crystal


{Please note that comment moderation is ON. Your comment will appear shortly.}

Friday, November 12, 2021

{BYSHC} Sketch Challenge 16 ~ Peppermint Wishes ~ Polka Dot Orchard

 Hello there crafty friend!
Today is the start of the wonderful Fall | Winter 2021 Coffee Lovers Hop and I have a card using this month's sketch from the {BYSHC} Sketch Challenge 16 from the Build Your Stash Holiday Cardmakers Facebook group. I've been building my stash of holiday cards all year long and I'm so happy to be able to add some caffeinated creations to the mix and also play along with the hop!


My first card for the hop features the sweet Peppermint Wishes digi stamp set from Sponsor Polka Dot Orchard and beautiful papers called Peppermint Latte from Sponsor Not 2 Shabby!!


Here's the quick list of Copic markers I used:

Candy ~ C00, C2, C3, R000, R14, R27
Whipped Topping ~ C00, C2, C3
Mug ~ C00, C2, C3, BG0000, BG01, BG10


I also added a few pieces of the Peppermint Candy Embellishment mix from Sponsor Twiddler's Nook. I just love the fun touch these little clay bits add to the card!


I love peppermint for Christmas and these mix of crafty goodies were so fun to play with!!


Here's a look at Sketch 16... I'd love to invite you to come check out the {BYSH} Cardmakers group! Lots of fun inspiration for your Holiday makes and prizes each month for our Sketch Challenge!


Be sure to check out the Coffee Lovers Hop and join in the fun! I can't wait to do some hopping and enjoy all the inspiration that will be shared!


Thanks so much for stopping by!
See ya next time.


Inky Hugs,
Crystal


{Please note that comment moderation is ON. Your comment will appear shortly.}

Wednesday, October 27, 2021

Falling for the Holidays 2021 {BYSHC} Hop ~ Poinsettia Greetings ~ Polka Dot Orchard

 Hello there crafty friend!

I'm back with another beautiful Christmas card for the Falling for the Holidays 2021 {BYSHC} Hop!! Today I have a sweet card using a fun digi stamp from hop Sponsor Polka Dot Orchard called Poinsettia Greetings. Poinsettias are my absolute favorite flower around the Holidays so whenever I get a chance to play with Poinsettia stamps I am a happy stamper!


This particular digi stamp is extra special to me since I illustrated it for Polka Dot Orchard. I was able to use the one digi stamp to create a beautiful border of poinsettias for my card. I also print an extra poinsettia to fussy cut and add a bit of dimension to the card.


I ink smooshed some Kitsch Flamingo and Festive Berries Distress Oxide inks leaving some bits of white. I die cut the Merry Christmas sentiment with the Labels 5 Nested dies from hop Sponsor Gina Marie Designs. And then I mat it with a piece of black card stock that I also die cut with a slightly larger die from the same die set.


Before you leave, be sure to stop Polka Dot Orchard... there's a fabulous sale going on!! Including the Poinsettia Greetings digi stamp set!! And if you haven't already, stop by the Falling for the Holidays 2021 {BYSHC} Hop to check out all the wonderful Holiday inspiration being shared!! I've been so inspired by all the pretty cards!

Thanks so much for stopping by!
See ya next time.

Inky Hugs,
Crystal


{Please note that comment moderation is ON. Your comment will appear shortly.}

Tuesday, August 17, 2021

Sunflower Slimline Card ~ You Make Me Happy ~ Polka Dot Orchard

 Hello there crafty friend!
I'm back with another fun slimline card using a beautiful digi stamp from Polka Dot Orchard called You Make Me Happy digi stamp set!! I love sunflowers! They are one of my favorite flowers and this one is so beautiful!! I just love it!


I kept this pretty card CAS with just a bit of copic coloring and a simple black mat. First I resized the images in a Word document and print them off on a piece of card stock. I then die cut the image with a Scalloped Stitched Slimline die from Gina Marie Design. 


And then I colored up this beautiful image with the following Copic markers:

Water ~ B000, B00
Jar ~ BV0000, BV00, BV11
Leaves ~ YG11, YG63, YG67
Sunflower ~ Y06, Y15, Y35, E21, E25
Grounding ~ N0, N2


I wrapped the top left and bottom right corners with some May Arts Black Burlap string. I adhered the die cut and colored image to a piece of True Black card stock measuring 3-1/2 x 8-1/2" and then adhered it to a white slimline card base measuring 7 x 8-1/2", scored at 3-1/2". I just love how this turned out... I really love how the jar turned out!


Here's a quick look at the beautiful You Make Me Happy digi stamp set! So beautiful!


Thanks so much for stopping by!
See ya next time.

Inky Hugs,
Crystal


{Please note that comment moderation is ON. Your lovely comment will appear shortly.}