Showing posts with label slimline. Show all posts

Tuesday, June 10, 2025

Anya Paints ~ Preview Day 1 ~ The Greeting Farm

 Hello there crafty friend!
It's the first day of previews at The Greeting Farm for the fabulous June release! I am so excited to share my makes with you this week. Be sure to check out The Greeting Farm blog each day this week!


I stamped Anya, the step stool, the paint can, and the kitty with Memento Tuxedo black ink and colored the images up with Copic Markers. I fussy cut them all on the line and colored the edges of the fussy cutting with a Memento Tuxedo Black marker making the fussy cutting all nice and neat. 

Here's a quick list of the Copic markers I used:
Skin: E000, E00, E21
Hair: Y11, E43, E44
Bow / Shorts: V01, V12, V15
Top / Belt: RV10, RV02, RV04
Paint Brush: C2, C3, C5, R20, R14, R27, YR15, YR68, Y11, Y15, YG17, B02, B05, V15, V17
Step Stool: C0, C1, C2, C3, C5
Paint Can: C1, C2, C3, R14, R27, YR15, YR68, Y15, B02, B05, V15, V17
Orange Kitty: YR20, YR15, YR27


I die cut a slimline panel from white card stock using the Slimline Striped Frame Stand-Alone Die Set from Trinity Stamps. I stamped my rainbow of paint and actually messed it up. My placement wasn't quite right. So I trimmed a piece of white card stock to fit in the center of the die cut and re-stamped my rainbow of paint. This time I stamped them closer together and they fit just right. I also stamped the heart on a scrap and fussy cut that leaving a white border.


I adhered the center panel on my slimline die and then I adhered the panel to a white slimline card base measuring 7 x 8-1/2"; scored at 3-1/2". I adhered Anya and all the fun accessories to build my scene. I stamped the sentiment, trimmed it and popped it up on the card, along with the heart.


This was such a fun card to make. I just love how it turned out! Release goes live in the store on the 15th at 12am EST.

Thanks so much for stopping by!
See ya next time.

Inky Hugs,
Crystal


{Please note that comment moderation is on. Your lovely comment will appear once approved.}


Wednesday, March 12, 2025

You Are My Sunshine ~ Preview Day 2 ~ The Greeting Farm

 Hello there crafty friend!
It's Day 2 of previews at The Greeting Farm for the March release. Oh. My. Cuteness... all the critters in the You Are My Sunshine stamp set are just too cute for words!!


I created a sweet little scene on a slimline card with some fun layers. I used the Slim Line Cloud Coverage Stencil from Picket Fence along with the Hills & Grass Stencil from Newton's Nook Designs. And I used Tumbled Glass & Mowed Lawn Distress Inks to blend over those stencils.


I stamped all the images with Memento Tuxedo black ink and colored them up with Copic Markers. I used a bunch of markers so the list is a bit long this time:
Bird: B000, B00, Y11, Y15, YR15
Deer: R00, R20, E21, E51, E23, E25
Daisy Garland: C00, C2, Y11, Y15
Bunny: C00, C2, R00, R20
Bear: R00, R20, E51, E33, E35, E37, N2, N4, N6
Bear's Flower Crown: YG11, YG03, YG63, R11, R22, V000, V12, V15, Y11, Y15
Fox: E51, E95, E97, E09, N2, N6
Flowers: Y11, Y15, YR15, V000, V12, R00, R11, B000, B00


I die cut the stenciled layers using dies from the Scalloped Card Panels Die from Trinity Stamps. I fussy cut all the critters and flowers and then colored the edges of my fussy cutting with a black marker.


I adhered the layers to a slimline card measuring 7 x 8-1/2"; scored at 3-1/2". And then I adhered all the critters and flowers to the card. To finish it off, I stamped the sentiment directly onto the card. This was so fun to make! I enjoyed coloring all the critters and flowers for the scene. The release goes live in the store on the 15th at 12am EST.

Thanks so much for stopping by!
See ya next time.

Inky Hugs,
Crystal


{Please note that comment moderation is on. Your lovely comment will appear once approved.}


Wednesday, March 1, 2023

Membership Wednesday ~ Rainbow Slimline ~ March 2023 Kit of the Month ~ Unity Stamp Co.

 Hello there crafty friend!
I'm back again today to share a rainbow slimline card using the amazing new March 2023 Kit of the Month from Unity Stamp Co. Ohhh... this kit is so awesome!! You are going to love it! I just couldn't wait to ink up the houses in the kit.


I stamped them twice with Black Amalgam ink for a fun slimline card! My rainbow inspiration is actually from one of our vacations. We visited a place that had these cool rainbow houses going down the street. I can't recall the vacation or the area now... lol. Oh my memory!! But I thought it would be fun to color up the houses in a rainbow. 


These houses have a lot of detail!! I just focused my Copic coloring to corners and tried to add dimension with darker shades of Copic markers where I thought portions of the house were in the background. I think it turned out pretty. I trimmed my slimline panel to 7-7/8 x 2-7/8" and adhered it to a kraft die cut from the Scalloped Stitched Slimline dies from Gina Marie Designs. The panel was then adhered to a white slimline card base measuring 8-1/2 x 7"; scored at 3-1/2".


The clouds are also in this kit and I adore them!! They have wonderful detail and the trio are perfect to use for a scene card. I added a bit of color to the bottoms with some cool grey markers. And I did fussy cut them and cleaned up the edges by coloring them with a Memento Tuxedo black marker. Here's a quick list of the Copic markers I used:

Red House ~ R20, R14, R27
Orange House ~ YR21, YR15, YR16
Yellow House ~ Y11, Y15, Y35
Green House ~ YG11, YG23, G14
Blue House ~ B000, B00, B02
Indigo-ish House ~ BG10, BG23, BG49
Violet House ~ V000, V01, V12, V15
Pink House ~ RV10, RV21, RV14
Yellow-Orange House ~ Y11, Y06, YR15
Blue-Green House ~ B000, BG10, BG23
Windows ~ Y06
Sky ~ B0000, B000, B00
Grass ~ YG11, YG23, G14


Here's a look at the whole Kit of the Month for March!! So perfect and wonderful! Can you believe that you get a full sheet of rubber for only $45. That includes shipping! You also get a $6.95 discount on every order from Unity over $45. And you can purchase any past kits for only $34 plus shipping. Such a great value! I can't wait to ink up those gorgeous butterflies!!

I hope to see you next week for another Membership Wednesday blog post. I'll be sharing inspiration for the amazing Background of the Month.


Thanks so much for stopping by!
See ya next time.

Inky Hugs,
Crystal


{Please note that comment moderation is on. Your lovely comment will appear once approved.}

Saturday, November 26, 2022

Bookmark Pocket Slimline Card ~ Winnie the Pooh: Enjoy the Day, Pooh ~ Unity Stamp Co.

 Hello there crafty friend!
Today is the last day for the Black Friday sale over at Unity Stamp Co!! I don't know about you but each addition to the Winnie the Pooh stamps has been a must have for me!! I couldn't wait to play with the new Enjoy the Day, Pooh!! Who doesn't love a cute picnic stamp!? 


This fun bookmark pocket slimline card would make a fun little gift for a book loving friend. I made the bookmark using a slimline die from Pinkfresh Studio called Slim Ornate Banner. I punched a hole on the top with a handy Crop-a-Dile... anyone else still have one of these in their stash? I added a couple pretty ribbons and tied them off with {Natural} May Arts Burlap string.


To make the pocket on the card I die cut two pieces of pattern paper from the Apple Pickin' {paper pack} from Unity using the . I trimmed them to fit on the 8-1/2 x 3-1/2" card base leaving a skinny border of Spring Moss card stock from Papertrey Ink. I adhered those layers together and then also die cut a piece of Vellum card stock, also from Papertrey Ink. I trimmed it to the same size as the light green pattern paper. I adhered it along the outer edges with Plus Vellum glue tape {not sure of the actual brand... this was a gift from a crafty friend}. 


How cute is this picnic stamp, though?! I believe this is another wonderful illustration by Angie Blom. I just love her stamps so much!


I tried to keep the Copic coloring for this pretty simple and just used two Copic markers for each image with exception to Piglet's sweater and the picnic blanket... I think I used three markers for those. I know some that are new to Copics get intimated by all the markers... I did when I was just starting out so I hope showing how easy it is with just a couple markers to achieve nice shading will help some of you take the leap and give Copics {or the other alcohol markers} a try. Here's a list of the Copic markers I used:

Skin ~ E00, E11
Hair ~ E30, E33
Pooh / Shirt ~ Y11, Y15
Shorts ~ B00, B12
Honey Pot ~ R20, R14
Piglet ~ RV10, RV21, RV14
Dishes ~ B000, B00
Cookies ~ E33, E35
Picnic Blanket ~ YG91, C00, YG95
Flowers ~ Y15, RV21
Grass ~ YG03, YG11
Rock ~ N1, N4
Book / Socks ~ C00, C2
Shoes ~ N4, N6


Head over to Unity and check out all the fab new releases... and the wonderful Black Friday deals!!! 


Thanks so much for stopping by!
See ya next time.

Inky hugs,
Crystal


{Please note that comment moderation is on. Your lovely comment will appear once approved.}

Tuesday, August 17, 2021

Sunflower Slimline Card ~ You Make Me Happy ~ Polka Dot Orchard

 Hello there crafty friend!
I'm back with another fun slimline card using a beautiful digi stamp from Polka Dot Orchard called You Make Me Happy digi stamp set!! I love sunflowers! They are one of my favorite flowers and this one is so beautiful!! I just love it!


I kept this pretty card CAS with just a bit of copic coloring and a simple black mat. First I resized the images in a Word document and print them off on a piece of card stock. I then die cut the image with a Scalloped Stitched Slimline die from Gina Marie Design. 


And then I colored up this beautiful image with the following Copic markers:

Water ~ B000, B00
Jar ~ BV0000, BV00, BV11
Leaves ~ YG11, YG63, YG67
Sunflower ~ Y06, Y15, Y35, E21, E25
Grounding ~ N0, N2


I wrapped the top left and bottom right corners with some May Arts Black Burlap string. I adhered the die cut and colored image to a piece of True Black card stock measuring 3-1/2 x 8-1/2" and then adhered it to a white slimline card base measuring 7 x 8-1/2", scored at 3-1/2". I just love how this turned out... I really love how the jar turned out!


Here's a quick look at the beautiful You Make Me Happy digi stamp set! So beautiful!


Thanks so much for stopping by!
See ya next time.

Inky Hugs,
Crystal


{Please note that comment moderation is ON. Your lovely comment will appear shortly.}

Tuesday, August 10, 2021

Happy Camping Slimline Card ~ Happy Camper ~ Polka Dot Orchard

 Hello there crafty friend!
Today I'm sharing a super quick slimline card that I made using the sweet Happy Camper {Say It Slim} digi stamp set from Polka Dot Orchard! I just love the {Say It Slim} line of digital stamps that Polka Dot Orchard has to offer and even though I'm more of a glamper I thought it would be fun to play with the Happy Camper {Say It Slim} digi stamp set!


My favorite technique when wanting to ink blend a background for a digital stamp image is to actually do my ink blending first. For this card I ink blended just Salty Ocean and Mustard Seed over about 1/3 of a piece of card stock and then I dried it with my Mini Wagner heat tool.


I printed the Happy Camper {Say It Slim} digi stamp on my ink blended card stock and die cut it with the Stitched Slimline die from Gina Marie Designs. I also die cut a piece of Kraft card stock. I trimmed the two ends of the ink blended background and adhered it to the die cut Kraft card stock. I wrapped a little May Arts Black burlap string around each end and adhering the top string with tape and then tying a little bow for the bottom string.


I adhered my focal piece to a True Black card base measuring 7 x 6-1/2", scored at 3-1/2". Now, here is where I goofed up my card just a bit... I added some Nuvo Black Board Vintage drops and for some reason my drops spit on my card. I used my palette knife to get some of it up but it smudged the printer ink when I tried to wipe the rest up with a paper towel. I decided to go with it and redid my drop making it a bit bigger to cover up the smudge. I think it still looks nice. It was definitely a quick card to make though... I think this quick design would work great with any of the {Say It Slim} digi stamps!!


Here's a look at the cute Happy Camper {Say It Slim} digi stamp set... isn't it just perfect for slimline cards?! Plus it has all those little extra digi stamps! I love it!


Thanks so much for stopping by!
See ya next time.

Inky Hugs,
Crystal


{Please note that comment moderation is ON. Your lovely comment will appear shortly.}

Monday, May 17, 2021

Slimline Feather Card ~ Unity Stamp Co.

 Hello there crafty friend!
Today I'm sharing a pretty slimline card using the new Slimline Feather from Unity Stamp Co.!! Another beautiful stamp illustrated by Angie Blom... I love all the different flowers and designs on this feather!! So much fun to color in so many different ways!


I chose to do kind of a rainbow of colors with the following Copic markers:

Purples ~ V0000, V01, V04
Blues ~ B000, B00, B02
Greens ~ YG0000, YG11, YG13, G12, G14
Yellows ~ Y06, Y15, Y35, Y38
Oranges ~ YR15, YR21, YR68
Pinks ~ RV06, RV17, RV23, R11, R43


For the base of the card I scored a 7 x 8-1/2" piece of white card stock at 3-1/2" and adhered a Scalloped Stitched Slimline die by Gina Marie Designs cut from white card stock. I splattered some pretty Liquid Pixie Dust from Ink on 3 all over the scalloped die before adhering it.


I fussy cut the Slimline Feather leaving a skinny white border and splattered it with some of the Liquid Pixie Dust... actually I splattered a lot! I popped up the feather with a lot of foam tape... this is such a huge stamp! Then I fussy cut around the sentiment from the newly released Floral and Buds stamp set. I love the font for this 'hi' sentiment... so pretty! I used a combination of foam tape and Tombow Mono Multi Purpose glue to also pop up the 'hi' sentiment but also overlap the feather just a tad.

The big Birthday Sale continues!! Be sure to stop by Unity Stamp Co. to see all the gorgeous new releases and save with an amazing 50% off stamps!!


Thanks so much for stopping by!
See ya next time.

Inky Hugs,
Crystal


{Please note that comment moderation is ON. Your lovely comment will appear shortly.}

Thursday, April 8, 2021

Monochromatic Slimline Cards ~ Layering Tulips Stamp & Stencil ~ Unity Stamp Co.

 Hello there crafty friend!

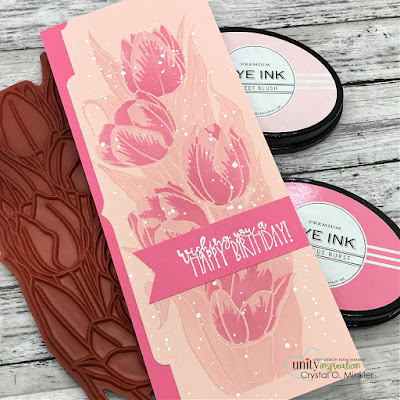
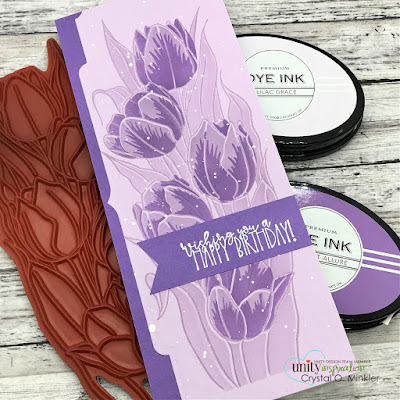
I'm back with a fabulous set of Monochromatic Slimline cards using the gorgeous new Layering Tulips stamp & stencil bundle from Unity Stamp Co. Oh my gorgeousness... you have got to check out this amazing bundle!! The Slimline Layering Tulips is a huge and beautiful stamp all on it's own, but when you combine it with the fabulous Layering Tulip stencil... it's a game changer!! Seriously amazing!


Check out this fun set of Monochromatic Slimline birthday cards that I made using the Slimline Layering Tulips stamp and the Layering Tulip stencil!! They turned out better than I even imagined!!


First I chose four main colors of card stock and the coordinating inks, along with four more slightly darker card stocks and inks to compliment the cards. For this first card, I used Lemon Tart card stock and ink along with the Summer Sunrise card stock and ink. I stamped the Slimline Layering Tulips stamp with the Lemon Tart ink on the Lemon Tart card stock.


I then blended Lemon Tart ink over the petals and leaves portion of the stencil to 'color' the tulips. Such a super easy and fast way to color this huge stamp! Don't pass up this stamp and stencil bundle if you don't like to color... the stencil seriously makes it easy to color without actually coloring!


For my second card I used Sweet Blush and Hibiscus Burst card stocks and inks.
I used the darker inks over the third portion of the stencil to give the tulips some shading and contrast.


I die cut each of the panels with the Essentials Slim Cuts die from PinkFresh Studio.


For my third card I used Aqua Mist and Hawaiian Shores card stocks and inks.
I stamped the sentiments with Wow Clear Embossing ink and then melted Alabaster White embossing powder with a Mini Wagner heat tool. I trimmed the sentiments and used a hexagon punch to cut the flags on the left side.


I splattered the panels with a bit of white acrylic paint that I spritzed with water to thin it out.


For my last card I used Lilac Grace and Amethyst Allure card stocks and inks.
I adhered all the layers together with Tombow Mono Multi Liquid glue.


And then I adhered the 3-1/2 x 8-1/2" slimline panels to slimline white card bases measuring 7 x 8-1/2", scored at 3-1/2". I have a video sharing my process in making these cards. You can check it out here... Monochromatic Slimline Cards | Layering Tulips.


A beautiful set of Monochromatic Slimline birthday cards!! I just love how these turned out!
Be sure to stop by Unity Stamp Co. and check out their fabulous new releases and the current sale!!


Thanks so much for stopping by!
See ya next time.

Inky Hugs,
Crystal


{Please note that comment moderation is ON. Your comment will appear shortly.}

Saturday, March 20, 2021

Spring | Summer Coffee Lovers Hop ~ Merry Little Coffee ~ Polka Dot Orchard

 Hello there crafty friend!

I have another card to share for the Spring | Summer Coffee Lovers Hop and yes, it's another Christmas card. I can't help it! I've been on a roll lately making Christmas cards!! I do have plans to share a Spring card or two... but for today I have a pretty slimline card using a beautiful digi stamp from Super Sponsor Polka Dot Orchard called Merry Little Coffee


This turned out to be a very CAS slimline card! I just love how it turned out... I hope you do too!


I watercolored the Merry Little Coffee mug with a few Zig Clean Color Real Brush markers. I love pink poinsettias... they are my absolute favorite!


And I finished it off with a few fun sequins from my stash. Super CAS and lovely!


Be sure to go check out the fantastic 2021 Spring | Summer Coffee Lovers Hop!!
So much fun!! And stop by Super Sponsor Polka Dot Orchard... lots of fabulous digi stamps on sale!!


Thanks so much for stopping by!
See ya next time.

Inky Hugs,
Crystal


{Please note that comment moderation is ON. Your comment will appear shortly.}

Thursday, February 25, 2021

Coffee, Gnomes & You Slimline Card ~ Copic Coloring ~ Unity Stamp Co.

 Hello there crafty friend!
Eeep! There's a new fabulous release over at Unity today!! I created this adorable slimline card using two new releases... the adorable Coffee, Gnomes & You stamp set along with the Coffee is Life background stamp! Love these new stamps!!


I stamped the Coffee is Life background stamp twice side by side with Gina K. Amalgam black ink and then trimmed it down to 3-1/4 x 8-1/16". I ink smooshed it in some Vintage Photo and Ground Espresso Distress Oxide inks and then splattered a little Ground Espresso Distress Oxide ink. I dried it with my mini Wagner Heat Tool and then mat it on an Early Espresso slimline card front measuring 3-1/2 x 8-1/2". I then adhered the card front to a white slimline card front measuring 7 x 8-1/2" scored at 3-1/2".


Now for this adorable gnome... also stamped with Gina K. Amalgam black ink and I colored her up with the following Copic markers:

Skin ~ E0000, E00, E11, R00, R20
Hair ~ E51, E74
Cup ~ BG10, BG23
Hat ~ RV10, RV11, RV14, BG23
Grounding ~ E74

I fussy cut the gnome about halfway through my coloring so I could place her on the card and see what colors I wanted to use. I went with a favorite combo... turquoise and pink!


I adhered the cute gnome to a white die cut 3" circle that I mat on an Early Espresso 3-1/2" circle. I trimmed the sentiment words separately so I could adhere them just where I wanted them. I just love how this card turned out! I have a video sharing my Copic coloring and assembling of this card. You can check that out here... Coffee, Gnomes & You Slimline Card.


Two of my favorite things... an adorable gnome and coffee!! What's not to love!
Go check out the fab new releases and sale over at Unity!!


Thanks so much for stopping by!
See ya next time.

Inky Hugs,
Crystal

Tuesday, December 29, 2020

Slimline Glittery Snow Scene Card ~ Dec. 2020 Whit Kit Winter Shake Up ~ Unity Stamp Co.

 Hello there crafty friend!

I'm excited to share a fun slimline card today! I had so much fun creating another card using the fantastic December 2020 Whit Kit called Winter Shake Up! And it's hard not to make a slimline when the ideas for this style of card are really endless!


I stamped the top portion of the white slimline card front with the snow stamp included in the Winter Shake Up stamp set several times with Sea Glass ink from Gina K. Designs. I also used a Nuvo glue pen to add some of the chunky glitter included in the card kit. I die cut a piece of the Silver Glitterstock and trimmed it so the A2 sized sheet of glitter paper would fit on the slimline card base. You can kind of see the line in between the silver glitter hills, but in real life it's hard to see with all the shine.


I used my Stamp Platform to ink up the car stamp because I wanted to use different inks for the tree and the car. I used Grass Green ink and Charcoal Brown ink, both from Gina K. Designs, for the tree, trunk and stand, and then Memento Tuxedo black ink for the car. I colored up the cute car stamp with the following Copic markers ~ R000, R14, R27, N0, N3, N5, B0000, E55, G46.

You can check out my process video here... Slimline Glittery Snow Scene | DEC 2020 Whit Kit | Unity Stamp Co. or you can click the video below.


I just can't get enough of this adorable car!! It just may be a new favorite! I have one more card to share using this fantastic card kit... I hope you'll come back tomorrow and check it out!

Thanks so much for stopping by!
See ya next time.

Inky Hugs,
Crystal