Showing posts with label layering stencils. Show all posts

Thursday, August 24, 2023

Colorful Balloon Card ~ Balloon Layering Stencils ~ Unity Stamp Co.

 Hello there crafty friend!
Today I have one more card featuring the new Balloon Layering Stencil and Cheers & Confetti stamps from Unity! So many possibilities with this fun new stencil!


I've been on a bit of a CAS card kick {Clean & Simple Card, for those not familiar}. They are quick and easy and I just LOVE all the white space. I partially stenciled some of the balloons using both of the balloon stencils in the stencil set... just focusing on the top portion of the card.


I've been trying to mix up my color choices. I seem to always grab the same colors so I challenged myself to grab a few colors I wouldn't normally. I already had Kitsch Flamingo on my desk from my No Layer Cards I shared the other day. I also grabbed Mustard Seed, Cracked Pistachio, and Abandoned Coral Distress Oxide inks.


I stamped the birthday sentiment using Black Amalgam ink. I die cut the panel using the Deckle & Stitches Nesting Dies... these dies are quickly becoming my favorite! I adhered the panel to a white A2 top fold card base. 

You can check out my short process video here... Colorful Balloons Card | Balloon Layering Stencil | Unity Stamp Co.


  Unity Stamp Co. has so many wonderful new releases but I think the new Bevy of Balloons Bundle is amazing! I haven't even played with the awesome new Bevy of Balloons Background stamp. I hope to this week if I have time. Stop by Unity to check out all the amazing new releases for the month of August! You won't regret it!

Thanks so much for stopping by!
See ya next time.

Inky hugs,
Crystal


{Please note that comment moderation is on. Your lovely comment will appear once approved.}

Tuesday, August 22, 2023

No Layer Cards with Stencils ~ Balloon Layering Stencil ~ Unity Stamp Co.

 Hello there crafty friend!
Today I'm sharing two fun and quick CAS cards with NO layers using the new Balloon Layering Stencil along with the Star Confetti Stencil and the Heart Confetti Stencil... all from Unity! Unfortunately, the Star Confetti and Heart Confetti Stencils are out of stock but the Falling Confetti Layering Stencil would be awesome with this technique!


As I mentioned above these CAS cards have NO layers. I blended over the stencils directly onto the front of the white A2 card bases. Easy peasy AND quick!


I blended Kitsch Flamingo Distress Oxide ink over the largest balloon in the Balloon Layering Stencil. And then I placed the Heart Confetti Stencil over the balloon stencil and blended Picked Raspberry Distress Oxide ink. 


I finished off the card by stamping the sentiment from the awesome new Cheers & Confetti stamps and adding a string for the balloon with a black Copic Multiliner Brush Small Marker.


For my second card, I blended Salvaged Patina Distress Oxide ink over the largest balloon in the Balloon Layering Stencil. I then blended Peacock Feathers over the Star Confetti Stencil.


And finished off this card in the same way by stamping a sentiment from the Cheers & Confetti stamps and drawing a string using a Copic Multiliner Brush Small Marker.


You can check out my short process video here... No Layer Cards with 2 Stencils | Balloon Layering Stencil | Unity Stamp Co.


 Stop by Unity Stamp Co. and check out all the amazing new releases for the month of August!

Thanks so much for stopping by!
See ya next time.

Inky hugs,
Crystal


{Please note that comment moderation is on. Your lovely comment will appear once approved.}

Saturday, July 2, 2022

~ Friends of Unity July 2022 Blog Hop ~

  Hello there crafty friend!
It's one of my favorite times of the month... time for the Friends of Unity Blog Hop!! Our cue this month is a really fun one that I think all of us have been excited to play with! I can't wait to see all the creations shared by our friends today! So let's get to the cue...


... Stencils!! Yes!! There are SO many possibilities when you create cards with stencils! It can actually be overwhelming if you think about it too hard. LOL! So I decided not to think and just play and see what happens.


My first card features the awesome recently released and it's Back in Stock... De Fleur Daisy {stamp & stencil}... and I'll be super honest here. I struggled with this combo. You may remember when this released I shared a DIY pattern paper that I made using the stencil and then I made 5 cards using the paper. Well, that's because everything I made with the combo just didn't turn out right. Of course, us cardmakers are notorious for being overly critical of our creations so they may not have been that bad, but I still threw them away! 


I didn't give up though!! I decided I'd give them another go and stamped the florals with Gina K. Design Black Amalgam ink on Stampers Select White card stock from Papertrey Ink. I then blended Squeezed Lemonade, Mustard Seed, Spiced Marmalade, Picked Raspberry, Kitsch Flamingo, Tumbled Glass, Wilted Violet, Twisted Citron, Mowed Lawn, and Pine Needles Distress Oxide inks over the awesome stencils. I very nearly tossed this one too. LOL! If you look closely on the left side of the floral... I messed up those two teardrop flowers. It screams at me every time I look at it, but I know that it's not that bad. So I kept it... a good lesson to keep on keeping on with our creations! 


My only other complaint is that I should have left my stamp in my Stamp Platform so that I could re-stamp the florals again and make the black lines nicer. Some of the oxides went over the lines and lightened them... definitely something to remember for next time! I trimmed up the panel to 4-3/4 x 3-1/2". I die cut a card front of True Black card stock from Papertrey Ink with the largest die from the Loopy Rectangle dies from Gina Marie Designs. It's a lovely layer of texture... a shame it doesn't show in the pictures that well. I adhered the daisy panel to the die cut with my go-to liquid glue ~ Tombow Mono Multi liquid glue. I added a few black rhinestones from the Rainbow Bling rhinestones from Gina Marie Designs and a cute sentiment sticker from the Small Talk sentiment stickers from Tim Holtz / Idea-ology. I adhered the Loopy Rectangle panel to a True Black card front measuring 5-1/2 x 4-1/4" and then adhered my panel to a white A2 side fold card base measuring 11 x 4-1/4"; scored at 5-1/2".


For my second card, I had a fun idea for a different kind of background. I wanted to make a scene card using a stencil that wasn't really meant for a scene card. I chose the Tim Holtz / Stampers Anonymous Mixed Media Stamps/Stencil combo {THMM103} from my stash and thought it would be super fun to pair it up with the adorable hot air balloon in the Sending Up Something Beautiful stamp kit from Unity. I think this turned out pretty cute BUT I may try another version where I lightly ink blend over the panel again after blending over the stencil so there's less white and it's more of a galaxy sky. And then add some white splatter for stars... I don't know. I do still love how this turned out!


I ink blended down my white card stock panel over the stencil with Kitsch Flamingo, Salvaged Patina, and Saltwater Taffy Distress Oxide inks because I had wanted to do a sunrise kind of background BUT the colors weren't right so I replaced the stencil and ink blended Chipped Sapphire Distress Oxide inks over the Kitsch Flamingo on the flourishes near the top. I love the sunset vibe {or galaxy vibe} the colors give to the background!


Here's a quick list of the Copic markers I used:

Clouds ~ BG0000, BG000, BG10, RV10, RV21
Hot Air Balloon ~  Y11, Y06, Y15, BG10, BG11, BG15, RV10, RV21, E41, E43, E44

I trimmed the background panel to 4 x 5-1/2". I stamped the sentiment on white card stock with Black Amalgam ink. I trimmed it up and mat it on True Black card stock. I adhered it to the trimmed background panel and trimmed off the excess card stock from the sentiment. I then adhered it to a white A2 top fold card base. I fussy cut my copic colored images and cleaned up the edges by coloring them with my Memento Tuxedo black marker. I adhered the one cloud to the back of the hot air balloon and then popped up all the pieces on the card with foam tape. What do you think? I like it... I'm pretty sure I need to try ink blending over the white a bit though so it has more of a galaxy background vibe. We'll see if I can find some time for that though...


And my last card using the adorable new release from Unity called Friends Furever just may be my fave for this month!! I had some more fun... this time I layered two stencils together and ink blended through them both to get my sunset background. I layered the Tim Holtz Stampers Anonymous Mini Stencil Set 43 stencil over the Oval Extraordinaire stencil from My Favorite Things and ink blended with Squeezed Lemonade and Spiced Marmalade Distress Oxide inks over top. I then removed the Tim Holtz stencil and lightly blended a tiny bit more yellow without adding more ink to my brush. This is where I got the idea to blend over the background on my second card. I really think it would change the whole vibe of the card.


Since I was having fun ink blending, I decided to ink blend some 'grass' for the cute pups... I used the negative oval stencil to protect my ink blended 'sunset' and carefully blended some Mowed Lawn Distress Oxide ink... BUT if I was to do this over again I would probably just use some copics to color a little grass underneath them. I think it would have been a cleaner way to ground the images and I could have added a few blades of grass.


Here's a quick list of the Copic markers I used for the pups:

Big Dog ~ W00, W1, W3, W5
Handkerchief ~ R20, R14, R27
Little Dog ~ N0, N1, N3
Collar ~ B0000, B00, B02

Now before we get to the hopping, I chose a lucky winner from the comments on last month's hop to win a fun prize package and that lucky winner is...


... Sue D!! Congratulations, Sue!!
Please email me at crystalominkler@gmail.com to claim your prize. 
Prize must be claimed within two weeks. 

Well, that's it for me this time! Please hop along and enjoy some more inspiration from the Friends of Unity! I'm so excited to see all the creations from our friends this month! I will be doing another fun giveaway this month!! Be sure to hop along and comment for a chance to win! I'll announce the winner next month! 


Let's get to the hopping...


Crystal <--- you're here

up next ---> Amber


Thanks so very much for supporting our little hop!
We appreciate you!!

See ya next time.

Inky Hugs,
Crystal


{Please note that comment moderation is ON. Your comment will appear shortly.}

Wednesday, April 27, 2022

Simple Stenciled One-Layer Card ~ April 2022 Uniquely Unity ~ Unity Stamp Co,

Hello there crafty friend!
I have one more card to share with you using the beautiful April 2022 Uniquely Unity membership stamp! This one is a very simple one-layer card. A little bit of ink blending over a stencil and then some simple stamping... so easy, quick and pretty! This would be super easy to duplicate in a rainbow of colors, too!
 

I started with a white card front measuring 5-1/2 x 4-1/4". I secured the Grime Layering stencil from Tim Holtz over the card front with Pixie Tape and ink blended Salty Ocean Distress Oxide ink over the bottom portion of the stencil. I started ink blending in the bottom left corner and gradually lightened my touch as I moved across the card.


You can see the ink blending is lighter on the bottom right. I ink blended Tumbled Glass on the top portion using a heavier hand in the middle of the ink blending over the Salty Ocean and gradually lightening my touch as I moved up and to the right of the card.


Once my ink blending was done I stamped the dandelions and the sentiment with Gina K. Black Amalgam ink. I trimmed the card front to 5-1/4 x 4" and adhered it to a white A2 top fold card base. Done. I think this would look lovely in purple and pink... oh, a pretty turquoise color would be beautiful too. Really any color would be lovely. 

You can check out my process video for this card here... Simple Stenciled One-Layer Card | April 2022 Uniquely Unity | Unity Stamp Co.


I had so much fun inking up the You Can Dream It stamp set! If you receive this membership, I sure hope you've been inspired to ink it up! You can check out the Uniquely Unity membership over at Unity Stamp Co. if you aren't already signed up to receive it. 


Thanks so much for stopping by!
See ya next time.

Inky Hugs,
Crystal


{Please note that comment moderation is ON. Your lovely comment will appear shortly.}

Thursday, April 8, 2021

Monochromatic Slimline Cards ~ Layering Tulips Stamp & Stencil ~ Unity Stamp Co.

 Hello there crafty friend!

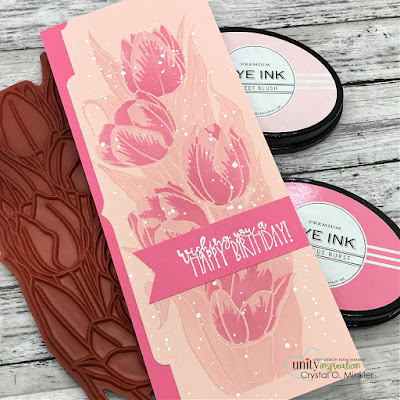
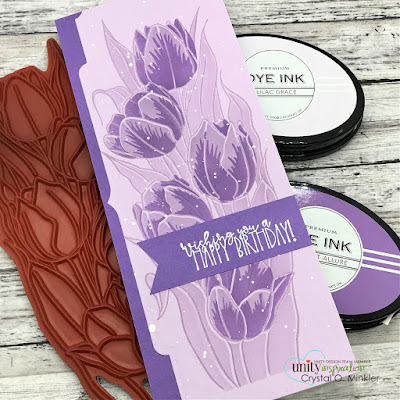
I'm back with a fabulous set of Monochromatic Slimline cards using the gorgeous new Layering Tulips stamp & stencil bundle from Unity Stamp Co. Oh my gorgeousness... you have got to check out this amazing bundle!! The Slimline Layering Tulips is a huge and beautiful stamp all on it's own, but when you combine it with the fabulous Layering Tulip stencil... it's a game changer!! Seriously amazing!


Check out this fun set of Monochromatic Slimline birthday cards that I made using the Slimline Layering Tulips stamp and the Layering Tulip stencil!! They turned out better than I even imagined!!


First I chose four main colors of card stock and the coordinating inks, along with four more slightly darker card stocks and inks to compliment the cards. For this first card, I used Lemon Tart card stock and ink along with the Summer Sunrise card stock and ink. I stamped the Slimline Layering Tulips stamp with the Lemon Tart ink on the Lemon Tart card stock.


I then blended Lemon Tart ink over the petals and leaves portion of the stencil to 'color' the tulips. Such a super easy and fast way to color this huge stamp! Don't pass up this stamp and stencil bundle if you don't like to color... the stencil seriously makes it easy to color without actually coloring!


For my second card I used Sweet Blush and Hibiscus Burst card stocks and inks.
I used the darker inks over the third portion of the stencil to give the tulips some shading and contrast.


I die cut each of the panels with the Essentials Slim Cuts die from PinkFresh Studio.


For my third card I used Aqua Mist and Hawaiian Shores card stocks and inks.
I stamped the sentiments with Wow Clear Embossing ink and then melted Alabaster White embossing powder with a Mini Wagner heat tool. I trimmed the sentiments and used a hexagon punch to cut the flags on the left side.


I splattered the panels with a bit of white acrylic paint that I spritzed with water to thin it out.


For my last card I used Lilac Grace and Amethyst Allure card stocks and inks.
I adhered all the layers together with Tombow Mono Multi Liquid glue.


And then I adhered the 3-1/2 x 8-1/2" slimline panels to slimline white card bases measuring 7 x 8-1/2", scored at 3-1/2". I have a video sharing my process in making these cards. You can check it out here... Monochromatic Slimline Cards | Layering Tulips.


A beautiful set of Monochromatic Slimline birthday cards!! I just love how these turned out!
Be sure to stop by Unity Stamp Co. and check out their fabulous new releases and the current sale!!


Thanks so much for stopping by!
See ya next time.

Inky Hugs,
Crystal


{Please note that comment moderation is ON. Your comment will appear shortly.}

Saturday, December 5, 2020

~ Friends of Unity December 2020 Blog Hop ~

 Hello there crafty friend!

Welcome to the December 2020 Friends of Unity Blog Hop! Our cue this month is...


... My Favorite Things!!
So fun! I have A LOT of favorite things... owls, coffee, books, snowmen, wreaths, holly & berries, old trucks, daisies, sunflowers... really I could go on with about a dozen more of my favorite things but the TOP of that list is Unity Stamp Co.!! I'm a HUGE fan of the fabulous company which is why I started this awesome monthly blog hop, along with my awesome friend Amber! Today we are celebrating 3 fantastic years of us hopping with Unity inspiration!! Woohoo!! I can't believe that it's been 3 years already... I for one, can't wait to see what the next 3 years brings!

I hope that you'll hop along with us and enjoy the fabulous inspiration we're bringing this month. Speaking of... let's get to it! 


My first card features the fabulous new Uniquely Unity stamp called Take a Break. If you're new to Unity, Uniquely Unity is a fabulous membership that Unity offers monthly. Each month you receive a wonderful stamp set in all different styles. It's one of my favorite memberships!

Anywho... if you've followed my blog you may recognize this card design. I used it with a Santa stamp a couple of years ago and I really love the design so I thought I'd recreate it with this new beautiful stamp that just happens to feature one of my favorite things... Coffee!! I also paired it up with one of my new favorite Christmas papers, the Farmhouse Christmas papers! The colors in these papers are just gorgeous! I also used a piece of the Cozy Christmas papers... the sweater piece! Love it! 


I die cut the image with the Papertrey Ink Shape Shifters: Oval 2 die and colored it with the following Copic markers:

Skin ~ E000, E00, E11
Hair ~ E35, E74, E79
Hat/Sleeve ~ E41, YG67, YG93, R00, R21
Blanket ~ E0000, E41, E81, R14, R27
Mug ~ BG70, BG72, N0, N1, N4

The sentiment is actually from a piece of patterned paper from Tim Holtz Christmas Paper Stash paper pad. I cut the words right out of the paper and adhered it to white card stock and then popped it up on the card along with the popped up focal image. I adore this card!!


My second card features the beautiful Start Something New stamp set... and books!! Another one of my favorite things!!! Notice anything about the design of this card?! It's another take, like a mirror image, of the first card. I used one of my favorite techniques... layering stencils to create my background. First I used the Scalloped Circle Masquerade Stencil from Heffy Doodle and blended a bit of Tumbled Glass Distress Oxide ink over it. I then used the Twinkle Stencil from Whimsy Stamps and blended a bit of Mermaid Lagoon Distress Oxide ink. I stamped the sentiment and the girl with Memento Tuxedo black ink. I trimmed the card front down to 4 x 5" and adhered it to a Tempting Turquoise card front measuring 4-1/4 x 5-1/2". I then adhered the card front to a white A2 top fold card base.


I then colored the girl using the following Copic markers:

Skin ~ E000, E00, E11
Hair ~ E21, E25, E27
Clothes ~ YR000, YR12, YR15, YR21, B95, B97, B99
Books ~ W3, G14, E57, E43, YR000, YR21, E74, B95, B97, G94, C00, C1

I fussy cut the image and popped her up on the card. To finish off this card I added a few dots with Nuvo Blue Lagoon Glitter drops. Love it! I really love that the designs are similar but so different!

I started a third card but didn't have enough time to finish it up. Boo!
I'm hoping to share it in a few days though. 

In celebration of our 3 years of hopping I am having a giveaway!! I will use random.org to chose a winner from the comments so be sure to comment on each of the blogs while you're hopping! I believe a few of my friends are also having giveaways this month!


Let's get to the hopping...

Crystal <--- you're here

up next ---> Eileen


Thanks so much for supporting our little hop!
We appreciate you so much!

See ya next time.

Inky Hugs,
Crystal