Showing posts with label #inkblending. Show all posts

Friday, July 12, 2024

{BYSHC} Sketch Challenge 47 ~ Create-in-Quads Snowflake Layering Stencil ~ Taylored Expressions

Hello there crafty friend!
I'm back with more inspiration for the {BYSHC} Sketch Challenge 47 over in the Build Your Stash Holiday Cardmakers Facebook group! Today I'm sharing a fun Christmas card featuring the awesome Create-in-Quads Snowflake Layering Stencil from our amazing sponsor, Taylored Expressions! Taylored Expressions has generously offered up a $25 gift card as a prize for the {BYSHC} Sketch Challenge 47 this month! So fabulous!!


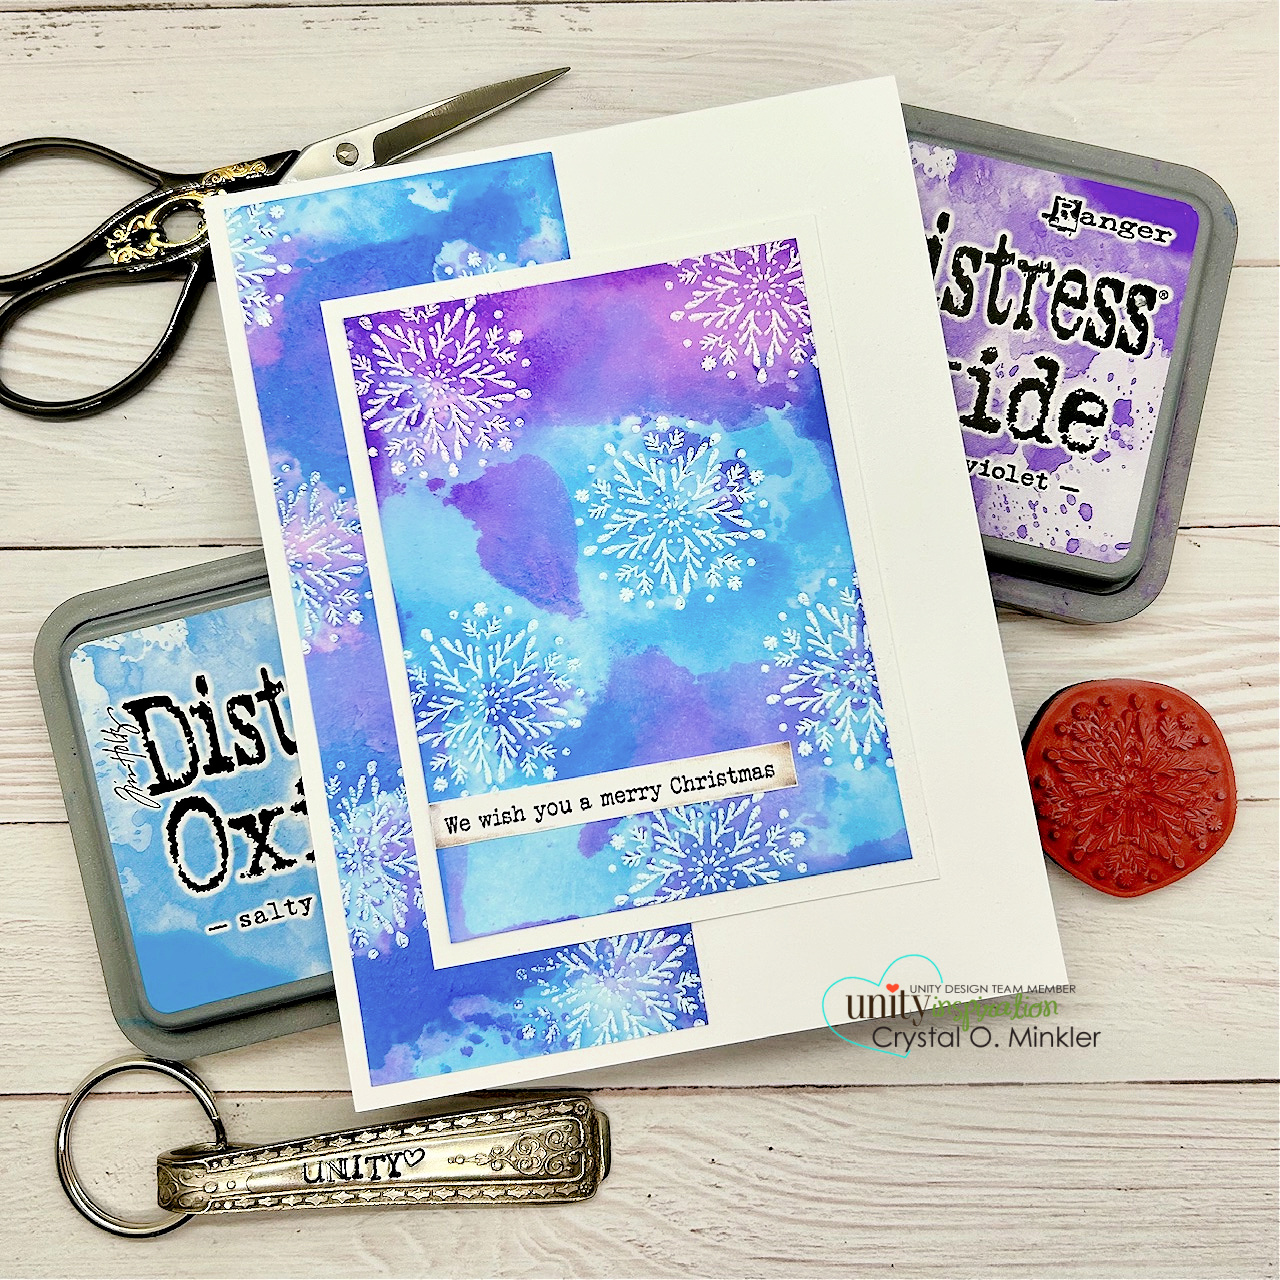
The Create-in-Quads Snowflake Layering Stencil makes it so easy to ink up a whole 8-1/2 x 11" sheet of card stock that you can cut up and make four awesome cards out of it!! The set includes four layering stencils that line up so easily and all you have to do is pick your colors and blend away! It was so much fun! I decided to use my four card stock panels in a different way. I actually used two of the four panels to create the fun layers in the card.


I blended Tumbled Glass Distress Ink over the first stencil being sure to ink up the four squares on the edges of the stencil. Those four squares are the guides to lining up the next three stencils. I replaced the first stencil with the second stencil in the set and blended Chipped Sapphire Distress Ink over that stencil. I blended Black Soot Distress Ink over the third stencil and then more Tumbled Glass Distress Ink over the fourth stencil. You may remember this color combo from the card I shared earlier in the month.


I cut the 8-1/2 x 11" sheet into my four panels. I trimmed down the first panel to 3-7/8 x 5-1/8" and mat it with a 4 x 5-1/4" piece of True Black Card Stock from Papertrey Ink. I trimmed the fourth panel for my next layers. My first piece measures 2-3/8 x 3-7/8". I mat it with a 2-1/2 x 4" piece of black card stock and a 2-5/8 x 4-1/8" piece of Bashful Blue Card Stock from Stampin' Up. The top layer was die cut from the remaining piece of the fourth panel. I die cut it using a die from the Stitched Square Stacklets from Taylored Expressions. I mat this layer with a 2-5/8" square piece of black card stock and a 2-3/4" square piece of blue card stock. I die cut one of the snowflakes from the scrap leftover from the fourth panel using the Stitched Circle Stacklets from Taylored Expressions. I mat it with a die cut circle from black card stock. I used the Nesting Additional Circles Dies from Waffle Flower for that piece. I added a glitter white enamel dot from my stash to finish off the snowflake layers.


 I heat embossed the sentiment from the Fluffy Friends - Holiday stamp set from Taylored Expressions. I prepped my black card stock with the TE Anti Static Powder Tool. I stamped the cute sentiment using the Sugar Cube White Pigment ink and added Alabaster White Embossing powder from Brutus Monroe. I then melted the embossing powder using my Wagner Precision Heat Tool. After letting the melted powder cool a bit, I rubbed my card stock with a microfiber cloth to remove the anti static powder. I trimmed up the sentiment and added a bit of foam tape to the right side and then adhered the sentiment directly to the card using liquid glue on the left side. A great trick to adhere the sentiment flat for cards with lots of layers. 


Here's a look at {BYSHC} Sketch Challenge 47 for the month of July. Loving this sketch! I can't wait to see what everyone does with it. I hope you'll join us and play along with the sketch. If you're interested in seeing a bit more inspiration for this sketch, check out the amazing inspiration from the design team over on the {BYSH} Cardmakers blog! So many fabulous cards this month from the design team.


Thanks so much for stopping by!
See ya next time.

Inky hugs,
Crystal


{Please note that comment moderation is ON. Your lovely comment will appear shortly.}

Wednesday, May 29, 2024

Membership Wednesday ~ May 2024 UU Wind in Your Hair ~ Unity Stamp Co.

  Hello there crafty friend!
Today I'm sharing a fun card featuring the girls stamp from the May 2024 Uniquely Unity membership called Wind in Your Hair from Unity. I absolutely adore this stamp! It reminds me of the bug my auntie had when I was a kid. I don't think it was a convertible like the one in the stamp but I loved going for rides in that car. 


I stamped the car and sentiment on scraps of Stampers Select White Card Stock from Papertrey Ink using Black Amalgam Ink from Gina K. Designs. I colored up the car using my Copic markers and die cut the image using a die from the Deckle & Stitches Nesting Die Set from Unity.

Here's a quick list of the Copic markers I used:
Car: R20, R14, R46, C00, C1, C3, Colorless Blender
Left Girl Hair: E70, E71, E74
Left Girl Shirt: BG11, BG23, BG45
Right Girl Hair: E51, E55, E57
Right Girl Shirt: V000, V12, V15
Outline: C00, C1


I set aside the car panel and grabbed a 4-1/4 x 11" piece of Stampers Select White Card Stock from Papertrey Ink. I scored the A2 top fold card base at 5-1/2" and then turned it on the side for a landscape card. I secured the card base to my table with purple tape. And then I laid the sunray of the 3-in-1 Stencil from Unity over top, also securing it to my table with purple tape. I blended Mustard Seed, Spiced Marmalade and Abandoned Coral Distress Oxide Inks using three of my TE Blender Brushes from Taylored Expressions.  


I fussy cut the sentiment and just adhered it directly to the car panel. I added foam tape to the back of the car panel and popped it up on the card base. I really love how this one turned out!
 

And here's a look at the awesome Uniquely Unity membership! I am seriously loving this month's stamp. Well, that's it for me today! I hope you've been inspired to play with your membership stamps!
Have an ink-redible day!


Thanks so much for stopping by!
See ya next time.

Inky Hugs,
Crystal


{Please note that comment moderation is on. Your lovely comment will appear once approved.}

Friday, December 22, 2023

Advent Calendar Day 22 ~ {BYSHC} Sketch Challenge 40 ~ Unity Stamp Co.

Hello there crafty friend!
It's Day 22 of the 2023 Advent Calendar from Unity!! I'm revealing the Advent Calendar stamp on my YouTube channel each day and also have a short blog post. I made a fun background using today's stamp with some ink smooshing and blending.


A fun snowflake stamp is the next Advent Calendar stamp! I stamped the snowflake several times with Sugar Cube Pigment ink from Taylored Expressions over the Stampers Select White card stock from Papertrey Ink and added Alabaster White embossing powder from Brutus Monroe. Melted the embossing powder with a Wagner Precision heat tool. Then I did some ink smooshing and a bit of ink blending using TE Blender Brushes from Taylored Expressions with Salty Ocean and Wilted Violet Distress Oxide inks.


Inspiration for today's card comes from the current {BYSHC} Sketch Challenge 40. I omitted the background paper on the right side and left some white space instead. If you need another Christmas card or maybe you want to get ahead for next year, give the {BYSHC} Sketch 40 a try and enter your card in the challenge. The challenge ends December 31st. I hope you'll join in the fun! If you'd like to see some more inspiration for the sketch check out the {BYSHC} blog.


The sentiment for today's card is from a cut apart sentiment strip that was a freebie during Brown Thursday or Black Friday... not sure. I trimmed it up and adhered it directly to the card. No foam tape this time.


This one didn't turn out how I thought it would but I like it. What do you think? If you watch the video I'd love to know if you would have kept the other ink smooshed piece for the right side or if you would have gone with the white card base like I did.

You can check out my video revealing the Advent Calendar Day 22 stamp and my process in making this card here... Advent Calendar Day 22 | Unity Stamp Co.


Looks like the Advent Calendars are out of stock... but there's some new goodies that were just released for the final release of 2023. I haven't had time to play with any of them yet, but soon I hope! I'll be back tomorrow for Day 23 of the 2023 Advent Calendar from Unity! Have an ink-tastic day!


Thanks so much for stopping by!
See ya next time.
 
Inky Hugs,
Crystal


{Please note that comment moderation is on. Your lovely comment will appear once approved.}

Saturday, November 18, 2023

A Friend Like You ~ Merry Mingle ~ Unity Stamp Co.

Hello there crafty friend! 
The awesome sale over at Unity Stamp Co. continues with another HUGE release for the Black Friday Sale! Lots and lots more amazing goodies available. Including a new Angie Girl that I just HAD to play with called Merry Mingle!


Isn't she lovely?! I wanted a very simple CAS card so that Merry Mingle would be the focus of the card. I blended over the Star Confetti Stencil onto the front of my white A2 top fold card base using Mustard Seed and Kitsch Flamingo Distress Oxide inks.


 Here's a quick list of the Copic markers I used:

Skin: E000, E00, E11
Hair: N0, N1, N3, N5
Dress: Y11, Y06, RV10, RV21
Heels: RV10, RV21
Gift: V000, V12, V15, V17, YG11, G14, Y11, Y06


I fussy cut Merry Mingle and colored the edges with a Memento Tuxedo Black marker making the edges look all nice and neat. I trimmed the sentiment and cut a fishtail on the end. I mat the sentiment with a piece of True Black card stock. I also found a strip of black card stock to ground Merry Mingle. I adhered the girl directly to the card for easy mailing. That's it for me today! Go check out the awesome new releases for Black Friday over at Unity! It's seriously another HUGE release friends! Lots and lots of fabulous new goodies!

Thanks so much for stopping by!
See ya next time.

Inky hugs,
Crystal

{Please note that comment moderation is on. Your lovely comment will appear shortly.}

Saturday, October 7, 2023

~ Friends of Unity October 2023 Blog Hop ~

   Hello there crafty friend!
It's the first Saturday of October and that means it's time for our Friends of Unity Blog Hop!! 
This month's cue is so much fun! I had so many fun ideas for this one but time has not been on my side and I only got a couple cards done. I hope you'll hop along with us and enjoy some wonderful inspiration from our friends!


Build A Scene is our cue this month! 
So stinkin' fun! I can't wait to see what our friends made to share with us all!


My first card features a whole bunch of stamps but the star is the adorable new Winnie the Pooh: Sweet Notes from Pooh!! Love, love, love this adorable stamp! Pooh bear and the mailbox were stamped with Black Amalgam ink and I colored them up with the following Copic markers:

Pooh: Y11, Y06, Y15
Scarf: R20, R14, R46
Hat: C00, C1, YG11, G24, G46
Mailbox: E51, E55, E57, N0, N1, N3, N5, R20, R14, R46
Envelopes: C00, C1, R20, R14, R46

I fussy cut Pooh bear and the mailbox and then cleaned up the edges by coloring them with a Memento Tuxedo Black marker. 


I stamped the background first with A Little Christmas Carol. I inked up the top with Tumbled Glass Distress Oxide ink and the bottom with Mowed Lawn. I did the colors separately and used a blending brush to soften the lines in between but they were covered up with the tree line. Next, I stamped the Blanket of Snow Background with Tumbled Glass... just on the top portion. And then I stamped the tree line from the Northwoods Peace with Forest Moss. I then stamped the little trees from Winnie the Pooh: Forever with You using Rustic Wilderness and then in the very front Pine Needles Distress Oxide inks.


I blended a bit of Tumbled Glass and Mowed Lawn oxides around the panel but then I decided to die cut it with the largest die from the Postage Stamp {nesting dies}. Next, I blended Ground Espresso Distress Oxide ink around the edges. I adhered the mailbox and Pooh bear to the panel and then I adhered the panel to a Kraft card base. In my rush to finish up my card, I didn't ground the mailbox or Pooh bear which I would do if I remade this card. I stamped the sentiment with Black Amalgam ink and colored 'Merry' with my R14 copic marker. I trimmed it up and adhered it to the card. I think it turned out pretty cute!


I totally cheated on my second card!! I didn't really build a scene because this beautiful stamp is a scene. It's the Scenic Route stamp. I stamped it with Black Amalgam ink and colored it up with the following Copic Markers:

Van ~ C00, C1, N0, N1, N3, R20, R14, R46
Snow ~ C00, C1
Sky ~ B95, B97, B99, B39


I die cut the background with the largest stitched rectangle die from the Scallops & Rectangles {nesting dies}. And then I did some white acrylic paint splatters all over the panel. I stamped the 'Merry Christmas' sentiment from the Vintage Poinsettia stamps using Black Amalgam ink and then I fussy cut it so it wouldn't cover up too much of the background.


I adhered the die cut panel to a white A2 top fold card base that I turned on the side. I had really hoped to make a fun Fall card but as I mentioned above I ran out of time. 

Now before we get to the hopping, I chose a lucky winner from the comments on last month's hop to win a fun prize and the lucky winner is...


... Kelly Brillhart!! Congratulations Kelly!!
Please email me at crystalominkler@gmail.com to claim your prize. 
Please claim the prize before November 1st. 

Well, that's it for me this time! Please hop along and enjoy some more inspiration from the Friends of Unity! I'm so excited to hop and check out the scene cards that our friends created. I will be doing another fun giveaway this month!! Be sure to hop along and comment for a chance to win. {When you comment please leave your name just in case it posts as anonymous.} I'll announce the winner next month! 


Let's get to the hopping...

Crystal <--- you're here

up next ---> Amber


Thanks so very much for supporting our little hop!
We appreciate you!!

See ya next time.

Inky Hugs,
Crystal


{Please note that comment moderation is ON. Your comment will appear shortly.}


Wednesday, September 27, 2023

Membership Wednesday ~ September 2023 BOM Off the Grid ~ Unity Stamp Co.

  Hello there crafty friend!
Today I'm sharing a fun card using the cool September 2023 Background of the Month membership from Unity called Off the Grid. I had a fun idea for a background only using a portion of the stamp.


I stamped a piece of white card stock using Sugar Cube Pigment ink from Taylored Expressions. I applied Alabaster White Embossing powder from Brutus Monroe and melted it with my heat tool. 


Then came the fun part... I ink smooshed some Candy Apple and Wilted Violet Distress Oxide inks. I also blended some of the inks to fill in the background.


I die cut the background using the largest die from the Deckle & Stitches Nesting Dies, also from Unity. I dried the background completely, added some white acrylic paint splatters, and then adhered it to a white A2 top fold card base.


I stamped the beautiful Zinnia on a scrap of white card stock really only focusing on the one flower. I didn't want the whole cluster for my card so the grid background would show. I colored up the zinnia with just a few purple Copic markers: V0000, V000, V12, V17. I didn't want it very dark so it would pop on the background. I stamped the 'hello' sentiment from the September 2023 Kit of the Month called Harvest Hues. Love the distressed look of the sentiment. The flower is fussy cut and I colored up the edges using a Memento Tuxedo Black marker to make it all nice and neat. I also fussy cut the sentiment but I left the edges white. Both are popped up on the card with foam tape.


Here's a quick look at the Background of the Month membership this month! So fun! This membership is available for only $18.99. That includes shipping! Included with both of these memberships is a wonderful inspiration sheet with pictures and step-by-step instructions for two cards so you can easily recreate the cards yourself. And now when you sign up you have the ability to pause, skip or cancel your subscription within your Unity account.


I'm playing along with the Color Hues Challenge #72: Purple & Red


 Well, that's it for me today! I'll be back in two weeks with inspiration for one of the fab October memberships. Just not sure at this point which one I want to play with first. {Be warned... they are ALL amazing!!} Until then, have an ink-tastic day!


Thanks so much for stopping by!
See ya next time.

Inky Hugs,
Crystal


{Please note that comment moderation is on. Your lovely comment will appear once approved.}

Tuesday, June 13, 2023

Joseph's Coat Technique with a Twist ~ Technique Tuesday ~ Unity Stamp Co.

 Hello there crafty friend!
I'm back with another Technique Tuesday! On the 2nd Tuesday of each month I'll be sharing a bit of inspiration and a video featuring a fun technique. I hope that you'll be inspired to get inky and play along with some of the techniques that I share.


Today's technique is a fun little twist on the Joseph's Coat Technique. I shared a masculine card a few days ago using this technique but this time I've changed it up a bit.


I created a colorful background by blending Squeezed Lemonade, Wild Honey, and Ripe Persimmon on a white card front. Next, I stamped the beautiful stamps from the Hive and Herb stamps using an embossing ink and I heat embossed each stamped image with a clear embossing powder. I then stamped the wonderful Honeycomb Chaos background stamp in the lower right side and heat embossed it, too.


Now for my little twist... I blended Ground Espresso Distress Oxide ink over the background. Usually this technique uses a black ink. I know that's not super crazy or anything but it sure is fun! And I just love how the colors pop!


Another twist on this technique... since I used distress oxide ink I was able to do some water splatter on the card and look at that added dimension. Loving it! 


To finish off the card, I die cut the panel with the Postage Stamp {nesting dies}. I wrapped it with some copper metallic thread securing it on the back of the panel with tape. Adhered it to a yellow mat and then a dark brown card front. I then adhered the entire piece to a white A2 top fold card base. Stamped the sentiment with white pigment ink and heat embossed a white embossing powder. Trimmed up the sentiment and adhered it directly to the card.


Such a fun technique and so many possibilities depending on what colors you use for your base and for the pop! If you give this fun technique a try, I'd love to see what you create so please share your cards in the Unity Show & Tell group and tag me. Have an ink-tastic day!

Thanks so much for stopping by!
See ya next time.

Inky Hugs,
Crystal


{Please note that comment moderation is on. Your lovely comment will appear once approved.}

Monday, March 27, 2023

Inky Paws Challenge #194 ~ Color Challenge Reminder

 Hello there crafty friend!
 There's still time to play along with the Inky Paws Challenge #194 - Color Challenge!! You have until this coming Friday, March 31st to get your entries in for the #194 Color Challenge and a chance to win a $20 store credit to Newton's Nook Designs!

Here's another look at the fun colors... Bubblegum Pink, Lilac, Spring Green, and White.


Our family had unexpected visitors so I found myself in need of a quick card for this week's challenge post. I love a fun stencil for a quick background!! I decided to go with an ombre style background using Picked Raspberry, Kitsch Flamingo, and Spun Sugar Distress Oxide inks for the first stencil in the Butterflies Stencil Set. Once I was happy with my blends, I replaced the stencil with the second stencil in the set and blended Wilted Violet Distress Oxide ink over the stencil.


I wanted a bunch of layers using all the colors in the color challenge so I pulled out my Frames & Flags Die Set. I die cut a card front of Stampers Select White card stock from Papertrey Ink using the largest scalloped die in the die set. I then die cut the butterfly background with the curved edge rectangle die from the die set. I mat the butterfly layer onto a 3-3/8 x 4-5/8" piece of Hibiscus Burst card stock from Papertrey Ink. All my layers were then adhered to a card front of Green Galore card stock from Stampin' Up.


I found a sweet sentiment from the Garden Mice Stamp Set that worked perfectly with my card! I stamped it with Sugar Cube Pigment ink from Taylored Expressions. I then added some Alabaster White Embossing Powder from Brutus Monroe and melted it with my Wagner Precision Heat Tool. I trimmed the sentiment to a cute banner and thought it would be hun to also layer a few banners with the colors. I trimmed a scrap of white card stock into a banner. I then die cut some Hibiscus Burst card stock with the longest banner from the die set. I adhered all the layers together and then adhered them to the card. I added a few pink enamel dots to finish up the card. And then I adhered it to a white A2 top fold card base measuring 4-1/4 x 11"; scored at 5-1/2".


Now it's your turn to get your paws inky with your Newton's Nook Designs products and create a project with the color combo of Bubblegum Pink, Lilac, Spring Green and White. Be sure to link up to the Inky Paws Challenge! Can't wait to see your projects!


Thanks so much for stopping by!
See ya next time.

Inky Hugs,
Crystal


{Please note that comment moderation is on. Your lovely comment will appear once approved.}

Thursday, December 15, 2022

Shake Your Flakes ~ December Challenge ~ Unity Stamp Co.

 Hello there crafty friend!
Today I'm sharing more inspiration for the December challenge over in the Unity Show & Tell group. It's All About Backgrounds this month!! I got inky with the fabulous Shake Your Flakes {December 2022 Sentiment Kit}.


The background was created by first stamping the cluster of snowflakes all over the white card front measuring 4-1/4 x 5-1/2". I inked it up with white pigment ink. I then added some white embossing powder to the card front and melted it with a heat tool. 


I blended Shaded Lilac, Wilted Violet and Villainous Potion Distress Oxide inks over the background. When I blend oxides I like to go over the blends a few times until I'm happy with the colors.


Next I stamped the background with the awesome Criss Cross Grunge December 2022 Background of the Month stamp. I wiped off the embossed flakes with a microfiber cloth and the lines of the background stamp moved to the back of the card like magic! Love the magic of heat embossing! I finished off the background with some water splatter and some white acrylic paint splatters. I wanted to break up the background a bit so I cut it on a diagonal and adhered the background to a white A2 top fold card base.

You can check out my process video here... Shake Your Flakes | December Callenge | Unity Stamp Co.


I stamped the sweet sentiment with Wilted Violet oxide ink. Next, I die cut it with the smalled stitched circle die from the Scallops & Circles {nesting dies}. I also die cut a stitched scalloped circle from white card stock and adhered the layers before popping it up on the card. To finish off the card, I added some pretty rhinestones to some of the snowflakes centers.


I've used a few background stamps the last few weeks for this challenge but you can create a background without using background stamps!! Repetitive stamping, like I did with the snowflakes cluster, is a great way to use your stamps for a wonderful background. The possibilities are seriously endless!! I hope you get a chance to play along. I'd love to see what you create. Be sure to share your cards in the Unity Show & Tell group and also add them to the December challenge album in the group to be entered for a prize!! See you back here next Thursday for more inspiration for the All About Backgrounds challenge!

Thanks so much for stopping by!
See ya next time.

Inky Hugs,
Crystal


{Please note that comment moderation is on. Your lovely comment will appear once approved.}

Friday, December 2, 2022

Stay Cozy Fox ~ Kindness is Like Snow ~ Unity Stamp Co.

 Hello there crafty friend!
Today I'm sharing a CAS card featuring the new Kindness is Like Snow stamp that was just released for Unity's Cyber Week Sale. I've been wanting to play with a CAS card idea on black card stock and thought this beautiful fox stamp would be perfect with this design.


I used an oval shaped stencil from My Favorite Things called Oval Extraordinaire to mask my True Black card front and ink blended Tumbled Glass, Chipped Sapphire and Black Soot Distress Oxide inks over the oval opening. First I ink blended Tumbled Glass and then I went over that with the Chipped Sapphire. I then blended a bit of the Black Soot around the edges.


I kept the stencil and a post it note on my card front and splattered some white acrylic paint over the ink blended oval. Love the starry night sky this created! I stamped the beautiful fox and colored it with the following Copic Markers:

Fox ~ E95, E97, E09
Scarf ~ V000, V12, V15, V17


I fussy cut the fox and popped it up on the card using foam tape. I originally used the 'Kindness is like snow.." sentiment but then I realized that there's no snow on my card and it didn't make any sense to use that sentiment. So... I pulled it off of my card as carefully as I could. It wasn't pretty. To cover up the mess I die cut another card front of True Black card stock with a stitched hillside die. I pulled up the bottom of the fox and then I adhered the card front slightly under the fox. I stamped the 'stay cozy' sentiment, trimmed it and adhered it in the bottom right corner. Still pretty CAS but I did have to add that layer to cover up my boo boo. 


Thanks so much for stopping by!
See ya next time.

Inky Hugs,
Crystal


{Please note that comment moderation is on. Your lovely comment will appear once approved.}