Showing posts with label Technique Tuesday. Show all posts

Tuesday, December 12, 2023

Salad Spinner Art ~ Technique Tuesday ~ Unity Stamp Co.

 Hello there crafty friend!
I'm back with another Technique Tuesday! Can you believe it's December already? Sadly, that means it's my final blog post of 2023. I hope that you've been inspired to get inky and maybe even played along with some of the techniques that I've shared. If you missed some and want to check them out, you can do that here.


I do love getting inky and the technique I'm sharing today is another fun inky technique called Salad Spinner Art. This technique is wonderful for making awesome backgrounds! Lots of fun for mixing up colors. And can be used with a whole bunch of mediums.


I made a couple fun holiday cards using two of the four backgrounds that I created using the Salad Spinner Art technique. 


For the first background I used Sepia, Tangerine, and Alizarin Crimson Color Burst. I thought it was a fun mix of colors for a holiday card and I added a couple touches of gold by heat embossing the sentiment from Cute Santa using Gold Glory Embossing powder from Stampin' Up and adding some Gold Foil paper also from Stampin' Up.


I stamped Cute Santa with Black Amalgam ink and colored him with the following Copic markers:

Skin: E000, E00, E11, E04
White: C00, C1, C3
Red: R20, R14, R46
Black: N1, N3, N5, N7
Holly & Berries: YG11, G24, G46, R59


I then fussy cut Cute Santa and cleaned up the edges by coloring them with a Memento Tuxedo Black marker. The Spinner Art panel is adhered to a 4-1/4 x 5-1/2" card front of True Black card stock from Papertrey Ink that was adhered to a white A2 top fold card base. All the layers are nice and flat for easy mailing. 


Card number two uses the last panel that I created with the Cosmic Shimmer pigments I got back in June at the Unity Lovers get together in Deepwater, MO at The Craft Lab. I've been anxious to play with them and boy, were they fun! 


Continuing the copper color in the background which is very light, I decided to heat emboss the Blanket of Snow Background stamp. I used the Wow Clear Embossing ink and Penny Embossing Powder from Brutus Monroe. And for a bit more copper... I heat embossed the season's greetings sentiment {minus the dot for the i... I lost it}.


I die cut the season's greetings from the Greetings of the Season {die set} from a scrap piece of white card stock. Pressed the sentiment into the clear embossing ink using my tweezers doing one side of the sentiment at a time so I had a place to hold the sentiment with my tweezers. Quick tip... be sure to let the melted embossing powder cool before touching! Not only does it hurt a smidge, but it can smudge up the pretty embossing. I speak from experience! LOL

I wasn't able to record my card making but you can check out my process in creating the backgrounds I used for my cards plus two more backgrounds that I didn't get to play with just yet. Check it out here... Salad Spinner Art | Technique Tuesday | Unity Stamp Co.


Two very different holiday cards using one fun technique! I've had a blast the last 12 months sharing some fun techniques with you all. I hope you've enjoyed them! If you give this fun technique a try, I'd love to see what you create so please share your cards in the Unity Show & Tell group and tag me. Have an ink-tastic day!

Thanks so much for stopping by!
See ya next time.

Inky Hugs,
Crystal


{Please note that comment moderation is on. Your lovely comment will appear once approved.}

Tuesday, November 14, 2023

Ink Cube Thumping ~ Technique Tuesday ~ Unity Stamp Co.

 Hello there crafty friend!
I'm back with another Technique Tuesday! On the 2nd Tuesday of each month I'll be sharing a bit of inspiration and a video featuring a fun technique. I hope that you'll be inspired to get inky and play along with some of the techniques that I share.


I do love to get inky so this time I thought I'd play with the Ink Cube Thumping Technique. Have you tried this simple technique?! It works great with so many different stamps and ink colors!


I paired up the Colossal Snowflake stamp with a couple of distress inks for some fun CAS cards.


Salvaged Patina with Peacock Feathers distress inks for my first card. Both panels were die cut using the largest die from the Scallops & Rectangles {nesting dies} and adhered to card fronts in coordinating colors. I used Bermuda Bay card stock from Stampin' Up for the card front on this first card.


Shaded Lilac with Dusty Concord distress inks for my second card. And I used Blackberry Bliss card stock from Stampin' Up for the card front on this second card. I also used the beautiful sentiment from the newly released Winter Cheer and Deer. Love the pretty font on this sentiment!

You can check out my process video here for my card... Ink Cube Thumping Technique | Technique Tuesday | Unity Stamp Co.


I played with a couple more card ideas using this fun technique. Both cards feature the beautiful Simple Blessings stamps. Loving the texture on these beautiful pumpkins! They were perfect for this technique.


Lots of fun layers for these cards and pretty Fall themed papers. 
Another fun technique! I sure hope you're inspired to pull out your stamps and give Ink Cube Thumping a try. If you give this fun technique a try, I'd love to see what you create so please share your cards in the Unity Show & Tell group and tag me. Have an ink-tastic day!


Thanks so much for stopping by!
See ya next time.

Inky Hugs,
Crystal


{Please note that comment moderation is on. Your lovely comment will appear once approved.}

Tuesday, October 10, 2023

Paper Piecing ~ Technique Tuesday ~ Unity Stamp Co.

 Hello there crafty friend!
I'm back with another Technique Tuesday! On the 2nd Tuesday of each month I'll be sharing a bit of inspiration and a video featuring a fun technique. I hope that you'll be inspired to get inky and play along with some of the techniques that I share.


This time I thought I'd play with pretty pattern papers and do some Paper Piecing. What is Paper Piecing? Well, basically it's like playing with paper dolls. Stamping on pretty pattern paper and cutting out the pieces you want to adhere to the image. I always think of it as paper dolls because I use it mostly for dressing up the beautiful Angie Girls.


Bailey Girl is perfect for paper piecing because she is a big stamp. I mean she's as big as my hand! If your no fan of fussy cutting little pieces... Bailey Girl is the stamp to paper piece.


 I stamped Bailey Girl on a piece of white card stock using Black Amalgam ink from Gina K. Designs. And I colored up her hair and skin. Here's a quick list of the Copic markers I used to color up Bailey Girl:

Skin: E000, E00, E11, E04
Hair: YR31, E43, E44
Mug: B0000, B000, B02
Finger Nails: RV0000, RV93


I paper pieced Bailey Girl using the beautiful Cozy Textiles 6x6 paper pack. Love these cozy papers! They are a favorite of mine! I also used these papers for my background on the card front. I die cut the blue denim plaid using the Pleated Lace Mini Slimline dies from Gina Marie Designs.

You can check out my process video here for my card... Paper Piecing Technique | Technique Tuesday | Unity Stamp Co.


Time has not been on my side lately so the other cards I had hoped to share with you will have to wait for another day. Instead, I found a few on my blog to share using this fun technique. I hope you like them. 


Sharing a fun twist on this technique on a card that I created a few years ago. I paper pieced the polka dots on the cow... so fun!! This card features Sassy Bessie. You can check out the details for this card here... Cow Bday Card.


A fun CAS-ish design for this beautiful Angie Girl card using Peyton Girl. I had fun using colorful papers with this one. You can check out the details here... Peyton Card.


Surprise! My last card is a holiday card! Anyone really surprised by that?! Hahaha... this one features the gorgeous Elsa Girl and only has a touch of paper piecing on her sweater. I used the same papers on my background which makes the sweater really pop. You can check out the details for this card here... 'Tis the Season Card.

Another fun technique! I sure hope you're inspired to pull out your stamps and give Paper Piecing a try. If you give this fun technique a try, I'd love to see what you create so please share your cards in the Unity Show & Tell group and tag me. Have an ink-tastic day!

Thanks so much for stopping by!
See ya next time.

Inky Hugs,
Crystal


{Please note that comment moderation is on. Your lovely comment will appear once approved.}

Tuesday, September 12, 2023

Baby Wipe Technique ~ Technique Tuesday ~ Unity Stamp Co.

 Hello there crafty friend!
I'm back with another Technique Tuesday! On the 2nd Tuesday of each month I'll be sharing a bit of inspiration and a video featuring a fun technique. I hope that you'll be inspired to get inky and play along with some of the techniques that I share.


Today's technique is one that I love to play with when I'm using large block stamps without much detail on them... the Baby Wipe Technique! This is an oldie but a goodie, for sure!


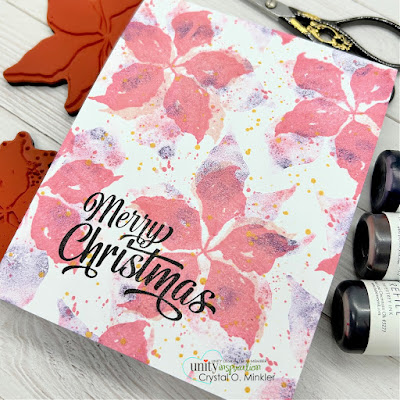
First up, I used the gorgeous Painted Poinsettias for two no layer cards. These were so fun to make and super easy!


I opened up the card base and masked off the back of the card using a post it note and Pixie Tape. Added a bunch of drops of reinker from a few fun dye ink colors in my stash to a clean baby wipe. Basically, this turned the baby wipe into my ink pad. I then stamped the larger poinsettia all over the background filling up as much of the white space as I could.


 Once I was happy with that I stamped the smaller poinsettia using the medium color from my dye inks. I just adore pink on holiday cards!


 My second card using the very same technique and steps. The only difference is I moved the sentiment for this one. I do love how the black sentiment pops on the card.


Once I had the backgrounds done, I removed the mask and stamped the sentiment using Black Amalgam ink.


Experimented a bit with my third card and used the lightest pink color for my smaller poinsettia on a couple of the flowers. And I just didn't like it as much. I set it aside for awhile but decided to add some gold silk splatter and I think it makes the card so much better.


I dried the background and then stamped the sentiment using Black Amalgam ink again.


And my last card... I wanted to show how you could step up the card a bit if you're wanting more layers. I used Distress Watercolor Paper for this one which gives the card a lot of texture. I do think the Baby Wipe Technique worked well with the watercolor paper. 


Die cut the background using the Scallops & Rectangles {nesting dies}. Wrapped it a few times with some Black May Arts Burlap String. I then adhered it to a black card base.

You can check out my process video here for creating the backgrounds... Baby Wipe Technique | Technique Tuesday | Unity Stamp Co.


Such a fun and simple technique with so many possibilities depending on what colors you use and the mix of stamps! If you give this fun technique a try, I'd love to see what you create so please share your cards in the Unity Show & Tell group and tag me. Have an ink-tastic day!

Thanks so much for stopping by!
See ya next time.

Inky Hugs,
Crystal


{Please note that comment moderation is on. You lovely comment will appear once approved.}

Tuesday, August 8, 2023

Emboss Resist with ZIGs Watercolor Wash ~ Technique Tuesday ~ Unity Stamp Co.

 Hello there crafty friend!
I'm back with another Technique Tuesday! On the 2nd Tuesday of each month I'll be sharing a bit of inspiration and a video featuring a fun technique. I hope that you'll be inspired to get inky and play along with some of the techniques that I share.


Today's technique is a fun twist on a technique I shared last month using ZIGs for a quick watercolor wash background... the twist? Throwing some Emboss Resist in there!


First up, I used the gorgeous flowers from the November 2021 Kit of the Month called Kinda Sorta Love Ya for a pretty Fall card. The flowers were stamped with white pigment ink and I heat embossed white embossing powder that I had applied to the wet ink. This shiny raised design is what resists the watercolor wash from the ZIGs.


I used Yellow, Bright Yellow, Orange, Brown and Mid Brown ZIGs for the background. Also used those colors to darken the flowers... adding Light Green and Olive Green for the leaves and stems. The watercolor washed background was die cut with the Deckle & Stitches Nesting Die Set. I then adhered it to an Early Espresso card front and adhered the entire panel to a white A2 card base.


 The sentiment is from the Cut Apart Sentiment Strips... these strips come in handy when you need a quick sentiment for a card!


 Such a fun card to make!


Next up is a rainbow-filled birthday card featuring the awesome Rainbow Birthday stamps... illustrated by Graciellie Design and available in red rubber at Unity! So happy to have this one in my collection! I stamped the candles on watercolor paper, also heat embossing them.


For this background I used Red, Orange, Yellow, Green, Blue and Purple ZIGs. Die cut the watercolor washed panel using the largest die from the Scallops & Rectangles Nesting Dies. Adhered the panel to a white A2 top fold card base.


I also heat embossed and watercolored the cake and an extra candle... doesn't it look yummy?! Used the same ZIGs that I used for the background. Added a touch of Light Grey for some shadow on the white icing. I also used the same rainbow ZIGs to watercolor stamp the sentiment.


Fussy cut the cake and candle and adhered them together. I added a bunch of foam tape to the back of both and popped it up on the card. Trimmed the sentiment and popped it up on the card with foam tape, as well.

You can check out my process video here for creating the backgrounds... Emboss Resist with ZIGs Watercolor Wash | Technique Tuesday | Unity Stamp Co.


Such a fun and simple technique with so many possibilities depending on what colors you use and the mix of stamps! If you give this fun technique a try, I'd love to see what you create so please share your cards in the Unity Show & Tell group and tag me. Have an ink-tastic day!


Inky Hugs,
Crystal

Tuesday, July 11, 2023

Fun with Background Stamps ~ Technique Tuesday ~ Unity Stamp Co.

 Hello there crafty friend!
I'm back with another Technique Tuesday! On the 2nd Tuesday of each month I'll be sharing a bit of inspiration and a video featuring a fun technique. I hope that you'll be inspired to get inky and play along with some of the techniques that I share.


Today's technique is a super fun one using background stamps that I learned about last year at a Unity Lovers Get Together for the Missouri/Kansas group that I am so honored to be a part of. I so wanted to share this technique for a challenge last year but other ideas kept getting in the way. Anywho, I'm super excited to share this fun technique with you today. I had a lot of fun creating some pretty backgrounds for my cards.


First up, I used the gorgeous Rustic Flutter with the Worn Grid background stamps. I also paired them up with the beautiful new Paper Wings. Die cut the background using the largest die from the Scallops & Rectangle {nesting dies} and I die cut the sentiment using a die from the Banner Nesting Dies. Adhered all the layers to an A2 top fold card. The butterflies' bodies are adhered to the card so the wings can be up giving the card lots of dimension.


Stamped the backgrounds with Frayed Burlap, Saltwater Taffy and Speckled Egg Distress Oxide inks.
Here's a quick list of the Copic markers I used ~ R00, R01, R05, R22, C3 


Next up is a soft, summery background featuring the Bloomy and Linen background stamps. Coincidentally, both of these stamps were Background of the Month stamps for the month of April {one in 2022 and the latest in 2023}. I thought that was fun! And they are SO beautiful together! I paired up the pretty background with the summer girl in the July 2023 Kit of the Month. I couldn't wait to color her up! So gorgeous! Die cut the background with the largest die from the Deckle & Stitches Nesting Dies. And die cut the sentiment using a die from the Scalloped & Stitched Sentiment Nesting Die Set.


Stamped the backgrounds with Lost Shadow, Tattered Rose and Bundled Sage Distress Oxide inks.
Here's a quick list of the Copic markers I used for the Summer Girl:

Skin ~ E000, E00, E11, E04
Hair ~ E40, E43, E44
Hat ~ E40, E43, R05
Dress ~ R00, R01, R20, R22, YG11, G24, Y15, Y38


My third card features the A Faithful Letter and the recently released Wrinkle background... a collaboration with Brutus Monroe. It's also my most favorite background right now, so I just had to use it! I paired it up with the beautiful typewriter stamp from the June 2023 Kit of the Month. I have had this sweet typewrite stamped and just sitting on my desk waiting to be on a card. So happy to finally use it! I love this stamp! Die cut the background using the largest die from the Postage Stamp Nesting Dies. I wrapped the background a few times with {Natural} May Arts Burlap String securing it on the back with some tape. I fussy cut the typewriter and popped it up on the card with foam tape. 


Stamped the backgrounds with Peacock Feathers, Evergreen Bough and Walnut Stain Distress Oxide inks.
Here's a quick list of the Copic markers I used for the typewriter ~ BG70, BG72, BG75, C00, C1


Last but not at all least, the fabulous coffee themed background featuring the Coffee Crazy and Coffee is Life background stamps. Such an easy background! I paired up this background with the sweet Ellie Girl. I don't believe I've ever inked her up so I was delighted to finally use her on a card. Die cut the background with the largest die from the Scallops & Rectangles {nesting dies}. Grounded Ellie Girl with a strip of Early Espresso card stock that I also mat the sentiment on.


Stamped the backgrounds with Antique Linen, Vintage Photo and Ground Espresso Distress Oxides inks.
Here's a quick list of the Copic markers I used for Ellie Girl:

Skin ~ E000, E00, E11, E04
Hair ~ E40, E43, E44
Top / Pants / Shoes ~ R00, R01, R22, R05, C00, C1, C3
Book ~ BG70, BG72, C00, C1
Cup ~ C00, C1, BG70, BG72, BG75

You can check out my process video here for creating the backgrounds... Fun with Background Stamps | Technique Tuesday | Unity Stamp Co.


Such a fun technique and so many possibilities depending on what colors you use and the mix of backgrounds, too! If you give this fun technique a try, I'd love to see what you create so please share your cards in the Unity Show & Tell group and tag me. Have an ink-tastic day!

Thanks so much for stopping by!
See ya next time.

Inky Hugs,
Crystal


{Please note that comment moderation is on, Your lovely comment will appear shortly.}