I'm back with another Technique Tuesday! On the 2nd Tuesday of each month I'll be sharing a bit of inspiration and a video featuring a fun technique. I hope that you'll be inspired to get inky and play along with some of the techniques that I share.
Today's technique is a fun twist on a technique I shared last month using ZIGs for a quick watercolor wash background... the twist? Throwing some Emboss Resist in there!
First up, I used the gorgeous flowers from the November 2021 Kit of the Month called Kinda Sorta Love Ya for a pretty Fall card. The flowers were stamped with white pigment ink and I heat embossed white embossing powder that I had applied to the wet ink. This shiny raised design is what resists the watercolor wash from the ZIGs.
I used Yellow, Bright Yellow, Orange, Brown and Mid Brown ZIGs for the background. Also used those colors to darken the flowers... adding Light Green and Olive Green for the leaves and stems. The watercolor washed background was die cut with the Deckle & Stitches Nesting Die Set. I then adhered it to an Early Espresso card front and adhered the entire panel to a white A2 card base.
The sentiment is from the Cut Apart Sentiment Strips... these strips come in handy when you need a quick sentiment for a card!
Such a fun card to make!
Next up is a rainbow-filled birthday card featuring the awesome Rainbow Birthday stamps... illustrated by Graciellie Design and available in red rubber at Unity! So happy to have this one in my collection! I stamped the candles on watercolor paper, also heat embossing them.
For this background I used Red, Orange, Yellow, Green, Blue and Purple ZIGs. Die cut the watercolor washed panel using the largest die from the Scallops & Rectangles Nesting Dies. Adhered the panel to a white A2 top fold card base.
I also heat embossed and watercolored the cake and an extra candle... doesn't it look yummy?! Used the same ZIGs that I used for the background. Added a touch of Light Grey for some shadow on the white icing. I also used the same rainbow ZIGs to watercolor stamp the sentiment.
Fussy cut the cake and candle and adhered them together. I added a bunch of foam tape to the back of both and popped it up on the card. Trimmed the sentiment and popped it up on the card with foam tape, as well.
Such a fun and simple technique with so many possibilities depending on what colors you use and the mix of stamps! If you give this fun technique a try, I'd love to see what you create so please share your cards in the Unity Show & Tell group and tag me. Have an ink-tastic day!
It's the first Saturday of July which means it's time for our Friends of Unity Blog Hop!!
This month's cue is a bit of a challenge for me. It's not a medium that I use too often though I have been trying to play around with it each month. It's a short hop this month with just seven of us hopping... I hope you'll hop along and enjoy some wonderful inspiration from our friends.
Now, onto our cue this month...
... Watercolor. As I mentioned above, this is not my go-to medium. I do have fun watercoloring when I play but I'm much more comfortable with my Copic markers. I did manage to create three cards to share so let's get to it...
First up is the super cute Shoreline Friendship that just released!! I can't help but love this trio of ladies. So fun to color them up with my Zig Clean Color Real Brush markers. I used Canson XL 140lb water color paper for all of my cards. I struggled with the skin tone on the middle gal. I wanted her a bit darker and it took a few tries to get her to where I was happy.
I paired up these fabulous friends with the Watercolor Stripes {paper pack}. I'll be honest, I was very tempted to just Copic color the gals and say the papers were my 'watercolor' element for this card. LOL! But I had to take the challenge and do a bit of watercoloring.
I trimmed the watercolored friends and mat the panel with Summer Sunrise card stock from Papertrey Ink. I die cut a piece of Orange Zest card stock from Papertrey Ink using a square die from the Scallops & Squares {nesting dies} from Unity. I also die cut the orange watercolor pattern paper using the largest rectangle die from the Scallops & Rectangles {nesting dies}. I wrapped the rectangle layer with some white and orange twine from my stash and also made a cute little bow. I adhered my layers together, popping up the watercolored panel on the card with foam tape. I adhered the little bow with a glue dot finishing off the card.
My second card also features a new release... I LOVE butterflies!! I can't help but love when Unity releases new butterflies! I couldn't wait to play with these beautiful butterflies from the Paper Wings stamps. So delicate and beautiful!!
Last month, I actually played with watercolors and I had fun creating a background using my ZIGs so I thought I'd give it a try again for this month's Watercolor cue. I absolutely love the texture in the watercolors... such a fun surprise how they dried.
The watercolor wash background was die cut using the same large rectangle die from the Scallops & Rectangles {nesting dies} that I used on my first card. It's a must have die set friends!! The butterflies were fussy cut on the line and I forgot to color up the edges with my black marker so they are a little rough around the edges. I do love how this turned out though!
And my third card... Unity has a few really beautiful Watercolor paper packs. The gorgeous Watercolor Winter {paper pack} that released last year is a favorite of mine so I just had to pull it out and make a holiday card. Y'all know I love Christmas cards!! I paired up the Watercolor Winter 6x6 {paper pack} with the super sweet Brightly Shining Itty Bitty stamp. I thought it would be fun to challenge our friends to ink up a stamp from their stash that hadn't seen ink yet and I've had this sweet stamp in my stash for a really long time and I'm 95% sure I haven't used it before. LOL! But now I have!
I found that the Persian Green and Emerald Green ZIGs combined to make a very similar green to the papers. And I used the Bright Yellow ZIG for the star. I did a bit of a watercolor wash on the Canson XL 140lb watercolor paper using the greens. I then stamped the tree coloring the words with the green ZIG markers and then the star with the yellow ZIG marker. I then used a water pen to outline around the tree and dabbed up some of the pigment with a paper towel. I did this a few times until it left the tree outline for the stamp.
The background layer is die cut using the largest rectangle die from the Scallops & Rectangles {nesting dies}. It's mat with a 4-1/4 x 5-1/2" piece of Tranquil Tide card stock from Stampin' Up. The trees paper was just a scrap from my paper pack. It measures 2-1/8 x 5-1/2" and the Tranquil Tide mat measures 2-1/4 x 5-1/2". I die cut the watercolor stamped tree using a circle die from the Scallops & Circles {nesting dies}. I also die cut a mat from Tranquil Tide card stock using the next largest die in the die set. All the layers are adhered together and then adhered to a white A2 top fold card base. I kept it pretty flat considering how many layers it has on it so it'll be easy to mail.
Now before we get to the hopping, I chose a lucky winner from the comments on last month's hop to win a fun prize and the lucky winner is...
... Laurie2cats!! Congratulations Laurie!!
Please email me at crystalominkler@gmail.com to claim your prize.
Prize must be claimed within two weeks.
Well, that's it for me this time! Please hop along and enjoy some more inspiration from the Friends of Unity! I'm so excited to hop and check out all the pretty creations shared by our friends!! I can't wait to see the watercolor projects our friends have made to share with us. I will be doing another fun giveaway this month!! Be sure to hop along and comment for a chance to win. {When you comment please leave your name just in case it posts as anonymous.} I'll announce the winner next month!
It's the first Saturday of June which means it's time for our Friends of Unity Blog Hop!! This month's cue has become an annual theme. It's one that us card makers are always looking for ideas and inspiration for our makes. I hope that you'll hop along with us this month and find lots of inspiration from our friends. Now, onto our cue this month...
... Masculine. Yup! Those cards for the guys in our lives. Sometimes masculine cards can be tough. I'm sharing a couple of easy masculine card ideas that never fail. Let's get to it...
Brown on Kraft - Monochromatic Earth Tones
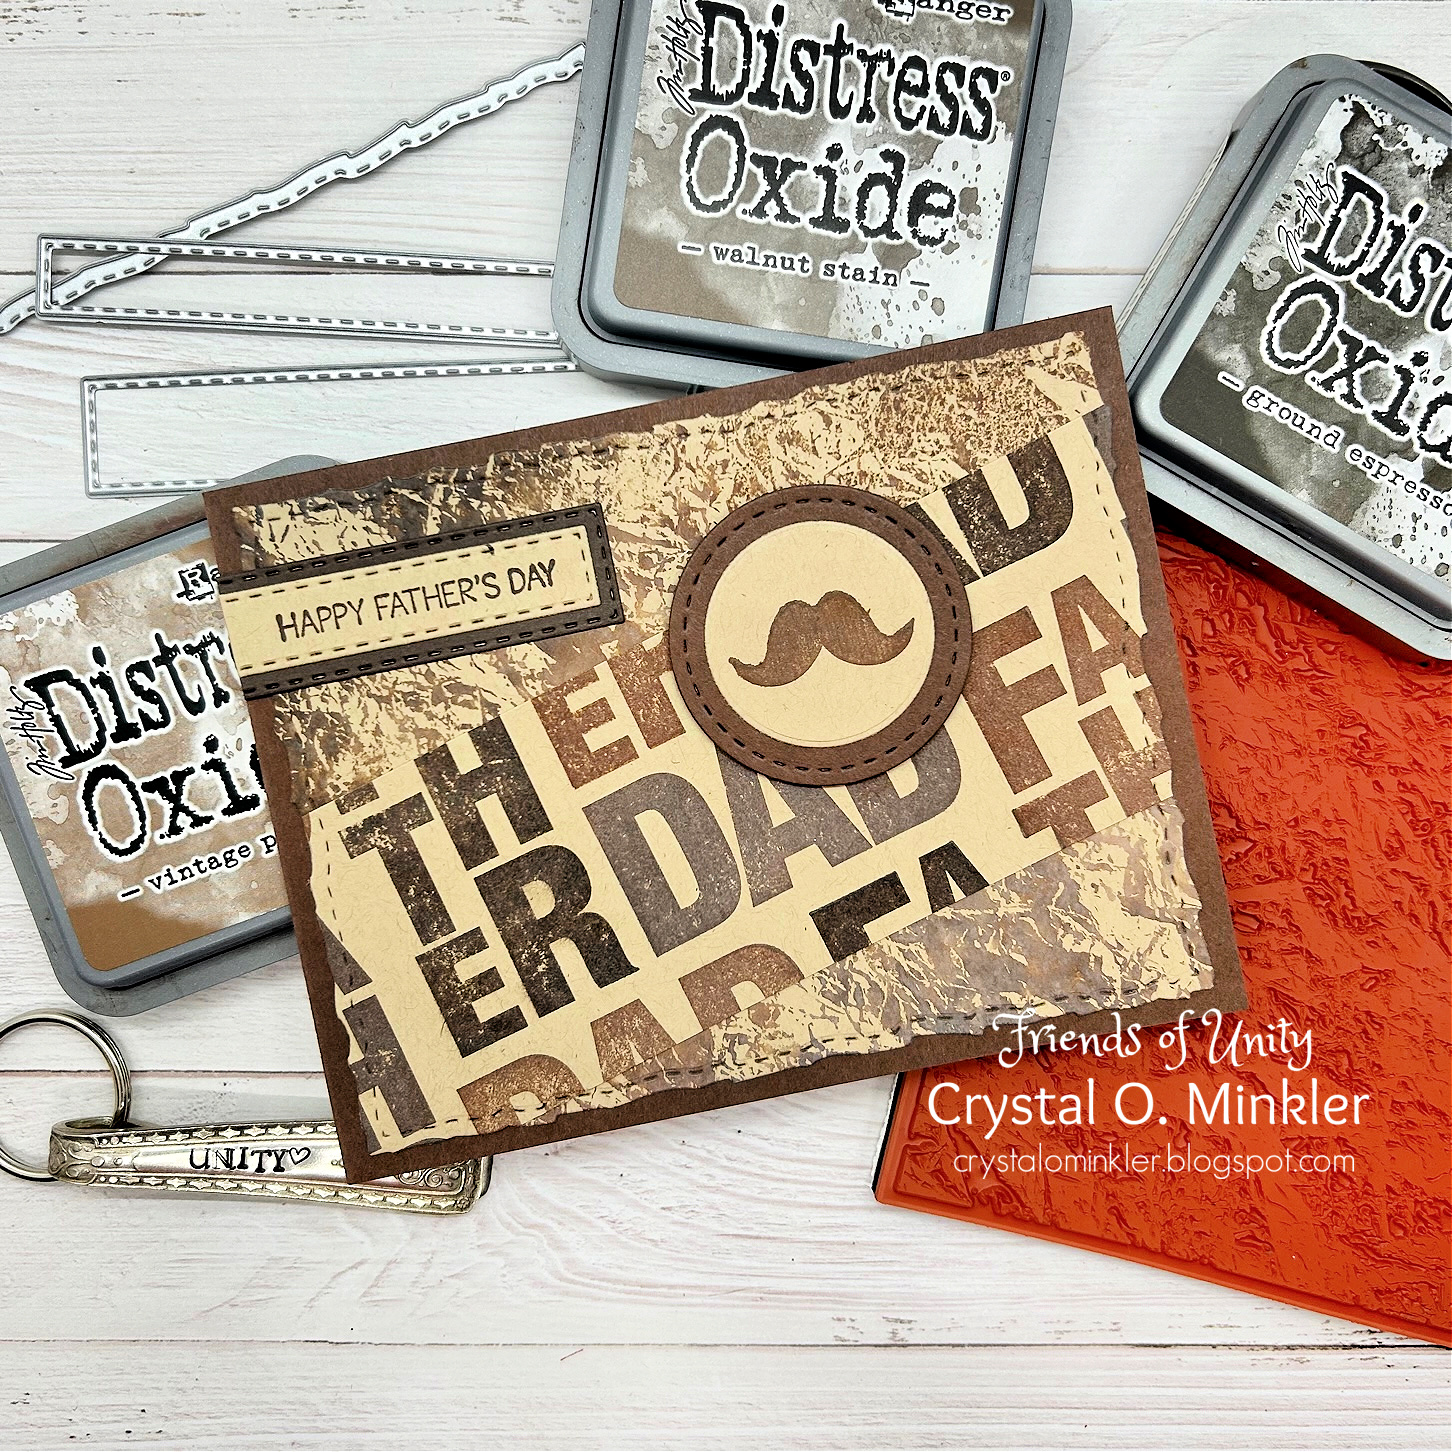
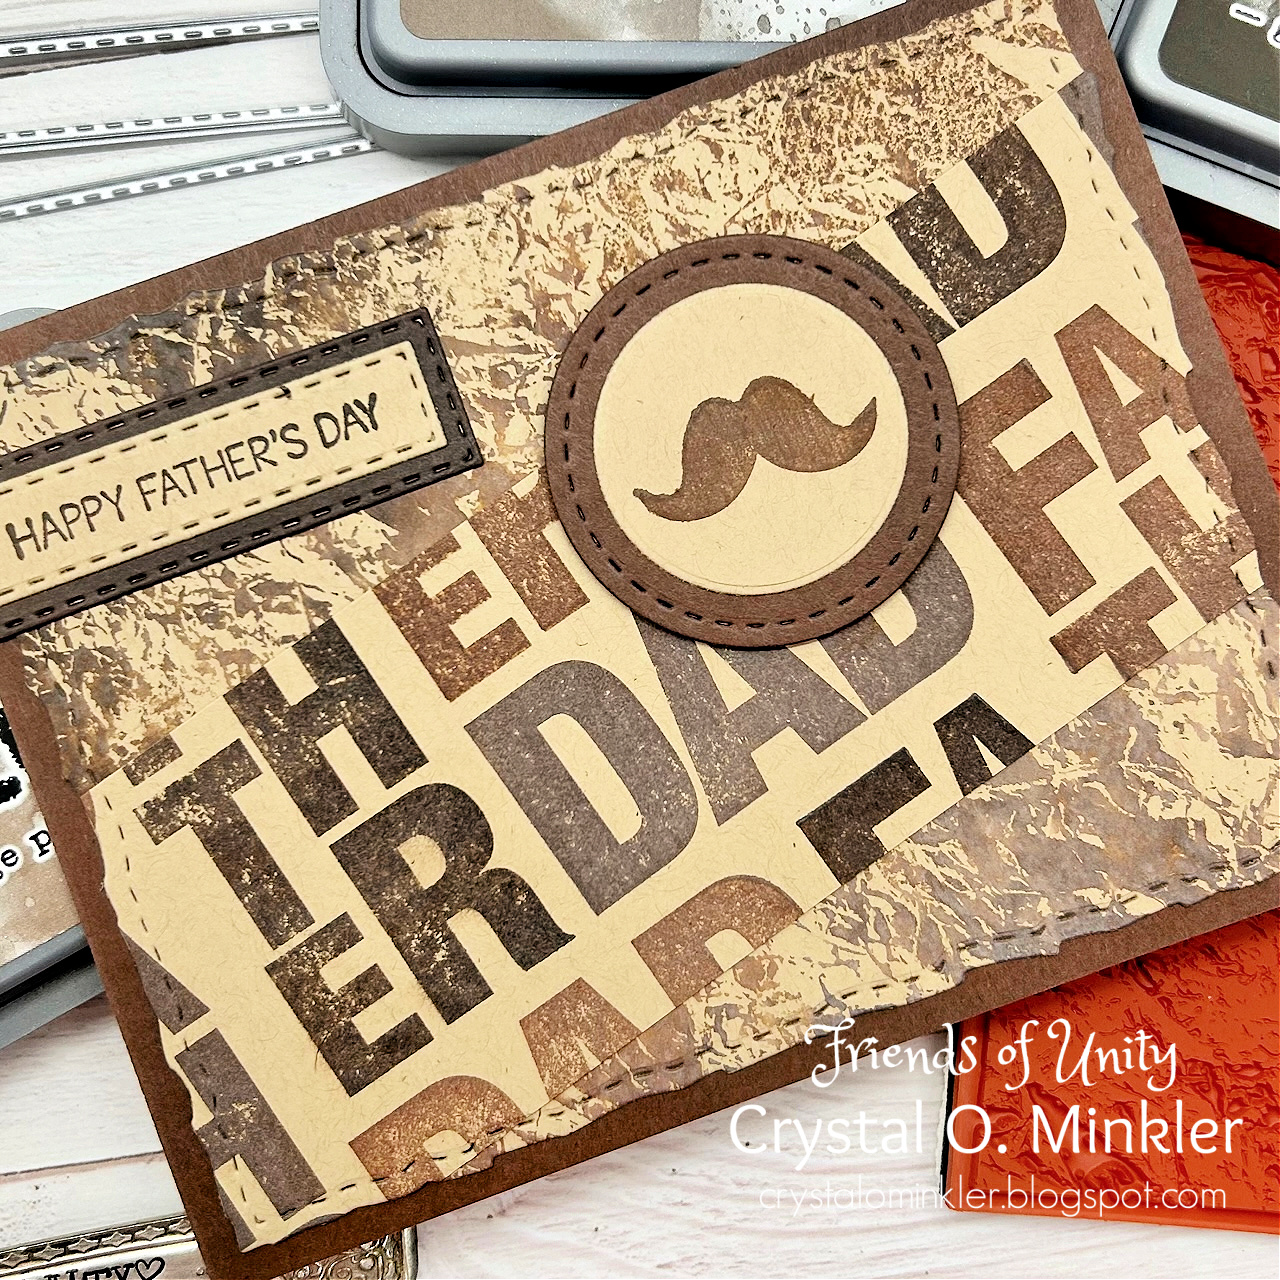
I'm excited to share my first card because it's also a sneak peek of a new stamp that will be releasing in just a few days. And yes, I got permission to share early. Woot woot! Thank you Ang & Whit!! I'm super excited about this upcoming release... it's Tuesday, by the way. Unity is releasing some super cool background stamps... a collaboration with Brutus Monroe, along with some other wonderful stamps. I just adore the Wrinkle background stamp. I inked it up for my background on Kraft card stock using Vintage Photo, Walnut Stain, and Ground Espresso Distress Oxide inks with a spritz of water here and there. It almost gives the background a leather vibe. Don'tcha think?!
I just love the texture that it gives the card. I also die cut the background with the recently released Deckle & Stitches Nesting die set. So excited to get these amazing dies in my recent order. Can't wait to use them more! So fun! I also stamped a fun background using the large fonts from the Favorite Dad stamps. I used the same three distress oxides to stamp those. I actually stamped a larger panel so I might just use the leftovers for another card. I laid the sentiment background over the Wrinkle background and then I placed the large deckle die overtop and secured it to the sentiment background with a couple pieces of washi tape. I then pulled it away and die cut it. Then I adhered the pieces together.
Did you notice the design for my card?! It's the sketch I recently shared in my Tawny Owl Paperie | Inky Inspiration Facebook group. It's also the same sketch that I used for one of my cards in last month's Inspired By hop. I just loved the card design so much I had to turn it into a sketch. I'm actually hosting a challenge in my group for this sketch with a fun prize. I hope you'll join us and play along!
The cute mustache was stamped with Vintage Photo and then I swiped the Ground Espresso ink down the stamp adding a cool texture to the mustache. I don't think you can see it as well in the photo though. It was die cut with a plain circle die and then adhered to a Dark Chocolate card stock mat from Papertrey Ink that was die cut using the smallest stitched circle die from the Scallops & Circles {nesting dies}. The sentiment, also from the Favorite Dad stamps, is stamped with Ground Espresso ink. I die cut it using the recently released Scalloped & Stitched Sentiment Nesting dies. I also used a slightly larger die to die cut a mat for the sentiment from Early Espresso card stock from Stampin' Up. The sentiment is adhered directly to the card and the mustache is popped up with foam tape. Brown on Kraft is always awesome for a guy card.
Nature Scene Cards
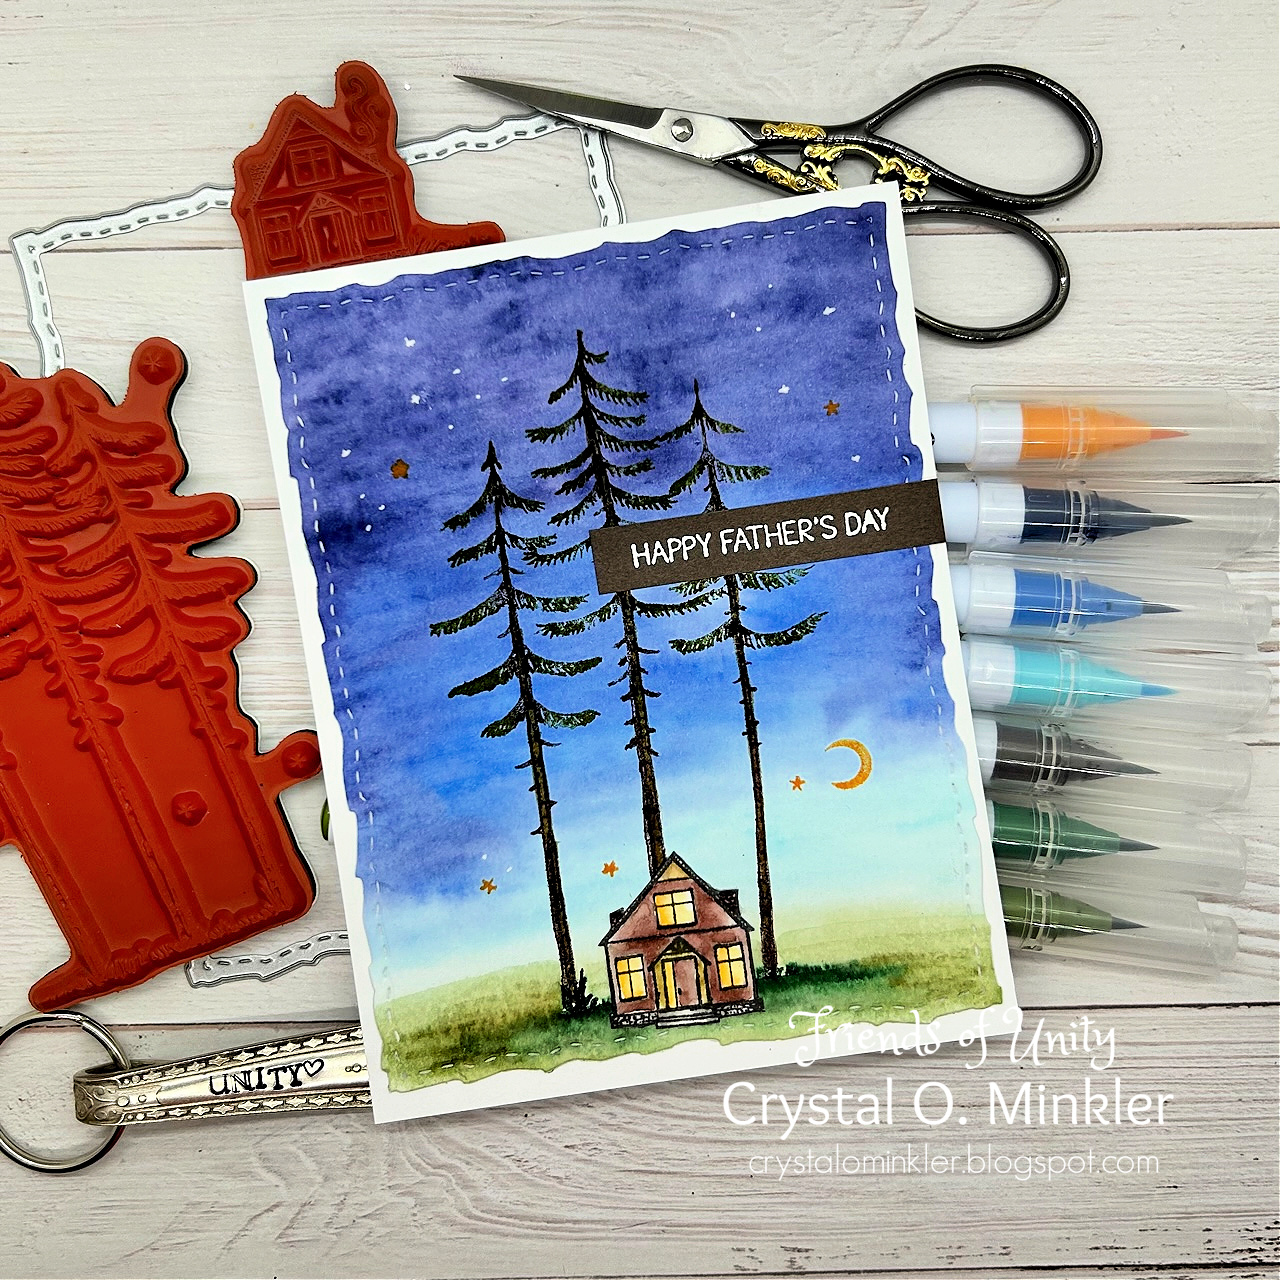
My second card features the sweet Happy and Cozy stamps. I had a blast playing with my ZIG Clean Color Real Brush markers. I used a couple of fun watercolor techniques for this card. I actually recorded my progress while I made this one. I'm hoping to share it soon {video is now below}. The background was created with a few blue ZIGS and a green one. It was actually really easy and it turned out pretty nice.
I dried the background with my heat tool and then stamped the trees using the ZIGs to color and then stamp each part. It was a tiny bit time consuming but it was fun coloring directly on the stamp. I played around a bit with the background until I was happy with it and die cut it with the deckle stitched die. Loving this die for guy cards! I stamped the cabin on a scrap of Canson XL watercolor paper using Black Amalgam ink from Gina K Designs. I used a few ZIGs to color up the cabin. Once it was dry, I fussy cut it. I colored the edges of the cabin using a Memento Tuxedo black marker. This is a great tip for making fussy cutting look nice and neat.
I stamped the sentiment from Favorite Dad stamps again... this time I heat embossed it with Sugar Cube Pigment ink from Taylored Expressions and Alabaster White embossing powder from Brutus Monroe on Early Espresso card stock from Stampin' Up. I just trimmed the sentiment this time and adhered it to the card. To finish off this card, I added a few more stars using a white gel pen. Nature cards are another great idea for guy cards.
Now before we get to the hopping, I chose a lucky winner from the comments on last month's hop to win a fun prize and the lucky winner is...
... Vannessa Osbourn!! Congratulations Vannessa!!
Please email me at crystalominkler@gmail.com to claim your prize.
Prize must be claimed within two weeks.
Well, that's it for me this time! Please hop along and enjoy some more inspiration from the Friends of Unity! I'm so excited to hop and check out all the pretty creations shared by our friends!! I can't wait to see the masculine cards our friends have made to share with us. I will be doing another fun giveaway this month!! Be sure to hop along and comment for a chance to win. {When you comment please leave your name just in case it posts as anonymous.} I'll announce the winner next month!
A quick blog post today to share one more card using the wonderful February 2023 Whit Kit from Unity. A super simple card! Stamping directly on pattern paper from the fantastic Newsprint Greetings {paper pack} for a quick background.
I die cut the stamped background with the largest postage stamp die from the Postage Stamp {nesting dies} before I watercolored the flowers with ZIG Clean Color Real Brush markers. Normally I would have Copic colored the flowers BUT I'm really trying to use my ZIGs more and I did make this card right after the first one I shared on Wednesday. {If you missed that card, you can check it out here... Ink Smooshed Card}. So I didn't want to Copic color them again in the same colors. Had to change things up a bit!
I lightly distressed the edges of the die cut panel with some Vintage Photo Distress ink. And then I adhered the background to a Kraft A2 top fold card base measuring 4-1/4 x 11"; scored at 5-1/2".
I cut apart one of the sentiments from the cut apart sheet included in the kit. I cut the one end at an angle and adhered it to the card. And then I trimmed the excess from the side of the card.
Here's a look at the wonderful Whit Kit for February!! So beautiful and I really enjoyed watercoloring the flowers! This wonderful card kit is available for only $42.99. That includes shipping! You also get a $6.95 discount on every order from Unity over $45. Members are also able to purchase past Whit Kit stamp sets for just $14 and past Whit Kit paper packs for $2 off!! So awesome!!!
I'll be back tomorrow with one more card I made using the February 2023 Whit Kit.
Thanks so much for stopping by!
See ya next time.
Inky Hugs,
Crystal
{Please note that comment moderation is on. Your lovely comment will appear once approved.}
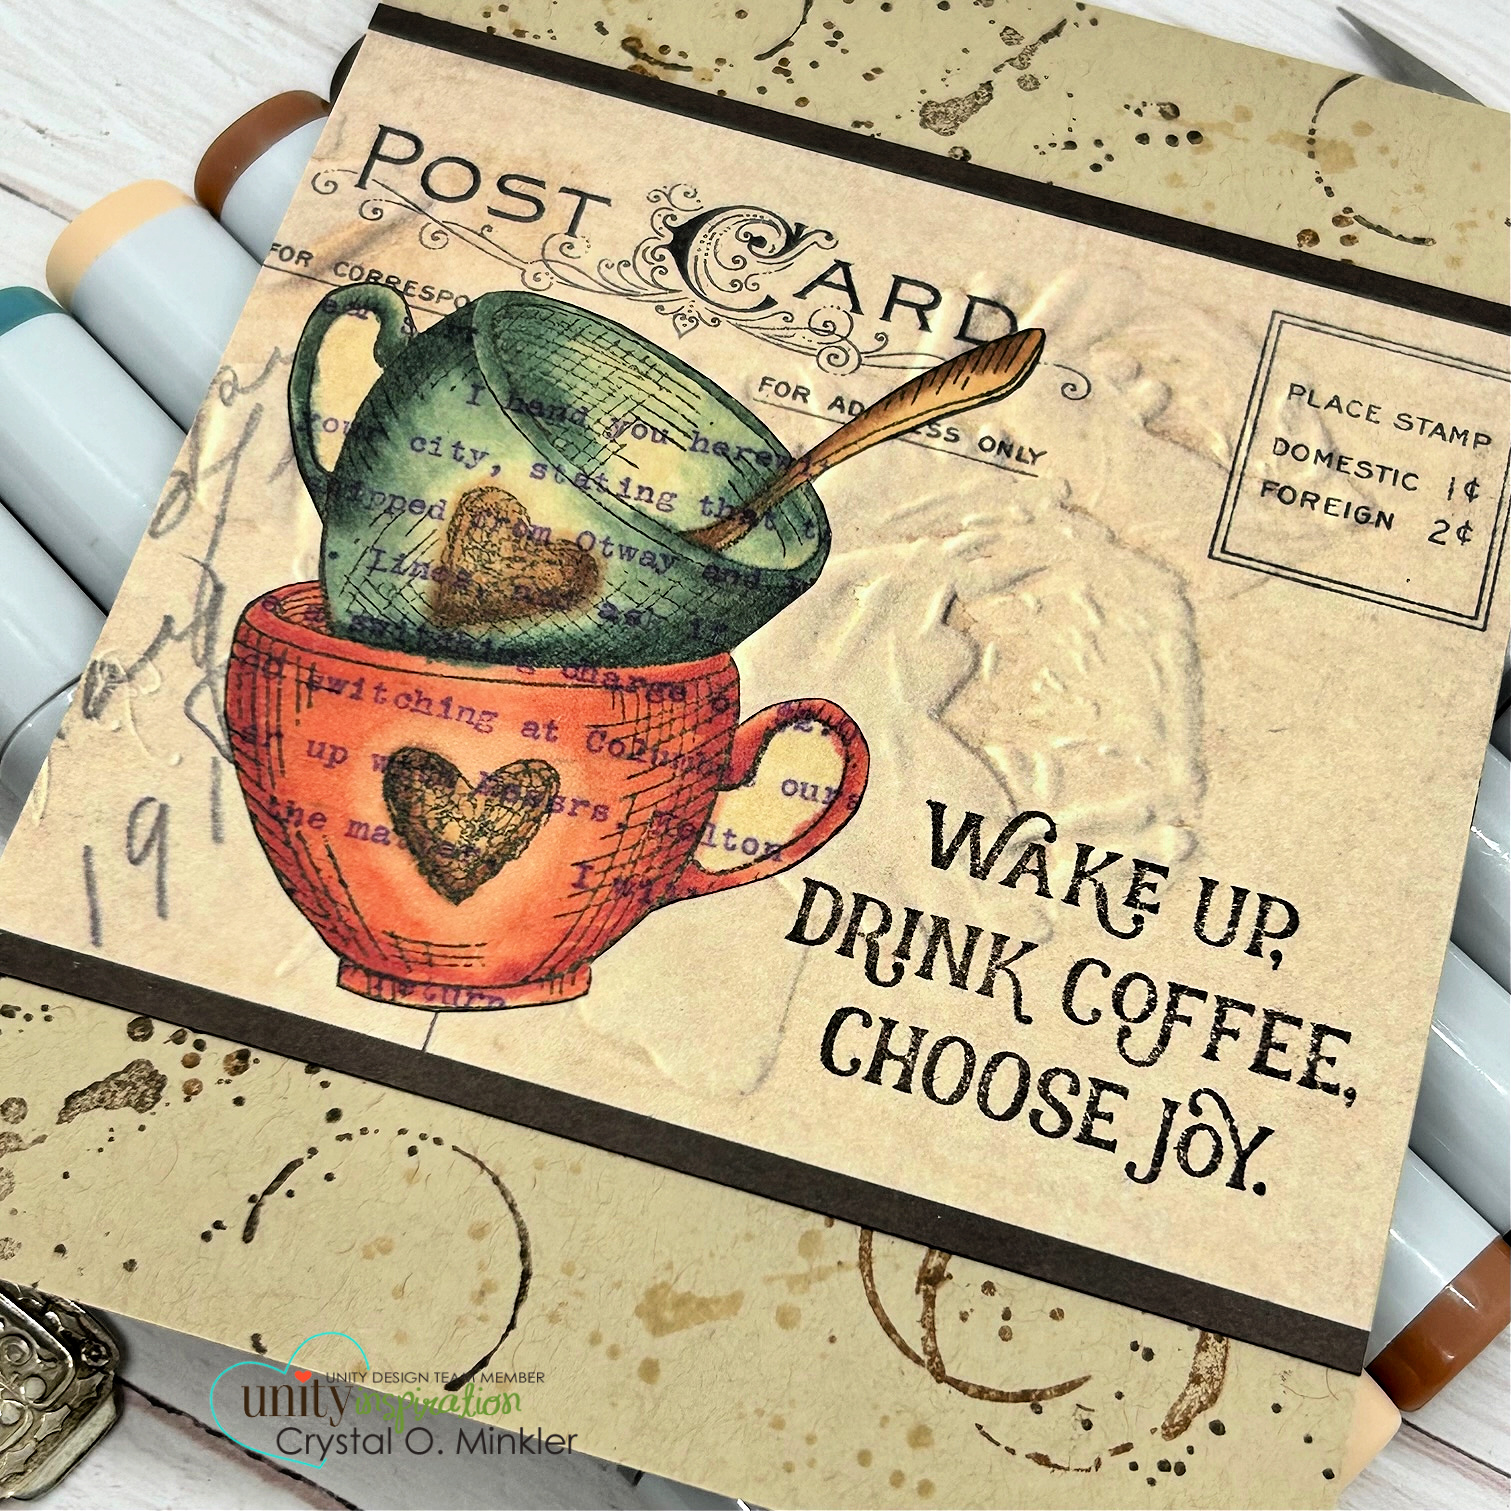
So happy to have you stop by for my last Membership Monday post! I'll be continuing this series... only it'll be moving to Membership Wednesdays. I'm excited to share some fun projects with you in the month of February... lots of beautiful stamps coming out next month for all four memberships that are available at Unity Stamp Co. Eeep! Can't wait! Anywho... back to today's cards. I'm sharing a pretty vintage style card using the January 2023 Whit Kit called Espresso to You.
I just adore this beautiful stamp from the kit and the vintage papers are gorgeous! I just had to go with one of my favorite color combos for this one... throwing a bit of turquoise and red in there. I just love how it pops with the browns!
I used Peacock Feathers and Uncharted Mariner Distress Oxide inks to watercolor the cups on Canson XL watercolor paper. Feeling out of practice once again with my watercoloring skills. I kind of fixed my attempt at watercoloring by distressing the edges of the cups with a bit of Vintage Photo Distress Oxide ink. I think it adds to the vintage vibe of the card too.
I did a bit of stamping on the vintage paper as well using the splatter and coffee rings stamps. I also distressed the edges of the papers with a bit of Vintage Photo and Ground Espresso Distress Oxide inks. And then distressed them again with a paper distresser that roughed up the edges a bit. I stamped the sentiment with white pigment ink and heat embossed some white embossing powder. I wrapped the paper layers with some of the burlap string included in the card kit. I popped up the cups with foam tape and finished off the card with a few enamel dots from my stash. I'm really liking how this one turned out!
For my bonus card, I stamped the cups onto one of the vintage papers in the kit using Black Amalgam ink. I colored up the cups with Copic markers {listed down below}, fussy cut them and adhered them to this pretty vintage paper piece. I stamped the splatter and coffee rings all over the front of my kraft card base using Vintage Photo, Antique Linen, and Ground Espresso Distress Inks.
I adhered the vintage paper to the kraft card base. Cut two 1/8" strips of dark brown card stock and adhered them to either side of the vintage paper. This is my favorite trick to avoid extra layers to a card but still make it look like there's some dimension and layers. I stamped the sentiment directly on the vintage paper with Ground Espresso Distress ink.
Just a little note about the vintage papers. If you look at the handles of my cups you can see that the Copic markers bled out of the lines {inside of the handles}. The vintage papers are pretty thin so I probably should have used less ink and maybe blended a little less. So if you decide to Copic color on these papers just be careful not to oversaturate your paper like I did. Here's a quick list of the Copic markers I used:
Blue-Greens ~ BG70, BG72, BG78
Browns ~ E21, E23, E27, E29
Reds ~ R20, R14, R37
Here's a look at the beautiful card kit! Be sure to check out the Whit Kit membership at Unity... there's still time to sign up for this kit!! If you already have the kit, I hope you share your creations in the Unity Show & Tell Facebook group! I'd love to see what you create!
Thanks so much for stopping by!
See ya next time.
Inky Hugs,
Crystal
{Please note that comment moderation is on. Your lovely comment will appear shortly.}
I'm back for Membership Monday with inspiration for the November 2022 Kit of the Month! Today I’m sharing fun watercolored cards using Color Burst which is a fine concentrated powder colorant to be used with water on porous surfaces. A wonderful and quick way to make a great background to showcase any stamp!
For my first card, I stamped Santa with VersaFine Onyx Black ink on Canson XL Watercolor paper. I used ZIG Clean Color Real Brush markers to watercolor Santa. Fussy cut him and set him aside.
Santa's background was created with Terre Verte and Chartreuse Color Bursts. I love the texture that the bursts of color give to the card!
The trimmed background was mat with a green card stock measuring 4 x 5-1/4". It was then adhered to a red card front measuring 4-1/4 x 5-1/2" that was adhered to a white A2 top fold card base.
My second card and I have to say I really love the pop of colors on this one! Same steps as the first card, I stamped it with VersaFine Onyx Black ink on Canson XL Watercolor paper and used ZIGs to watercolor it.
The background was created with Ultramarine Blue and Violet Color Bursts. I used a heat tool to help the drying process on both of the backgrounds.
Here’s a look at the whole Kit of the Month for November!! Isn't it awesome?! I couldn't wait for this KOM to get to my mailbox!
Hope you've been inspired to get inky with your November Kit of the Month and if you haven't received yours yet, why not try this technique with stamps from a past KOM! I just love this technique. I hope you'll give it a try.
Thanks so much for stopping by!
See ya next time.
Inky Hugs,
Crystal
{Please note that comment moderation is on. Your lovely comment will appear once approved.}


.jpg)