Showing posts with label #whitkit. Show all posts

Wednesday, June 12, 2024

Membership Wednesday ~ June 2024 Whit Kit Hydrangea Love ~ Unity Stamp Co.

  Hello there crafty friend!
Today I'm sharing a pretty card featuring the gorgeous hydrangea stamp from the June 2024 Whit Kit membership called Hydrangea Love from Unity. This gorgeous stamp was an absolute dream to color! So beautiful!


I stamped the Hydrangea Love flowers and sentiment on a piece of Stampers Select White Card Stock from Papertrey Ink using Black Amalgam Ink from Gina K. Designs. I loosely fussy cut the flower separating it from the sentiment. Before I started coloring the flowers with my Copic markers, I ink smooshed the flowers and leaves with a bit of Antique Linen Distress Ink. I wanted to see how the 'underpainting' of Antique Linen ink would change the look of the Copic coloring and I love the effect. I dried the flowers with a Wagner Precision Heat Tool and then I colored them up using my Copic markers.

Here's a quick list of the Copic markers I used:
Hydrangeas: RV91, RV93, RV95, BV23
Flower Centers: YG00, Y06, Y15, Y28
Leaves / Stem: YG91, YG95, YG97


I fussy cut the flowers along the line. I even cut through the bottom left flower and the leaf so that I could cut off that enclosed piece and open it up. The trick to doing that while fussy cutting is to cut in the center of the line so both images get some of the black line. And then very carefully color the edges of the whole image with the edge of a black marker from behind. Always from behind just in case the marker slips. I used a Memento Tuxedo Black marker. Coloring the edge cleans up the cutting and when it's adhered back together no one knows how you did it - unless you tell them, of course! LOL!


The background panel of Stampers Select Card Stock from Papertrey Ink was ink smooshed with Ground Espresso and Antique Linen Distress Inks. I left just a bit of white on the panel around the edges. I dried it with the Wagner Precision Heat Tool and then die cut the panel using the largest big scallops die from the recently released BIG Scallops & Rectangles {nesting dies}. I trimmed the sentiment and just adhered it directly across the card. I also adhered the flowers directly to the card. No foam tape for this one. I added a few enamel dots from my stash to finish off the card. I just love how this turned out!
 

And here's a look at the awesome Whit Kit membership! I am seriously loving the stamps in this month's kit. Well, that's it for me today! I hope you've been inspired to play with your membership stamps! Have an ink-redible day!


Thanks so much for stopping by!
See ya next time.

Inky Hugs,
Crystal


{Please note that comment moderation is on. Your lovely comment will appear once approved.}

Wednesday, October 18, 2023

Membership Wednesday ~ October 2023 Whit Kit ~ Unity Stamp Co.

 Hello there crafty friend!
Today I'm sharing a bit of inspiration for the October 2023 Whit Kit from Unity Stamp Co. I made four quick cards featuring this fabulous kit. A set of three cards featuring the gorgeous papers in the Fallen Elegance paper pack with some of the ephemera pieces from the kit and a fourth card using the awesome Burlap Stencil along with the Harvest of Gratitude stamps. All goodies from this month's card kit!


First up... the cards featuring a few pattern papers from the Fallen Elegance paper pack from the kit. I just fell in love with these papers. So delicate and pretty! I couldn't pick just one piece so I thought it would be fun to cut them up and combine them on each card.


I cut each pattern paper down to 3-3/4 x 5". And then I cut them to 1-1/4" strips. I adhered the pattern papers to a scrap of card stock measuring 3-3/4 x 5" and then adhered them to a kraft A2 card base measuring 4-1/4 x 11"; scored at 5-1/2".


I combined three ephemera pieces for the focal image of each card. There are so many beautiful pieces. It was hard to narrow it down, but I love how they turned out.


I then heat embossed the sentiment from the Harvest of Gratitude stamps using white pigment ink, white embossing powder and I melted it with a heat tool. Three very quick and easy Thanksgiving cards ready to send!


The card kit has a pretty Champagne pigment ink included that I thought would make a lovely background. I tried it on kraft first but it wasn't very visible so I decided to give it a try on white and I love it! So delicate and beautiful!


I blended the Champagne ink over the Burlap Stencil using a blending brush. Blended heavier in the center of the card front and lighter on the edges leaving some white for a border.


I then stamped the pretty pumpkins using Spiced Marmalade Distress Oxide ink first. I cleaned the stamp and added some Carved Pumpkin Distress Oxide on the bottom portion of the stamp. I cleaned the stamp again and then I inked just a touch of Vintage Photo Distress Oxide ink on the bottom portion of the stamp. I fussy cut the pumpkins leaving a skinny border. I stamped the sentiment directly on the card using Vintage Photo Distress Oxide ink. And then adhered the pumpkins to the card.


Easy peasy and I love the dimension the different colors of oxide inks gives to the stamped image. 


Here's a look at all four cards together. All so quick and easy!! 
Another wonderful card kit!


Here's a look at the wonderful Whit Kit for October!! Gorgeous!! This wonderful card kit is available for only $42.99. That includes shipping! Members get a $6.95 discount on every order from Unity over $45. Members are also able to purchase past Whit Kit stamp sets for just $14 and past Whit Kit paper packs for $2 off!! So awesome!!! 

That's it for me today! Have an ink-tastic day!

Thanks so much for stopping by!
See ya next time.

Inky Hugs,
Crystal


{Please note that comment moderation is on. Your lovely comment will appear once approved.}

Wednesday, September 20, 2023

Membership Wednesday ~ September 2023 Whit Kit Worthy of a Good Thing ~ Unity Stamp Co.

 Hello there crafty friend!
I had so much fun playing with the Fall-filled September 2023 Whit Kit from Unity Stamp Co. I made three cards featuring this fabulous kit. A couple focusing on the gorgeous papers in the Golden Autumn Whispers paper pack and the last one using the awesome Spotlight Stencil.


First up is a card featuring a few pattern papers from the Golden Autumn Whispers paper pack from the kit. I just fell in love with these papers. I really love this front maple leaf paper. It's so pretty! I wanted to feature it on the front of the card. I just die cut it and a darker pattern paper using the larger rectangle dies in the Scallops & Rectangles Nesting Dies. I adhered all my layers together and adhered them to a white A2 top fold card base. I trimmed a sentiment and adhered it directly to the card. Done. Easy peasy and oh so lovely for Fall.


Card number two features two lovely pattern papers. Loving the yellows and golds! I die cut the yellow pattern paper using the second largest die from the Make a Tag Die Set. I also die cut a piece of Early Espresso card stock from Stampin' Up using the largest die from that same die set. I adhered those together and then I went a little nuts wrapping them with gold metallic thread from my stash. I adhered the tag element directly to the pattern paper that I had adhered to a white A2 top fold card base. The sentiment was heat embossed using Sugar Cube White Pigment ink from Taylored Expressions along with Alabaster White Embossing Powder from Brutus Monroe. I trimmed the right side at an angle, added foam tape to the back of the sentiment and popped it up on the card.


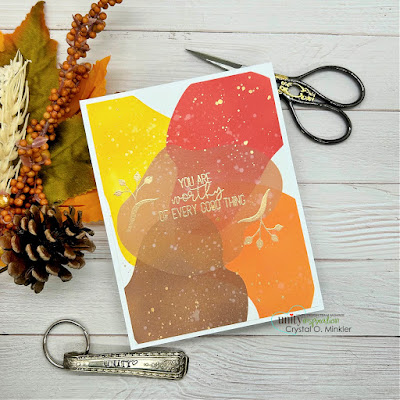
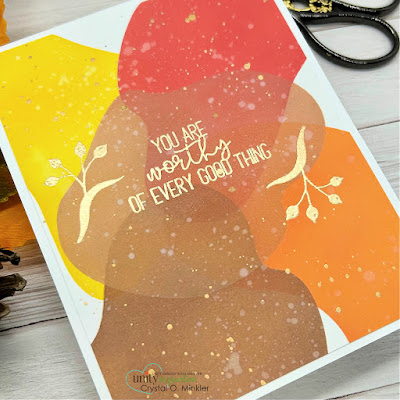
And my last card is an abstract Fall-ish card using the awesome Spotlight Stencil. I debated back and forth doing a super CAS card but I thought it would be fun to play with some Fall colors and try out all the different shapes on the stencil. The sentiment and little branches are heat embossed with an Antique Gold Embossing Powder from Simon Says Stamp.


I used Mustard Seed, Barn Door, Carved Pumpkin, and Vintage Photo Distress Oxide inks over the Spotlight Stencil. I also did a bit of water splatter over the Distress Oxide inks. And added a bit of gold watercolor splatters using the gold watercolors included in the kit.

You can check out my process for this final card here... Abstract Fall Card | September 2023 Whit Kit | Unity Stamp Co.


Here's a look at all three cards together. All so different, but so fun!! 
Another wonderful card kit!


Speaking of... here's a look at the wonderful Whit Kit for September!! Those papers are so gorgeous!! This wonderful card kit is available for only $42.99. That includes shipping! Members get a $6.95 discount on every order from Unity over $45. Members are also able to purchase past Whit Kit stamp sets for just $14 and past Whit Kit paper packs for $2 off!! So awesome!!! 

That's it for me today! I'll be back next week with inspiration for the Background of the Month membership... at least, that's what I'm leaning towards. I may change my mind. I hope you'll come back to visit and check it out - whatever 'it' may be. LOL! Have an ink-tastic day!

Thanks so much for stopping by!
See ya next time.

Inky Hugs,
Crystal


{Please note that comment moderation is on. Your lovely comment will appear once approved.}

Wednesday, August 23, 2023

Membership Wednesday ~ August 2023 Whit Kit Vintage Blooms & Botany ~ Unity Stamp Co.

 Hello there crafty friend!
I had lots of fun playing with the August 2023 Whit Kit from Unity Stamp Co. I made three cards featuring this fabulous kit. Three VERY different cards.


First up is a card featuring a beautiful pattern paper from the Vintage Blooms & Botany {paper pack}. This piece of pattern paper is my absolute fave from the pack! I love that beautiful yellow flower. I cut the pattern paper to 4 x 5-1/4" and then cut away a couple of strips. I adhered the pattern paper to an A2 top fold card base of Kraft Card Stock from Papertrey Ink.


Stamped the sentiment with Sugar Cube Pigment Ink from Taylored Expressions. I added some Alabaster White Embossing Powder to the wet ink and then melted it with my Wagner Precision Heat Tool. Next, I die cut it with a stitched banner die from the Banner Nesting Dies {sadly, these may be retired}. I popped it up on the card with Scotch 3M Double Sided 1" Foam Tape. Card one done!


My second card... are you surprised I used that beautiful yellow flower again?! Hahaha! This card had a mind of it's own. Not at all what I was planning for this one, but I sure do love how it turned out. I cut the pattern paper in strips and added it to a piece of Kraft Card Stock. Next, I die cut it with a die from the Make a Tag Die Set. I stamped and heat embossed the sentiment like I did for the previous card. I laid it on the tag piece and then secured the tag die to the sentiment with washi tape. I ran it through my Big Shot and adhered it to the tag.


I used the Woven 3D Embossing Folder from Tim Holtz for my bottom layer. I also die cut it with the largest die from the Deckle & Stitches Nesting Dies from Unity. I blended or distressed the edges of the tag, card base, and the die cut woven layer using Vintage Photo Distress Ink. I adhered the woven layer to a Kraft A2 top fold card base. And then I popped up the tag using Scotch 3M Double Sided 1" Foam Tape. Love how this turned out!


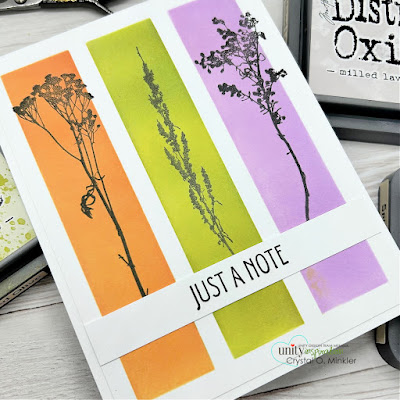
And my last card... I just HAD to play with the cool stencil in this month's kit. I also wanted to ink up more of the stamps. I secured the stencil over a card front of Stampers Select Card Stock from Papertrey Ink using iCraft Purple Tape. I masked the two left rectangles and blended Milled Lavender Distress Oxide Ink. I think there's some other purples mixed in there though. I need to clean my blending brushes! Anywho, I moved the mask to cover the right and left side rectangles. I then blended Crushed Olive Distress Oxide Ink. I moved the mask to cover the green rectangle and blended Spiced Marmalade Distress Oxide Ink. Still using colors I normally wouldn't grab. And I love how it turned out!


I stamped three of the Vintage Blooms & Botany stamps over the rectangles using Black Amalgam Ink from Gina K. Designs. I also stamped the sentiment on a long piece of white card stock. I trimmed up the panel cutting 1/8" off of each side. I then adhered the sentiment to the panel and trimmed off the excess. All that was left was to adhere it to the white A2 top fold card base.


Here's a look at the wonderful Whit Kit for August!! Such a lovely card kit! This wonderful card kit is available for only $42.99. That includes shipping! Members get a $6.95 discount on every order from Unity over $45. Members are also able to purchase past Whit Kit stamp sets for just $14 and past Whit Kit paper packs for $2 off!! So awesome!!! 

That's it for me today! I'll be back next week with inspiration for the Kit of the Month membership... I hope you'll stop by again and check it out. Have an ink-tastic day!

Thanks so much for stopping by!
See ya next time.

Inky Hugs,
Crystal


{Please note that comment moderation is on. Your lovely comment will appear once approved.}

Wednesday, July 19, 2023

Membership Wednesday ~ July 2023 Whit Kit Slices of Summer ~ Unity Stamp Co.

 Hello there crafty friend!
I had so much fun playing with the July 2023 Whit Kit from Unity Stamp Co. I made three cards featuring this fabulous kit. Simple {relatively} CAS card designs too. 


The pattern papers in this month's kit are GORGEOUS!! I mean it! So perfect for Summer and so fun! Love, love, love them! Anywho, when I have a hard time picking papers I like to do a tearing technique and layer some of the papers together for my background. I did limit myself to just four pattern papers because I wanted to go for more of a CAS design.


Otherwise, I probably would have torn more papers and filled up the whole background. The colors in these papers are so beautiful. I just can't get enough of them! I adhered the torn and layered pattern papers to a card front of white card stock and then I trimmed it down to 4 x 5-1/4". I adhered it to a white A2 top fold card. 


I stamped the sentiment onto white card stock using Black Amalgam ink and trimmed it down. I then mat it on the pink pattern paper and trimmed it down. I adhered the cute watermelon ephemera piece from the kit to the sentiment and then I added foam tape to the back of both pieces and popped them up on the card. I finished off the card with three of the water droplet beads from the kit.


My second card features three of the pattern papers again. I cut a 1" strip of the striped papers and die cut two of the other papers using the smallest circle dies from the Scallops & Circles Nesting Dies. I stamped the beautiful watermelon from the Slices of Summer stamps with Black Amalgam ink. I colored it up with the following Copic markers: YG11, YG21, G14, G24, RV00, RV63, RV55, E44.


I die cut the watermelon using the next largest circle die from the Scallops & Circles nesting dies. I adhered the striped paper to a 4 x 5-1/4" piece of white card stock. I then adhered the green striped circle and the pink circle. I popped up the watermelon focal piece using foam tape.


Here's a look at the sketch that inspired my card. So fun! This isn't the current challenge over at Freshly Made Sketches but I thought the circles would be fun with the watermelon.


I partially stamped the sentiment using Black Amalgam ink and die cut it using a scalloped and stitched die from the Scalloped & Stitched Sentiment Nesting Dies. I actually die cut this sentiment twice using the ends of the same die. A trick I like to do when I don't have quite the right die in my stash. To finish off this card, I also added a few of the water droplet beads.


My third and final card featuring the fabulous stencil set in the kit! Oh my gosh... these stencils were so easy to use and so fun! They each have a tab on the side that helps you line them up just right. They literally made these watermelon slices come together so fast! And how fun... I did my ink blending on kraft. I love kraft card stock!


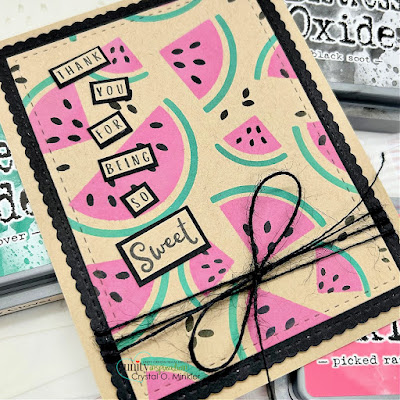
I used Lucky Clover, Picked Raspberry and Black Soot Distress Oxide inks over the three stencils to create my background. I then die cut the background using the largest stitched rectangle die from the Scallops & Rectangles Nesting Dies. I also die cut a piece of True Black card stock from Papertrey Ink using the larges scalloped die from the die set. I adhered the layers together and wrapped it with Black May Arts Burlap String.


I then adhered it to a kraft A2 top fold card base. I stamped the sentiment using Black Amalgam ink on the kraft card stock. I then trimmed each word of the sentiment and mat it on True Black card stock. Breaking up the words of the sentiment doesn't cover up as much of the background... which I really didn't want to cover up at all. It's so pretty!


Here's a look at the wonderful Whit Kit for July!! So perfect for a Summer card kit! This wonderful card kit is available for only $42.99. That includes shipping! Members get a $6.95 discount on every order from Unity over $45. Members are also able to purchase past Whit Kit stamp sets for just $14 and past Whit Kit paper packs for $2 off!! So awesome!!! 


Here's a look at all three card together. All so different and so fun! 
That's it for me today! I'll be back next week with inspiration for one of the July memberships... I can't seem to pick one right now!! LOL! Have an ink-tastic day!

Thanks so much for stopping by!
See ya next time.

Inky Hugs,
Crystal


{Please note that comment moderation is on. Your lovely comment will appear once approved.}

Wednesday, June 28, 2023

Membership Wednesday ~ June 2023 Whit Kit Sending Smiles ~ Unity Stamp Co.

 Hello there crafty friend!
I had a bit of fun playing with the June 2023 Whit Kit from Unity Stamp Co. I made two mini slimline cards and two A2 sized cards. I really love this month's kit!! I have a bunch of photos to share so let's get to them... 


My first mini slimline... I actually made both of the mini slimline cards at the same time. It was so easy just cutting the 6x6" pattern paper from the paper pack in half. I just HAD to make two cards!


I used the pretty hot air balloon paper and the travel insignia {not sure if that's the right term to use, but I'm going with it} paper for my layers on the mini slimline white card front measuring 6 x 6", scored at 3".


The clouds are die cut from another pattern paper from the paper pack using the adorable stitched cloud dies from the kit. Love this paper pack! The soft colors are so beautiful. The photos really don't do them justice.


Here's the second mini slimline card using the other half of the pattern papers. I also added a few clouds to this one.


The sentiment is from the Sending Smiles stamps. I stamped it with Black Amalgam ink, trimmed it and adhered it to the card.


These were really quick cards to make and the only stamping was for the sentiment.


Love how these turned out!


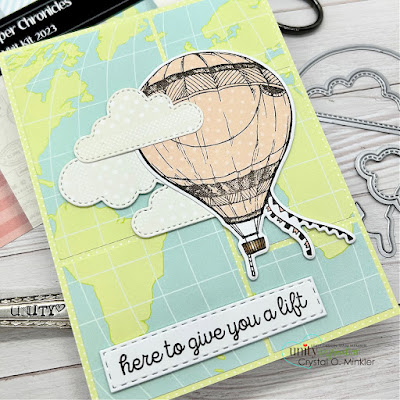
My third card and the first of my two A2 cards... for this one I used the TOP Inky Inspiration Sketch 13 that I shared yesterday. When I saw the world map papers it just made sense to use this sketch.

Here's another look at the sketch. So fun!


For this card I stamped that hot air balloon on white card stock and colored the basket and little flags. I also stamped the hot air balloon onto one of the pattern papers. I fussy cut it and colored the edges of the balloon with a Memento Tuxedo black marker and then I adhered it to the colored hot air balloon essentially paper piecing the balloon. I die cut a few more clouds with the same pattern paper and adhered them to the balloon and then I popped the whole piece up with foam tape.


I stamped the sentiment from the Sending Smiles stamps and die cut it using one of the dies from the Scalloped & Stitched Sentiment Nesting Die Set, also from Unity. I popped it up on the card with foam tape. I think this one turned out so fun!


My fourth and last card using the same sketch again but I used different pattern papers from the Cloud Hopper Chronicles paper pack. These papers are just the cutest and filled with the prettiest colors! Love them!


This time I stamped the hot air balloon on white card stock with Black Amalgam ink and I colored it up with some Copic markers. And yup. I die cut more clouds from the same papers. I couldn't help myself. They are just too cute! Here's a quick list of the Copic markers I used ~ R00, R02, YG11, B0000, B000, E55, E57.


I didn't pop anything up on the card. I kind of wish I had because it's missing that bit of dimension you can see in the third card. I do still love how this turned out though using a mix of papers from the kit.


Here's a look at the wonderful Whit Kit for June!! So beautiful! This wonderful card kit is available for only $42.99. That includes shipping! Members get a $6.95 discount on every order from Unity over $45. Members are also able to purchase past Whit Kit stamp sets for just $14 and past Whit Kit paper packs for $2 off!! So awesome!!! 

That's it for me today! I'll be back in two weeks with inspiration for one of the new July memberships!! Have an ink-tastic day!

Thanks so much for stopping by!
See ya next time.

Inky Hugs,
Crystal


{Please note that comment moderation is on. Your lovely comment will appear once approved.}