It's time for Unity's April release and I am just so excited to share my card featuring the latest addition to the roost... Cluckin' Chicks!! Fun stamps with two cute and hilarious chicks plus a few super funny sentiments. Love it!
I stamped the hilarious chicken with Black Amalgam ink and colored her up with just a few Copic markers.
I paired up this fun chicken with the Cluck & Bloom {paper pack}. I die cut the background paper using the largest die from the Scallops & Rectangles {nesting dies}. All of my layers are adhered to a white A2 top fold card base. I finished off the card with some Glossy Accents on the chicken's eyes! I love the fun shine it gives to the card!
Thanks so much for stopping by!
See ya next time.
Inky hugs,
Crystal
{Please note that comment moderation is on. Your lovely comment will appear shortly.}
I'm so excited to share another card for Unity's latest release. The sweet elephant from the Lil' Jumbo stamps is jut TOO CUTE!! I had to color her up!
I stamped Lil' Jumbo with Black Amalgam ink and colored her up with just a few Copic markers.
Here's a quick list of the ones I used:
Elephant: N0, N2, N4, N6, V000, R00, R20
Balloon: BG10, BG01
Ground: C00, C2
Inspiration for my card comes from the the fun sketch challenge going on NOW in the Unity Show & Tell Facebook group! There's still time to play along with us! AND there's TWO $25 gift certificates being offered as the prize for this challenge! Challenge ends on Monday, March 31st. I hope you'll join us!
Today I'm sharing one more holiday card for Unity's August release. This time I inked up the super cute and adorable Just for You Dear. This adorable stamp is also available in photopolymer... {Clearly Unity} Just for You Dear. I love that Unity offers some of their stamps in clear and rubber now!
I had a fun idea for layering circles in a card design and wanted to give it a try! I thought the deer from Just for You Dear would work perfectly with this design. I stamped the sweet deer and sentiment with Black Amalgam ink and colored up the deer with my Copic markers.
The green striped pattern paper in the background measures 4 x 5-1/4". It's adhered to a 4-1/4 x 5-1/2" card front of Garden Green card stock and then I adhered the panel to a white A2 top fold card base. The adorable deer circles and the sentiment are popped up using foam tape. Such a fun card to make!
I hope you have an ink-tastic day!
Thanks so much for stopping by!
See ya next time.
Inky hugs,
Crystal
{Please note that comment moderation is on. Your lovely comment will appear shortly.}
It's the first Saturday of July which means it's time for our Friends of Unity Blog Hop!!
This month's cue is a bit of a challenge for me. It's not a medium that I use too often though I have been trying to play around with it each month. It's a short hop this month with just seven of us hopping... I hope you'll hop along and enjoy some wonderful inspiration from our friends.
Now, onto our cue this month...
... Watercolor. As I mentioned above, this is not my go-to medium. I do have fun watercoloring when I play but I'm much more comfortable with my Copic markers. I did manage to create three cards to share so let's get to it...
First up is the super cute Shoreline Friendship that just released!! I can't help but love this trio of ladies. So fun to color them up with my Zig Clean Color Real Brush markers. I used Canson XL 140lb water color paper for all of my cards. I struggled with the skin tone on the middle gal. I wanted her a bit darker and it took a few tries to get her to where I was happy.
I paired up these fabulous friends with the Watercolor Stripes {paper pack}. I'll be honest, I was very tempted to just Copic color the gals and say the papers were my 'watercolor' element for this card. LOL! But I had to take the challenge and do a bit of watercoloring.
I trimmed the watercolored friends and mat the panel with Summer Sunrise card stock from Papertrey Ink. I die cut a piece of Orange Zest card stock from Papertrey Ink using a square die from the Scallops & Squares {nesting dies} from Unity. I also die cut the orange watercolor pattern paper using the largest rectangle die from the Scallops & Rectangles {nesting dies}. I wrapped the rectangle layer with some white and orange twine from my stash and also made a cute little bow. I adhered my layers together, popping up the watercolored panel on the card with foam tape. I adhered the little bow with a glue dot finishing off the card.
My second card also features a new release... I LOVE butterflies!! I can't help but love when Unity releases new butterflies! I couldn't wait to play with these beautiful butterflies from the Paper Wings stamps. So delicate and beautiful!!
Last month, I actually played with watercolors and I had fun creating a background using my ZIGs so I thought I'd give it a try again for this month's Watercolor cue. I absolutely love the texture in the watercolors... such a fun surprise how they dried.
The watercolor wash background was die cut using the same large rectangle die from the Scallops & Rectangles {nesting dies} that I used on my first card. It's a must have die set friends!! The butterflies were fussy cut on the line and I forgot to color up the edges with my black marker so they are a little rough around the edges. I do love how this turned out though!
And my third card... Unity has a few really beautiful Watercolor paper packs. The gorgeous Watercolor Winter {paper pack} that released last year is a favorite of mine so I just had to pull it out and make a holiday card. Y'all know I love Christmas cards!! I paired up the Watercolor Winter 6x6 {paper pack} with the super sweet Brightly Shining Itty Bitty stamp. I thought it would be fun to challenge our friends to ink up a stamp from their stash that hadn't seen ink yet and I've had this sweet stamp in my stash for a really long time and I'm 95% sure I haven't used it before. LOL! But now I have!
I found that the Persian Green and Emerald Green ZIGs combined to make a very similar green to the papers. And I used the Bright Yellow ZIG for the star. I did a bit of a watercolor wash on the Canson XL 140lb watercolor paper using the greens. I then stamped the tree coloring the words with the green ZIG markers and then the star with the yellow ZIG marker. I then used a water pen to outline around the tree and dabbed up some of the pigment with a paper towel. I did this a few times until it left the tree outline for the stamp.
The background layer is die cut using the largest rectangle die from the Scallops & Rectangles {nesting dies}. It's mat with a 4-1/4 x 5-1/2" piece of Tranquil Tide card stock from Stampin' Up. The trees paper was just a scrap from my paper pack. It measures 2-1/8 x 5-1/2" and the Tranquil Tide mat measures 2-1/4 x 5-1/2". I die cut the watercolor stamped tree using a circle die from the Scallops & Circles {nesting dies}. I also die cut a mat from Tranquil Tide card stock using the next largest die in the die set. All the layers are adhered together and then adhered to a white A2 top fold card base. I kept it pretty flat considering how many layers it has on it so it'll be easy to mail.
Now before we get to the hopping, I chose a lucky winner from the comments on last month's hop to win a fun prize and the lucky winner is...
... Laurie2cats!! Congratulations Laurie!!
Please email me at crystalominkler@gmail.com to claim your prize.
Prize must be claimed within two weeks.
Well, that's it for me this time! Please hop along and enjoy some more inspiration from the Friends of Unity! I'm so excited to hop and check out all the pretty creations shared by our friends!! I can't wait to see the watercolor projects our friends have made to share with us. I will be doing another fun giveaway this month!! Be sure to hop along and comment for a chance to win. {When you comment please leave your name just in case it posts as anonymous.} I'll announce the winner next month!
I'm back with my weekly Christmas card but this pretty card is also for the Brown Thursday Instagram Hop so I'm posting a little later than I normally do. If you're visiting from my Instagram... welcome!!! I'm so glad to have you drop by! I share a Christmas card each Friday using the current {BYSHC} Sketch Challenge from the Build Your Stash Holiday Cardmakers Facebook group. It's a fun group that shares holiday inspiration throughout the year so there's less stress to get our holiday cards done later in the year. Today I'm sharing a card using some products from Unity Stamp Co. along with the {BYSHC} Sketch 28.
I am a sucker for snowman stamps! I just love this new one rightly called The Sweetest Snowman. He's currently one of the freebies during the big Brown Thursday sale. I colored him up super quick with just a handful of Copic markers. He was die cut with one of the recently released circle dies from the Scallops & Circles {nesting dies}. I mat him with a red piece of card stock die cut with the next largest circle die in the set.
I die cut the poinsettia paper with the Season's Greetings die from the brand new Greetings of the Season {die set} and I mat the paper with white card stock so the sentiment would pop. I adhered all my layers together and actually didn't pop anything up this time. LOL!
I hope you'll join us and play along with the sketch! If you're interested in seeing a bit more inspiration for this sketch, check out the amazing inspiration from the design team over on the {BYSH} Cardmakers blog! And if you haven't already be sure to check out the Brown Thursday sale over at Unity!! It's the biggest sale of the year and there are SO many amazing new releases!!
Thanks so much for stopping by!
See ya next time.
Inky hugs,
Crystal
{Please note that comment moderation is ON. Your lovely comment will appear shortly.}
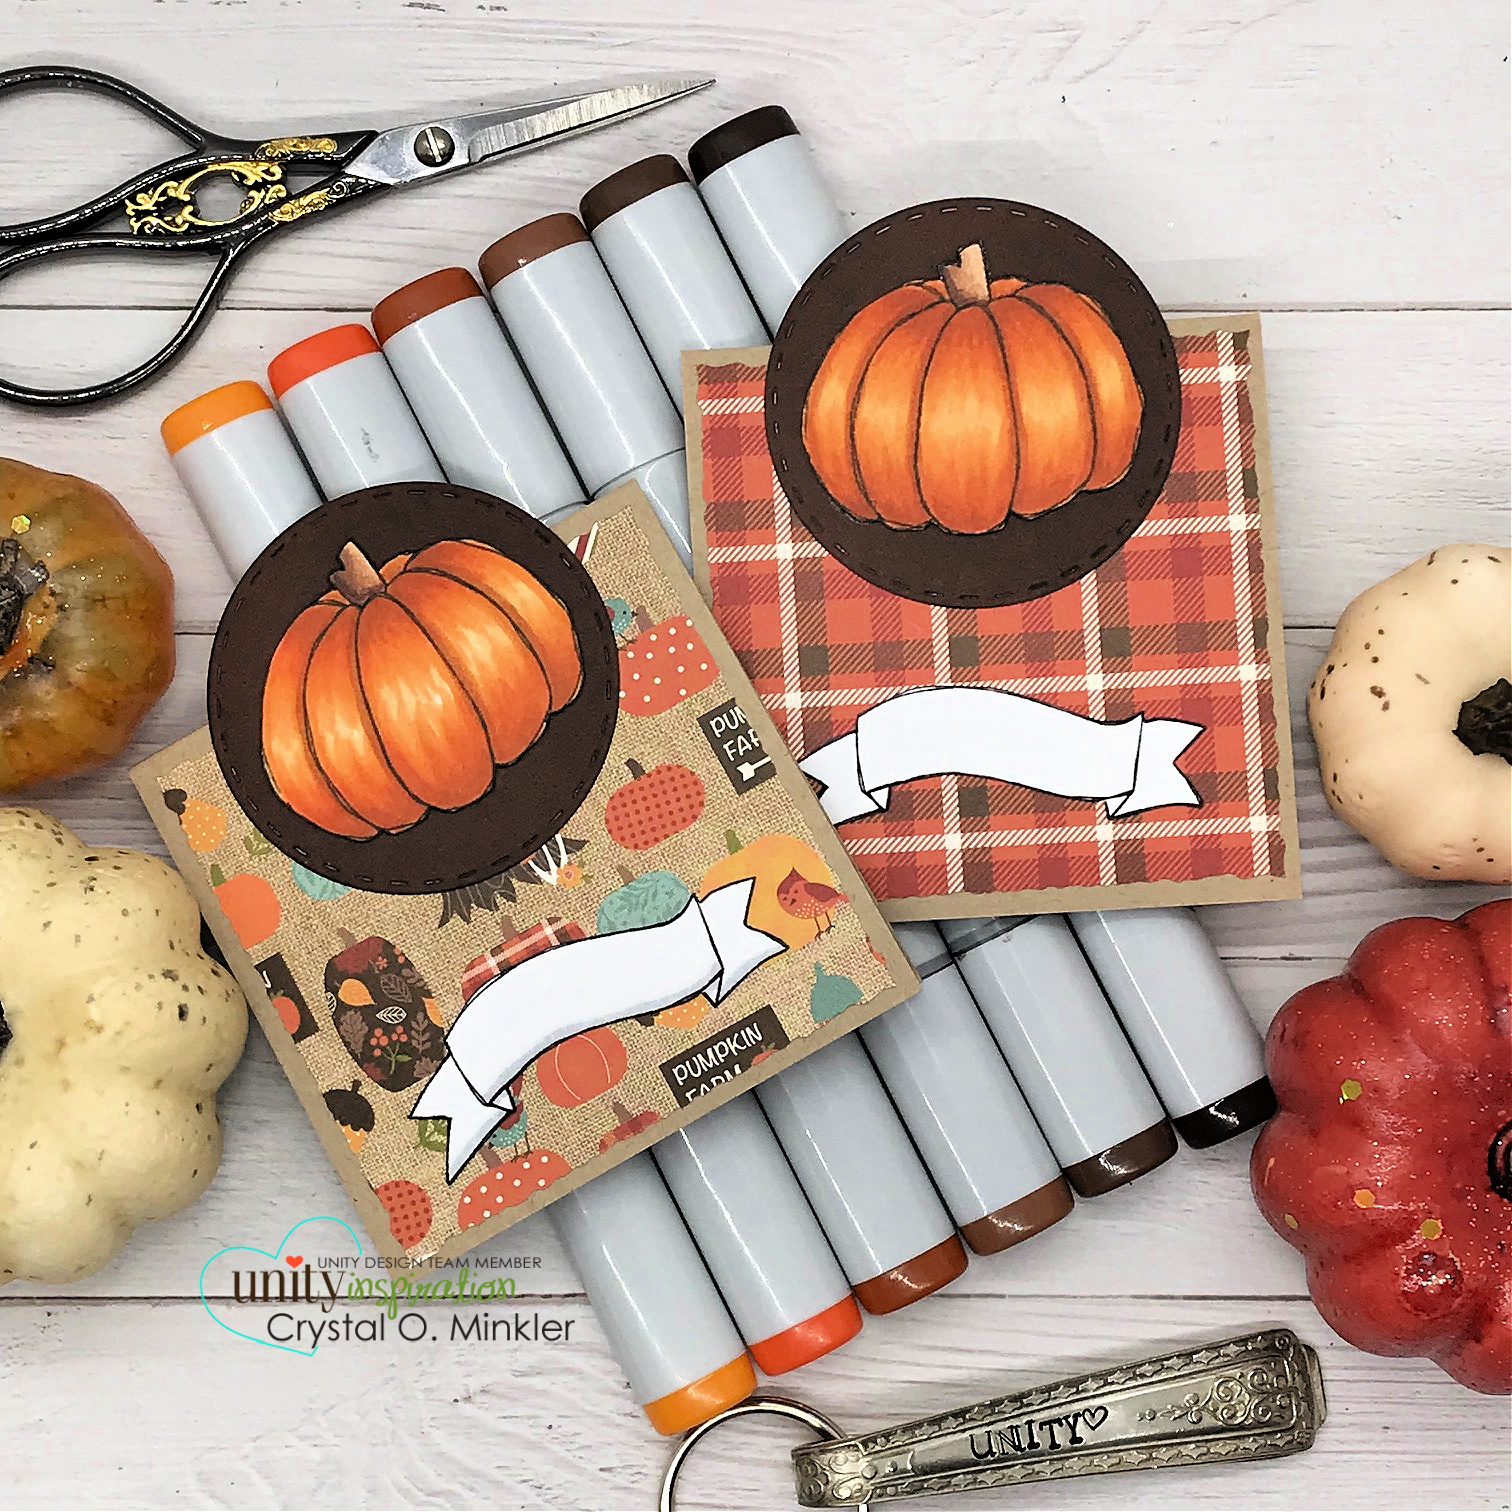
Today I'm sharing adorable Thanksgiving place cards using the new Fall, That's All stamps from Unity Stamp Co. Love this sweet set of stamps!! I had created these to share as part of my Fall is in the Air Collab with my sweet friend Teresa, but sadly she's unavailable currently with a health issue so we've postponed our collab. I would really love if you would lift her up in prayer or send good vibes her way. I bet she'd appreciate it! Well, let's get to these cute cards...
Aren't they just the cutest?! These stamps are perfect for some cute 3 x 3" place cards! How fun are these and so easy to make! A fun addition to your Thanksgiving table this year!
I paired up these cute stamps with the Celebrate Autumn 6 x 6" paper pad from Echo Park Paper Co. I die cut the circles from Orange Zest and Dark Chocolate card stock (both from Papertrey Ink) using a die from the Stitched Circle Stacklets dies from Taylored Expressions... it measures approx. 2-1/8".
So these are just top fold 3 x 3" notecards of Kraft card stock measuring 6 x 3"; scored at 3". I trimmed up the pattern papers using my Tim Holtz Tonic Deckle Torn Edge Trimmer so they're about 2-7/8" square. Ha! I just realized I forgot to color the name tag for my second pumpkin card! Ooops! I got rushed finishing up my video and missed that! Oh, well... let's just imagine it has that bit of shading.
The pattern papers are adhered to the 3 x 3" place cards. I went with this size so that I could also write little notes inside. So fun!
I had so much fun coloring up these stamped images! I just love coloring Fall images... something about the rich beautiful colors of Fall!
I adhered the bottom portion of the circles to the top of the note cards. I thought about popping up the fussy cut images but decided to just leave all the layers flat. Here's a quick list of the Copic Markers I used to color up the images:
I just love this pumpkin pie stamp! It's definitely my fave... and I think it could be used for other pies! I have a video sharing my coloring of the three images and then I assemble just one of the cards so it's not a super long video. I hope you'll check it out!! Here's the link... Thanksgiving Place Cards | Fall, That's All | Unity Stamp Co.
Here's another look at the set of Thanksgiving Place Cards. Today is the last day for the Tag Sale over at Unity Stamp Co. Be sure to stop by and check out all the amazing new releases and the sale, of course!!
Thanks so much for visiting my blog and YouTube channel!
See ya next time.
Inky Hugs,
Crystal
{Please note that comment moderation is on. Your lovely comment will appear shortly.}
I'm so excited! Today I'm starting a fun Collab with my sweet friend Teresa from Fresh and Renewed with Teresa. We will be sharing a Fall card or cards each Wednesday in September.
I changed up the background on this one by flipping two of the pattern papers so the opposite design would show. I think it gives the card nice contrast.
This ephemera piece didn't have a sentiment so I heat embossed a cute sentiment from the Acorn Greetings stamps from Unity. I stamped it with Sugar Cube pigment ink from Taylored Expressions on a scrap of black pattern paper and then melted the Alabaster White embossing powder that I had applied to the white ink. Trimmed it up and popped it up on the card along with the focal piece. Here's a link to my process video... Fall is in the Air | September Collab | Fall Sunshine from Not 2 Shabby
I sure hope you've enjoyed the cards I shared today. I hope you'll give my YouTube channel a visit and then stop by Teresa's YouTube channel, too! We're each having a giveaway this month for the Fall is in the Air series on our YouTube channels. I share a peek at my prize in my video {link above}. To be eligible you must comment on each video we share during the whole Fall is in the Air Series all month!
Thanks so much for stopping by!
See ya next time.
Inky Hugs,
Crystal
{Please note that comment moderation is on. Your comment will appear shortly.}
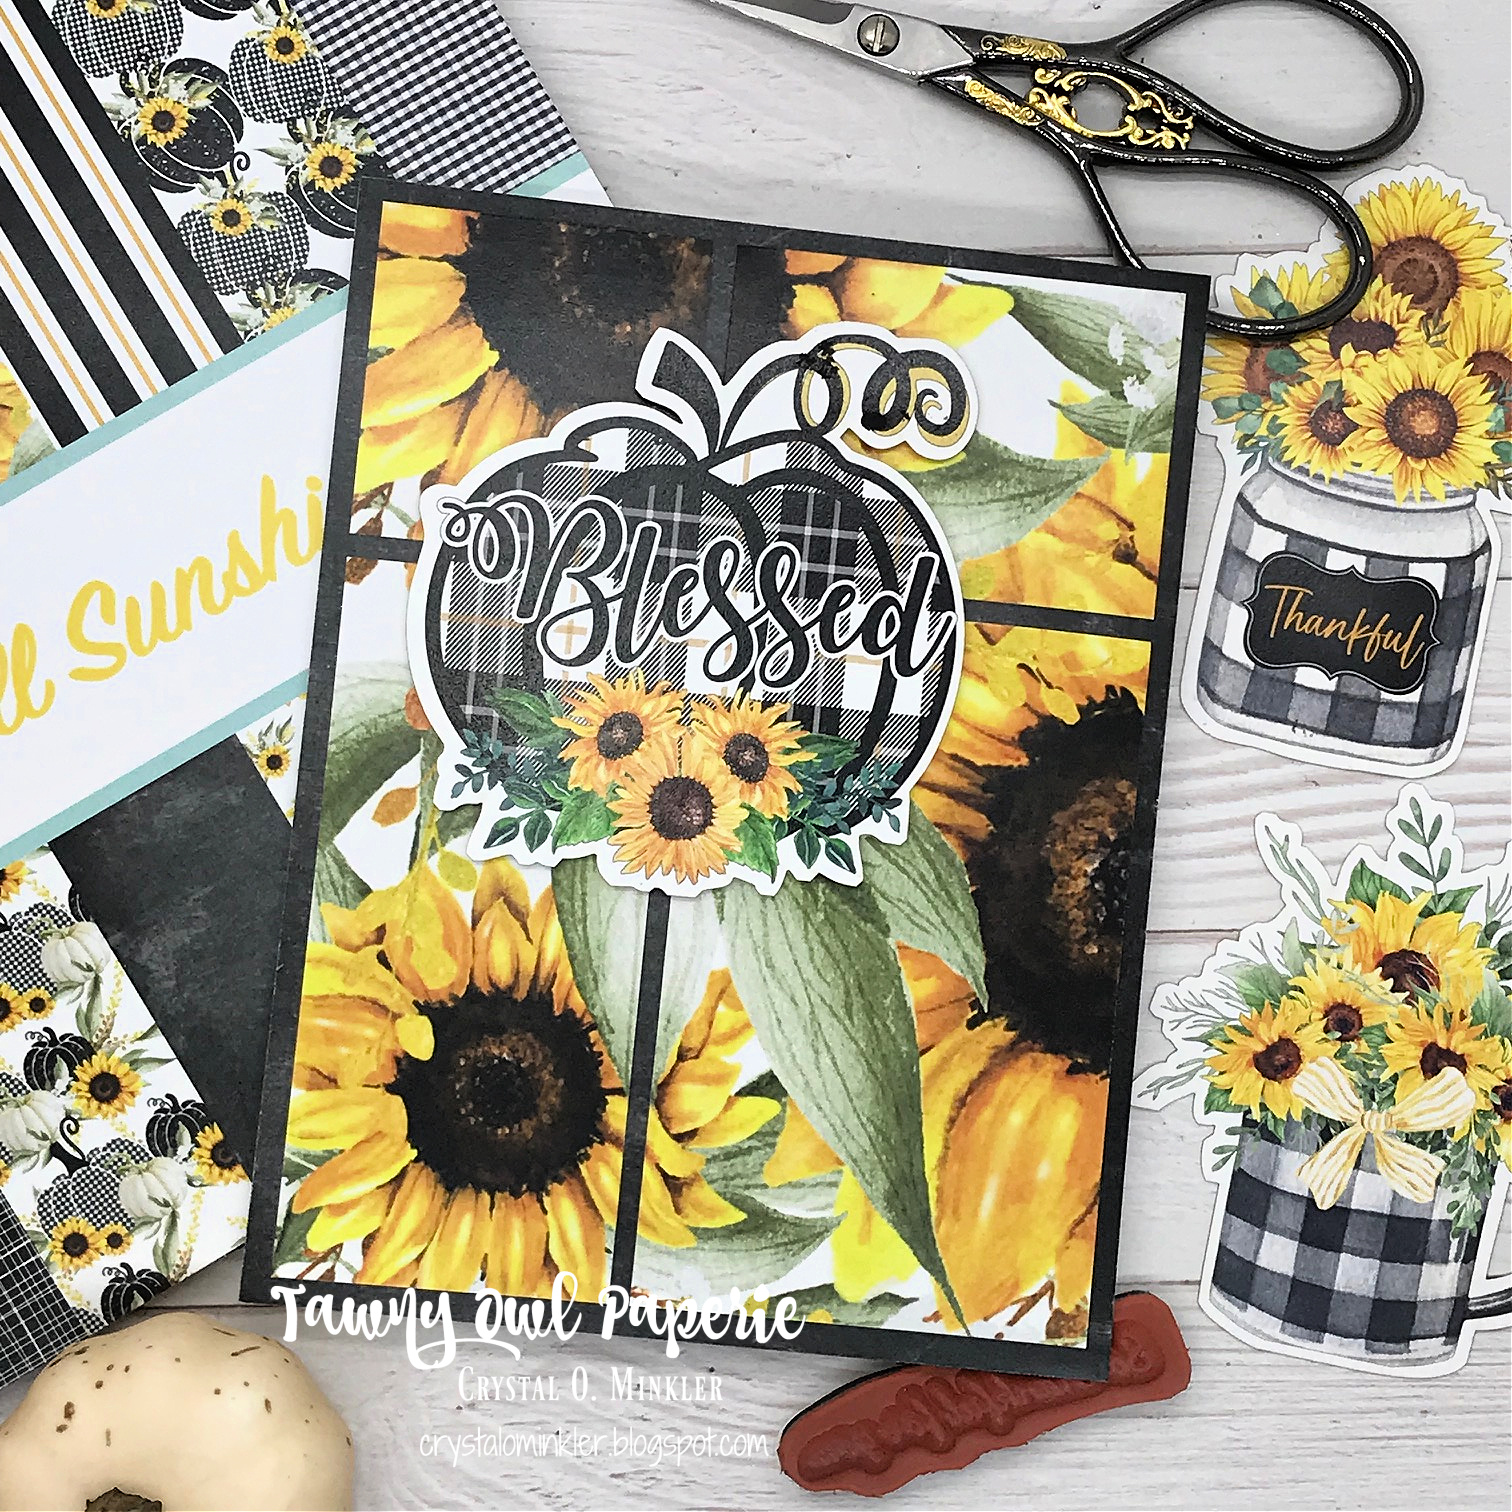
It's the last Tuesday of August and that means I have a new Tawny Owl Paper Inky Inspiration Sketch to share... we're on Sketch 4 now! I hope that you've found some inspiration from the sketches I've been sharing. I know that they have come in handy for me!
The beautiful Ever So Thankful stamp from Unity was just delivered to my house and I've been itching to ink it up and color so I thought it would be fun to play with it for Sketch 4. I paired it up with the Fall Y'all {paper pack} from Unity.
Here's a quick list of the Copic markers I used to color up this beautiful image:
And a look at TOPII Sketch 4... I love the possibilities with that big white background! It would be great with ink smooshing or blending... not just pattern papers like I've used today.
I adhered all my layers together and then adhered them to an A2 card base of Kraft card stock from Papertrey Ink. I also used Kraft card stock to heat emboss the sentiment. I stamped it with Sugar Cube White Pigment ink from Taylored Expressions and then applied Alabaster White Embossing Powder from Brutus Monroe. I melted the EP with a Precision Wagner Heat Tool. I popped up the focal piece with some foam tape.
My card today is also a sneak peek of a fun collaboration that I'm doing with my sweet friend, Teresa. For more information check out my video... Ever So Thankful Card & A Sneak Peek!!
Did you check out my video?! What do you think about the sneak peek? I sure hope you like it and will follow along with us for the Fall is in the Air Collab! And if you're liking the fun new sketch I shared, I sure hope you'll join us in the Tawny Owl Paperie Inky Inspiration Facebook group. I would love to see what you create with this sketch!
Thanks so much for stopping by!
See ya next time.
Inky Hugs,
Crystal
{Please note that comment moderation is on. Your lovely comment will appear shortly.}
Today I'm so excited to be joining Design Team members from Unity Stamp Co. and Therm O Web in an inspiration filled YouTube Hop featuring the newly released Deco Foil Adhesive Transfers!! These fabulous Adhesive Transfers make foiling SO easy and, of course, they're beautiful!
I used the wonderful {Let's Celebrate} Deco Foil Adhesive Transfer along with the gorgeous new Wildflowers Stand Tall background stamp from Unity. This gorgeous background stamp was a dream to color up... so fun! Here's a quick list of the Copic Markers I used to color up the background:
I trimmed it to 4-7/8 x 3-5/8" and adhered it to a piece of white card stock that I had die cut with the largest scalloped die from the Scallops & Rectangles {nesting dies} from Unity. I adhered it to a black card front measuring 5-1/2 x 4-1/4" and then to a white A2 top fold card base that I turned on the side.
These sentiments are so gorgeous in person!! I love how the Mystic Rainbow foil compliments the colors in the Copic colored background.
I'd love for you to check out my process video for this card and please also hop along and see all the wonderful inspiration shared using the fabulous Adhesive Transfers!! The Adhesive Transfers make foiling SO easy! Here's a link to my video or you can click below... Unity & Therm O Web YouTube Hop | Celebrate Your Special Day | Adhesive Transfers.
Here's a look at the 6 new Adhesive Transfers that are available... 4 are from Unity and the other 2 are from Brutus Monroe. All are so much fun!
Thanks so much for stopping by!
See ya next time.
Inky Hugs,
Crystal
{Please note that comment moderation is on. Your lovely comment will appear shortly.}


).png)


).png)


