Showing posts with label ephemera. Show all posts

Tuesday, August 5, 2025

Tawny Owl Paperie Inky Inspiration Sketch 34 Extended ~ Review

 Hello there crafty friend!
I've been out of town visiting my dearest and best friends so I thought I'd share a fun review of the cards I've made for the Tawny Owl Paperie Inky Inspiration Sketch Challenge 34 Extended so far since I didn't get a chance to make another card. You can click on each of the links below the cards for more information.


The card that inspired the sketch. Ween Party Crew.


Here's a look at the fun sketch for Tawny Owl Paperie Inky Inspiration Sketch Challenge 34 Extended. The sketch, as always, is meant to inspire not require. So let the sketch lead in your design, but don't feel limited by it.


And last week I shared Spectrum Gardenia
I'll be back next week with more inspiration for this fun sketch. Have an ink-tastic week!

Thanks so much for stopping by!

Inky Hugs,
Crystal

Tuesday, July 29, 2025

Tawny Owl Paperie Inky Inspiration Sketch 34 Extended ~ Spectrum Gardenia ~ 49 and Market

 Hello there crafty friend!
It's been a busy summer and I'm having so much fun with TOPII Sketch 34 that I've decided to extend this challenge for a few extra weeks. Today I'm sharing more inspiration for the Tawny Owl Paperie Inky Inspiration Sketch Challenge 34 Extended in the Tawny Owl Paperie Inky Inspiration Facebook group. Absolutely no stamping or coloring for this card!


I used papers from the Spectrum Gardenia 12 x 12 Collection from 49 and Market. The white distressed background paper measures 5-1/2 x 4-1/4". The orange strips measure 3/4 x 


Here's a look at the fun sketch for Tawny Owl Paperie Inky Inspiration Sketch Challenge 34 Extended. The sketch, as always, is meant to inspire not require. So let the sketch lead in your design, but don't feel limited by it. I turned the sketch today and moved the sentiment.


And the cluster of ephemera is from the coordinating Spectrum Gardenia Ephemera Bits pack. I wrote 'Love' on the tab and stapled it to the ephemera using the Tim Holtz Idea-ology Tiny Attacher Mini Stapler. The sentiment is adhered directly to the ephemera piece and the butterfly was popped up with foam tape.


I adhered the four orange strips to the card and popped up the large ephemera piece with foam tape. I'm having a blast with this sketch! Now there's more time to play along... I hope you'll join in the fun! Have an ink-tastic week!

Thanks so much for stopping by!

Inky Hugs,
Crystal

Thursday, July 3, 2025

Tawny Owl Paperie Inky Inspiration Sketch 34 ~ Vintage Artistry Countryside ~ 49 and Market

 Hello there crafty friend!
Today I'm sharing some inspiration for the Tawny Owl Paperie Inky Inspiration Sketch Challenge 34 in the Tawny Owl Paperie Inky Inspiration Facebook group. Absolutely no stamping or coloring for this card!


I used papers from the Vintage Artistry Countryside 12 x 12 Collection from 49 and Market.


Here's a look at the fun sketch for Tawny Owl Paperie Inky Inspiration Sketch Challenge 34. The sketch, as always, is meant to inspire not require. So let the sketch lead in your design, but don't feel limited by it. 


And the cluster of ephemera is from the coordinating Vintage Artistry Countryside Ephemera Bits pack.


I adhered the ephemera pieces together and popped up the tag on the card. I also popped up the bee with foam tape. I added some wrinkled ribbon from my stash and finished off the card with a sentiment from the ephemera pack. I'm having a blast with this sketch! I hope you can find time to play along. Have an ink-tastic week!

Thanks so much for stopping by!
See ya next time.

Inky Hugs,
Crystal


{Please note that comment moderation is on. Your lovely comment will appear once approved.}

Tuesday, April 8, 2025

Tawny Owl Paperie Inky Inspiration Sketch 31 ~ Winnie the Pooh ~ Echo Park Paper Company

 Hello there crafty friend!
Today I'm sharing a few quick cards for the Tawny Owl Paperie Inky Inspiration Sketch 31 in the Tawny Owl Paperie Inky Inspiration Facebook group. No stamping for these cards! Just some cute papers and ephemera from Echo Park Paper Company.


It was so easy and fun to put these three cards together!


Here's a look at the fun sketch for Tawny Owl Paperie Inky Inspiration Sketch Challenge 31. The sketch, as always, is meant to inspire not require. So let the sketch lead in your design, but don't feel limited by it.


I used the measurements from the sketch for all three cards. The papers and ephemera are both called Winnie the Pooh. I added a simple mat using pattern paper for the ephemera on my first card. Otherwise, it was just getting lost in the background.


I just had to use the map papers for a card! I adhered it to a Kraft A2 top fold card base. All of the ephemera pieces are popped up on the cards with foam tape.


Pooh bear always needs some honey so I made a fun honey themed card for my last one. I sure hope you can find time to play along with the sketch. Have an ink-tastic week!

Thanks so much for stopping by!
See ya next time.

Inky Hugs,
Crystal


{Please note that comment moderation is on. Your lovely comment will appear once approved.}

Thursday, April 3, 2025

Hey Beautiful ~ Miss Anya Jeans ~ The Greeting Farm

 Hello there crafty friend!
Today I'm sharing a sweet and sunny card for any occasion!


I was looking through my collection of TGF goodies to see which stamps I've yet to ink up and the darling Miss Anya Jeans stamp set caught my eye. I just love inking up Miss Anya! She's so fun to color. I stamped her and the sentiment using Memento Tuxedo Black ink and colored her up with Copic markers.

Here's a quick list of the Copic markers I used:
Skin: E000, E00, E21, R00, R20
Mouth: R20, R14
Hair: YR23, YR24, YR27, R59
Shirt: Y11, Y15, R20, R14, R37
Belt: C00, C2, N2, N4
Jeans: B91, B93, B95, B97
Shoes: C00, C2, R20, R14


I fussy cut Miss Anya on the line and then I used a Memento Tuxedo Black marker to color the edges of my fussy cutting. This makes the cutting look nice and neat.


I used some bright and sunny papers and ephemera from my stash to make a background for Miss Anya. I even added a white doily. I like how it frames her face.


I added a strip of black card stock to the bottom of my paper layer to ground Miss Anya. I had such a blast making this card. I'm definitely ready for some sunshiny days! I hope I've inspired you to get inky!

Thanks so much for stopping by!
See ya next time.

Inky Hugs,
Crystal

{Please note that comment moderation is on. Your lovely comment will appear once approved.}

Saturday, March 1, 2025

~ Friends of Unity March 2025 Blog Hop ~

Hello there crafty friend!
It's time for our Friends of Unity Blog Hop!! This month's cue is one of my favorite things...! 


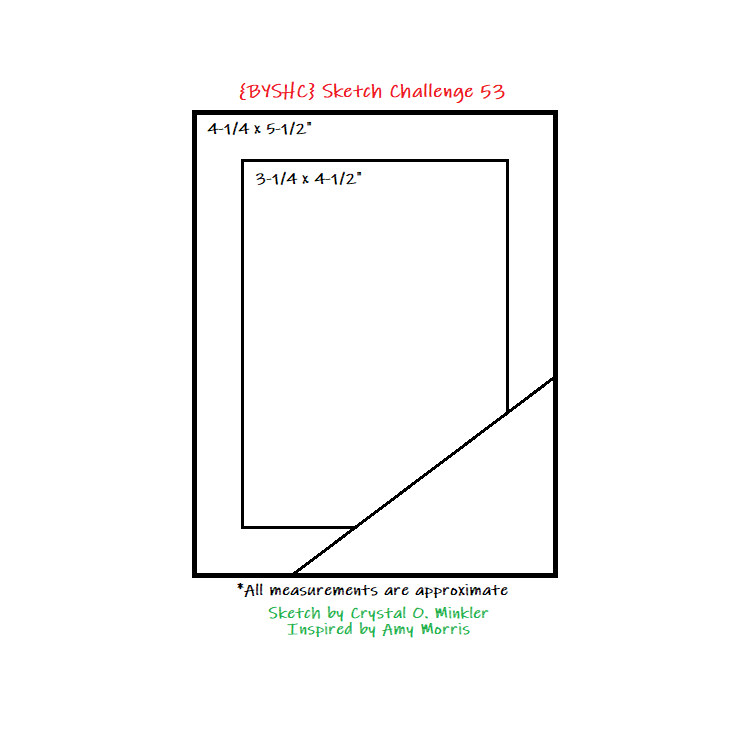
... a fun SKETCH! And it's doubly fun because it's also a Sketch Challenge! The Friends of Unity are hosting a fun sketch challenge in the Unity Show & Tell. Wait. It get's better!! There's prizes!! Two $25 gift cards to Unity are up for grabs! All you have to do is make a card or project inspired by the Friends of Unity Sketch above and enter it into the ALBUM in the Unity Show & Tell. You can enter as many cards as you like! Yay! I can't wait to see what you all make!


I was inspired to pull out the Grit & Grace {paper pack} and I paired it up with the gorgeous lilies from the Lily Notes stamps. On a side note, this gorgeous stamp is also available as a bundle with a fab stencil... Lily Notes {stamp & stencil bundle}.


I pulled out three different pattern papers from the Grit & Grace {paper pack}. I adhered my bottom layer to a Kraft A2 top fold card base. Next I trimmed a piece of Kraft card stock down to 4 x 5-1/4". I trimmed my lightest pattern paper to 3-3/4 x 5" and mat it with the Kraft layer. And then I trimmed my top layer of pattern paper to 3-1/4 x 4-1/2". 


I stamped the lilies next. I actually stamped them twice though that probably wasn't necessary. I stamped them on white card stock and die cut them using a die from the Scallops & Circles {nesting dies}. I then colored the other ones using the following Copic markers: RV10, RV02, R14, Y15, YG11, YG03. I fussy cut the lilies and colored the edges of the cutting with a black marker. I then adhered them to the circle layer. I stamped and fussy cut the sentiment. I added foam tape to the back of both and popped them up on the card. And then I finished it off with a few black enamel dots.


 My second card is very simple. I wanted to play with one of the Coffee To-Go Ephemera pieces. I fussy cut it leaving a thin white border around the edges. And then I got stuck... LOL! I had to go looking through my papers to find something that would work with these colors.


The colors in the Pretty Polka's {paper pack} coordinate very nicely with the colors in this cup. So I trimmed the pink paper down to 5-1/4 x 4" and adhered it to a Kraft A2 top fold card base that I turned on the side for a landscape card. I was going to just cut the green paper like I did for the first card, but got to thinking I could use a die. So I pulled out the Scallops & Rectangles {nesting dies} and die cut the paper. My Kraft mat for this layer measures 4-1/4 x 3-1/8". I wrapped the layer with {Ivory} May Arts Burlap String and then popped up the green layer with foam tape.


I also popped up the cup on this card... this one probably won't be going in the mail! LOL! I heat embossed the sentiment using white pigment ink, white embossing powder and a Wagner Precision Heat Tool. Such a simple, but lovely card. I kept going back and forth on adding something to the sleeve on the cup. What do you think? Maybe I'll add a heart? I don't know.

Now before we get to the hopping, I chose a lucky winner from the comments on last month's hop to win a fun prize and the lucky winner is...


... Karen Adams!! Congratulations, Karen!!
Please email me at crystalominkler@gmail.com to claim your prize. 
Please claim the prize before April 2nd, 2025. 

Well, that's it for me! Please hop along and enjoy some more inspiration from the Friends of Unity! I can't wait to see how our friends were inspired this month. I will be doing another fun giveaway this month!! Be sure to hop along and comment for a chance to win. {When you comment please leave your name just in case it posts as anonymous.} I'll announce the winner next month! 


Let's get to the hopping...

Crystal <--- you're here

up next ---> Doreen


Thanks so very much for supporting our little hop!
We appreciate you so much!!

See ya next time.

Inky Hugs,
Crystal


{Please note that comment moderation is ON. Your comment will appear shortly.}


Friday, February 14, 2025

Coffee for All Seasons ~ Not 2 Shabby ~ Coffee Loving Papercrafters

 Hello there crafty friend!
I’m back as a guest designer for the month of February for the Coffee Loving Papercrafters!


Today I'm sharing a set of caffeinated seasonal cards that I created using awesome papers and fun ephemera from Not 2 Shabby. I am a huge fan of Not 2 Shabby's papers and coordinating ephemera. I have oodles and oodles and was happy to finally play with some of my stash.


First up is a lovely Valentine's Day card I created using the Lattes of Love 6x6 Paper Pad and the coordinating Lattes of Love Ephemera. I used all kinds of papers from the pack for all of my layers even the mats for my panels. And I used five different ephemera pieces for my focal piece.


Up next is a wonderful card for Summer... I used the gorgeous Make It Iced 6x6 Paper Pad and coordinating Make It Iced Ephemera. So many fab girls and summer drinks in this one! Love it! I used three pieces of ephemera for the focal image for this one and then a sentiment I added near the bottom of the card.


My third card features one of my favorite paper pad and ephemera pairings... the gorgeous Give Thanks 6x6 Paper Pad and coordinating Give Thanks ephemera. I love the beautiful pumpkins in these papers. I used three ephemera pieces for this one.


My card design was inspired by one of my favorite sketch from the {BYSHC} group... {BYSHC} Sketch 7. Lots of fun layers and endless possibilities! All of my measurements are directly from the sketch.


 Lastly, I just had to share a Christmas card. I love making them all year long! I used the adorable Brewing It Up 6x6 Paper Pad along with the Brewing It Up Ephemera. I used just two ephemera pieces for my focal image and then I fussy cut the sentiment from a third ephemera piece. So cute and so much fun to make! I hope you've been inspired to get crafty with some coffee papers and ephemera in your stash.


Thanks so much for stopping by!
See ya next time.

Inky hugs,
Crystal

{Please note that comment moderation is on. Your lovely comment will appear once approved.}

Friday, January 17, 2025

{BYSHC} Sketch Challenge 53 ~ Snowy Pastels ~ Not 2 Shabby

Hello there crafty friend!
I'm back with a little inspiration for the {BYSHC} Sketch Challenge 53 hosted in the Build Your Stash Holiday Cardmakers Facebook group! Today I'm sharing a sweet holiday card featuring another beautiful set of papers and ephemera from our fab sponsor, Not 2 Shabby!


I am in love with these gorgeous papers!! The colors are so beautiful! I used the Snowy Pastels 6x6 Paper Pad and the coordinating Snowy Pastels Ephemera. Love the sweet deer ephemera!


This month's design is so simple. I love how quick a card can come together with this sketch, pretty papers and cute ephemera! 


The sweet sentiment is from the Gingerbread Hugs stamp set {sadly, it's no longer available}. I've used this sentiment many times over the years though. It's a fave!


Here's a look at {BYSHC} Sketch Challenge 53 for the month of January. If you're interested in seeing a bit more inspiration for this sketch, check out the amazing inspiration from the design team over on the {BYSH} Cardmakers blog! The design team, as always, rocked this sketch!


Thanks so much for stopping by!
See ya next time.

Inky hugs,
Crystal


{Please note that comment moderation is ON. Your lovely comment will appear shortly.}

Wednesday, January 1, 2025

{BYSHC} Sketch Challenge 53 ~ Sparkling Christmas Wishes Ephemera ~ Not 2 Shabby

Hello there crafty friend!
It's time for a new sketch challenge over in the Build Your Stash Holiday Cardmakers Facebook group! Today I'm sharing a sweet Christmas card featuring gorgeous papers and ephemera from our wonderful sponsor, Not 2 Shabby! Not 2 Shabby has generously offered up a $25 gift certificate as a prize for the {BYSHC} Sketch Challenge 53 this month! So fabulous!!


For my first card this month, I used the Pink Christmas 6x6 Paper Pad and I paired it up with the Sparkling Christmas Wishes Ephemera


I trimmed the pink pattern papers down to  3 x 4-1/4" and mat it with a piece of white card stock trimmed to 3-1/4 x 4-1/2". I just eye-balled the corner piece. I placed the paper over the card base and just marked the edges where I wanted the triangle to sit on the card and then I cut it with my trimmer.


The sweet sentiment is from the Purrs & Cocoa stamp set. I adore this sweet stamp set. You have got to take a look at it {click on the ^^^ link}.


Here's a look at {BYSHC} Sketch Challenge 53 for the month of January. If you're interested in seeing a bit more inspiration for this sketch, check out the amazing inspiration from the design team over on the {BYSH} Cardmakers blog!


Thanks so much for stopping by!
See ya next time.

Inky hugs,
Crystal


{Please note that comment moderation is ON. Your lovely comment will appear shortly.}

Friday, October 25, 2024

{BYSHC} Sketch Challenge 50 ~ Falling for the Holidays 2024 {BYSHC} Linky Party ~ Simple Christmas Trees ~ A Colorful Life Designs

Hello there crafty friend!
I'm back with more inspiration for the {BYSHC} Sketch Challenge 50 over in the Build Your Stash Holiday Cardmakers Facebook group! Today I'm sharing a fun Christmas card featuring two fabulous stencils from our amazing sponsor A Colorful Life Designs! A Colorful Life Designs has generously offered up a $25 gift card as a prize for the {BYSHC} Sketch Challenge 50 this month! So fabulous!!


I started with my background for this card. I scored a 4-1/4 x 11" piece of Kraft card stock from Papertrey Ink at 5-1/2" for an A2 card base. I secured my card to my glass table with purple tape and then I laid the Arctic Snow Stencil from our amazing Sponsor A Colorful Life Designs over the top and lightly blended using my brown distress ink blending brush. I didn't even bother with adding any more ink. The snowflakes fade out towards the mug. I love the effect!


I replaced the stencil with the Simple Christmas Trees Stencil, also from A Colorful Life Designs, and blended Lumberjack Plaid Distress Ink over top. I love this fun tree design! I removed the stencil and then distressed the edges of the card using Vintage Photo Distress Ink. I love the vintage vibe it gives the card! 


I stamped the sentiment from A Wintry Hello from our lovely Sponsor Unity Stamp Co. using the Lumberjack Plaid Distress Ink. I trimmed the sentiment and adhered it to the card using iCraft UltraBond Adhesive from our fab Sponsor Therm O Web. The fun ephemera piece is from our wonderful Sponsor Not 2 Shabby and it's called A Shabby Christmas. I distressed the edges with my brown blending brush just to tame the brightness of the white. I finished off the card with a few red confetti pieces from the Crystal Iris Cranberry Card Bling from A Colorful Life Designs.


Here's a look at {BYSHC} Sketch Challenge 50 for the month of October. Loving this sketch! There's just under a week left to play along with us. If you're interested in seeing a bit more inspiration for this sketch, check out the amazing inspiration from the design team over on the {BYSH} Cardmakers blog! So many fabulous cards this month from the design team.


I'm also playing along with the Falling for the Holidays 2024 {BYSHC} Linky Party. Have you stopped by to check out all the wonderful holiday inspiration being shared?! I've been inspired by so many of the cards! I'm hoping to squeeze in at least one more project! Fingers crossed I can swing it today! Have a wonderful day!


Thanks so much for stopping by!
See ya next time.

Inky hugs,
Crystal


{Please note that comment moderation is ON. Your lovely comment will appear shortly.}