Showing posts with label #byshcsketchchallenge7. Show all posts

Friday, February 14, 2025

Coffee for All Seasons ~ Not 2 Shabby ~ Coffee Loving Papercrafters

 Hello there crafty friend!
I’m back as a guest designer for the month of February for the Coffee Loving Papercrafters!


Today I'm sharing a set of caffeinated seasonal cards that I created using awesome papers and fun ephemera from Not 2 Shabby. I am a huge fan of Not 2 Shabby's papers and coordinating ephemera. I have oodles and oodles and was happy to finally play with some of my stash.


First up is a lovely Valentine's Day card I created using the Lattes of Love 6x6 Paper Pad and the coordinating Lattes of Love Ephemera. I used all kinds of papers from the pack for all of my layers even the mats for my panels. And I used five different ephemera pieces for my focal piece.


Up next is a wonderful card for Summer... I used the gorgeous Make It Iced 6x6 Paper Pad and coordinating Make It Iced Ephemera. So many fab girls and summer drinks in this one! Love it! I used three pieces of ephemera for the focal image for this one and then a sentiment I added near the bottom of the card.


My third card features one of my favorite paper pad and ephemera pairings... the gorgeous Give Thanks 6x6 Paper Pad and coordinating Give Thanks ephemera. I love the beautiful pumpkins in these papers. I used three ephemera pieces for this one.


My card design was inspired by one of my favorite sketch from the {BYSHC} group... {BYSHC} Sketch 7. Lots of fun layers and endless possibilities! All of my measurements are directly from the sketch.


 Lastly, I just had to share a Christmas card. I love making them all year long! I used the adorable Brewing It Up 6x6 Paper Pad along with the Brewing It Up Ephemera. I used just two ephemera pieces for my focal image and then I fussy cut the sentiment from a third ephemera piece. So cute and so much fun to make! I hope you've been inspired to get crafty with some coffee papers and ephemera in your stash.


Thanks so much for stopping by!
See ya next time.

Inky hugs,
Crystal

{Please note that comment moderation is on. Your lovely comment will appear once approved.}

Thursday, April 25, 2024

Love You, Mom! ~ Snarky Mama ~ Unity Stamp Co.

Hello there crafty friend! 
Popping in with a pretty Mother's Day card featuring the beautiful flowers from the brand new stamp called Snarky Mama from Unity Stamp Co. Even though I love all the fun and snarky sentiments in this kit, I just had to use the 'Love You, Mom!' sentiment. I miss my mama every single day.


I paired up the pretty flowers with the Kindness is Magic {paper pack}. I really love the yellow in this paper and wanted to color the flowers yellow! Which I did using a handful of Copic markers and die cut them with a stitched arch die from the Scallops & Arches {nesting dies}. I also die cut the sentiment using one of the dies from the Scalloped & Stitched Sentiment Nesting Dies.

Here's a quick list of the Copic markers I used:

Yellow Flowers: Y11, Y15, Y35, E23, E25
Red Flowers: R14, R46
Leaves: YG03, YG63, YG97


Inspiration for my card came from the {BYSHC} Sketch #7. This is one of my favorite sketches from the Build Your Stash Holiday Cardmakers Facebook group. If you're interested in seeing more fun sketches, check out the group or stop by the Build Your Stash Holiday Cardmakers blog. I'd love to have you join us!


I die cut a scalloped arch from Kraft card stock from Papertrey Ink using the next largest die from the Scallops & Arches {nesting dies}. I used the dimensions for the sketch for my paper layers {minus the die cuts, of course}. The yellow card stock is Daffodil Delight from Stampin' Up and the green card stock is Prairie Grass from Papertrey Ink.


I adhered the sentiment to the arches and added foam tape to the back of both. I popped them up on the card. This turned out prettier than I had thought! Have a wonderful night friends!

Thanks so much for stopping by!
See ya next time.

Inky hugs,
Crystal

{Please note that comment moderation is on. Your lovely comment will appear shortly.}

Sunday, December 4, 2022

Advent Calendar Day 4 ~ Merry & Bright ~ Unity Stamp Co.

Hello there crafty friend!
It's Day 4 of the Unity 2022 Advent Calendar! I've teamed up with Echo and Sandhya to do a little reveal and project on our YouTube channels using the fantastic Advent Calendar from Unity Stamp Co!! Please be sure to subscribe to our channels so you don't miss a day of this fun series!


Day 4 ~ the cutest little Santa!


I paired it up with the Watercolor Winter {paper pack}, also from Unity (looks like it's currently out of stock though). And colored it up with the following Copic markers: E000, E00, E11, C00, C2, R20, R14, R27, N1, N4, N6, YG11, G24, G46


Here's a look at Sketch 7 that inspired my card.


I also used the Make a Tag {die set} and the Scallops & Circles {nesting dies}, also from Unity. 
The sentiment is from the May Your Days be Merry & Bright.

Check out my process video here...  Unity Advent Calendar Day 4.


I'll be back tomorrow with Day 5 of the Advent Calendar reveal and a really cute card!


Thanks so much for stopping by!
See ya next time.


Inky Hugs,
Crystal


{Please note that comment moderation is ON. Your comment will appear shortly.}

Friday, February 26, 2021

{BYSHC} Sketch Challenge #7 ~ More Milk & Cookies ~ Doodlebug Design

 Hello there crafty friend!
I'm back with one last Christmas card using sketch #7 for the {BYSHC} Sketch Challenge #7 in the Build Your Stash Holiday Cardmakers Facebook group. And yes, I just had to use the adorable Milk & Cookies papers from Doodlebug Design again!! I really am trying to use up these papers... I still have SO much!! Anywho... this was another super quick card!


No joke! It took me longer to decide if I wanted to go landscape or portrait for this one more than anything else. The papers were easy... since the main piece is busy with Santa and the fun Christmas scene I wanted to go with less busy papers for my background panels. The tan paper is kind of busy with images but not in color so I think it works well as a background. I have the papers mat on a piece of kraft card stock and then a mat of Real Red card stock and a card base of kraft card stock.


The main focal piece is also a paper that is included in the paper pad. I had already cut into this paper to use the other side of the double sided paper but I'd been looking at this one piece trying to figure out a way to use it in this sketch. The Stitched Arch STAX from My Favorite Things was the perfect dies to die cut the focal piece and work around the portion that I had already used. Woohoo! I also used another cut apart sentiment from the paper pad. I trimmed down the Seasons Greetings and adhered it to a die cut piece of kraft card stock. I adhered it to the bottom of the main piece and then popped up the whole piece. It almost looks like a snow globe which is why I added some shimmer to the Santa scene.


It's so hard to get a good photo of the shimmer though. I used a Nuvo Glitter Gloss Aqua Shimmer pen for the shimmer and in person it really is like a snow globe! You can see bits of the shimmer in each of the photos or maybe I'm imagining it. LOL Hopeful thinking!


Here's another look at the {BYSHC} Sketch #7.
There's just a couple more days to play along! Head over to the {BYSH} Cardmakers blog to see more inspiration using this fun and super easy sketch!


Thanks so much for stopping by!
See ya next time.

Inky Hugs,
Crystal

Friday, February 19, 2021

{BYSHC} Sketch Challenge #7 ~ Camping Adventures with Poinsettia Greetings ~ Mix Match of Digis

 Hello there crafty friend!
I'm so excited to share a fun card that I created using a non-Christmas digi set from Angie Blom Digital Designs that I combined with one of my very own digi sets available at Polka Dot Orchard!! Such a fun combination and it works fabulous with the current sketch challenge over at Build Your Stash Holiday Cardmakers Facebook group. AND both shops are having a sale!!! Gotta love a good sale!!


Since both of these fun stamps are digital, I was able to combine them in a Word Document. I inserted the beautiful lantern from the Camping Adventures set from Angie Blom Digital Designs into my Word document. I resized it so it would work nicely for this card design. I then inserted the pretty poinsettia from the Poinsettia Greetings digi set from Polka Dot Orchard. I decided to add two... making the front poinsettia a little smaller and the back one a little bigger. I love the festive combination here!


I also inserted the Seasons Greetings sentiment from the Poinsettia Greetings digi set and printed off the images. Time to color!! I used the following Copic markers:

Lantern ~ C00, C2, N0, N1, Y000, Y06, Y17, B0000
Poinsettias ~ R000, R14, R27, Y06, Y17, YG11, G14, G46 
Grounding ~ N0, N1 


I changed up the sketch for the sentiment... I didn't want to cover up any more of the images so I just had it come off the edge of the card. Ohhh... I forgot to mention the pretty papers I used are from another Doodlebug Design paper pack in my stash called Christmas Magic. I was lucky enough to find these perfect papers to coordinate with my colored images!! Phew! The two bottom layers are both pretty papers from the paper pack. The yellow mat for my focal piece is Daffodil Delight card stock from Stampin' Up! All the pretty layers are adhered to a white A2 top-fold card base. The sentiment is adhered to the focal piece and then that whole panel is popped up on the card with foam tape.


Here's another look at the fun {BYSHC} Sketch 7. I will be sharing one more card next week using this fun sketch! I hope you'll come check it out.

Speaking of checking things out, drop by the {BYSH} Cardmakers blog... we're featuring a mix of creations shared by the {BYSH} Cardmakers team and a fun card randomly chosen from the challenge entries in the {BYSH} Cardmakers Facebook group.


Thanks so much for stopping by!
See ya next time.

Inky Hugs,
Crystal

Friday, February 12, 2021

{BYSHC} Sketch Challenge #7 ~ Santa & the Mrs. ~ Unity Stamp Co.

 Hello there crafty friend!

I have had such a busy week... I wasn't sure that I would make it with this weeks Christmas card, but thankfully I already had this sweet design started so I was able to find time to finish it. I'm still trying to use up that Milk & Cookies paper pad by Doodlebug Design I've been hoarding. I still have lots and lots of paper left but I'm making progress! The sweet Santa & the Mrs. stamps from Unity Stamp Co. were also in the pile of stamps I wanted to create holiday cards for last year... so it only made sense to pair it up with these papers! Let's check out the card...


I always like to play around with sketches and change things up a bit... for this one I've altered the measurements to work for a 5 x 5" square card. The holly patterned paper measures 2-1/2 x 4-3/4" and the brick is 2-1/8 x 4-3/4". I love how the Santa is over the brick paper like he's going down a chimney and Mrs. Claus has that little holly in her hair that plays off the holly paper. Perfection!


I chose not to mat the papers and just use a 5 x 5" Real Red card front for the card. I adhered that to a 5 x 10" white card base that I scored at 5". The main focal piece was stamped on a large scrap of white card stock and then colored with the following Copic markers:

Skin ~ E0000, E00, E11, R00, R20
Hair ~ C00 C2
Clothes ~ R000, R14, R27, N0, N2, N3, N4, N6, Y06, Y17
Gingerbread Man ~ E21, E23, E25
Holly ~ YG11, G14, G46, R14
Santa's List ~ N0, N3


I just realized I didn't color the sky behind them! Ooops! Well, I did add a little C00 and C2 for the snow. Lol! Anywho... I die cut the colored image with the Stitched Square Stacklets die from Taylored Expressions and mat it with a 3 x 3" piece of Real Red card stock. I stamped the Merry & Bright sentiment with Wow Clear embossing ink and heat embossed Alabaster White embossing powder from Brutus Monroe. I trimmed the sentiment and cut the ends for a banner. I adhered the top part of the sentiment to the focal piece with Tombow Mono Multi liquid glue and then popped the whole thing up with foam tape. Love it!


Here's another look at the sketch for {BYSHC} Sketch Challenge #7.
I hope you'll come join us over in the Build Your Stash Holiday Cardmakers Facebook group and start building your stash of holiday cards along with us!


Thanks so much for stopping by!
See ya next time.

Inky Hugs,
Crystal

Friday, February 5, 2021

{BYSHC} Sketch Challenge #7 ~ Milk & Cookies ~ Doodlebug Design

 Hello there crafty friend!
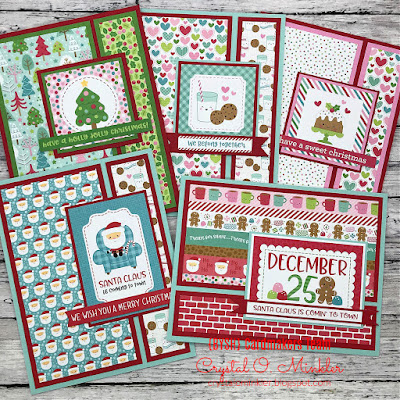
Today I'm sharing five cards that I created for the {BYSHC} Sketch Challenge #7 using the adorable Milk & Cookies papers by Doodlebug Design!! I adore Doodlebug Design papers and these ones I've been hoarding... but no more! I'm trying to use up these papers so when the new designs come out this year I'll have room for them! Woohoo!


Here's a look at all five cards together. Aren't they just the cutest?! I used the cut-apart papers for my focal pieces... such easy cards to make. It did take some time to get all the papers and card stock cut, but other than that and adhering all the layers... super quick!


For my first card I actually flipped the sketch... kinda. I kept the bottom layers {striped and brick papers} the same as in the sketch, but flipped the focal piece. It definitely worked for this design! So cute! I love that adorable gingerbread man! I used Pool Party and Real Red card stock from Stampin' Up for my mats and card front. And also used a scrap of white card stock to mat the focal piece.


The sentiments for all of these cards are also part of the cut-aparts in the paper pack. They worked perfectly for this card sketch too! I had fun mixing and matching the papers for all the cards. I used Real Red from Stampin' Up and New Leaf from Papertrey Ink for this card.


Now this one isn't very Christmassy, so I may add another sentiment to the card to give it more of a holiday feel... OR I might just give it to my hubby for Valentine's Day. Not sure. Either way... its adorable and also came together super quick! I used Pool Party and Real Red card stock from Stampin' Up! for this one, as well.


Eeep! How cute is this one?! I love that sweet cake! I chose the hearts and polka dots for the background papers to play off of the hearts and polka dots on and around the cake. Just perfect! Now for this one, I used Real Red card stock again, but I also wanted the pink in the papers to pop so I used Lovely Lady card stock from Papertrey Ink. Isn't that sentiment strip just perfect?! I added a couple of tiny scrap layers on either end of the strip to keep it level with the focal piece. Love!


And the last one... which is probably my most favorite! Love that cute Santa! I used Pool Party and Real Red card stock again for this one. The sentiment is also a cut-apart but I did make it a bit more sturdy by adhering it to a layer of red card stock. A trick I used for most of the sentiment strips.


Well, I'm definitely ahead this month for my goal of a Christmas card a week! I'm super happy with how all of these cute cards turned out. Check your stash of Christmas papers... you may just have some with these quick cut-aparts too! They are perfect for this month's sketch challenge. I hope you'll come join us over in the Build Your Stash Holiday Cardmakers Facebook group and start building your stash of holiday cards along with us!

Thanks so much for stopping by!
See ya next time.

Inky Hugs,
Crystal

Monday, February 1, 2021

{BYSHC} Sketch Challenge #7 ~ By Golly Be Jolly ~ Unity Stamp Co.

 Hello there crafty friend!
It's time for a new sketch challenge over at the Build Your Stash Holiday Cardmakers Facebook group and I'm sharing the card I created using the adorable By Golly Be Jolly stamp set from Unity Stamp Co. I just adore the festive little birdies in this stamp set!


All of my paper layers on the base of the card are patterned papers from Doodlebug Design called Milk & Cookies... I love these sweet papers and I'm really trying not to hoard the papers in my stash and use them so I kind of forced myself to cut into these.


I decided to have this one sweet birdie peeking in as if to say... "have a dashing good holiday". I chose colors from the papers to use in coloring up this cutie. Here's a quick list of the Copic markers I used:

Hat/Antlers ~ R000, R14, R27, C00, C2, E21, E23, E27
Hair/Nose ~ Y000, Y11, E21, E23, R000, R14, R27
Body/Legs ~ R0000, RV10, RV02, E21, E23
Outline ~ BG10


Here's a look at the sketch! You can check out inspiration for this sketch over in the {BYSHC} Sketch Challenge Album. I think this will be another good one for using up some of my Christmas papers... gotta make room for the new papers released this year, right?


I just love how this cute card turned out!
I hope you'll come join us over in the Build Your Stash Holiday Cardmakers Facebook group and start building your stash of holiday cards along with us!

Thanks so much for stopping by!
See ya next time.

Inky Hugs,
Crystal