Showing posts with label cut aparts. Show all posts

Friday, February 28, 2025

{BYSHC} Sketch Challenge 54 ~ Winter Remix Berry Stencil ~ Club Scrap

Hello there crafty friend!
I'm back with one last card for the {BYSHC} Sketch Challenge 54 hosted in the Build Your Stash Holiday Cardmakers Facebook group! Today I'm sharing a lovely holiday card using the Winter Remix Berry Stencil from our lovely Sponsor Club Scrap. Unfortunately, I bought this item on clearance and it looks like they aren't available any more.


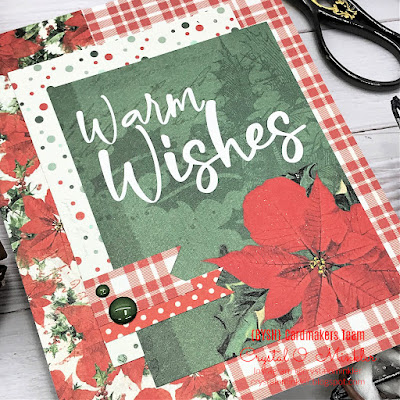
I blended Vintage Photo and Scorched Timber Distress Inks over the branches on the stencil. I blended Spun Sugar and Festive Berries Distress Inks over the berries.


I used Copic markers to add depth and shadow to the branches and berries. I used T5 for the branches and R20, R14, and R37 for the berries.


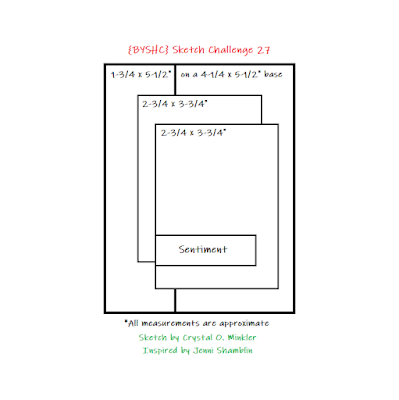
I used the measurements from the sketch for my card. To make the two panels on top stand out from the others I distressed the edges very lightly with a brown blending brush without adding more ink to the brush. I die cut the sentiment from the cut apart papers from the Gnome for Christmas Maze Book in a Box using a circle die and popped it up on the card. The ribbon is a grosgrain ribbon from Stampin' Up. It's really old. LOL! I think it's called cranberry.


Here's a look at {BYSHC} Sketch Challenge 54 for the month of February. Today is the last day to enter this challenge! If you're interested in seeing a bit more inspiration for this sketch, check out the amazing inspiration from the design team over on the {BYSH} Cardmakers blog! I'm always blown away by the creations from the DT... they are amazingly talented cardmakers!


Thanks so much for stopping by!
See ya next time.

Inky hugs,
Crystal


{Please note that comment moderation is ON. Your lovely comment will appear shortly.}

Friday, February 14, 2025

{BYSHC} Sketch Challenge 54 ~ Gnome for Christmas ~ Club Scrap

Hello there crafty friend!
I'm back with a little inspiration for the {BYSHC} Sketch Challenge 54 hosted in the Build Your Stash Holiday Cardmakers Facebook group! Today I'm sharing another sweet holiday card again featuring fun papers from our wonderful brand new sponsor, Club Scrap!


So since I'm new to Club Scrap I only have a couple of products from them. Which means I'm playing with the Gnome for Christmas Maze Book in a Box again. I love the fun papers in this pack! Aren't the snowman, gingerbread and gnome just too cute?!


I am in love with this textured paper! I used the same measurements as last time which are on the sketch except for the red layer isn't a 4 x 5-1/4" card front. Because I only have so much of the paper in this kit, I decided to cut it down to just 4 x 2". 


I trimmed up the focal image leaving a bit of a border around the edge and then I popped it up using foam tape. And then I finished off the card with a few brown enamel dots from the Winter Berry Branch enamel dots from Gina Marie Designs.


Here's a look at {BYSHC} Sketch Challenge 54 for the month of February. If you're interested in seeing a bit more inspiration for this sketch, check out the amazing inspiration from the design team over on the {BYSH} Cardmakers blog! The design team, as always, rocked this sketch!


Thanks so much for stopping by!
See ya next time.

Inky hugs,
Crystal


{Please note that comment moderation is ON. Your lovely comment will appear shortly.}

Saturday, February 1, 2025

{BYSHC} Sketch Challenge 54 ~ Gnome for Christmas ~ Club Scrap

Hello there crafty friend!
It's time for a new sketch challenge over in the Build Your Stash Holiday Cardmakers Facebook group! Today I'm sharing a sweet Christmas card featuring fun papers from our wonderful BRAND NEW sponsor, Club Scrap! Club Scrap has generously offered up a $25 gift certificate as a prize for the {BYSHC} Sketch Challenge 54 this month! So fabulous!!


For my first card this month, I used papers and a cut apart sheet that I got on clearance over at Club Scrap last year. It's actually called Gnome for Christmas Maze Book in a Box, but I used it for a sweet holiday card. Though I did get instructions on how to create the awesome book in a box and I think I'm going to attempt to make it with other products since I've cut into these papers already.


Before I get into all the measurements I used... can you see that texture in the card stock?! Isn't it amazing! I don't often use textured card stock like this so it was so fun to play with. Okay, so my top four papers all measure 1 x 3-1/4" per the measurements on the sketch. The green paper on the bottom measures 4 x 2". And then the bottom layer of brown paper measures 4-1/4 x 5-1/2" and it's adhered to a white A2 top fold card base.


I cut the long strip of cut apart paper using my large Tonic Guillotine. I trimmed the cute gnome paper and popped it up on the card with a bunch of foam tape. And then finished off the card with a few red enamel dots from the Winter Berry Branch enamel dots from Gina Marie Designs.


Here's a look at {BYSHC} Sketch Challenge 54 for the month of February. If you're interested in seeing a bit more inspiration for this sketch, check out the amazing inspiration from the design team over on the {BYSH} Cardmakers blog!


Thanks so much for stopping by!
See ya next time.

Inky hugs,
Crystal


{Please note that comment moderation is ON. Your lovely comment will appear shortly.}

Friday, August 25, 2023

{BYSHC} Sketch Challenge 36 ~ Christmas Magic ~ Echo Park Paper Co.

 Hello there crafty friend!
I'm sharing one last Christmas card for the {BYSHC} Sketch Challenge 36 for the Build Your Stash Holiday Cardmakers Facebook group. This month's sketch is really great for the paper packs that have cut-aparts in them. I made four pretty quick cards using the Echo Park Paper 6x6 Paper Pad called Christmas Magic.


I cut down two pattern papers to 4-1/4 x 5-1/2" - for my first two cards that's the plaid and the green pattern papers. I cut them both again at the two inch mark and adhered them to two white A2 top fold card bases.


I then cut a couple little strips of pattern paper to adhere across the card base and trimmed off the excess. I adhered the cut apart directly on the card for the first card with the gifts. For the reindeer card I added foam tape to the back of this cut apart and popped it up on the card.


Just like the first two cards, I used two pattern papers for my last two cards. I cut them down to 4-1/4 x 5-1/2" and then cut off 2" from both. I then adhered them to card bases.


And this time I adhered Santa directly to the card and the house cut-apart was popped up using a bunch of foam tape.


Four really quick cards!! I'll definitely be using this sketch again with the cut-aparts in my paper packs. Loving it!


Here's a look at {BYSHC} Sketch 36 for the month of August!
There's still a few days to play along with the sketch! The challenge ends on August 31st. I hope you'll join in the fun and start building your stash of holiday cards. If you're interested in seeing a bit more inspiration for this sketch, check out the amazing inspiration from the design team over on the {BYSH} Cardmakers blog!


Thanks so much for stopping by!
See ya next time.

Inky hugs,
Crystal


{Please note that comment moderation is ON. Your lovely comment will appear shortly.}

Friday, October 7, 2022

{BYSHC} Sketch Challenge 27 ~ Easy Cut Apart Cards ~ Simple Stories

 Hello there crafty friend!
I'm back with my weekly Christmas card for the {BYSHC} Sketch Challenge 27 but today I'm actually sharing four cards!! So you know how some paper pads have cut aparts in them... well, I remembered I had a beautiful paper pad from Simple Stories called Simple Vintage Country Christmas with these beautiful cut apart papers. I actually thought about finishing up as much of the paper pad as I could since I had twelve cut aparts left, but I ran out of time so we just have the four. These were so easy with this sketch!


It's just a matter of mixing and matching pattern papers. I like to lay them out on my desk and just start laying them on top of each other to see which ones work well together. 


The red text paper is a lovely contrast to the plaid and the diagonal stripes has both colors so it ties it all together with the cut apart. I finished off this card with a couple Christmas Mirrored Metallic enamel dots from Gina Marie Designs.


This card has a similar bottom layer with the polka dots and the plaid papers contrasting well. I liked the lighter holly paper to break up the polka dots and then the solid red on the cut apart is another nice contrast. 


I added a couple banners using scraps from the paper pad and a couple red enamel dots from the Merry & Bright Clear Christmas enamel dots from Gina Marie Designs.


Poinsettias are my favorite flowers for Christmas so I just had to use the poinsettia cut apart and it only made sense to use the poinsettia paper, as well.


The green of the cut apart helps to make this layer pop on the lighter polka dot papers and the gingham papers. I added a couple banners to this card too and the green enamel dots are from the Pine Branch Clear with Color enamel dots from Gina Marie Designs.


I also added some glitter to the poinsettia... you can see it a little bit in this photo. I used a Nuvo Glitter Gloss Aqua Shimmer pen.


For my last card I went with the gorgeous aqua papers... I love these papers! They were the whole reason I bought this paper pad. LOL! I paired up as much of them as I could for this card and added the green paper for a nice contrast.


A little red banner for this one to compliment the red in the sentiment. I also added a couple light green enamel dots from the Pine Branch Clear with Color enamel dots.


So excited to have four more cards for my stash and these were so easy to make! I really love how they turned out too!


Here's another look at {BYSHC} Sketch 27 for the month of October!
I hope you'll join us and play along with the sketch! If you're interested in seeing a bit more inspiration for this sketch, check out the amazing inspiration from the design team over on the {BYSH} Cardmakers blog! I'll be back next week with my weekly Christmas card using this fun new sketch!


Thanks so much for stopping by!
See ya next time.

Inky hugs,
Crystal


{Please note that comment moderation is ON. Your lovely comment will appear shortly.}

Friday, September 24, 2021

{BYSHC} Sketch Challenge 14 ~ Love Peppermint ~ The Greeting Farm

 Hello there crafty friend!

I'm back with my weekly Christmas card and this time I used a super adorable stamp from The Greeting Farm called Love Peppermint!! I got this adorable stamp during the Farmer's Market one day sale back in April, I think. I've been anxious to ink her up and use her for one of the {BYSHC} sketches and she worked perfectly for this month's sketch!


I went with a whole peppermint theme for my card and used the beautiful Candy Stripe paper collection from Brutus Monroe. I used the reds and greens from the papers as my color palette for my coloring. I am so happy with how this one turned out!


Here's a list of the Copic markers I used:

Skin ~ E000, E00, E04, E11, R00, R20
Hair ~ E43, E44, E47, E49
Peppermint Hat ~ C00, C2, C3, R000, R14, R46, R59
Blouse ~ C00, C2, C3
Dress ~ R000, R14, R46, R59, YG11, G14
Shoes ~ R14, R46, R59


The Love Peppermint stamp doesn't come with a sentiment and I couldn't find one in my stash that would work so I just typed one up on my computer and printed it off. Keeping with the peppermint theme, of course! I thought peppermint wishes was fun!


Here's a close up of the sweet Love Peppermint girl! Love this adorable stamp!


Here's a look at the fun {BYSHC} Sketch 14 for the month of September!
There's just a few more days to play along with the sketch! If you're interested in seeing a bit more inspiration, check out the {BYSH} Cardmakers blog! I'll be back next Friday with another Christmas card using the new {BYSHC} Sketch Challenge 15!


Thanks so much for stopping by!
See ya next time.

Inky hugs,
Crystal


{Please note that comment moderation is ON. Your lovely comment will appear shortly.}

Friday, September 17, 2021

{BYSHC} Sketch Challenge 14 ~ Sugar Cookie Christmas ~ Prima Marketing Inc.

 Hello there crafty friend!

Today I'm sharing a super quick card that I created for the {BYSHC} Sketch Challenge 14 using some pretty papers and ephemera. I love when the papers make a card come together so quickly! Just like my cards from last week, the sentiment and focal piece is a cut apart from the Sugar Cookie Christmas paper pad by Prima Marketing Inc.


I trimmed the cut apart and mat it on white card stock. I trimmed the other layers of pattern paper from the same Sugar Cookie Christmas paper pad and also mat them on white card stock.


I adhered all the layers to a white A2 top fold card base adding scraps of card stock underneath the top layers so that each of the layers would lay flat.


I popped up the little ephemera cup with foam squares and added some fun sparkle with Sprinkled Sugar Stickles. Another Christmas card for my stash!


Here's a look at the fun {BYSHC} Sketch 14 for the month of September!
I hope you'll join us and play along with the sketch! If you're interested in seeing a bit more inspiration, check out the {BYSH} Cardmakers blog! I'll be back next Friday with one last Christmas card using Sketch 14!


Thanks so much for stopping by!
See ya next time.

Inky hugs,
Crystal


{Please note that comment moderation is ON. Your lovely comment will appear shortly.}

Friday, September 10, 2021

{BYSHC} Sketch Challenge 14 ~ Christmas Town ~ Doodlebug Design

 Hello there crafty friend!

Today I am sharing four cute Christmas cards I made using the adorable Christmas Town papers from Doodlebug Design along with the {BYSHC} Sketch 14 from the Build Your Stash Holiday Cardmakers Facebook group! I love when the paper pads have those cute cut aparts... it really makes for quick cards! I used four of the cut aparts for the cards I'm sharing today.


My first card is a fun mix of papers that are a bit busy so I used a nice white mat on each layer to break that up a bit. I just love this cut apart though... I still believe in Santa!! So cute! The cute Santa paper is adhered to a Real Red card front and then the whole panel is adhered to a white A2 top fold card base.


I adore this holly paper and it works perfectly with the cut apart I chose for this card! The Cucumber Crush green mats on all of these layers really bring the green images to your eye. I chose a few red enamel dots to compliment the red berries on the cut apart.


I love the cute houses in these papers and just had to use the paper with the house cut apart! I chose Baked Brown Sugar card stock for my mats for this one... in person it really compliments the browns in the papers. And I finished this one off with a few red enamel dots.


And my last card, which is probably my favorite... features the adorable snowman cut apart and the fun snowman papers. I chose white mats for all these layers to make all the snowmen pop! I wanted to use pink enamel dots for this one, but I didn't have any that were quite the right shade. I think the green enamel dots work well though with the green dots in the snowman's scarf.


Here's a look at the fun {BYSHC} Sketch 14 for the month of September!
I hope you'll join us and play along with the sketch! If you're interested in seeing a bit more inspiration, check out the {BYSH} Cardmakers blog! I'll be back next Friday with another cute Christmas card!


Thanks so much for stopping by!
See ya next time.

Inky hugs,
Crystal


{Please note that comment moderation is ON. Your lovely comment will appear shortly.}

Friday, July 9, 2021

{BYSHC} Sketch Challenge 12 ~ My Favorite Christmas ~ Echo Park Paper

 Hello there crafty friend!

I'm back with a little more inspiration for the {BYSHC} Sketch Challenge 12... I actually have four cards to share today! I used some fun Christmas papers by Echo Park Paper called My Favorite Christmas... the cut apart pieces made these cards come together SO quickly! I love when that happens!


Card #1 ~ isn't Santa on this penny farthing bicycle just too cute?! I paired up this cut apart with the poinsettia papers! I absolutely love the colors in these papers!


Card #2 ~ Another cute Santa cut apart! I paired him up with adorable Santa papers and that little strip of reindeer paper was a leftover piece that worked perfectly with this one!


Card #3 ~ I love the mix of fonts on this cut apart. I paired it up with similar colors in the paper pad. And brought in the white enamel dots to add a bit of white to compliment the white in the cut apart.


Card #4 ~ Love this cut apart!! It's so cute with the mug and sentiment... I had to use it! I paired it up with the plaid and red papers from the paper pad! I also used green enamel dots to compliment the green on the cut apart piece.


Four pretty simple cards done and added to my stash! So happy!


Here's a look at the fun {BYSHC} Sketch 12 for the month of July!
I hope you'll join us and play along with the sketch! If you're interested in seeing a bit more inspiration, check out the {BYSH} Cardmakers blog! I'll see you next week with another fun Sketch 12 card!


Thanks so much for stopping by!
See ya next time.

Inky hugs,
Crystal


{Please note that comment moderation is ON. Your lovely comment will appear shortly.}

Friday, February 12, 2021

{BYSHC} Sketch Challenge #7 ~ Santa & the Mrs. ~ Unity Stamp Co.

 Hello there crafty friend!

I have had such a busy week... I wasn't sure that I would make it with this weeks Christmas card, but thankfully I already had this sweet design started so I was able to find time to finish it. I'm still trying to use up that Milk & Cookies paper pad by Doodlebug Design I've been hoarding. I still have lots and lots of paper left but I'm making progress! The sweet Santa & the Mrs. stamps from Unity Stamp Co. were also in the pile of stamps I wanted to create holiday cards for last year... so it only made sense to pair it up with these papers! Let's check out the card...


I always like to play around with sketches and change things up a bit... for this one I've altered the measurements to work for a 5 x 5" square card. The holly patterned paper measures 2-1/2 x 4-3/4" and the brick is 2-1/8 x 4-3/4". I love how the Santa is over the brick paper like he's going down a chimney and Mrs. Claus has that little holly in her hair that plays off the holly paper. Perfection!


I chose not to mat the papers and just use a 5 x 5" Real Red card front for the card. I adhered that to a 5 x 10" white card base that I scored at 5". The main focal piece was stamped on a large scrap of white card stock and then colored with the following Copic markers:

Skin ~ E0000, E00, E11, R00, R20
Hair ~ C00 C2
Clothes ~ R000, R14, R27, N0, N2, N3, N4, N6, Y06, Y17
Gingerbread Man ~ E21, E23, E25
Holly ~ YG11, G14, G46, R14
Santa's List ~ N0, N3


I just realized I didn't color the sky behind them! Ooops! Well, I did add a little C00 and C2 for the snow. Lol! Anywho... I die cut the colored image with the Stitched Square Stacklets die from Taylored Expressions and mat it with a 3 x 3" piece of Real Red card stock. I stamped the Merry & Bright sentiment with Wow Clear embossing ink and heat embossed Alabaster White embossing powder from Brutus Monroe. I trimmed the sentiment and cut the ends for a banner. I adhered the top part of the sentiment to the focal piece with Tombow Mono Multi liquid glue and then popped the whole thing up with foam tape. Love it!


Here's another look at the sketch for {BYSHC} Sketch Challenge #7.
I hope you'll come join us over in the Build Your Stash Holiday Cardmakers Facebook group and start building your stash of holiday cards along with us!


Thanks so much for stopping by!
See ya next time.

Inky Hugs,
Crystal