Showing posts with label unity stamp co. Show all posts

Tuesday, August 5, 2025

Tawny Owl Paperie Inky Inspiration Sketch 34 Extended ~ Review

 Hello there crafty friend!
I've been out of town visiting my dearest and best friends so I thought I'd share a fun review of the cards I've made for the Tawny Owl Paperie Inky Inspiration Sketch Challenge 34 Extended so far since I didn't get a chance to make another card. You can click on each of the links below the cards for more information.


The card that inspired the sketch. Ween Party Crew.


Here's a look at the fun sketch for Tawny Owl Paperie Inky Inspiration Sketch Challenge 34 Extended. The sketch, as always, is meant to inspire not require. So let the sketch lead in your design, but don't feel limited by it.


And last week I shared Spectrum Gardenia
I'll be back next week with more inspiration for this fun sketch. Have an ink-tastic week!

Thanks so much for stopping by!

Inky Hugs,
Crystal

Saturday, July 19, 2025

Christmas in July 2025 {BYSHC} Linky Party ~ Bunny & Guinea: Snowman ~ Rachelle Anne Miller Stamps

 Hello there crafty friend!
I'm back for Day 2 of the Christmas in July 2025 {BYSHC} Linky Party with another cute holiday card! It was so much fun checking out the inspiration shared yesterday for the start of the Linky Party. So many wonderful cards! Today I'm sharing a card using a sweet digital stamp from our sweet Sponsor Rachelle Anne Miller Stamps, AKA RAM Stamps.


I combined and resized the digital stamp and sentiment from the Bunny & Guinea: Snowman digital stamps. Isn't that just the cutest trio!? So adorable!! I printed off the digis on white card stock and colored them up with Copic markers.

Copic markers I used:
Bunny: W0, W1, W3, C0, C2, R00, R20
Snowman: C0, C2, YR20, YR15, YR16
Hat: C0, C2, YG11, G21
Scarf: YG11, G21, R20, R14
Guinea Pig: W0, W1, W3, C0, C2, E21, E25


I ink smooshed a wintry background using Uncharted Mariner and Villainous Potion Distress Inks. Once it was dry, I die cut it with the Swirls Pierce & Cut Plate from Sponsor Taylored Expressions.


The snowy hill was die cut using a die from the Stitched Hillside Borders from Sponsor Lawn Fawn. I trimmed the background to 5-1/4 x 4" and adhered it to a white A2 card base using iCraft UltraBond Adhesive from Sponsor Therm O Web. I popped up the sentiment and the fun trio using iCraft 3D Foam Tape Jumbo Roll (white) from Therm O Web.


 Woohoo!! I'm so excited to have another card done for my stash! If you haven't already, stop by the Christmas in July 2025 {BYSHC} Linky Party to check out all the wonderful Holiday inspiration being shared!! Have a fantastic day!


Thanks so much for stopping by!

Inky Hugs,
Crystal

Friday, July 18, 2025

Christmas in July 2025 {BYSHC} Linky Party ~ All Ears ~ Unity Stamp Co.

Hello there crafty friend!
I'm so excited to share my first card for the Christmas in July 2025 {BYSHC} Linky Party hosted by the Build Your Stash Holiday Cardmakers Facebook group! This is our sixth annual Christmas in July Linky Party! Woohoo!! Even though were in the middle of Summer the linky party is focused on Christmas and wintry holiday cards. It's a great way to get ahead on those holiday cards to relieve some of the stress later on in the year during the holidays. I am super excited to add a few more holiday cards to my Christmas card stash and I sure hope that you'll join in the fun!


For my first card I'm featuring the super cute and adorable pup from the All Ears stamps from our lovely Sponsor Unity Stamp Co. The fun knit hat is from the Best of 'Em stamps, also from Unity. The hats a little big but I think it looks so cute! And the sentiment is from the Woofy Christmas stamps. Yup, also from Unity.

Copic markers I used:
Dog: E21, E25, E59
Hat: C0, C1, YG11, G24, G46, R20, R14, R27


The fun background was created using the Cozy Knit Stencil from Sponsor A Colorful Life Designs. I masked the card front using iCraft Pixie Tape from our Sponsor Therm O Web and blended Vintage Photo Distress Ink on the top portion. I moved the Pixie Tape to the other side and used two more pieces of tape so I could blend Mowed Lawn and Candied Apple Distress Inks in stripes.


The background was die cut using the largest die from the Wonky Stitched Rectangle dies from Sponsor Gina Marie Designs. I adhered the background to a Kraft A2 top fold card base using the iCraft UltraBond Adhesive from Sponsor Therm O Web. And then I popped up the pup using iCraft 3D Foam Tape Jumbo Roll (white) from Sponsor Therm O Web. I finished off the card with a few red confetti pieces from the Hologram Red Card Bling from A Colorful Life Designs. A quick and cute card to start off the Linky Party!


My card was inspired by the {BYSHC} Sketch 58 from last month! Have you visited the Build Your Stash Holiday Cardmakers Facebook group? We host a fun sketch challenge each month to inspire our holiday cardmaking all year long. I love using sketches for my cards... makes designing the cards so easy!


I'm also a Sponsor for the Christmas in July 2025 {BYSHC} Linky Party!! I have a wonderful prize set aside for one lucky winner. For a chance to win my fun prize make a Christmas card and link it up to the linky party blog post on the Build Your Stash Holiday Cardmakers blog. All of the winners of all the amazing prizes will be announced on the {BYSHC} blog on Tuesday, July 29th.


Before you leave, be sure to stop by the Christmas in July 2025 {BYSHC} Linky Party to check out all the wonderful Holiday inspiration from our Sponsors and the {BYSHC} Design Team!! I'm so excited to continue building my stash of holiday cards for 2025... I hope you'll join in the fun and play along!


Thanks so much for stopping by!

Inky Hugs,
Crystal

Tuesday, February 18, 2025

February Scraps Cards ~ Ween Party Crew ~ Unity Stamp Co.

 Hello there crafty friend!
Today I'm sharing a trio of birthday cards I created to finish up my latest pack of scrap papers! Woohoo! Another one bites the dust... LOL! I couldn't resist inking up the adorable weens from the Ween Party Crew from Unity. Love these cuties!


I had exactly 11 pieces of paper scraps and boy was I ever happy to find that I could use them for three fun cards! I stamped the cutes partying weens three times and colored them up with Copic markers.

Here's a quick list of the Copic markers I used:
Red Ween: E21, E13, E17
Green Balloon: YG11, G14
Black Ween: E21, E13, N0, N1, N3, N5
Pink Balloon: RV10, RV02
Tan Ween: E40, E21
Blue Balloon: B000, B02


First up I used the strips for this card. They are close to same width and all are 4" long. I alternated the stripe patterns with the confetti patterns for a nice eye-pleasing background.


Next up, I used the largest green scrap with three similarly sized squares. Again, alternating the stripe patterns makes it more pleasing to the eye. Also coloring one of the balloons green helps to balance the colors on the card.


And lastly, I had three rectangle scraps left. I adhered those to a mat and then adhered them to the white A2 card base. Placing the green polka dot paper in the center to balance the busy-ness of the other two patterns. 


I fussy cut the pups leaving a thin white border around the images. And I popped them up on the cards with foam tape. I stamped the sentiments, trimmed them up and adhered them directly to the card bases. I found some enamel dots in my stash in a nice blue that works with the blue of the papers and the blue of the balloons... I think it adds a little something to the cards. I'm ecstatic to have another paper pack done. Yay! I hope you have an inkredible week!

Thanks so much for stopping by!
See ya next time.

Inky Hugs,
Crystal


{Please note that comment moderation is on. Your lovely comment will appear once approved.}

Tuesday, January 21, 2025

January Scraps Cards ~ Penguin Hugs & Cozy Vibes Owl ~ Unity Stamp Co.

 Hello there crafty friend!
Today I'm sharing the last two cards I created using the leftover scraps I opened up way back in October 2024. Goodness! My plan to use up scraps each month has been going way too slow! I need to up my game a bit. BUT I am so happy to finally be finishing off these papers!


I've shared this fun technique before here and here. For these two cards I cut 1/2" strips of the pattern papers and adhered them to a thin white card stock panel {I recommend using copy paper if you plan on die cutting the panels} leaving a little bit of room. I didn't measure it or anything... just eyeballed it. I then cut these into 1/2" strips. These papers are from a company that's no longer in business, unfortunately. I love them! Now that these papers are finished up, I'll pick out another pack and share them next week for the new TOPII Sketch 29 that starts on January 28th.


For my first card, I adhered all of the pattern paper horizontally across the white card stock and then I cut 1/2" strips. I adhered those strips to another piece of white card stock with a bit of space in between them making a fun pattern. I trimmed the panel down to 4 x 5-1/4" and adhered it to a white A2 card base measuring 4-1/4 x 11"; scored at 5-1/2".


I stamped the adorable Penguin Hugs with Black Amalgam ink and colored it just a little bit with C00, C1, C3, BV0000, BV11. I die cut the sweet penguin using a die from the Scallops & Circles {nesting dies}.


I stamped the sentiment, trimmed it up and then adhered it to the scalloped circle. I added foam tape to the back of both and popped them up on the card.


For my second card I used the same 1/2" strips of the pattern paper, but I adhered them diagonally to a panel of white card stock. And then I cut the strips vertically. I then adhered the strips horizontally on another piece of white card stock leaving a little bit of space in between the strips. This panel was trimmed down to 3-3/4 x 5".


I stamped the adorable owl from the Cozy Vibes Owl stamps with Black Amalgam ink and die cut it with another circle die from the Scallops & Circles {nesting dies}. I colored the owl a little bit with C00, C1, and C3.


I stamped the sentiment and trimmed it. Added foam tape to the back of both and popped them up on the panel. I then trimmed off the excess hanging over the edges and adhered the panel to a white A2 top fold card base. Two cute cards for my wintry/holiday stash and another paper pack done!! Woohoo!

Thanks so much for stopping by!
See ya next time.

Inky Hugs,
Crystal


{Please note that comment moderation is on. Your lovely comment will appear once approved.}

Tuesday, November 5, 2024

Tawny Owl Paperie Inky Inspiration Sketch 27 ~ Roger Guy ~ Unity Stamp Co.

 Hello there crafty friend!
Today I'm sharing a bit more inspiration for the Tawny Owl Paperie Inky Inspiration Sketch Challenge 27 in the Tawny Owl Paperie Inky Inspiration Facebook group. I found myself in need of a birthday card so I thought this easy sketch would be perfect!


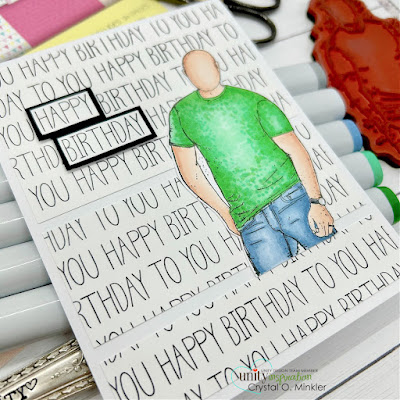
I pulled out my scraps from the beautiful Pastel Party Parade {paper pack}. Knowing that I was making a masculine card, I really just wanted the sentiment pattern paper. I trimmed three panels to fit on the white A2 top fold card.


Here's a look at the fun sketch for Tawny Owl Paperie Inky Inspiration Sketch Challenge 27. The sketch, as always, is meant to inspire not require. So let the sketch lead in your design, but don't feel limited by it. I feel my cards are a good example of that, as I'm always making adjustments... like this time I moved the sentiment.


I stamped the handsome Roger Guy with Black Amalgam ink and colored him up with my Copic markers. The t-shirt was looking a little plain so I added some texture with dots. I think it's fun! 

Here's a quick list of the Copic markers I used to color up Roger Guy:
Skin: E000, E00, E11
Watch: N0, N1, N4, N6
Shirt: G00, G02, G07, G09
Jeans: B91, B95, B97


I trimmed the sentiment from a scrap of the pattern paper. Mat it with True Black card stock from Papertrey Ink. And then I popped up the sentiment with foam tape for some fun dimension. All of my other layers are adhered directly to the card base. I'm having so much fun with this sketch! I hope you can find time to play along! Have an inktastic week!

Thanks so much for stopping by!
See ya next time.

Inky Hugs,
Crystal


{Please note that comment moderation is on. Your lovely comment will appear once approved.}

Tuesday, October 29, 2024

Tawny Owl Paperie Inky Inspiration Sketch 27 ~ Merry Whatever ~ Unity Stamp Co.

 Hello there crafty friend!
It's time for a fun, new sketch challenge! Today I'm sharing my first card for the Tawny Owl Paperie Inky Inspiration Sketch Challenge 27 in the Tawny Owl Paperie Inky Inspiration Facebook group. Another great sketch for scraps! I inked up the hilarious Merry Whatever kitty from Unity!


I paired up the funny kitty with the beautiful Watercolor Winter {paper pack}, also from Unity. I had these purr-fect paper scraps in my paper pack. LOL!


Here's a look at the fun sketch for Tawny Owl Paperie Inky Inspiration Sketch Challenge 27. The sketch, as always, is meant to inspire not require. So let the sketch lead in your design, but don't feel limited by it. I'm not even sure what the measurements of my paper scraps are... I do know that they were all 4" wide.


 I stamped the fun kitty with Black Amalgam ink from Gina K. Designs and colored him up with my Copic markers. There's so much detail to this kitty that coloring is a breeze. Not to mention there's no need to color the antlers or really the hat if you don't want to. But I decided to color the hat to coordinate a bit with the colors in the papers.

Here's a super quick list of the Copic markers I used:
Kitty: N0, N2, N4, R00, R20
Eyes: YG11, YG25
Hat: R20, R14, R27


I fussy cut and adhered the kitty directly to the card. I heat embossed the sentiment on Pure Poppy card stock from Papertrey Ink. Die cut it with a die from the Scalloped & Stitched Sentiment Nesting dies. I added a strip of foam tape to the back and popped it up on the card. I finished off the card with a few bits of red confetti from the Hologram Red Card Bling from A Colorful Life Designs. This was such a super quick and fun card to make!

 I hope you all have fun with this sketch! I can't wait to see what you create with it. 
Have an inktastic week!

Thanks so much for stopping by!
See ya next time.

Inky Hugs,
Crystal


{Please note that comment moderation is on. Your lovely comment will appear once approved.}

Tuesday, October 15, 2024

September Scraps Cards in October ~ Purr-Fect Time Kitty with a Planner Gal ~ Unity Stamp Co.

 Hello there crafty friend!
Today I'm sharing the last two cards I created using the leftover scraps I opened up last month. I've been working on these for awhile. I'm so glad I finally got them finished up.


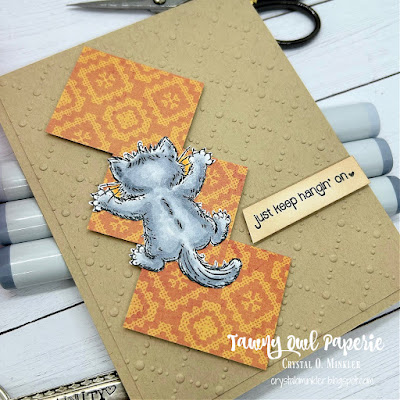
Here's a look at the cards together. I love how the kitty card turned out! If I could change one thing, I would distress the edges of the girl. Just add a bit of Vintage Photo Distress Ink around the edges so it isn't so white on all the Kraft.


I adhered the strips of pattern paper to the base leaving a nice edge around the card base. And then I adhered the pink layer over top. I think it's a fun design. I found the gal from Planner Gal: Brave & Beautiful already stamped on my pile of images. I thought she would look nice with these papers. I die cut her using a die from the Deckle & Stitches Nesting Die Set. Colored her up with my Copic markers and then popped her up on the card with foam tape.

Here's a list of the Copic markers I used:
Skin: E000, E00, E11
Hair: E43, E44, E47
Hat: E21, E23, E25, R81, R83, R20, R14, YR27
Blouse: R81, R83, YG61, YG63
Pants:B91, B97


I thought it would be fun to use one of my many sentiment dies from Unity. I die cut a scrap piece of white card stock with the hello die from Chic Script Salutations {die set}. It was way too white for the card so I decided to color it with Copics. I used R81, R83, R20, and R14. I die cut the hello outline from Kraft card stock.


I really got stuck on this card! This card may be why it's taken me so long to finish up these paper scraps. I had the orange pattern paper rectangles adhered together and sitting on a Kraft card base... that's as far as I got. It just sat on my desk taunting me. Until I remembered the little kitty from the {Clearly Unity} Purr-Fect Time stamp set. {This stamp set is also available in red rubber... Purr-Fect Time.} I inked him up and colored him with the following Copic markers: C00, C2, C4, C5, YR21, and YR15 (orange background around the whiskers).


 I fussy cut the kitty and adhered him to the pattern paper. The Kraft card base was too plain so I ran a piece of Kraft card stock through my Big Shot with a random embossing folder. I trimmed the panel down to 4 x 5-1/4" and adhered it to the A2 top fold card base. I blended a bit of Vintage Photo Distress Ink around the sentiment to soften the white and then I popped it up and the kitty/pattern paper focal piece up using foam tape. So happy to finally be done with these papers! I'll be back next week with one last card for the Tawny Owl Paperie Inky Inspiration Sketch 26. Have a wonderfully inky week!

Thanks so much for stopping by!
See ya next time.

Inky Hugs,
Crystal


{Please note that comment moderation is on. Your lovely comment will appear once approved.}

Friday, August 23, 2024

August Scraps Cards {Take Two} ~ Queen Girl & Some Other Stamps ~ Unity Stamp Co.

 Hello there crafty friend!
Today I'm sharing a trio of cards I created using up the rest of the leftover scraps I've been trying to finish up this month. SO excited to be done with another pack of scraps! Woohoo!! I also inked up some very neglected and untouched stamps from Unity Stamp Co. including the gorgeous Queen Girl.


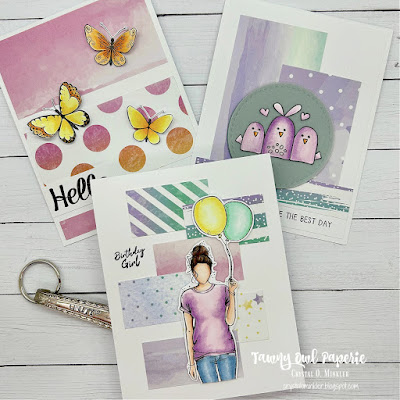
Here's a look at the three cards all together. All so sweet and fun! I'd love to know if you have a favorite of the three... mine is probably Queen Girl, but I do love how they all turned out.


I went with a simple background for my first card. I had two larger panels and a small strip of pattern paper so I adhered them as shown leaving some white space of my white card base showing. Such a fun and simple card design. The beautiful butterflies are from a retired set of stamps called 3 Little Butterflies. I got these a long time ago and finally inked them up! So sad to discover that they are no longer available at Unity. They are so pretty!


 I stamped them with Black Amalgam ink and colored them up with the following Copic markers: Y11, Y15, Y38, YR21, YR15, YR16. I fussy cut the butterflies and colored the edges using a Memento Tuxedo Black marker. I bent the wings up a bit and adhered the butterflies to the card just at the base of the their little bodies. I love the dimension this gives to the card! They look like they are just stopping by for a quick visit. I stamped the sentiment from the same set, trimmed it up and adhered it directly to the card.


My second card uses up three more pieces of pattern paper. They all had similar colors so it just made sense to pair these ones up. I also found a circle scrap that was die cut from Ocean Tide card stock from Papertrey Ink. It's the perfect shade for the greeny-blues in the pattern paper. I did die cut another circle from Vellum card stock also from Papertrey Ink to adhere over it just to soften the color a little bit. The pattern papers are adhered to 4 x 5-1/4" piece of Stampers Select White card stock from Papertrey Ink. And then I adhered the panel to a white A2 top fold card base. All of my white papers are almost always Stampers Select White card stock.


Inspiration for this card came from the Tawny Owl Paperie Inky Inspiration Sketch 22. Such a great sketch for these random pieces of pattern paper! It was perfect for these three pieces!


I stamped the adorable birds from the Many Happy Birdies... which is also retired. So sad! Just like the butterflies, I had never inked these cuties up so I'm glad I finally did. I colored up the birdies... OH MY. I just realized I didn't color the middle birdies dots! LOL!! Well, imagine they are white because that's what I planned on coloring them... anywho, I colored up the birdies with the following Copic markers: V0000, V000, V01, V12, V15, YR21, YR15, RV52. Also just like the butterflies, I fussy cut the birdies and colored the edges with a black marker. I adhered them to the vellum circle and then added glue to the vellum just behind the birdies. I popped up the circle layer with foam tape and stamped the sentiment. So easy peasy and cute!


My third and last card today uses up the last of my scraps. All of these six little rectangles are about the same size. I thought it would be fun to do a wonky stairs design with them. I really love how it turned out. And I think having the girl touch all six pieces of the pattern paper really brings the whole design together. All six pattern papers are just adhered to a white A2 top fold card base. No extra layers here.


I stamped the gorgeous Queen Girl and colored her with my Copic markers. I fussy cut her leaving a white border around the edges. Before I popped her up on the card with foam tape, I stamped the sentiment directly onto the card base. I am really loving this card and the fun design. I think I might turn it into a sketch... whatcha think?

I used the following Copic markers for Queen Girl:
Skin: E000, E00, E11
Hair: E33, E35, E37
Shirt: V0000, V000, V01, V12, V15
Jeans: B91, B93, B95
Balloons: Y000, Y11, Y13, G000, G00, G02


 I am so ecstatic to have another paper pack totally done! I'm going to look through my papers and see if there's a Fall themed one maybe for next month. There's just a few more days left to play along with the Tawny Owl Paperie Inky Inspiration Sketch Challenge 24. I'll be back on Tuesday of next week with a brand spanking new sketch challenge!! Woohoo! I hope you have a wonderfully inky weekend!

Thanks so much for stopping by!
See ya next time.

Inky Hugs,
Crystal


{Please note that comment moderation is on. Your lovely comment will appear once approved.}