Showing posts with label Gina Marie Designs. Show all posts

Friday, July 25, 2025

Wrapped with Extra Love ~ Holiday Flock Talk ~ Unity Stamp Co.

Hello there crafty friend! 
I couldn't help myself... sharing one last card for the Christmas in July 2025 {BYSHC} Linky Party! I promise! It's the last one! But I just HAD to play with Holiday Flock Talk! It's a brand new stamp from our wonderful Sponsor Unity that just released! Yay!


What's better than a cute holiday birdie?! Well, THREE cute holiday birdies, of course! I stamped all three together for a mini slimline card. I colored them up with some festive colors using Copic markers.

Here's a quick list of the Copic markers I used:
Purple Bird: BV00, BV02, YR20, YR15, C0, C2
Hats: C0, C2, R20, R14, R27
Scarf: G000, G21, G82
Tree: G000, G21, G82, E57
Striped Present: R20, R14, R27, Y11, Y15
Blue Bird: B000, B00, B02, Y11, Y15, C0, C2, YR20, YR15
Tiny Present: G000, G21, R14, R27
Orange Bird: Y11, YR20, YR15, YR20, YR15, R20, R14, R27
Ground: C0, C2


I hope you'll stop by the Christmas in July 2025 {BYSHC} Linky Party to check out all the wonderful Holiday inspiration being shared and maybe you can even play along! I've been inspired by so many of the cards! That's why I've been making so many extras! LOL! Today is the last day to enter the linky party!


I die cut the trio using the Big Little Chain Mini Slimline dies from Gina Marie Designs. I popped up the die cut panel using foam tape.


I paired up these cuties with the Minty Christmas {paper pack}. My mini slimline measures 6-1/2 x 3-1/2" so I trimmed a piece of pattern paper to 6 x 3-1/2" and then cut it in half. I adhered the pieces to the sides of the mini slimline card base. And then I had a scrap of the mint paper. It's probably 2-1/2" wide by 3-1/2". That's a wrap for the linky party! I hope you've enjoyed my cards. 

Thanks so much for stopping by!

Inky hugs,
Crystal

Monday, July 21, 2025

Christmas in July 2025 {BYSHC} Linky Party ~ Christmas Cookie Gnomies ~ Crafty Stamp Co.

 Hello there crafty friend!
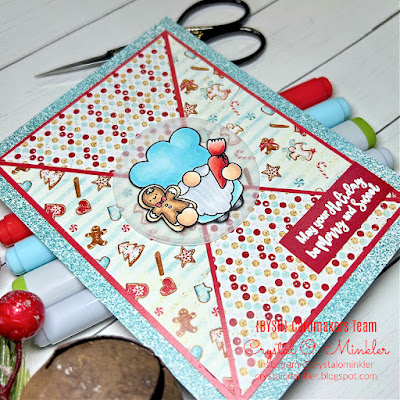
It's day 4 of the Christmas in July 2025 {BYSHC} Linky Party!! I'm adding not one, but two sweet cards to my Christmas stash! This time I played with the super cute Christmas Cookies Gnomies from our BRAND NEW Sponsor Crafty Stamp Co.


I paired up the gnomies with the Gingerbread Christmas 6x6 Paper Pad also from our new Sponsor Crafty Stamp Co.! Love these yummy papers! 


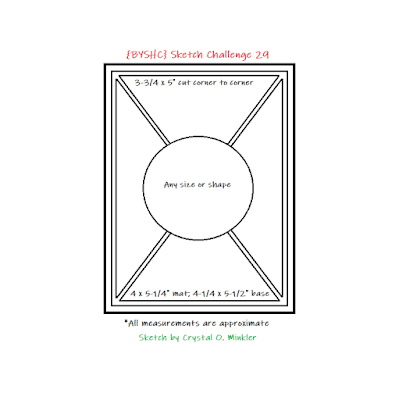
Inspiration for my card came from one of our past sketches... BYSHC Sketch 29. I love using the past sketches and this one is a big favorite and great for a TWOfer!


The blue glittery background paper measures 4-1/4 x 5-1/2" and it's adhered to a white A2 top fold card base. The red pattern paper layer measures 3-3/4 x 5". And then the colorful cookies and dots papers measure 3-1/2 x 4-3/4". If you'd like to see how I cut my triangles you can check out this VIDEO to see how I do it for this sketch.


I adhered all of my background layers using the iCraft UltraBond Adhesive from Sponsor Therm O Web. The sentiments are heat embossed with my favorite combo of products. I prepped the card stock with the TE Anti-Static Powder Tool and then stamped the sentiment with Sugar Cube Pigment White ink, both from Taylored Expressions. I then dusted the wet ink with Alabaster White Embossing Powder from Brutus Monroe and melted it with a Wagner Precision Heat Tool.

Copic markers I used:
Skin: E000, E00, E11
Mustache / Beard: C0, C2
Clothes: B000, B00, BG000, BG11
Shoes: N2, N4, N6
Gingerbread Cookie: E21, E23, E25, C0, C2, R20, R14, R27
Icing Bag: R20, R14, R27


I die cut two circles from vellum card stock using a die from the X Stitched Circle dies from Sponsor Gina Marie Designs. Looks like it's not available right now on the website... bummer.


I popped up the gnomies on the vellum circles using iCraft 3D Foam Tape Jumbo Roll (white) from Sponsor Therm O Web and then I adhered the circles to the card by just applying glue to the back of the gnomes.

Copic markers I used:
Skin: E000, E00, E11
Mustache / Beard: C0, C2
Clothes: R20, R14, R27, YG11, G24, G46
Shoes: N2, N4, N6
Stocking / Mitten Cookies: E21, E23, E25, C0, C2, B000, B00, BG000, BG11


If you haven't already, stop by the Christmas in July 2025 {BYSHC} Linky Party to check out all the wonderful Holiday inspiration being shared!! So much amazing inspiration! You can't help but be inspired to make a card or two! Heehee. Have an ink-tastic week!

Thanks so much for stopping by!

Inky Hugs,
Crystal

Friday, July 18, 2025

Christmas in July 2025 {BYSHC} Linky Party ~ All Ears ~ Unity Stamp Co.

Hello there crafty friend!
I'm so excited to share my first card for the Christmas in July 2025 {BYSHC} Linky Party hosted by the Build Your Stash Holiday Cardmakers Facebook group! This is our sixth annual Christmas in July Linky Party! Woohoo!! Even though were in the middle of Summer the linky party is focused on Christmas and wintry holiday cards. It's a great way to get ahead on those holiday cards to relieve some of the stress later on in the year during the holidays. I am super excited to add a few more holiday cards to my Christmas card stash and I sure hope that you'll join in the fun!


For my first card I'm featuring the super cute and adorable pup from the All Ears stamps from our lovely Sponsor Unity Stamp Co. The fun knit hat is from the Best of 'Em stamps, also from Unity. The hats a little big but I think it looks so cute! And the sentiment is from the Woofy Christmas stamps. Yup, also from Unity.

Copic markers I used:
Dog: E21, E25, E59
Hat: C0, C1, YG11, G24, G46, R20, R14, R27


The fun background was created using the Cozy Knit Stencil from Sponsor A Colorful Life Designs. I masked the card front using iCraft Pixie Tape from our Sponsor Therm O Web and blended Vintage Photo Distress Ink on the top portion. I moved the Pixie Tape to the other side and used two more pieces of tape so I could blend Mowed Lawn and Candied Apple Distress Inks in stripes.


The background was die cut using the largest die from the Wonky Stitched Rectangle dies from Sponsor Gina Marie Designs. I adhered the background to a Kraft A2 top fold card base using the iCraft UltraBond Adhesive from Sponsor Therm O Web. And then I popped up the pup using iCraft 3D Foam Tape Jumbo Roll (white) from Sponsor Therm O Web. I finished off the card with a few red confetti pieces from the Hologram Red Card Bling from A Colorful Life Designs. A quick and cute card to start off the Linky Party!


My card was inspired by the {BYSHC} Sketch 58 from last month! Have you visited the Build Your Stash Holiday Cardmakers Facebook group? We host a fun sketch challenge each month to inspire our holiday cardmaking all year long. I love using sketches for my cards... makes designing the cards so easy!


I'm also a Sponsor for the Christmas in July 2025 {BYSHC} Linky Party!! I have a wonderful prize set aside for one lucky winner. For a chance to win my fun prize make a Christmas card and link it up to the linky party blog post on the Build Your Stash Holiday Cardmakers blog. All of the winners of all the amazing prizes will be announced on the {BYSHC} blog on Tuesday, July 29th.


Before you leave, be sure to stop by the Christmas in July 2025 {BYSHC} Linky Party to check out all the wonderful Holiday inspiration from our Sponsors and the {BYSHC} Design Team!! I'm so excited to continue building my stash of holiday cards for 2025... I hope you'll join in the fun and play along!


Thanks so much for stopping by!

Inky Hugs,
Crystal

Friday, July 4, 2025

Holly Jolly Santa ~ Christmas Joy Mugs ~ Angie Blom Digital Designs

Hello there crafty friend! 
I made a quick holiday card featuring the adorable Santa Mug from the Christmas Joy Mugs Digi Stamps along with the Christmas Joy Script Background Digi Stamp, both from Angie Blom Digital Designs.

 
My process:
  • Combine and resize the Santa Mug and sentiment digis near the top of a Word Document
  • Print off digis on white card stock
  • Cut off top portion of the card stock
  • Ink smoosh bottom portion of the card stock with Candied Apple and Lumberjack Plaid Distress Inks leaving some white space
  • Dry background with heat tool 
  • Print off the Christmas Joy Script Background digi


  • Die cut background with the Wonky Stitched Rectangle die from Gina Marie Designs
  • Adhere background to white A2 top fold card base
  • Copic color Santa Mug digi
  • Fussy cut Santa Mug and trim sentiment
  • Pop up both on card with foam tape
Copic Markers Used
Skin: E000, E00, E11, R00, R20
Hair/ Mustache / Beard: C0, C2, C3
Handle / Rim: R20, R14, R27
Whipped Topping: W0, W1


Inspiration for my card came from the fun #TCH113 color challenge over at The Color Hues Challenge. A Santa card is just perfect for these colors!


I love making Christmas cards. They make my day brighter.

Thanks so much for stopping by!

Inky hugs,
Crystal

Saturday, June 14, 2025

Release Day Blog Hop ~ Anya Paints ~ The Greeting Farm

The June 2025 New Release is now available for purchase in The Greeting Farm Store! This month we introduced 3 new stamp sets. In our first set called ANYA PAINTS, Anya is ready to brush those worries away by exploring her creative side. For our next set called HUNNY BUNNY, we introduced 6 of the cutest bunnies hopping by with well wishes. Lastly, we have GLOW UP ANYA, featuring Anya with her makeup palette along with a gorgeous makeup vanity.


Anya is busy painting a big flower on her wall. I just love this stamp set! I stamped the flower using the brushstroke stamp with Mustard Seed Distress Ink. I stamped the heart on a scrap of white card stock with Abandoned Coral Distress Ink. I fussy cut the heart. I colored a quick stem and leaf using Copic markers and adhered the heart to the center of the flower.


I stamped sweet Anya and two paint cans using Memento Tuxedo Black ink. I colored them up with some Copic markers. I fussy cut all of the images on the line and colored the edges with a black marker.

Here's a quick list of the Copic markers I used:
Skin: E000, E00, E21
Hair: Y11, E00, E21, E15
Shorts: B000, B93
Bow / Top / Belt: V12, V15, V17
Paint Brush: E21, E25, E57, C2, C5, R20, R14
Paint Cans: C0, C2, Y02, Y15, R20, R14


I die cut the panel using a Wonky Stitched Rectangle die from Gina Marie Designs. I adhered it to a black A2 top fold card base. I popped up Anya and the paint cans using foam tape. And then I finished off the card by stamping the sentiment directly on the panel.


To celebrate this release we are having a short BLOG HOP! One lucky fan will win a $50.00 Gift Certificate to The Greeting Farm Store!! You have until June 18th, 12pm CST/1pm EST to leave your comments on each Designer's Blog. Then head back to The Greeting Farm Blog to let us know you completed the hop. **Remember to qualify for the prize you MUST leave a comment on each Designer's Blog AND The Greeting Farm Blog letting us know you completed the hop.

NOTE: Comments on The Greeting Farm Blog are admin approved so it may take a day for your comment to be visible. Please only comment once, and use the same name on all the blogs when leaving a comment. Do not pick the Anonymous option (otherwise we won't be able to verify that it's you). We will announce the random winner later in the week on the Blog and in our Facebook Group: The Greeting Farm Fan Page.

TGF Design Team:

This is a short hop, and definitely worth playing along! If you want to grab your favorites now, you can purchase the new stamps HERE. We will have more cards featuring the New Release from our Design Team Leaders starting on the 17th so be sure to stop by The Greeting Farm Blog to see more inspiration.

Happy Hopping!

Inky Hugs,
Crystal


{Please note that comment moderation is on. Your lovely comment will appear once approved.}

Wednesday, May 14, 2025

Membership Wednesday ~ May 2025 KOM Slow Down & Savor ~ Unity Stamp Co.

Hello there crafty friend!
Happy Membership Wednesday! Today I'm sharing a card featuring a fab stamp from the May 2025 Kit of the Month membership from Unity called Slow Down & Savor. 


I stamped the sweet scene with Black Amalgam ink and colored it up with some Copic markers. Here's a quick list of the Copic markers I used: 

Skin: E000, E00, E21, R00, R20
Hair: Y11, Y21, E31
Clothes / Hair Bow: RV10, R20
Tights: RV10, R20, C00
Book: G94, C00, C2
Bunny: C00, C2, R00, R20
Grass / Stems / Leaves: YG11, G94
Purple Flowers: V12
Pink Flowers: RV10, R32
Yellow Flowers: Y11, Y15
Blue Flowers: BG10, BG01
Background: B0000


My color choices were pulled from the pretty papers that came in my Kit of the Month. I just love the free goodies in my membership each month! I thought these papers were just perfect with this sweet stamp. I'm not sure which paper pack they are from but I'm sure they're from Unity's huge selection of papers!


I die cut my stamped and colored panel using a die from the Peekaboo Rectangle dies from Gina Marie Designs. I also die cut the pattern papers using the same die. I trimmed the pattern papers to fit an A2 card base. I distressed the edges of my stamped panel with my brown blending brush. I just used the residual ink on the brush and blended very lightly. And then I adhered them both to the card base.


Here's a quick look at this month's Kit of the Month membership!

Well, that's it for me today! I hope you've been inspired to play with your membership stamps! Have an inkredible day!


Thanks so much for stopping by!
See ya next time.

Inky Hugs,
Crystal


{Please note that comment moderation is on. Your lovely comment will appear once approved.}

Friday, May 9, 2025

Spring into Christmas 2025 {BYSHC} Linky Party ~ Winter Cardinals Set 2 ~ Pink & Main

 Hello there crafty friend!
I can't believe how fast the time is going by! It's the last day of the Spring into Christmas 2025 {BYSHC} Linky Party! It's always so sad to reach the end, but I'm super happy to be adding so many cards to my stash! Yay!


This time I used the adorable Winter Cardinals Set 2 from our wonderful Sponsor Pink & Main. I just adore this stamp!! The birds are so cute and they're kissing under the mistletoe... AWWWW... Super cute! I stamped the image using Memento Tuxedo Black ink on white card stock and colored them up with Copic markers.

Here's a quick list of the markers I used:
Left Bird: R20, R14, R27, C00, C2, YR21, YR04
Right Bird: R20, R14, R37, C00, C2, YR21, YR04
Scarves: YG11, G24, G46
Branches: E21, E23, E25
Mistletoe: G24, G46
Bow: R20, R14, R27


As always, I used the fabulous Pressure Pal from our awesome Sponsor Twiddler's Nook when I stamped the sweet birds. I also used it when I stamped the sentiment. I die cut the panel using the X Stitched Mini Slimline Die from Sponsor Gina Marie Designs. I wrapped the corners with some Natural May Arts Burlap String and tied a pretty bow. I popped up the panel using iCraft 3D Foam Tape Jumbo Roll (white) from Therm O Web. 


My card design was inspired by past {BYSHC} Sketch 44. This simple sketch has become a favorite and it was perfect with this cute stamp.


I wanted to use another fun stencil for a lovely background for these two lovebirds. I grabbed the Simple Christmas Trees Stencil from Sponsor A Colorful Life Designs. I blended lightly with Vintage Photo Distress Ink over the stencil on Kraft card stock. I trimmed the panel to 5-1/4 x 4" and adhered it to an A2 kraft card base.


I hope you'll stop by the Spring into Christmas 2025 {BYSHC} Linky Party to check out all the wonderful Holiday inspiration being shared! I've been inspired by so many of the cards! I sure hope you'll stop by and check it out! Have an ink-tastic day!


Thanks so much for stopping by!
See ya next time.

Inky Hugs,
Crystal


{Please note that comment moderation is ON. Your comment will appear shortly.}

Wednesday, May 7, 2025

How's it Growing? ~ Petal Princesses ~ The Greeting Farm

 Hello there crafty friend!
Today I'm wondering How's It Growing?! Haha... I'm sharing a sweet card featuring one of the beauties from the Petal Princesses Big Kit from The Greeting Farm!


I was so excited when my kit arrived that I just had to ink up a few of the cute Petal Princesses!! I was going to share the beautiful Daisy Anya from the kit but I saw her on the blog already a couple of times so I went with my next fave... Peony Anya! Isn't she gorgeous! Unfortunately, I can't seem to find the Petal Princesses Big kit on the website. But if you'd like to add her and the rest of the Petal Princesses to your collection, you can check out thFarmers Market and submit a request via email... maybe it'll be available for the next Farmers Market.  


I inked her up with Memento Tuxedo Black ink and colored her up with Copic markers. I fussy cut Peony Anya on the line and then I used a Memento Tuxedo Black marker to color the edges of my fussy cutting. This makes the cutting look nice and neat.

Here's a quick list of the Copic markers I used:
Skin: E000, E00, E11, E04, RV10, R20
Hair: Y11, E33, E15, E09
Flower: BV00000, BV31, BV23
Leaves: YG91, YG95, YG97
Dress: C00, C2, C3, BV0000, BV31, BV23
Shoes: BV0000, BV31, BV23


I paired up Peony Anya with the C'est La Vie paper pad from Pink Paislee. These pretty papers had peonies and I thought they would be fun to use with this beautiful Anya. I cut them down to 4-1/8 x 5-3/8" and adhered a 1" strip of the peony paper along the right edge. 


I wanted to add a bit of a frame around Anya so I die cut a rectangle from vellum card stock using the Loopy Rectangle from Gina Marie Designs. I die cut a couple of hearts using the Dashes and Frills Hearts Die Set from Unity. And then I finished off the card with a few enamel hearts from the Doodlebug Design I Love Snow Shape Sprinkles. I hope I've inspired you to get inky!

Thanks so much for stopping by!
See ya next time.

Inky Hugs,
Crystal

{Please note that comment moderation is on. Your lovely comment will appear once approved.}

Friday, April 25, 2025

{BYSHC} Sketch Challenge 56 ~ Hipster Christmas ~ Jaded Blossom

Hello there crafty friend!
I'm back with one last card for the {BYSHC} Sketch Challenge 56 hosted in the Build Your Stash Holiday Cardmakers Facebook group! Today I'm sharing another cute holiday card featuring a fun stamp from our wonderful Sponsor, Jaded Blossom.


I inked up the cute Santa from the Hipster Christmas Stamp Set using Memento Tuxedo Black ink and I colored him up with Copic markers. Isn't he just too fun and cute?! I love this stamp!

Here's a quick list of the Copics I used:
Skin: E000, E00, E51, E04
Hair: C00, C2, C3
Hat: R20, R14, R27, C00, C2, C3, N0, N2, N4, N6
Glasses: R20, R14, R27


I paired him up with the Winter Cabin 6x6 Paper Collection from Brutus Monroe. These papers have a lumberjack vibe and I thought they were fun to use with this hipster Santa.


I wanted to add a little layer between Santa and the paper but I didn't want to cover up the paper too much so I went with vellum card stock. I die cut a scrap piece using a circle die from the X Stitched Circle dies from Gina Marie Designs.


Here's a look at {BYSHC} Sketch Challenge 56 for the month of April. There's just a few days left to enter the challenge that ends on April 30th! If you're interested in seeing a bit more inspiration for this sketch, check out the amazing inspiration from the design team over on the {BYSH} Cardmakers blog! I'm always blown away by the creations from the amazingly talented gals on the DT!


Thanks so much for stopping by!
See ya next time.

Inky hugs,
Crystal


{Please note that comment moderation is ON. Your lovely comment will appear shortly.}

Sunday, April 13, 2025

Bee Happy ~ Preview Day 3 ~ The Greeting Farm

 Hello there crafty friend!
It's the final day of previews at The Greeting Farm for the April release! Introducing Bee Happy... oh. my. cuteness! These bees and all the pretty flowers are just too darn cute.


I stamped the bees and flowers with Memento Tuxedo Black ink and colored them up with Copic markers. I fussy cut each of the images leaving a white border - almost like they were die cut.

Here's a quick list of the Copic markers I used:
Bees: Y11, Y15, YR23, N0, N2, N4, BG10, BG01, BG15
Pink Flowers: RV10, RV02, RV04
Blue Flowers: BG10, BG01, BG15, Y11, Y15
Stems / Leaves: YG11, G94, G99


I paired up these sweet bees and flowers with the Simple Vintage Lemon Twist 6x8 paper pad from Simple Stories. This is a 6-1/2 x 7" mini slimline card base, scored at 3-1/2". My paper layers are: black with polka dots - 6-1/2 x 3-1/2"; Yellow distressed - 6-5/16 x 3-5/16" ; and the die cut is 6-3/16 x 3-3/16" approximately.


The white panel is die cut with the largest die from the X Stitched Mini Slimline Die from Gina Marie Designs. I popped up the white panel with foam tape avoiding the negative hexagon space. The hexagons are all cut using the Hexagon Frames Die Set from Newton's Nook Designs. The two on the right side are die cut from the white panel giving me the negative space to build around. The larger hexagon on the left is die cut from the pretty papers and it's popped up with foam tape.


I stamped the sentiment directly on the white panel. All of the adorable bees are popped up on the card with foam tape. Too fun! The release goes live in the store on the 15th at 12am EST! Woohoo! Bee sure to come back tomorrow for the release Blog Hop!! One lucky winner will receive a $50 gift card to The Greeting Farm. All you have to do is comment on the hop! Yay!

Thanks so much for stopping by!
See ya next time.

Inky Hugs,
Crystal


{Please note that comment moderation is on. Your lovely comment will appear once approved.}

Saturday, March 8, 2025

Trust the Journey ~ Savannah Girl ~ Unity Stamp Co.

Hello there crafty friend! 
I'm so excited to share a fun card for Unity's March release. I just had to play with the gorgeous new Angie Girl called Savannah Girl. She makes me want to buy a bike and go for a ride!


I was in a vintage chic kinda mood. And just had to play with the Grit & Grace {paper pack} again! I love these papers!! I stamped gorgeous Savannah Girl and colored her up with Copic markers.

Here's a quick list of the Copic markers I used:
Skin: E000, E00, E21
Hair: E43, E44 
Hat: E30, E31, RV10, RV02
Dress: Y11, Y15, RV10, RV02
Bike: RV10, RV02, C00
Basket: E30, E31
Flowers: RV10, RV02, R14, B000, B00, YR15, Y11, Y15


I die cut Savannah Girl using a die from the Big and Little Chain Mini Slimline dies from Gina Marie Designs. I really wanted to add a little something between the layers so I grabbed a white doily from Doodlebug Designs. I grunged it up a bit with my brown and red blending brushes. I didn't add any ink to the brushes... just used the residue ink already on them.


I wrapped the die cut panel with Ivory May Arts Burlap String and made a pretty bow. I adhered all of my layers to a Kraft A2 top fold card base. I adhered the trimmed sentiment to my focal panel and then popped them both us with foam tape. I finished off the card with a few raindrop embellishments. I think this turned out pretty cute.


Thanks so much for stopping by!
See ya next time.

Inky hugs,
Crystal

{Please note that comment moderation is on. Your lovely comment will appear shortly.}