Showing posts with label Hearts. Show all posts

Saturday, June 28, 2025

Need a Hug ~ Heart Mode: Activated ~ Unity Stamp Co.

Hello there crafty friend! 
How stinkin' cute is this sweet new robot from Unity!? 


I inked up the cute robot from the Heart Mode: Activated stamps and colored him up with Copic markers. I fussy cut him leaving a border around and set him aside.

Here's a quick list of the Copic markers I used:
Robot: C0, C1, C3, C5
Heart: R20, R14, R27
Ground: YG11, G94


I chose the Nostalgic Armour Romantic Vintage {paper pack} to pair up with this cutie. I have a piece adhered to my card front giving me those pretty hearts in the background. I die cut a piece of Vintage Cream card stock from Papertrey Ink using the retired Fall Out Hearts Background die from Unity. The cream card stock didn't quite look right so I blended Aged Mahogany Distress Ink all over it. It coordinates nicely with the papers. 


I wanted to break up the hearts in the background so I chose the striped paper and tore the top to expose some of the hearts in the background. I like how the stripes ground the robot too. I die cut hearts from the pattern papers using dies from the Dashes and Frills Hearts Die Set. I stamped, trimmed and adhered the sentiment to the heart. I also adhered the robot and then added foam tape to the back of the robot and the heart and popped them up on the card. I adhered the second sentiment to the bottom of the card. I had to break up all that white on the side of the sentiment so I blended Aged Mahogany Distress Ink over one of the hearts from the background. Love it!

Thanks so much for stopping by!
See ya next time.

Inky hugs,
Crystal

{Please note that comment moderation is on. Your lovely comment will appear shortly.}

Wednesday, May 7, 2025

How's it Growing? ~ Petal Princesses ~ The Greeting Farm

 Hello there crafty friend!
Today I'm wondering How's It Growing?! Haha... I'm sharing a sweet card featuring one of the beauties from the Petal Princesses Big Kit from The Greeting Farm!


I was so excited when my kit arrived that I just had to ink up a few of the cute Petal Princesses!! I was going to share the beautiful Daisy Anya from the kit but I saw her on the blog already a couple of times so I went with my next fave... Peony Anya! Isn't she gorgeous! Unfortunately, I can't seem to find the Petal Princesses Big kit on the website. But if you'd like to add her and the rest of the Petal Princesses to your collection, you can check out thFarmers Market and submit a request via email... maybe it'll be available for the next Farmers Market.  


I inked her up with Memento Tuxedo Black ink and colored her up with Copic markers. I fussy cut Peony Anya on the line and then I used a Memento Tuxedo Black marker to color the edges of my fussy cutting. This makes the cutting look nice and neat.

Here's a quick list of the Copic markers I used:
Skin: E000, E00, E11, E04, RV10, R20
Hair: Y11, E33, E15, E09
Flower: BV00000, BV31, BV23
Leaves: YG91, YG95, YG97
Dress: C00, C2, C3, BV0000, BV31, BV23
Shoes: BV0000, BV31, BV23


I paired up Peony Anya with the C'est La Vie paper pad from Pink Paislee. These pretty papers had peonies and I thought they would be fun to use with this beautiful Anya. I cut them down to 4-1/8 x 5-3/8" and adhered a 1" strip of the peony paper along the right edge. 


I wanted to add a bit of a frame around Anya so I die cut a rectangle from vellum card stock using the Loopy Rectangle from Gina Marie Designs. I die cut a couple of hearts using the Dashes and Frills Hearts Die Set from Unity. And then I finished off the card with a few enamel hearts from the Doodlebug Design I Love Snow Shape Sprinkles. I hope I've inspired you to get inky!

Thanks so much for stopping by!
See ya next time.

Inky Hugs,
Crystal

{Please note that comment moderation is on. Your lovely comment will appear once approved.}

Monday, January 13, 2025

Inky Paws Challenge #236 ~ Color Challenge {Week 2}

Hello there crafty friend!
It's week two of the Inky Paws Challenge! We're playing with a fun mix of colors this month for a Color Challenge! I sure hope that you'll join us and play along with your Newton's Nook Designs products! Our challenges are now a whole month long so there's lots of time to play along with us! Yay! You have until Friday, January 31st to get your entries in for the #236 Color Challenge and a chance to win a $20 store credit to Newton's Nook Designs!


We have a gorgeous mix of colors that are perfect for so many different occasions. Our lovely colors are... Cherry Red, Dreamy Turquoise, Buttery Brown, and White!! 


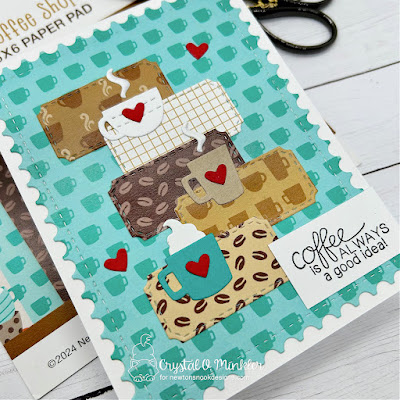
I had so much fun making this card! I started by die cutting the background and the brown papers from the Coffee Shop 6x6 Paper Pad. I die cut the background and the ticket shape using dies from the Framework Die Set.


Inspiration for my card comes from the Tawny Owl Paperie Inky Inspiration Sketch Challenge 28. The sketch, as always, is meant to inspire not require. So let the sketch lead in your design, but don't feel limited by it. I'd love for you to join in the fun over at the Tawny Owl Paperie Inky Inspiration Facebook group.


I die cut the coffee cups and hearts using dies from the Coffee Silhouettes Die Set. I love these dies and I'm super happy I finally played with them. I die cut the cups from Kraft, Stampers Select White, and Pure Poppy card stock from Papertrey Ink. And the bottom cup is die cut from Bermuda Bay card stock from Stampin' Up.


I finished off the card with a fun {and true!} sentiment from the Newton Loves Coffee Stamp Set. It's stamped with Memento Tuxedo Black ink. I trimmed it up and adhered it directly on the card. No foam tape for this one.


Now it's your turn to get your paws inky with your Newton's Nook Designs products and create a project using the color combo of Cherry Red, Dreamy Turquoise, Buttery Brown, and White. Be sure to link up to the Inky Paws Challenge! Can't wait to see your projects!


Thanks so much for stopping by!
See ya next time.

Inky Hugs,
Crystal


{Please note that comment moderation is on. Your lovely comment will appear once approved.}

Friday, January 10, 2025

Love is in the Air ~ Struck by Cupid Digi ~ The Greeting Farm

 Hello there crafty friend!
 I'm also sharing a sweet Valentine featuring a fab new digi set called Struck by Cupid from The Greeting Farm! This adorable digi set includes a super cute little Cupid Bean along with some bunny friends, lots of hearts, and sentiments. Just too cute!


I created a sweet background of pink clouds using the Clouds Stencil from Newton's Nook Designs. I die cut the background using a die from the Labels 6 Cloud Like dies from Gina Marie Designs. And it's adhered to a white A2 top fold card that I turned on the side for a landscape card.


I combined and resized all of the fun images and sentiment in a Microsoft Word Document and then I printed them off on white card stock. I colored them up with Copic Markers. Fussy cut the hearts, bunny, and Cupid Bean. Colored the edges of the fussy cutting with a Memento Tuxedo Black marker. Here's a quick list of the Copic markers I used:

Skin: E000, E00, E11, E04, R00, R20
Hair: E40, E43, E44
Eyes: YG11, YG23, G05, C00, C1 
Wings: YG21, YG23
Cloud: RV0000, RV52
Bow: E51, E55, E57
Arrows: N0, N2, N5, RV10, RV11, RV02, RV14
Hearts: RV10, RV11, RV02, RV14
Gray Bunny: W00, W1, W3, R00, R20
Bunny Wings: B0000, B000


I finished off the card with a few glittery green enamel dots. Such a fun card to make!


This cutie is available now in the shop so you can get started on your Valentine's Day cards! Woohoo! 

Thanks so much for stopping by!
See ya next time.

Inky Hugs,
Crystal


{Please note that comment moderation is on. Your lovely comment will appear once approved.}

Sunday, December 15, 2024

Unity Advent Calendar 2024 Day 15 ~ Unity Stamp Co.

Hello there crafty friend!
It's Day 15 of the 2024 Advent Calendar from Unity!! I have a sweet bunny card to share today.


Today's goodies are snowflake embellishments and beautiful heart brads. I used a few of the heart brads on my love card. Here's a quick list of the Copic markers I usedR00, R20, W0, W2, W4, W5.

You can check out my video revealing the Advent Calendar Day 15 stamp and my process in making this card here... Unity Advent Calendar 2024 Day 15 | Unity Stamp Co.


Inspiration for my card came from the {BYSHC} Sketch 35! I altered the sketch and made a mini slimline card.


I found the perfect sentiment for this cute card from the Born to Be Loved stamps.


Did you check out my video? If you did, you saw me add the beautiful snowflake embellishments to this card and the next one below. I love the added texture! If you missed this card, you can check it out here... Advent Calendar Day 14.


I also added a few snowflake embellishments to this card. Love the added shimmer it adds to the card! If you'd like to check out more info on this card you can see it here... December 2024 Whit Kit Card.


I paired up the beautiful heart brads with the Gosh I Love You {paper pack}. I think it's a fun pairing with a heart theme.

I'll be back tomorrow for Day 16 of the 2024 Advent Calendar from Unity!
Have an inktastic day!


Thanks so much for stopping by!
See ya next time.
 
Inky Hugs,
Crystal


{Please note that comment moderation is on. Your lovely comment will appear once approved.}

Wednesday, April 19, 2023

Membership Wednesday ~ April 2023 BOM Linen & KOM All the Wishes ~ Unity Stamp Co.

Hello there crafty friend!
It's Membership Wednesday again!! I'm back with one more card featuring the awesome new April 2023 Background of the Month stamp called Linen along with the awesome hot air balloon from the new April 2023 Kit of the Month called All the Wishes. I did say last week that I'd be featuring the April 2023 Whit Kit but time got away from me this week and I still had this fabulous background piece leftover from the card I shared last week. So here we are...
 

As I mentioned last week for my sweet mouse card, I ink smooshed the background using Abandoned Coral, Crushed Olive, Antique Linen, and Evergreen Bough Distress Oxide inks onto white card stock. I stamped the ink smooshed background with the awesome Linen Background stamp. And then I die cut the background with the Fall Out Hearts {background die}.


I die cut a piece of white card stock with the largest die from the Scallops & Rectangles {nesting dies}. I adhered the die cut heart background onto a 3-9/16 x 4-13/16" piece of True Black card stock from Papertrey Ink. I then adhered the panel to the white scalloped rectangle layer. And then I adhered the combined background layers to a 4-1/4 x 5-1/2" piece of True Black card stock that was adhered to a white top fold card base measuring 4-1/4 x 11"; scored at 5-1/2".


The beautiful hot air balloon was stamped with Black Amalgam ink and I colored it up with the following Copic Markers:

Balloon ~ BG000, BG11, BG23
Basket ~ R00, R12, R05
Leaves ~ YG11, YG03, YG91, YG95, YG97
Ballasts ~ YG11, Y06

I fussy cut it leaving a bit of a white border around the edges. I popped up the hot air balloon with lots of thin foam tape.


I stamped the sentiment with Sugar Cube Pigment ink from Taylored Expressions and heat embossed Alabaster White Embossing powder from Brutus Monroe that I melted with a Wagner Precision Heat Tool. I trimmed the sentiment and taped it directly to the background.


Here's a look at the beautiful Background of the Month for April from Unity. Love it! 


And a look at the fabulous Kit of the Month for the month of April... isn't it wonderful! I have ideas for cards for just about every image. Just wish I had more time to play.

I hope to see you next week for another Membership Wednesday blog post. I will definitely be sharing inspiration for the awesome Whit Kit membership


Thanks so much for stopping by!
See ya next time.

Inky Hugs,
Crystal


{Please note that comment moderation is on. Your lovely comment will appear once approved.}

Wednesday, April 12, 2023

Membership Wednesday ~ April 2023 BOM Linen ~ Unity Stamp Co.

Hello there crafty friend!
It's Membership Wednesday and I'm sharing a card featuring the awesome new Background of the Month stamp called Linen along with the adorable mouse from the new April 2023 Kit of the Month called All the Wishes. I am in love with the memberships this month!
 

I ink smooshed a background using Abandoned Coral, Crushed Olive, Antique Linen, and Evergreen Bough Distress Oxide inks onto white card stock. I stamped the ink smooshed background with the awesome Linen Background stamp. And then I die cut the background with the Fall Out Hearts {background die}.


I die cut a piece of Kraft card stock with the largest die from the Scallops & Rectangles {nesting dies}. I placed the die cut background onto the Kraft scalloped layer and then I adhered some of the hearts. I set the background aside and stamped the mouse with Black Amalgam ink. Here's a quick list of the Copic Markers I used to color up the mouse:

Mouse ~ W00, W1, W3, R20, E00, C00, C1
Dandelion ~ C00, C1, C3


The Kraft layer was adhered to a black mat measuring 4-1/4 x 5-1/2". I grounded the mouse with a strip of black card stock across the card. I added a circle of vellum die cut using a die from the Scallops & Circles {nesting dies}. It almost looks like the little mouse is on a dandelion puff ball.


I stamped the sentiment with Sugar Cube Pigment ink from Taylored Expressions and heat embossed Alabaster White Embossing powder from Brutus Monroe that I melted with a Wagner Precision Heat Tool. I trimmed the sentiment and popped it up on the card with thin foam tape. To finish off the card, I added a few black enamel dots from the Farmhouse Summer Enamel Dots from Carta Bella.


Here's a look at the beautiful Background of the Month for April from Unity!! Love it! 

I hope to see you next week for another Membership Wednesday blog post. I'll be sharing inspiration for the awesome Whit Kit membership.


Thanks so much for stopping by!
See ya next time.

Inky Hugs,
Crystal


{Please note that comment moderation is on. Your lovely comment will appear once approved.}

Wednesday, March 22, 2023

Trio of Quick Cards ~ Membership Wednesday ~ March 2023 Whit Kit ~ Unity Stamp Co.

 Hello there crafty friend!
It's time for another Membership Wednesday and today I'm sharing three quick cards that I created using the beautiful March 2023 Whit Kit from Unity Stamp Co. I decided to focus on the gorgeous papers in the card kit for my first two cards. My last card features the gorgeous Write a New Story stamps from the kit.


My first card features one of the pretty papers from the Write Your Story {paper pack} that's included in the card kit. I had planned on it being centered on the card front but it didn't work out quite right so it's offset in the bottom right corner and I actually like it more!


The front of the card is die cut with one of the circle dies from the Scallops & Circles {nesting dies}. That partial circle die cut of pattern paper is actually adhered inside the card so it's a fun twist on a peek-a-boo card. I finished off the card with a quick sentiment from the So Kind So Caring So You {Front & Center Stamps} stamped with Black Amalgam ink.


My second card features another beautiful pattern paper from the Write Your Story {paper pack}. I die cut it with the largest die from the Scallops & Rectangles {nesting dies}. And then I adhered it to an A2 card base of Vintage Cream card stock from Papertrey Ink.


I stamped the sentiment with Vintage Photo Distress Ink on the scrap of pattern paper from the first card. I then die cut it using one of the dies from the Banner Nesting dies included in the Whit Kit. It's adhered directly on the card with liquid glue.


My last card features another piece of beautiful pattern paper from the card kit AND the wonderful Write a New Story stamp set from the kit. The background paper was trimmed and torn along the edges. I distressed the edges with Ground Espresso Distress Ink. I used the Vintage Photo Distress ink to stamp the heart of books onto kraft card stock.


I die cut the heart of books with a scalloped heart die from the Dashes and Frills Hearts {die set}. I distressed the edges of the heart with Ground Espresso Distress Ink and then mat it with a die cut heart from Early Espresso card stock using the next largest die from the same set. I popped up the heart on the card with lots of foam tape. If you look closely along the left edge you can see I used one of the Lace Border stickers under the pattern paper. And I finished this one off with another sentiment from the So Kind So Caring So You {Front & Center Stamps} this time stamped with Ground Espresso Distress ink.

You can check out my process video here... Trio of Quick Cards | March 2023 Whit Kit | Unity Stamp Co.


I can't get enough of this beautiful card kit! Love love love it!


Here's a look at the wonderful Whit Kit for March!! Love it! This wonderful card kit is available for only $42.99. That includes shipping! You also get a $6.95 discount on every order from Unity over $45. Members are also able to purchase past Whit Kit stamp sets for just $14 and past Whit Kit paper packs for $2 off!! So awesome!!! 

I'll be back tomorrow with inspiration for the March Sketch Challenge that I'm hosting over in the Unity Show & Tell Facebook group.


Thanks so much for stopping by!
See ya next time.

Inky Hugs,
Crystal


{Please note that comment moderation is on. Your lovely comment will appear once approved.}

Tuesday, February 14, 2023

Partial Stenciling with Chatty Hearts ~ Technique Tuesday ~ Unity Stamp Co.

  Hello there crafty friend!
I'm back with another Technique Tuesday! On the 2nd Tuesday of each month I'll be sharing a bit of inspiration and a video featuring a fun technique. I hope that you'll be inspired to get inky and play along with some of the techniques that I share.


Today's technique is a simple one that's great for any occasion... Partial Stenciling! Partial Stenciling is simply blending inks over a stencil but only inking up part of the stencil rather than the whole background. Super easy! I'm using the recently released Chatty Hearts {Stamp & Stencil Duo} paired up with the adorable Old Chicks Itty Bitty stamp!


For my first card I've ink blended over a white card front using the Candy Hearts Stencil #1 with Evergreen Bough Distress Oxide inks. I then ink blended Peacock Feathers Distress Oxide over the Candy Hearts Stencil #2.


I ink blended on a diagonal concentrating my ink in the middle of my diagonal line and fading out towards the other two corners. I love the softness this gives to the background.


I stamped the sweet Old Chicks birdie with Black Amalgam ink on white card stock and colored it with the following Copic Markers:

Birdie ~ Y11, Y15, Colorless Blender
Beak ~ YR21, YR15, YR68
Hearts / Flowers ~ R20, R14
Leaves / Grass ~ G00, G02


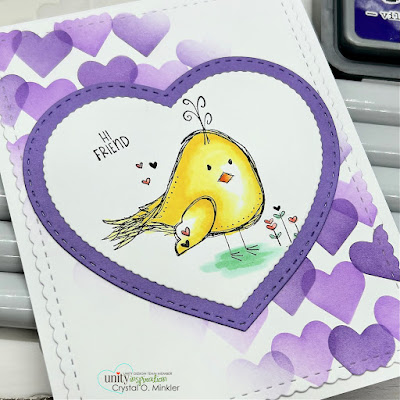
For my second card I've ink blended Wilted Violet Distress Oxide inks over the Candy Hearts Stencil #1 and Villainous Potion Distress Oxide inks over the Candy Hearts Stencil #2.


I die cut my Old Chicks birdies with a scalloped heart die from the Dashes and Frills Hearts {die set}. Mat them with coordinating card stocks die cuts with the next largest die from the same die set.


The sentiment from the Chatty Hearts background stamp was stamped with Black Amalgam ink. I'm obsessed with this background stamp friends! 49 individually cut sentiments so you can use them separately or pop them back in the background to stamp them all together. Love it!

You can check out my process video here... Partial Stenciling | Technique Tuesday | Unity Stamp Co.


The Partial Stenciling Technique is super easy, right?! It makes for such a quick and easy card, too! Do you have a stencil in your stash that you've been wanting to play with? Maybe you even got the new Candy Hearts stencils... let's get inky with our stencils friends. If you give this fun technique a try, I'd love to see what you create so please share your cards in the Unity Show & Tell group and tag me.

Thanks so much for stopping by!
See ya next time.

Inky Hugs,
Crystal


{Please note that comment moderation is on. Your lovely comment will appear once approved.}