Showing posts with label mouse. Show all posts

Wednesday, March 12, 2025

Membership Wednesday ~ March 2025 KOM Chapters & Crossings ~ Unity Stamp Co.

Hello there crafty friend!
Happy Membership Wednesday! Today I'm sharing a sweet card featuring the adorable mouse from the March 2025 Kit of the Month membership from Unity called Chapters & Crossings. 


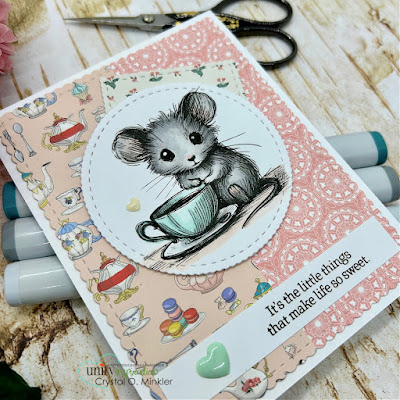
I just had to ink up this cutie from the KOM! Isn't it just too sweet!? I stamped the mouse with Black Amalgam ink and colored it up with some Copic markers that coordinated with the papers I chose ahead of time.

Here's a quick list of the Copic markers I used:
Mouse: N0, N2, N4, R00, R20
Cup: BG0000, BG10, BG72
Saucer: C00, C2
Table: R00
Outline: N0


Here's a look at the fun sketch for Tawny Owl Paperie Inky Inspiration Sketch Challenge 30. The sketch, as always, is meant to inspire not require. So let the sketch lead in your design, but don't feel limited by it.


I paired up the sweet mouse with some old papers in my stash that just seemed perfect! Coincidentally enough, they are called Practically Perfect by Carta Bella. I die cut the papers using the largest die from the Scallops & Rectangles {nesting dies}. The cute mouse was die cut using a die from the Scallops & Circles {nesting dies}.


I stamped and trimmed up the sentiment and then I adhered it directly to the card. I added foam tape to the back of the mouse and popped it up on the card. And then I finished it off with a couple of heart enamel dots from my stash. So fun! I love how it turned out!


Here's a quick look at this month's Kit of the Month membership! Love it!

Well, that's it for me today! I hope you've been inspired to play with your membership stamps! And if you're inspired by the sketch, I'd love to have you join in the fun and play along with us. The sketch challenge ends on Monday, March 24th at 11:59pm PST. Have an inkredible day!


Thanks so much for stopping by!
See ya next time.

Inky Hugs,
Crystal


{Please note that comment moderation is on. Your lovely comment will appear once approved.}

Wednesday, February 26, 2025

Best Day Ever Memory Dex Card ~ Best Day Anya ~ The Greeting Farm

 Hello there crafty friend!
Today I'm sharing another fun memory dex card featuring a sweet stamp set from The Greeting Farm!! 


I still had my memory dex dies on my desk so I thought, why not make another one? I've been wanting to ink up Best Day Anya for awhile and she's just too cute on this card.


I stamped the adorable Anya with Memento Tuxedo black ink and colored her up with Copic Markers. Unfortunately, I can't seem to find Best Day Anya on the website. But if you'd like to have her you can check out the Farmers Market and submit a request via email... maybe she'll be available for the next Farmers Market. Fingers crossed!

Here's a quick list of the Copic markers I used:
Skin: E000, E00, E21, E04, R00, R20
Hair: Y21, E43, E44
Ears: N0, N2, N4, N6, N8
Heart / Dress: R20, R14, R27
Bow: Y11, Y15
Boots: N0, N2, N4, N6


I die cut my layers for the memory dex card using an old retired die from my stash along with some fun papers called Mousin' Mix-Up {paper pad} from Unity. I also paper pieced the cute bow using the papers. I stamped the area around the bow onto the pattern paper and then I fussy cut it with scissors. I colored the edges of my fussy cutting with a Memento Tuxedo Black marker to make the cutting nice and neat and then I adhered it to the colored image.


I die cut a few circles to create a balloon using the Nesting Circles Die from Waffle Flower. I adhered a piece of black twine from Anya's hand behind her to the balloon. And then finished it off with a yellow bow. So fun to make. I hope I've inspired you to get inky!

Thanks so much for stopping by!
See ya next time.

Inky Hugs,
Crystal


{Please note that comment moderation is on. Your lovely comment will appear once approved.}

Tuesday, August 6, 2024

Tawny Owl Paperie Inky Inspiration Sketch 24 ~ Mousing Around: Hiya, Pal ~ Unity Stamp Co.

 Hello there crafty friend!
Today I'm sharing inspiration for the Tawny Owl Paperie Inky Inspiration Sketch Challenge 24 in the Tawny Owl Paperie Inky Inspiration Facebook group. Just like last week's card, I had this adorable stamped heart on my desk just asking to be made into a card. These adorable mice are from the Mousing Around: Hiya, Pal stamps from Unity. Love them!


I'm continuing to use up some of my leftover papers. This 4 x 3-1/2" piece of pattern paper is the only left in the scraps that would work with this month's sketch. All the other were cut down for last week's card so I'm thinking next week I'll do my August scraps cards. 
 

Here's a look again at the original scraps I started with this month. I should have taken a current picture so you could see what's left. It's not nearly this much.


Here's a look at the fun sketch for Tawny Owl Paperie Inky Inspiration Sketch Challenge 24. The sketch, as always, is meant to inspire not require. So let the sketch lead in your design, but don't feel limited by it. I like to think my inspiration is usually a good example of this since I'm always adjusting the sketch. Today is no different since I added the heart over the pattern paper.


 I stamped the mice from the Mousing Around: Hiya, Pal with Black Amalgam ink from Gina K. Designs. I stamped the hearts with a reddish purple ink but since this has been sitting on my desk for months, I'm not sure what actual ink I used. I die cut the mice using a die from the Dashes and Frills Hearts {die set}. I colored up the mice with my Copic markers. I coordinated my colors with the papers. 

Here's a quick list of the Copic markers I used: 
Black: N0, N2, N4, N6
White: C00, C1, C3
Yellow: Y15, Y06, Y38
Pinky Purple: RV10, V91, V93, V95
Red: R20, R14, R46
Ground: C00, C1


I adhered the pattern paper to a 4 x 5-1/4" piece of Stampers Select White card stock from Papertrey Ink. I trimmed up the star paper and adhered it to the heart and then I added a bunch of foam tape to the back of both the heart and the star paper. I popped those up on the panel and then I adhered the panel to a white A2 top fold card base. The sentiment was also a scrap on my desk. I know it's Unity but I'm really not sure which stamp. If you happen to know, please let me know in the comments. I hope you all have fun with this sketch! I can't wait to see what you create with it. 
Have an ink-tastic week!

Thanks so much for stopping by!
See ya next time.

Inky Hugs,
Crystal


{Please note that comment moderation is on. Your lovely comment will appear once approved.}

Monday, June 24, 2024

Inky Paws Challenge #226 ~ Summer Theme Challenge

Hello there crafty friend!
It's time for a new Inky Paws Challenge... a super fun Summer Theme Challenge! I sure hope that you'll play along with us using your Newton's Nook Designs products! You have until Friday, July 5th to get your entries in for the #226 Summer Theme Challenge and a chance to win a $20 store credit to Newton's Nook Designs!


Such a broad and fun theme! I'm excited to see the entries for this one!


I thought the Garden Mice Stamp Set was perfect for the Summer theme! Especially the mouse with the butterfly. Butterflies come to mind when I think of Summer. I stamped the adorable mouse and butterfly with Memento Tuxedo Black Ink and colored them up with my Copic markers. I then die cut the mouse and butterfly using the coordinating Garden Mice Die Set

Here's a quick list of the Copic markers I used:
Mouse: N0, N1, N2, N4, N6, R00, R20
Butterfly: Y11, Y15, YR15, YR16, N0, N1


I cut two pieces of pattern paper from the beautiful Summertime 6x6 Paper Pad. And then I die cut them together using the postage stamp die from the Framework Die Set. I ended up also die cutting a piece of thin card stock using the same postage stamp die and I adhered the pattern papers to the card stock. It was just easier to have them together on one piece of card stock when I adhered them to the white A2 card base. 


I die cut a circle of white card stock using a die from the Circle Frames Die Set. I laid the mouse and butterfly on the circle die cut so I could figure out where I wanted to stamp the sentiment. Once I had stamped the sentiment, I adhered the mouse and butterfly on the circle. Added foam tape to the back of the circle and popped it up on the card. To finish up the card, I added three enamel dots from my stash.


Now it's your turn to get your paws inky with your Newton's Nook Designs products and create a project with a Summer theme. Be sure to link up to the Inky Paws Challenge! Can't wait to see your projects!


Thanks so much for stopping by!
See ya next time.

Inky Hugs,
Crystal


{Please note that comment moderation is on. Your lovely comment will appear once approved.}

Friday, April 5, 2024

Tent Topper Card ~ Tiny Buckaroo ~ Unity Stamp Co.

Hello there crafty friend! 
Today I'm sharing a cute Tent Topper Card featuring the adorable new Tiny Buckaroo stamp from Unity Stamp Co. This stamp is just too cute!! I just had to ink her up and make a cute little girl Sheriff Mouse. Eeep!


Typically, I'm not one for mice. I scream and jump on furniture to get away, but I just love this cutie! I was totally inspired to play with this fun design after seeing a fab set of cards created by Danni Bindel in my Tawny Owl Paperie | Inky Inspiration Facebook group. Lots of fun inspiration shared just about every day in the group. I'd love to have you join us!


This was such a fun card to make! The design is so easy too! It's a 4-1/4" squared card base measuring 8-1/2 x 4-1/4" and scored at 4-1/4". I paired up the sweet mouse with the Boho Bandana {paper pack}. I used the largest square die from the Scallops & Squares {nesting dies} to die cut my teal layer. I just cut a strip of the brown pattern paper to 6 x 1-1/4" and mat it with a piece of kraft card stock measuring 4-1/2 x 1-1/2". I tried to center the pattern paper on the mat before adhering it to the card and trimming off the excess from both sides. I die cut a kraft circle using the second to largest die from the Scallops & Circles {nesting dies}. I also die cut the pink pattern paper using the same die. I adhered them together and used an A2 card base as a guide to adhere the circle on the card making it to where it fits in an A2 envelope. So even though the base is smaller, it's basically an A2 card.

You can check out my video for this card here... Tent Topper Card | Tiny Buckaroo | Unity Stamp Co.


Here's a quick list of the Copic Markers I used for the cute mouse:

Mouse: W00, W2, W3, W5, R00, R20
Ears: R00, R20, W00, W1
Hat: RV10, RV11, RV32, RV34
Bandana: RV10, RV11, RV32
Star: Y11, Y06, Y15
Shirt: Y11, Y15
Pants: B93, B95, B97
Accessories / Belt: Y06, Y15, N2, N4

You can check out my Copic Coloring of Tiny Buckaroo here... Copic Coloring | Tiny Buckaroo | Unity Stamp Co.


I stamped the Tiny Buckaroo cutie and sentiment with Black Amalgam ink on Stampers Select White card stock from Papertrey Ink. Fussy cut the mouse leaving a white border around the image. I die cut the sentiment using a die from the Scalloped & Stitched Sentiment Nesting Dies. Finished off the card with a few Translucent Enamel Dots from Gina Marie Designs. Loving how this card turned out! Hope you have an ink-tastic day!

Thanks so much for stopping by!
See ya next time.

Inky hugs,
Crystal

{Please note that comment moderation is on. Your lovely comment will appear shortly.}

Friday, January 19, 2024

Wishes Come True ~ Wishing and Wishing ~ Unity Stamp Co.

Hello there crafty friend! 
I got some inky time with an adorable mouse from Wishing and Wishing from Unity. I even had some time to do a video sharing some ink smooshing and copic coloring for this card. I hope you'll check it out! 


I love ink smooshing! I didn't want to go too crazy with the colors just doing a nice yellow and light orange for a pretty Spring card. I ink smooshed Mustard Seed and Spiced Marmalade Distress Oxide inks and stamped the fun Spring in Your Step Background using Crushed Olive Distress Oxide ink.


I stamped the sweet mouse directly on the front of my white A2 top fold card base. I was a bit concerned the copic coloring would bleed through but it wasn't bad at all.

Here's a quick list of the Copic Markers I used:

Mouse: R00, R20, W00, W1, W3, W5
Dandelion: C00, C1, C3
Stem: G12, G14, YG93


I heat embossed the sentiment in white on Prairie Grass Card Stock from Papertrey Ink. I used TE Anti Static Powder to prep the card stock. Stamped with Sugar Cube Pigment ink from Taylored Expressions. I added some Alabaster White Embossing Powder from Brutus Monroe and then melted the powder using a Wagner Precision Heal Tool.

You can check out my process in making this card here... Wishes Come True | Wishing and Wishing | Unity Stamp Co.


That's it for me today! I hope you've found some inspiration for this wonderful combination of stamps. Have an ink-tastic day!

Thanks so much for stopping by!
See ya next time.

Inky hugs,
Crystal

{Please note that comment moderation is on. Your lovely comment will appear shortly.}

Wednesday, April 12, 2023

Membership Wednesday ~ April 2023 BOM Linen ~ Unity Stamp Co.

Hello there crafty friend!
It's Membership Wednesday and I'm sharing a card featuring the awesome new Background of the Month stamp called Linen along with the adorable mouse from the new April 2023 Kit of the Month called All the Wishes. I am in love with the memberships this month!
 

I ink smooshed a background using Abandoned Coral, Crushed Olive, Antique Linen, and Evergreen Bough Distress Oxide inks onto white card stock. I stamped the ink smooshed background with the awesome Linen Background stamp. And then I die cut the background with the Fall Out Hearts {background die}.


I die cut a piece of Kraft card stock with the largest die from the Scallops & Rectangles {nesting dies}. I placed the die cut background onto the Kraft scalloped layer and then I adhered some of the hearts. I set the background aside and stamped the mouse with Black Amalgam ink. Here's a quick list of the Copic Markers I used to color up the mouse:

Mouse ~ W00, W1, W3, R20, E00, C00, C1
Dandelion ~ C00, C1, C3


The Kraft layer was adhered to a black mat measuring 4-1/4 x 5-1/2". I grounded the mouse with a strip of black card stock across the card. I added a circle of vellum die cut using a die from the Scallops & Circles {nesting dies}. It almost looks like the little mouse is on a dandelion puff ball.


I stamped the sentiment with Sugar Cube Pigment ink from Taylored Expressions and heat embossed Alabaster White Embossing powder from Brutus Monroe that I melted with a Wagner Precision Heat Tool. I trimmed the sentiment and popped it up on the card with thin foam tape. To finish off the card, I added a few black enamel dots from the Farmhouse Summer Enamel Dots from Carta Bella.


Here's a look at the beautiful Background of the Month for April from Unity!! Love it! 

I hope to see you next week for another Membership Wednesday blog post. I'll be sharing inspiration for the awesome Whit Kit membership.


Thanks so much for stopping by!
See ya next time.

Inky Hugs,
Crystal


{Please note that comment moderation is on. Your lovely comment will appear once approved.}

Monday, February 13, 2023

Inky Paws Challenge #191 ~ Color Challenge Reminder

Hello there crafty friend!
 There's still time to play along with the Inky Paws Challenge #191 Color Challenge!! You have until Friday, February 17th to get your entries in for the #191 Color Challenge and a chance to win a $20 store credit to Newton's Nook Designs!

Here's another look at the fun colors... Cherry Red, Pewter Gray, Daffodil Yellow, and White.


I used the adorable little mouse from the Garden Mice stamp set along with the coordinating Garden Mice die set for my card today. Mr. Mouse here is enjoying the little moments... he's found a mushroom in the snow on a lovely sunny day. He's going to take it back to his little family and have a feast.


The lovely yellow color for my background is a pretty polka dot paper from the Springtime 6x6 paper pad. It measures 3-5/8 x 5-1/2".  I used a scrap of white card stock from my scrap bin to ground Mr. Mouse. It measures roughly 1-3/8" on the left side and 1" on the right side.


I adhered a die cut circle behind the mouse like the sun was shining behind him. I used the stitched circle die from the Circle Frames die set to die cut a piece of vellum card stock. Here's a quick list of the Copic markers I used to color up Mr. Mouse and his mushroom:

Mr. Mouse ~ R00, R20, N0, N2, N4
Mushroom ~ C00, C1, C3, R20, R14, R27


I adhered my little scene onto a gray card front measuring 5-1/2 x 4-1/4". I placed my card front in my mini misti and stamped the sweet sentiment with Memento Tuxedo Black ink. I use this ink whenever I'm stamping with clear stamps because it cleans off nicely.


To finish off the card, I added a few red enamel dots from my stash. Now it's your turn to get your paws inky with your Newton's Nook Designs products and create a project using the color combo of Cherry Red, Pewter Gray, Daffodil Yellow, and White. Be sure to link up to the Inky Paws Challenge! Can't wait to see your projects!


Thanks so much for stopping by!
See ya next time.

Inky Hugs,
Crystal


{Please note that comment moderation is on. Your lovely comment will appear once approved.}