Showing posts with label Tea. Show all posts

Wednesday, March 12, 2025

Membership Wednesday ~ March 2025 KOM Chapters & Crossings ~ Unity Stamp Co.

Hello there crafty friend!
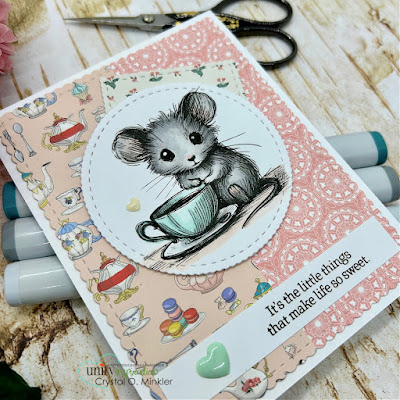
Happy Membership Wednesday! Today I'm sharing a sweet card featuring the adorable mouse from the March 2025 Kit of the Month membership from Unity called Chapters & Crossings. 


I just had to ink up this cutie from the KOM! Isn't it just too sweet!? I stamped the mouse with Black Amalgam ink and colored it up with some Copic markers that coordinated with the papers I chose ahead of time.

Here's a quick list of the Copic markers I used:
Mouse: N0, N2, N4, R00, R20
Cup: BG0000, BG10, BG72
Saucer: C00, C2
Table: R00
Outline: N0


Here's a look at the fun sketch for Tawny Owl Paperie Inky Inspiration Sketch Challenge 30. The sketch, as always, is meant to inspire not require. So let the sketch lead in your design, but don't feel limited by it.


I paired up the sweet mouse with some old papers in my stash that just seemed perfect! Coincidentally enough, they are called Practically Perfect by Carta Bella. I die cut the papers using the largest die from the Scallops & Rectangles {nesting dies}. The cute mouse was die cut using a die from the Scallops & Circles {nesting dies}.


I stamped and trimmed up the sentiment and then I adhered it directly to the card. I added foam tape to the back of the mouse and popped it up on the card. And then I finished it off with a couple of heart enamel dots from my stash. So fun! I love how it turned out!


Here's a quick look at this month's Kit of the Month membership! Love it!

Well, that's it for me today! I hope you've been inspired to play with your membership stamps! And if you're inspired by the sketch, I'd love to have you join in the fun and play along with us. The sketch challenge ends on Monday, March 24th at 11:59pm PST. Have an inkredible day!


Thanks so much for stopping by!
See ya next time.

Inky Hugs,
Crystal


{Please note that comment moderation is on. Your lovely comment will appear once approved.}

Tuesday, March 11, 2025

Regency Couple ~ Preview Day 1 ~ The Greeting Farm

 Hello there crafty friend!
I'm so excited! It's the first day of previews at The Greeting Farm for the March release! Yay!


Oh my goodness, Anya and Ian from the Regency Couple stamp set were SO much fun to color!! I love them! They made me think of shows like Downtown Abbey or the Pride & Prejudice movie. 


I stamped sweet Anya and Ian with Memento Tuxedo black ink and colored them up with Copic Markers. I fussy cut them both and colored the edge of the fussy cutting with a Memento Tuxedo Black marker. I adhered them to a die cut piece of vellum card stock. 

Here's a quick list of the Copic markers I used:
Anya's Skin: E000, E00, E21, R00, R20
Anya's Hair: E33, E35, E37, E79
Dress: Y11, Y15, B91, B95, B97
Head Piece: Y11, Y15, B91, B95, B97
Ian's Skin: E000, E00, E21, E04
Ian's Hair: Y32, E33, E35
Ian's Clothes: B91, B95, B97, Y11, Y15, N0, N2, N4, N6
Flowers: R01, R12, R02, YG11, YG03, YG63
Tea Cup: B000, B01, B95, C00, C2


I paired up this beautiful couple with the gorgeous Flora Paper Pad from Carta Bella. I die cut the floral piece and the vellum layer using dies from the A2 Lacy Layers Dies from Waffle Flower. I stamped the beautiful flowers and fussy cut them leaving a white border and then I popped them up on the card with foam tape.


I stamped, trimmed and popped up the sentiment, too. Lots of fun layers for this card! Release goes live in the store on the 15th at 12am EST.

Thanks so much for stopping by!
See ya next time.

Inky Hugs,
Crystal


{Please note that comment moderation is on. Your lovely comment will appear once approved.}


Friday, December 17, 2021

Hello and Hugs ~ Advent Calendar Day 17 ~ Unity Stamp Co.

  Hello there crafty friend!
It's Day 17 of my Countdown to Christmas series!! I'm sharing a little reveal and a project each day on my YouTube channel using the fantastic Advent Calendar from Unity Stamp Co!! Please be sure to subscribe to my channel so you don't miss a day of this fun countdown series!


Day 17 ~ a cute kitchen shelf!


I paired it up with the My Bright Life paper pad from American Crafts. 


The images and sentiment, from the Doily Hugs and Wishes {March 2021 Sentiment Kit}, are just stamped with Black Amalgam ink from Gina K. Designs and colored up with copic markers.

Check out my process video here... Unity Advent Calendar Day 17.


I'll be back tomorrow with Day 18 of the Advent Calendar reveal and a cute vintage card!


Thanks so much for stopping by!
See ya next time.


Inky Hugs,
Crystal


{Please note that comment moderation is ON. Your comment will appear shortly.}

Tuesday, December 14, 2021

Just Saying Hello ~ Advent Calendar Day 14 ~ Unity Stamp Co.

  Hello there crafty friend!
It's Day 14 of my Countdown to Christmas series!! I'm sharing a little reveal and a project each day on my YouTube channel using the fantastic Advent Calendar from Unity Stamp Co!! Please be sure to subscribe to my channel so you don't miss a day of this fun countdown series!


Day 14 ~ a sweet teapot!


I paired it up with the Hello Darling papers from The Paper Studio and a sentiment from the So Very Grateful {January 2018 Sentiment Kit} from Unity. 


The teapot and sentiment are stamped with Black Amalgam ink from Gina K. Designs and colored up with copic markers.

Check out my process video here... Unity Advent Calendar Day 14.


I'll be back tomorrow with Day 15 of the Advent Calendar reveal and a pretty card!


Thanks so much for stopping by!
See ya next time.


Inky Hugs,
Crystal


{Please note that comment moderation is ON. Your comment will appear shortly.}

Friday, March 20, 2020

Scrapping for Less ~ Tea Party Collection ~ More Tea-rrific Inspiration!

Hello there crafty friend!
Today I have more tea-rrific inspiration using the sweet Tea Party Collection from the It's All About the Girls card kit! This collection is especially endearing for me because my Mom was a tea drinker and her favorite color was purple. So while I created with this collection she was in the forefront of my mind.


With that said, it's no surprise that a couple of the cards I made are cards that could be for Mother's Day. I know it's a couple months away but it sure doesn't hurt to have those in your stash, right?!


I used up almost every last scrap of the patterned papers on these four cards. I had a lot of fun mix matching the patterned papers for each of the cards. I even paper pieced for this first card. Isn't that tea pot just the cutest with those pink polka dots! Love it! And it works well with all the polka dots in the patterned papers and even the enamel dots play into that design!


I had a couple more of the wood icons left over in my collection so I stamped the cup and saucer with Memento Tuxedo black ink and colored it with the following copic markers ~ R81, R83, R85, E51. I kept the tea a light milky color because my Mom liked her tea with a lot of milk. I then fussy cut the cup/saucer and cleaned up the edges of the image with my Memento Tuxedo black marker. I adhered the cup/saucer to the wood icon with Ranger Multi Medium Matte. I then adhered the wood icon piece to a Grape Jelly die cut scalloped circle.


My third card is really very simple in the design... I adhered all of the layers on a card front measuring 4-1/4 x 5-1/2" of Pink Lemonade card stock and then adhered it to a white card base from my stash. I just adhered the sweet little wood icon tea pot to this card, along with the sentiment and was done. Very simple but sweet... I like it!


My last card is my favorite... I love the cute papers and the white embossed sentiment on the Plum Punch card stock. I colored this cup with the same copics as the other cup, but made it a bit darker. I also used BV0000, BV000, BV01 for the saucer. I used N0 and N2 to add some steam and for the ground. A similar design to the first two cards but I really love the way this one turned out!

I sure hope you've enjoyed more inspiration for the It's All About the Girls card kit!! I'll be back tomorrow with even more inspiration using the gorgeous Glass Slippers Collection!!

Thanks so much for stopping by!
See ya next time.

Inky hugs,
Crystal

Sunday, June 9, 2019

Unity Stamp Company ~ Planner Gal: Thinking About Wine... or Tea?!

Hello crafty friends!
Today, I have a few cards to share using the beautiful new Planner Gal: Thinking About Wine kit... this kit is the current freebie with a $75+ order at Unity Stamp Company. I had so much
fun coloring her up that I just couldn't seem to stop making cards!!


My first card using some of my precious hoard of Basic Grey papers Perhaps... I can't believe I cut into these!! But I sure love how this card turned out! I used the Outside In Stitched Scalloped Rectangle Stackables by Lawn Fawn. I used the following Copic markers:
Skin ~ E000, E00, E21
Hair ~ E55, E57, E59
Clothes ~ V91, V93, V95, N0, N1
Wine Glass/Bottle ~ RV91, RV95, R12, YR00, N0, N1 


For this card, I used the Stampin' Up! Painted with Love Specialty DSP. I die cut the background piece with a stitched rectangle die and the hearts paper with the Memory Box Wrapped Scalloped Rectangles die. I popped up the main focal panel and adhered the fussy cut girl directly on the paper.
I used the following Copic markers for this card:
Skin ~ E000, E00, E21
Hair ~ Y21, YR12, YR14, E15, E18
Clothes ~ R12, R22, N0, N1
Watch - BG23, N1


For my last card, I used the same SU! papers as the second card and the same dies as the first card. I adhered my layers on a Kraft card base, popping up the center scalloped panel using foam tape. I stamped the sentiment from Beau-Tea-Ful Friend onto Kraft card stock using VersaMark watermark ink and heat embossed a fine white embossing powder. 


I fussy cut the image and popped it up on the card using dimensionals. I colored in the tea mug from the recently released Hot Mess {border backgrounds} and fussy cut it out.
I used the following Copic markers for this card:
Skin ~ E000, E00, E21
Hair ~ Y21, YR12, YR14, E15
Clothes ~ N0, N1, BG11, BG23
Tea Mug ~ Y06, YR15, YR21


For my last touch on this card, I added a few little pearls from Little Things from Lucy's Cards ~ Crystal Collection ~ Harmony Sparkly Shaker Mix.


I love how these three cards turned out! Such a fun kit to play with!

Thanks for checking out my blog post!
See ya next time.

Inky Hugs,
Crystal


Saturday, August 4, 2018

~ Friends of Unity August Blog Hop ~ Coffee & Tea

Hello!! It's time for the August Blog Hop with the Friends of Unity and our theme this month is...


Coffee & Tea!
Ahhh... I don't know about you but I just love a good cuppa, be it coffee or tea! I tend to drink more coffee though so for this hop I decided my projects are all about the coffee!! I'm also a huge fan of blues with browns ~ my absolute favorite color combo! So let's get to the projects...


It's been a while since I've worked on a mixed media project. I wasn't sure where this was going to go... but I like how it turned out. I started with a panel of watercolor paper. Using mod podge I added bit of papers... the paper with text is from a pack of Stampin' Up! papers called Typeset Specialty DSP and the other papers are from Heartfelt Creations Coffee Talk Collection. Once I had my papers adhered and the mod podge was dry I smudged some acrylic paints just using my finger to apply it. I also used a bit of bubble wrap to add texture. Some of the bubble wrap spots smudged terribly so I covered them with mod podge and laid antique gold tissue paper over top wrinkling it here and there. I let the mod podge dry and then tore off the excess paper. I applied more mod podge around the edges of the gold tissue paper and also adhered a doily... you can see some of the texture of the doily in the girls face.


 So once all the mod podge was dry, I did some blending with Vintage Photo and Evergreen Bough Distress Oxide Inks. I stamped the coffee girl image from Unity's Itty Bitty set called Best Friends. I just love this girl... she's all full of sass! I also stamped a coffee ring and splatter using my new Ground Espresso Distress Ink! So excited to have this new color in my stash! The coffee ring stamp is from the January 2017 SMAK kit called Progress and Change. The splatter is from the Blow Your Mind kit.


I trimmed the panel down to 4-1/2 x 6 inches and then wrapped some gold thread around it several times after threading the heart charm onto the thread. I added a touch of Ranger Multi Medium Matte around the edges of the heart charm to adhere it in place on the panel. To secure the thread I just used some packing tape on the back of the paper.


My final touch for this piece was the die cut COFFEE. I die cut it twice from white card stock and then once with Lost Lagoon card stock. I adhered all of the layers and then sponged some Vintage Photo distress ink around the edges of the letters. I then adhered it to the panel. Well, it was still too clean... lol... so I stamped a splatter stamp from the Never kit with the Vintage Photo distress ink and that did it. I thought I was done at this point but when I saw it the next morning I decided to not make it into a card, but to mat it and potentially frame it. So, I mat it on Lost Lagoon and then Early Espresso card stocks. I really like how this turned out. I hope you do too!


Now for my card, I started with a 4-1/4 x 5-1/2 piece of Crumb Cake card stock. I blended some Tea Dye and Vintage Photo Distress Oxide inks over the little flower stencil (not sure that it's a flower but we'll go with that) in the Woodblock Prints from Papertrey Ink. I then blended some Evergreen Bough Distress Oxide ink over the Knitted Sweater Stencil from Echo Park. I then blended some Ground Espresso Distress Oxide ink over the Mini Art Is stencil from The Crafters Worshop and the coffee and splatter stencil from Tim Holtz' Mini Stencil Set #3. I stamped the big ornate background stamp from the Never kit using VersaMark watermark ink and then heat embossed fine white embossing powder. I did goof and forget to use my embossing buddy so the powder kind of splattered but we're going with it. I did also heat up the embossed area again and added some more embossing powder... it kind of thickened it up. I die cut the piece using a Wonky Scalloped Frame die from Avery Elle. I did this so I could mat the piece and then pop it up on the card. I mat it using Lost Lagoon card stock from Stampin' Up. I then mat the scalloped frame on Early Espresso card stock and adhered the entire piece to a white card base. I stamped the girl from Dream of Being on a piece of white card stock and colored her in using Copic markers {E0000, E000, E43, E47, E57, C1, R20, RV21, BG10, BG13, BG32}. I fussy cut her out and adhered her to the card. I added a few enamel dots here and there. I stamped my favorite 'happy birthday' stamp from the Abundant Blessings sentiment kit onto Early Espresso card stock using Versamark watermark ink and heat embossed a fine white embossing powder. I trimmed the sentiment and adhered it to the card. And there you have it! My projects for this month's hop.


Here's a look at both projects... it looks like the girls are looking at each other. How funny... I just noticed that while writing up my blog post. LOL

Before we move on to the hopping, I have some business to take care of. Last month I had a giveaway and I need to share who the lucky winner of the brand new Jolly Ol' Santa stamp set is...  drum roll please... the lucky winner is...


Marjorie Dumontier!!!! Woohoo! 
Marjorie please email me at crystalominkler@gmail.com with your mailing address to claim your prize. Prize must be claimed within two weeks.
Thank you to all those that hopped with us last month and, of course, this month!

 One or two of my friends are having giveaways on their blogs for this month's hop so be sure to hop and comment on each of our blogs so you'll be entered into this giveaway. We sure appreciate and love all of your fun comments! 


Now let's get hopping!


Crystal <--- you are here

up next ---> Joyce


Thanks for stopping by!

See ya next time.
~ Crystal


Friday, December 15, 2017

'Teas the Season


Hello! I have my final card for the Winter Coffee Lovers blog hop... I'm kind of bummed. I've been having so much fun making cards for the hop and, in fact, I have ideas for more cards but it's time to be done. This post is also kind of bittersweet... I don't want to put a whole bummer on the post though so I'm just dedicating this card and post to my Mom that passed away in September. She loved a good cuppa and I made this for her.


I stamped the mug and deer from STAMPlorations' Winter Mug set using Memento Tuxedo black ink and colored it in with copic markers {R12, R14, R27, 0, N3, N7, E11, E51}. I fussy cut it out and set it aside. I decided to use some patterned papers that I hadn't opened yet... these papers are from Echo Park's paper pad called A Perfect Christmas. 


I cut the papers and adhered them directly to a kraft card base. I then adhered a strip of grosgrain ribbon to the card trimming the sides. I stamped the sentiment from STAMPlorations' Caffeinated Christmas on white card stock, trimmed it and then adhered it to the card. I popped up the mug using dimensionals and there you have it! I think it's cute and I think my Mom would have liked it. :)

There's not much time left to play along but if you have a chance, go check out the Coffee Loving Cardmakers blog to play along!!

Thanks for stopping by!

See ya next time.
~ Crystal