Showing posts with label Unity Stamp Company. Show all posts

Wednesday, July 22, 2020

Unity Stamp Co. ~ July 2020 Whit Kit ~ Friends Are Like Flowers

Hello there crafty friend!
Today I'm sharing two quick card using the beautiful July 2020 Whit Kit called Friends Are Like Flowers!! I wanted to keep a simple color scheme for both cards... kind of monochromatic except for the touch of green on the leaves (and blue water for the first card).


I used the following Copic markers for this card:

Flowers ~ R000, R11, R14, R27, R37, Y11, Y13, Y38
Vase ~ B0000, B000, C00, C1, C2
Leaves ~ YG11, G12


Flowers are like friends; they bring color to your world.
Such a fitting sentiment!! I love the distressed looks to the sentiments in the kit too!


The second card is really more monochromatic with all the blues. I kept the colors on the flowers soft, but it still looks lovely with the blues in the patterned papers. I used the following Copic markers for this card:

Flowers ~ B0000, B000, B00, B02, Y11, Y13, Y38
Vase ~ B0000, B000, C00, C1, C2
Leaves ~ YG11, G12


You can still love yourself and be a work in progress.
How fabulous is that sentiment?! I love it!!


And a quick picture of both cards together. I didn't make a video this time for the coloring of the flowers. I wish I had thought to do so... but I do have a video showing some of the products I used to create these cards and the assembling of both cards. You can check that out below.


Thanks so much for stopping by!
See ya next time.

Inky hugs,
Crystal

Thursday, June 11, 2020

Unity Stamp Co. ~ Stick Together ~ Mojo Monday Sketch!

Hello there crafty friend!
I'm popping in here real quick to share a card that I created for the recent release over at Unity Stamp Co. using this gorgeous Stick Together stamp!


Such a beautiful stamp to watercolor! I've really been enjoying my Zig Clean Color Real Brush markers! It's nice to play with a different medium sometimes.


I combined this beautiful stamp with some old Stampin' Up! papers called Festive Birthday from my stash... I'm sure that they are retired, it's been so long! But they really worked well with the colors that I used to watercolor this image.


I used this beautiful Mojo Monday sketch #538 for my card design... I did move the orange patterned paper over a bit more to work with my design, but otherwise I kept to the sketch. I am loving using black for my neutral color lately. I hope you're liking it, as well.

Thanks so much for stopping by!
See ya next time.

Inky Hugs,
Crystal

Monday, June 8, 2020

Unity Stamp Company ~ June 2020 Whit Kit Live in the Sunshine ~ Sparkle Dust ATCs

Hello crafty friend!
I'm back with a little ATC fun for the June challenge in the Unity Show & Tell Facebook group! This fun challenge is hosted by my sweet friend, Dawn Bryson. You can check out the challenge here ---> Unity Blog... or here ---> Unity Show & Tell.


I'm using the gorgeous June 2020 Whit Kit called Live in the Sunshine... this kit is stunning! All the fabulous glittery goodness is amazing!! And the beautiful papers... I just can't get enough of this kit! 


I'm a huge fan of kraft card stock combined with blues so when I saw the Nuvo Sparkle Dust in the kit, I just had to make a background on kraft card stock!! 


To see how I created the fabulous sparkly background for these ATCs check out my video below!! I also show my process in assembling the cards.


Thank you so much for stopping by!
See ya next time.

Inky Hugs,
Crystal

Thursday, May 28, 2020

Unity Stamp Company ~ December 2018 Layers of Life Revive ~ Spring | Summer Coffee Lovers Hop

Hello there crafty friend!
Today, I'm sharing another card for the fabulous Spring | Summer 2020 Coffee Lovers Hop using one of my favorite kits from Unity Stamp Company called Revive... this is a Layers of Life kit from December 2018 and it is ABSOLUTELY amazing to use in a mixed media style card so, that's exactly what I did!!


I started by blending Antique Linen Distress Oxide ink over the right side of a 4-1/4 x 5-1/2" piece of Kraft card stock. I then blended some Vintage Photo Distress Oxide ink over the left side and into the middle. I blended with big wispy circles kind of giving a smoky feel to the blends. I then blended some Ground Espresso on the right side leaving some of the Vintage Photo. And to add a bit more contrast to the colors I added a tiny bit of Black Soot to the very edge on the left side.


I stamped the Revive stamp onto the dried background that I rubbed with my anti-static pouch with Ground Espresso Distress Oxide ink and heat embossed a fine clear embossing powder. I then stamped another background stamp from the Vibes kit this time, but again with the Ground Espresso. I stamped that twice down the left side of the card. It gets lost in the darker portion of the card on the left side, but you can see some of the text in the center on the Vintage Photo blends. It needed more of something so I started looking through my stencils. I decided first to use the grid-like stencil from the Tim Holtz Mini Stencil Set 22. I used it on the upper right side and blended some Antique Linen Distress Oxide ink... it goes about two-thirds down the card. I then blended some Ground Espresso Distress Oxide ink over the same stencil in the bottom right corner.


I set that stencil aside and started rummaging through my stencils again... that's when I found my coffee splatter stencil and knew I HAD to use it! This stencil is from the Tim Holtz Mini Stencil Set 3. I blended some Antique Linen Distress Oxide ink over the stencil on the left side of the card. It really pops on the darker blends on that side. Now I decided the coffee cup was getting lost in this background so I stamped it again but this time I used VersaFine Onyx Black ink and I heat embossed it with the fine clear embossing powder, as well. And then to color the coffee cup all I did was blend some of the Antique Linen Distress Oxide ink making sure to keep it light near the top of the cup. To ground the cup on the background, I blended some Ground Espresso Distress Oxide ink just back and forth... I love how the stencil pops through the darker ink! I did a bit of water splatter and dabbed it up with a paper towel and then I added some black acrylic paint splatters. I fussy cut the cup and popped it up on the background. Now this fabulous sentiment which sums up my addiction to the wonderful caffeinated beverage that this whole hop is about is from another fantastic kit called Whit's Words. I blended a tiny bit of Antique Linen Distress Oxide ink on a scrap piece of white card stock and then stamped the Obsessed sentiment with Gina K.'s Black Amalgam ink. 


To mat my background, I blended some Antique Linen Distress Oxide ink around the edges of a white card front trimmed down to 4-1/8 x 5-3/8". I trimmed down my background to 4 x 5-1/4" and adhered it to the mat. I then adhered the entire panel to a black card front measuring 4-1/4 x 5-1/2" and adhered that to a kraft top-fold A2 card base.

Well... this was not a short post but I think I covered all the details of this card. If you have any questions on how I created this card, feel free to ask in the comments. Be sure to check out the Spring | Summer 2020 Coffee Lovers Hop... it's winding down tomorrow. I sure have had a blast creating and sharing during this hop... I hope to sit back and check out more of the creations soon!

Thanks so much for stopping by!
See ya next time.

Inky Hugs,
Crystal

Thursday, May 21, 2020

Unity Stamp Company ~ May 2020 Whit Kit Have Courage ~ Enjoy the Little Things!

Hello there crafty friend!!
Today, I'm excited to share a couple of beautiful cards that I created using the stunning May 2020 Whit Kit called Have Courage!! Such a gorgeous kit!! It has fabulous watercolor papers, and glitter embossing powder AND these gorgeous flowers!!


Both of my cards are very similar in design, I just used different colors for the papers and for watercoloring the flowers.


How fun is this card design overlapping the patterned papers?! I just may use this design again and again... I love the contrast it gives to the card!


And those stunning flowers!! They were amazing to watercolor! 


And my second card using purples... I even added a touch of pink to the tips of the flowers! Love how they turned out!


A little bummed that I messed up the placement for my sentiment, but sometimes you just gotta go with it... LOL!


Here's a closeup of these stunning flowers!
Now, if you are interested I made a video for these cards showing my process in making these cards but I'll warn you... there's a bit of a glare from my OTT light overhead. I almost deleted the video completely when I realized I goofed, but I thought someone might like to see it anyways so I'm still sharing it...


Thanks so much for stopping by!
See ya next time.

Inky Hugs,
Crystal


Tuesday, May 19, 2020

Unity Stamp Company ~ Giveaway Winner!!

Hello there crafty friend!!
First, I have to say a huge THANK YOU, THANK YOU, THANK YOU!!!! for all those that subscribed to my YouTube Channel and followed my blog and Instagram... and even those of you who found my Facebook page and followed me there, too!!! I appreciate each and every one of you following me on my crafty journey! And now it's time to announce the winner of my celebration giveaway and that is... 


@karenladd510 on Instagram!! Woohoo!!
Karen, please email me at crystalominkler@gmail.com so I can send you your prize!!

Now, it just wouldn't be right for me to announce the winner and not share at least one card so I wanted to share a card I created for the latest release over at Unity Stamp Company!! It's Whit's birthday and they are celebrating with a Flash Sale. I believe it's still going so head on over there and check out all the fabulous deals!! 


But before you go... here's my card using the new Take Me Home kit designed by Graciellie Designs and available at Unity!! Love this sweet house!! I had so much fun coloring this beauty up!

Well, that's it for me today! 
Thanks again for being awesome and I'll see ya next time.

Inky Hugs,
Crystal

Tuesday, March 17, 2020

Unity Stamp Company ~ March 2020 Wildflower Wonders Whit Kit ~ Shaker Cards!

Hello there crafty friend!
Today I'm sharing two versions of shakers cards using the March 2020 Whit Kit called Wildflower Wonders from Unity!! This monthly membership is designed by Whitney Magnuson of Unity Stamp Company and she has really put together some amazing kits. I really love the vintage feel of this month's kit with the delicate textures of the papers and the gorgeous sentiment stamps!


My first shaker card is a traditional shaker card that is a full A2 card size measuring 5-1/2 x 4-1/4". I adhered a 5-3/8 x 4-1/8" piece of clear card stock to the back of a large stitched scalloped frame that I had die cut from one of the papers in the Vintage Textiles paper included in the kit. I trimmed down another patterned paper and adhered it to a white card base from my stash. I then sprinkled some of the Pearl Confetti Sequins onto the card and popped up the frame with a thin foam tape. 


I stamped the sentiment with Kraft ink from Gina K. Designs on a scrap of the same patterned paper I used on the card base. I couldn't find quite the right size of a stitched rectangle die so I used a little crafty trick and thought I would take a few pictures and share them with you.


First you'll want to line up the die for your first cut... I usually do this on the top since it's easier for me to line it up just so.


And this is what you have after running it through your die cutting machine.


Now you want to line up the bottom portion of the image or sentiment and then gently move the die in your hands back and forth a tiny bit to make sure that it's in the grooves that are already cut.


And this is how it'll look after running it through your die cutting machine... there are a couple extra stitches at the top and bottom but those don't bother me.


I adhered the sentiment to the card with a liquid glue and then wrapped some of the beautiful jute string around the front of the card a few times and tied a little bow leaving extra long tails. A pretty simple but lovely shaker card!


My second card is actually a Faux Shaker card. It has the appearance of a shaker card but the pretty sequins don't actually move. I used three different papers from the Vintage Textiles paper pack for this card. I used the burlap for my bottom layer that is adhered to a white card base from my stash. I then die cut the center from the white burlap paper that I had trimmed down to about 4 x 5-1/4". I trimmed the floral paper to 3-3/4 x 5" and adhered it to the center of the card.


I stamped the Hello sentiment onto a scrap of vellum card stock from my stash with VersaMark watermark ink and heat embossed an ultra fine white embossing powder. I then stamped the beauty sentiment and did the same steps. I trimmed down the vellum card stock and adhered it to the card. I popped up the white burlap paper that I had set aside earlier using foam tape.... giving the card an appearance of being a shaker card. I then adhered a bunch of the sequins around the bottom portion of the cut out... even tucking some in under the scallops. I adhered a few more around the sentiment and was done. I love making faux shaker cards!! This one turned out so lovely!

You can check out all the details for this amazing card kit here ---> March 2020 Wildflower Wonders card kit!


Thanks so much for stopping by!
See ya next time.

Inky Hugs,
Crystal

Wednesday, March 4, 2020

Unity Stamp Company ~ Therm O Web ~ Deco Foil Designer Card Fronts!

Hello there crafty friend!
Today, I have a sweet little card to share using some brand new releases from a fabulous collaboration with Unity Stamp Company and Therm O Web... Deco Foil Designer Card Fronts!! These card fronts are so amazing!! I have been slow to taking on this foiling trend but now, I'm SOLD!!


These toner card fronts can be colored with markers, inks, sprays... I decided to do some ink smooshing. I used Spun Sugar, Tumbled Glass, and Shaded Lilac Distress Oxide inks. I smooshed the inks on my Tim Holtz Mixed Media Glass Mat and dipped the Circles A Plenty toner card front in the inks. I let the card front dry overnight. I wanted to make sure it was completely dry. I then die cut the Circles A Plenty toner card front with an oval die and ran it through my laminator with Pink Melon deco foil. While I had the inks out, I also ink smooshed a piece of Tim Holtz Distress Watercolor card stock and did a little splattering! I set those aside and got to coloring this adorable little girl and all the cute flowers from the Feeling Off kit!!


I used the following copic markers to color:

Skin ~ E000, E00, E21
Hair ~ E55, E57, E59
Clothes ~ R000, R00, R20
Glass ~ B0000, Y0000, Y06, C1
Flowers ~ Y0000, Y06, YG23, B0000, B00, BV0000, BV01, R00, R20


I fussy cut the images and adhered them to the oval. I trimmed the ink smooshed background down to 4-1/8 x 5-3/8" and adhered it to a white card base. I then popped up the oval piece with foam squares. I die cut the sentiment with a banner die and popped it up on the card, as well. A sweet little card to send off to a friend that's feeling a little off. Head over to the Unity website to see all the fabulous new releases... so many adorable stamps and foiling fun!!


Thanks so much for stopping by!
See ya next time.

Inky hugs,
Crystal

Monday, February 24, 2020

Unity Stamp Company ~ A Girl. A Bunny ~ Happy Easter Day!

Hello there crafty friend!
Today, I wanted to share a darling card using the sweet A Girl. A Bunny kit by Unity Stamp Company that was just recently released and still on sale!! If you haven't checked out the latest release, go check it out!! So many sweet stamps and even a couple of fabulous new stencils!


I wasn't sure which direction I wanted to take this card... but when I saw the Glamour Paper by Authentique in my stash it hit me! These beautiful papers totally inspired my card. I die cut the polka dot and rose paper with the Frilly Lace Nested Rectangle die by Gina Marie Designs. I cut a slightly smaller piece of black card stock and adhered it behind the polka dot and rose paper. I then adhered the whole thing to a white card base. I trimmed down the blue paper, mat it with black card stock and adhered it to the card. I then die cut the sentiment with a circle die and adhered it to a black mat. I die cut a piece of the black patterned paper from the same paper pack with a banner die.


I set those pieces aside and colored up this sweet image with the following copic markers:

Skin ~ E000, E00, E21
Hair ~ E21, E23, E25, E27
Clothes/Accessories ~ BG000, BG01, BG11, BG34, C00, C1
Bunny ~ C00, C1, C3, R00, R20


I die cut the sweet girl and bunny image with an oval die and popped it up on the card with foam squares. I adhered the black banner die cut piece using a few skinny strips of card stock for the bottom portion of the banner... stacking them so it sat level with the blue paper layer. I then adhered the banner piece with liquid glue. I popped up the sentiment with foam squares and debated adding some ribbon or maybe a bow, but decided I liked the card as is. Hope you like it too!

Go check out the new releases at Unity!! The sale ends tomorrow!!

Thanks so much for stopping by!
See ya next time.

Inky hugs,
Crystal


Tuesday, February 18, 2020

Unity Stamp Company ~ Hailey's Puppy Mini

Hello there crafty friend!
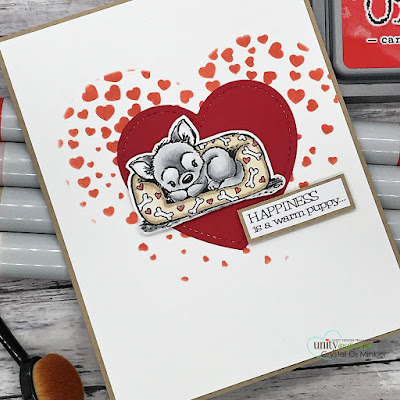
I have a quick and sweet CAS card today to share with you using one of the cutest stamps... a new release at Unity called Hailey's Puppy Mini!! I just adore this sweet little puppy!


To start, I die cut a thin piece of white card stock with a heart die to use as my mask over the brand new Heart Confetti stencil ~ just released too! I am loving this stencil!! I blended some Candied Apple Distress Oxide ink over the masked stencil until I was happy with the blend. I then trimmed the Tim Holtz Distress Watercolor paper to 4-1/8 x 5-3/8" and adhered it to a kraft card front measuring 4-1/4 x 5-1/2". I then adhered the panel to a white card base.


I die cut a smaller stitched heart using the same Outside In Stitched Heart Stackables by Lawn Fawn from Real Red card stock. I adhered that to the card and colored up the adorable puppy. I kept the coloring simple using the following copic markers ~ N0, N1, N3, R000, R14, E41, E43, C00, C1. I fussy cut the puppy leaving a bit of a border and then trimmed down the sentiment and adhered that to a kraft mat. I popped up the puppy and the sentiment on the card with foam tape. Too cute!
I just love how this turned out! I hope you like it too!

Thanks so much for stopping by!
See ya next time.

Inky hugs,
Crystal


Saturday, January 4, 2020

~ Friends of Unity January 2020 Blog Hop ~

Hello there crafty friends!!
It's my favorite time of the month... time for the Friends of Unity Blog Hop!!


This month we are creating with our Favorite Unity Stamp of 2019!! I was so excited to have this as our cue, but it was very hard to narrow down the choices... there's really so many that I consider to be my favorites from the last year.


Now, coffee stamps are my jam... I love them!! AND the border backgrounds stamps are one of my most favorite stamp lines that Unity offers. So naturally I had to use my most favorite border backgrounds stamp called Hot Mess {border backgrounds}, but I wanted to use a metallic embossing powder. I chose the fun Penny Ultra Fine Embossing Powder from Brutus Monroe... love this stuff!!!


And then using the backside of a piece of Tim Holtz Distress Watercolor paper, I smooshed some watered down Peacock Feathers, Vintage Photo, and Ground Espresso Distress Oxide inks. I dried the paper in between layers... I really love the dimension the different layers of colors gives to the panel. I dried the panel with my Ranger heat tool to ensure that it was completely dry before adhering it to a piece of Really Rust card stock that I cut just slightly larger than the panel. I then mat it with a 4-1/4 x 5-1/2" piece of Taken with Teal card stock and then adhered the entire panel to a white card base.


Another favorite stamp set from 2019 is the A Little Warmth kit... this kit has a beautiful Angie Girl along with a bunch of sentiments. I originally wanted to use the girl from the kit, but I decided not to cover up the background. So, I went with one of the sentiments from the kit instead. I stamped it on a scrap piece of Really Rust card stock with VersaMark watermark ink and heat embossed it with the same Penny metallic embossing powder that I used on the background. I trimmed the sentiment and cut it to fit within the Really Rust card stock layer on the card. I just love how this turned out!


While I was working on the background for my first card, I happened to notice the fabulous colors resembled a rusty kind of color and thought that they would be fantastic with one of my new favorite truck stamps in the kit by Tierra Jackson called Ol' Fashion Holiday Love. So for this card I've decided to use some of my new favorite kits that I haven't had a chance to ink up yet... lol! I have just been itching to get these kits inked up... so glad I finally did!


I considered paper piecing the truck to make it look slightly more realistic but I just couldn't cut into it. I really love how it turned out. I made a very similar background to the last one using the same distress oxides only this time I used the textured side of the distress watercolor paper. I love the texture it gives this truck!! A total happy accident because my plan was to copy the other background as much as possible! I fussy cut the truck and added some glossy accents and then set it aside to dry. The background was easy peasy and I absolutely love how it turned out! I stamped the gorgeous Alpine Wonderland stamp onto a card front of kraft card stock measuring 4-1/4 x 5-1/2" with VersaMark watermark ink and then heat embossed Alabaster embossing powder by Brutus Monroe that is available at Unity! I love Brutus Monroe embossing powders!! So glad that Unity carries them in their shop! Once the background was heat set, I decided to add a bit of color to the background... the clean kraft just wasn't quite right. I added a bit of Pine Needles distress ink to the ground and the trees, and Stormy Sky distress ink to the sky. I wiped off the white embossed background with a paper towel to get the colored inks off. It buffed the embossed background a bit too much so I reheated the background to get the pretty glossy shine back. 


You can see some of the discoloration in the white embossed background in this picture, but in person it's really not as visible. I trimmed the background and distressed the edges. I adhered it to a 4-1/8 x 5-3/8" piece of Lost Lagoon card stock and then adhered it to a white card base that I trimmed just tiny bit to fit the slightly smaller card front.


To finish off the card, I stamped the fun sentiment from the November 2019 KOM called Wonder. It took me a bit of searching to find just the right sentiment, but I think this one really works with the design of my card. That's it for me this month! I can't wait to see what my friends have made to share with us this month!! 

Before we get to the hop list, I'm having another giveaway this month... I have a fabulous brand new Say It Big May 2019 Sentiment Kit to share with one lucky winner!! I'll announce the winner during next month's hop. A few of my friends are also having giveaways so be sure to check out all the fabulous creations along the hop and comment on each blog for a chance to win!! 

Thank you all so much for your continued support of our little hop... and for all of your lovely comments! I really, truly do appreciate each and every one of your sweet comments. 


Let's get to the hopping...

Crystal <--- you're here

up next ---> Kim


Thanks so much for checking out my blog post!
See ya next time.

Inky Hugs,
Crystal