Showing posts with label #scrapscards. Show all posts

Tuesday, August 6, 2024

Tawny Owl Paperie Inky Inspiration Sketch 24 ~ Mousing Around: Hiya, Pal ~ Unity Stamp Co.

 Hello there crafty friend!
Today I'm sharing inspiration for the Tawny Owl Paperie Inky Inspiration Sketch Challenge 24 in the Tawny Owl Paperie Inky Inspiration Facebook group. Just like last week's card, I had this adorable stamped heart on my desk just asking to be made into a card. These adorable mice are from the Mousing Around: Hiya, Pal stamps from Unity. Love them!


I'm continuing to use up some of my leftover papers. This 4 x 3-1/2" piece of pattern paper is the only left in the scraps that would work with this month's sketch. All the other were cut down for last week's card so I'm thinking next week I'll do my August scraps cards. 
 

Here's a look again at the original scraps I started with this month. I should have taken a current picture so you could see what's left. It's not nearly this much.


Here's a look at the fun sketch for Tawny Owl Paperie Inky Inspiration Sketch Challenge 24. The sketch, as always, is meant to inspire not require. So let the sketch lead in your design, but don't feel limited by it. I like to think my inspiration is usually a good example of this since I'm always adjusting the sketch. Today is no different since I added the heart over the pattern paper.


 I stamped the mice from the Mousing Around: Hiya, Pal with Black Amalgam ink from Gina K. Designs. I stamped the hearts with a reddish purple ink but since this has been sitting on my desk for months, I'm not sure what actual ink I used. I die cut the mice using a die from the Dashes and Frills Hearts {die set}. I colored up the mice with my Copic markers. I coordinated my colors with the papers. 

Here's a quick list of the Copic markers I used: 
Black: N0, N2, N4, N6
White: C00, C1, C3
Yellow: Y15, Y06, Y38
Pinky Purple: RV10, V91, V93, V95
Red: R20, R14, R46
Ground: C00, C1


I adhered the pattern paper to a 4 x 5-1/4" piece of Stampers Select White card stock from Papertrey Ink. I trimmed up the star paper and adhered it to the heart and then I added a bunch of foam tape to the back of both the heart and the star paper. I popped those up on the panel and then I adhered the panel to a white A2 top fold card base. The sentiment was also a scrap on my desk. I know it's Unity but I'm really not sure which stamp. If you happen to know, please let me know in the comments. I hope you all have fun with this sketch! I can't wait to see what you create with it. 
Have an ink-tastic week!

Thanks so much for stopping by!
See ya next time.

Inky Hugs,
Crystal


{Please note that comment moderation is on. Your lovely comment will appear once approved.}

Tuesday, July 30, 2024

Tawny Owl Paperie Inky Inspiration Sketch 24 ~ Bitty Birthday Bash ~ Unity Stamp Co.

 Hello there crafty friend!
Today I'm sharing my first card for the Tawny Owl Paperie Inky Inspiration Sketch Challenge 24 in the Tawny Owl Paperie Inky Inspiration Facebook group.  I've been wanting to play with the adorable Bitty Birthday Bash from Unity. It's been sitting on my desk for weeks!


I am continuing to use up some of my leftover papers. I came across these pretty rainbow papers in my stash. No idea what these papers are called or who made them. They sure are pretty though!
 

Here's a look at the leftovers I'll be using up. I'm hoping to finish these up quick this month.


Here's a look at the fun sketch for Tawny Owl Paperie Inky Inspiration Sketch Challenge 24. The sketch, as always, is meant to inspire not require. So let the sketch lead in your design, but don't feel limited by it. I moved my sentiment and added the sequins in place of the little rectangle. A good example of letting the sketch lead, but not limiting the design.


 I stamped the Bitty Birthday Bash birds using Black Amalgam ink for the birds and Picked Raspberry and Wilted Violet Distress Ink for the balloons. I colored up the birds and a bit more of the balloons using my Copic markers. Fussy cut them leaving a bit of a white border around the images.

Here's a quick list of the Copic markers I used: 
Birds: Y11, Y15, YR12
Pink Hat / Pink Balloons: RV000, RV11, C1
Purple Hat / Purple Balloons: V000, V12, C1
Grass: YG11, YG23
Flowers: B000, B00


I love how quick these cards came together! All my layers are adhered directly to a white A2 top fold card base. No foam tape or popping up of anything on this one.


 I hope you all have fun with this sketch! I can't wait to see what you create with it. 
Have an ink-tastic week!

Thanks so much for stopping by!
See ya next time.

Inky Hugs,
Crystal


{Please note that comment moderation is on. Your lovely comment will appear once approved.}

Tuesday, July 9, 2024

Tawny Owl Paperie Inky Inspiration Sketch 23 ~ Sammy Girl ~ Unity Stamp Co.

 Hello there crafty friend!
Today I'm sharing a another card for the Tawny Owl Paperie Inky Inspiration Sketch Challenge 23 in the Tawny Owl Paperie Inky Inspiration Facebook group. I'm still using up some of my leftover papers from old card kits from my Scrapping for Less days a few years ago. I made another mermaid card! The papers kind of dictated the theme of this card.


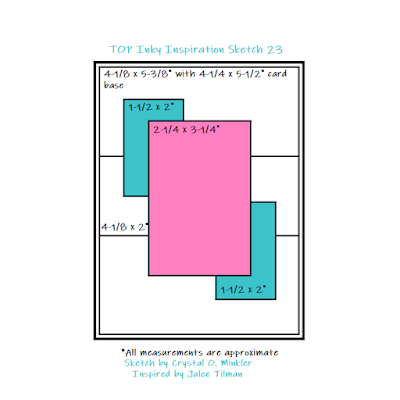
And the papers actually dictated a landscape card rather than a portrait card because of the direction of the images in my scraps. My bottom layer is a little smaller than the sketch calls for but I made it work. I cut mats for the small rectangle pieces because they seemed to get lost in the background papers. I used Tempting Turquoise card stock from Stampin' Up for my mat and card front layers. 


Here's a look at the fun sketch for Tawny Owl Paperie Inky Inspiration Sketch Challenge 23. The sketch, as always, is meant to inspire not require. So let the sketch lead in your design, but don't feel limited by it. A great example is how I turned the sketch for a landscape card.


Sammy Girl is stamped with Black Amalgam ink from Gina K. Designs. I also stamped the sentiment on a scrap of white card stock. I colored up Sammy Girl with my Copic markers and fussy cut her on the line. I used a Memento Tuxedo Black marker to color the edges of the fussy cutting. This helps to make the fussy cutting look nice and neat. I added some texture to my coloring by adding dots of Copic marker and then I added some Sakura White Gelly Roll pen dots too.  

Here's a quick list of the Copic markers I used: 
Skin: E000, E00, E11
Hair: Y21, YR23, E97, E99
Mermaid: B000, B00, B02, B04, V12, V15, Y11, Y15
Shell Necklace: B000, B00, B02, B04


I die cut a circle of vellum card stock using a die from the Scallop & Circles {nesting dies}. All of my layers are adhered directly to the card front. No foam tape for this one. My card front is adhered to a white A2 top fold card base. I finished off the card with a few glitter enamel dots from my stash. I hope you all have fun with this sketch! Have an ink-tastic week!

Thanks so much for stopping by!
See ya next time.

Inky Hugs,
Crystal


{Please note that comment moderation is on. Your lovely comment will appear once approved.}

Tuesday, July 2, 2024

Tawny Owl Paperie Inky Inspiration Sketch 23 ~ Sea Babies ~ Avery Elle

 Hello there crafty friend!
Today I'm sharing a couple more cards for the Tawny Owl Paperie Inky Inspiration Sketch Challenge 23 in the Tawny Owl Paperie Inky Inspiration Facebook group.  I had a look through my old card kits from my Scrapping for Less days a few years ago. These are the kits I've been pulling my leftover papers from and I grabbed a cute kit that had a decent amount of paper. But what I was really drawn to was the adorable mermaid. I didn't create anything for Mer-May so I'm late but I'm excited I finally made a mermaid card... actually two! 


I cut my papers to the measurements on the sketch except for the small rectangles on the pink mermaid card {right side}. Those rectangles were scraps and I just went with them. I adhered my background papers together and then adhered them to a 4-1/4 x 5-1/2" card front of Island Indigo card stock from Stampin' Up. After copic coloring the mermaids and fish. I fussy cut the fish on the line and cleaned up my cutting by coloring the edges of the fish with a Memento Tuxedo Black marker. I adhered the fish to the focal panel and adhered the focal panel to the small rectangles. And then I added foam tape to the back of the whole thing, including little pieces for the fish tails.


Here's a look at the fun sketch for Tawny Owl Paperie Inky Inspiration Sketch Challenge 23. The sketch, as always, is meant to inspire not require. So let the sketch lead in your design, but don't feel limited by it. 


I adhered the fish to the focal panel and adhered the focal panel to the small rectangles. And then I added foam tape to the back of the whole thing, including little pieces for the fish tails. I removed the backing from the foam tape and popped them up on the card. 

Here's a quick list of the Copic markers I used: 
Skin: E000, E00, E11
Hair: Y21, E95, E97
Purple Mermaid: V000, V12, V05, RV0000, RV10, RV11
Pink Mermaid: RV0000, RV10, RV11, V000, V12, V05
Yellow/Orange Fish: Y11, Y06, Y15, YR21, YR15, YR16
Orange Fish: YR21, YR15, YR16


I added a couple flat back pearls to the cards to finish them up. These were in the kits so I'm not really sure where they are from. My card fronts are adhered to a white A2 top fold card base. I hope you all have fun with this sketch! I can't wait to see what you create with it. Have an ink-tastic week!

Thanks so much for stopping by!
See ya next time.

Inky Hugs,
Crystal


{Please note that comment moderation is on. Your lovely comment will appear once approved.}

Tuesday, April 16, 2024

Tawny Owl Paperie Inky Inspiration Sketch 20 ~ Birthday Present Marci ~ La-La Land Crafts

 Hello there crafty friend!
I am back with inspiration for the Tawny Owl Paperie Inky Inspiration Sketch Challenge 20. I have picked out another paper pack leftover from my Scrapping for Less days. I absolutely love the colors in these papers!! I, again, don't know who made these papers or if they are still available. Sorry about that! I'm just so excited to be finishing up another paper pack!


Not only am I finishing up papers... I am also inking up stamps that haven't seen ink! A few years ago I was getting the La-La Land Crafts monthly kit and I haven't touched one of these kits. So I thought, why not grab one of those kits and see what we can make. Of course, I decided to go with a birthday themed kit because I'm still trying to build my birthday stash. But want to hear a secret?! I've been sending birthday cards!! For realz! So while I'm building my stash of birthday cards I'm also sending them out. So I need more!


Here's a look at the scraps I'm working with this time. I'm not sure if I'll officially include the tags as part of the leftovers. But I did use a few of the enamel dots from the leftover kit I opened up.


There was some fun products in this La-La Land Crafts monthly kit from August 2019... a couple sentiment dies and more stamps, but I chose this adorable girl and sentiment to play with. Trying to keep the cards I'm sending simple so the postage stays to the minimum. Of course, those enamel dots may call for extra postage, but we'll see. So for this card, I used the largest scrap {a 6x6" piece that I had already cut before taking the photo} for my background layer. I love the contrast of the stripes with the polka dots and the enamel dots play off of the dots in the paper.


I stamped the girl and sentiment using Black Amalgam ink from Gina K. Designs. I then colored up the girl using a bunch of Copic markers. I actually messed up the skirt while coloring. Did not like how it turned out! So I stamped the skirt on a scrap of white card stock and colored it up again. I fussy cut the skirt on the line and paper pieced it onto the girl. Easy peasy fix. Then I fussy cut the girl on the line and colored the edge of the fussy cutting using a Memento Tuxedo black marker {I also did that to the paper pieced skirt}. This makes the fussy cutting look much nicer! I trimmed up the sentiment and adhered it to the pink circle that I die cut using a 1-1/4" circle die from the Nesting Circles Die from Waffle Flower. I then adhered the sentiment to the girl and added foam tape to the back of both. Popped them up on the card and added those three enamel dots. I really like how this one turned out!

Here's a list of the Copic markers I used:

Skin: E000, E00, E11, E04
Hair: Y11, Y21, E23, E25
Lips: R20, RV11
Top: R20, RV11, RV14, RV06, RV19
Skirt: RV0000, R20, RV11, RV14, RV06, RV19 
Shoes: RV0000, R20, RV11, RV14, RV06, C00, C3
Present: Y11, Y15, Y35, G000, G12, G24


Here's a look at the fun new sketch for Tawny Owl Paperie Inky Inspiration Sketch 20. This sketch does call for larger pieces so if you have a fun paper pad you've been wanting to cut into... now's the time! The sketch, as always, is meant to inspire not require. So let the sketch lead in your design, but don't feel limited by it. My card is another good example of altering the sketch but still keeping within the sketch.


I'm so happy with how this card turned out! I hope you're inspired to play along with the sketch... and maybe even pull out some papers and stamps that you haven't played with yet! Have a wonderful week!

Thanks so much for stopping by!
See ya next time.

Inky Hugs,
Crystal


{Please note that comment moderation is on. Your lovely comment will appear once approved.}