Showing posts with label #paperscraps. Show all posts

Tuesday, August 6, 2024

Tawny Owl Paperie Inky Inspiration Sketch 24 ~ Mousing Around: Hiya, Pal ~ Unity Stamp Co.

 Hello there crafty friend!
Today I'm sharing inspiration for the Tawny Owl Paperie Inky Inspiration Sketch Challenge 24 in the Tawny Owl Paperie Inky Inspiration Facebook group. Just like last week's card, I had this adorable stamped heart on my desk just asking to be made into a card. These adorable mice are from the Mousing Around: Hiya, Pal stamps from Unity. Love them!


I'm continuing to use up some of my leftover papers. This 4 x 3-1/2" piece of pattern paper is the only left in the scraps that would work with this month's sketch. All the other were cut down for last week's card so I'm thinking next week I'll do my August scraps cards. 
 

Here's a look again at the original scraps I started with this month. I should have taken a current picture so you could see what's left. It's not nearly this much.


Here's a look at the fun sketch for Tawny Owl Paperie Inky Inspiration Sketch Challenge 24. The sketch, as always, is meant to inspire not require. So let the sketch lead in your design, but don't feel limited by it. I like to think my inspiration is usually a good example of this since I'm always adjusting the sketch. Today is no different since I added the heart over the pattern paper.


 I stamped the mice from the Mousing Around: Hiya, Pal with Black Amalgam ink from Gina K. Designs. I stamped the hearts with a reddish purple ink but since this has been sitting on my desk for months, I'm not sure what actual ink I used. I die cut the mice using a die from the Dashes and Frills Hearts {die set}. I colored up the mice with my Copic markers. I coordinated my colors with the papers. 

Here's a quick list of the Copic markers I used: 
Black: N0, N2, N4, N6
White: C00, C1, C3
Yellow: Y15, Y06, Y38
Pinky Purple: RV10, V91, V93, V95
Red: R20, R14, R46
Ground: C00, C1


I adhered the pattern paper to a 4 x 5-1/4" piece of Stampers Select White card stock from Papertrey Ink. I trimmed up the star paper and adhered it to the heart and then I added a bunch of foam tape to the back of both the heart and the star paper. I popped those up on the panel and then I adhered the panel to a white A2 top fold card base. The sentiment was also a scrap on my desk. I know it's Unity but I'm really not sure which stamp. If you happen to know, please let me know in the comments. I hope you all have fun with this sketch! I can't wait to see what you create with it. 
Have an ink-tastic week!

Thanks so much for stopping by!
See ya next time.

Inky Hugs,
Crystal


{Please note that comment moderation is on. Your lovely comment will appear once approved.}

Tuesday, July 30, 2024

Tawny Owl Paperie Inky Inspiration Sketch 24 ~ Bitty Birthday Bash ~ Unity Stamp Co.

 Hello there crafty friend!
Today I'm sharing my first card for the Tawny Owl Paperie Inky Inspiration Sketch Challenge 24 in the Tawny Owl Paperie Inky Inspiration Facebook group.  I've been wanting to play with the adorable Bitty Birthday Bash from Unity. It's been sitting on my desk for weeks!


I am continuing to use up some of my leftover papers. I came across these pretty rainbow papers in my stash. No idea what these papers are called or who made them. They sure are pretty though!
 

Here's a look at the leftovers I'll be using up. I'm hoping to finish these up quick this month.


Here's a look at the fun sketch for Tawny Owl Paperie Inky Inspiration Sketch Challenge 24. The sketch, as always, is meant to inspire not require. So let the sketch lead in your design, but don't feel limited by it. I moved my sentiment and added the sequins in place of the little rectangle. A good example of letting the sketch lead, but not limiting the design.


 I stamped the Bitty Birthday Bash birds using Black Amalgam ink for the birds and Picked Raspberry and Wilted Violet Distress Ink for the balloons. I colored up the birds and a bit more of the balloons using my Copic markers. Fussy cut them leaving a bit of a white border around the images.

Here's a quick list of the Copic markers I used: 
Birds: Y11, Y15, YR12
Pink Hat / Pink Balloons: RV000, RV11, C1
Purple Hat / Purple Balloons: V000, V12, C1
Grass: YG11, YG23
Flowers: B000, B00


I love how quick these cards came together! All my layers are adhered directly to a white A2 top fold card base. No foam tape or popping up of anything on this one.


 I hope you all have fun with this sketch! I can't wait to see what you create with it. 
Have an ink-tastic week!

Thanks so much for stopping by!
See ya next time.

Inky Hugs,
Crystal


{Please note that comment moderation is on. Your lovely comment will appear once approved.}

Tuesday, July 16, 2024

July Scraps Cards ~ Just Keep Swimming plus More ~ Unity Stamp Co.

 Hello there crafty friend!
I finished up my latest batch of leftover scraps and turned them into four pretty simple cards. Yay! I also played with some stamps that hadn't seen ink yet which is always a great bonus! It feels so good to have some more papers done!


Here's a look at the four cards all together. All very different! I'd love to know if you have a favorite of the batch. If you have a moment, comment below and let me know.


My first card features the beautiful turtle from the Just Keep Swimming stamps. I love this turtle! It's always so much fun to color too. As far as the scraps for this card, I had a bunch of paper strips that were different lengths and widths. I decided to combine them for a fun background. I adhered them all to a 3-1/2 x 3-7/8" piece of thin card stock. I trimmed off the excess paper strips and adhered the panel to a white A2 top fold card base. I die cut some Vellum Card Stock from Papertrey Ink using the Stitched Wave Borders dies from Lawn Fawn for a fun wave background for the turtle. 


I stamped the turtle with Black Amalgam ink from Gina K. Designs. I colored up the turtle using my Copic markers and then I fussy cut it on the line. I colored the edges of the fussy cutting using a Memento Tuxedo Black marker from behind the turtle just in case my marker slipped. I secured the vellum waves together using washi tape and then I trimmed the excess so they would fit over the 3-1/2 x 3-7/8" panel. I adhered the turtle tucking his bottom behind the last vellum wave. I adhered the vellum to the card by adding glue to the back of the turtle. Once it was a little dry and wouldn't shift anymore, I added a drop of liquid glue to the bottom corners of the vellum to secure it a tiny bit more. I also added tiny dots of glue under the stitches on the very edge of each layer. The stitches covered the glue pretty well. You can see the glue a tiny bit on those bottom corners but it's hardly noticeable in person. I finished this card by stamping the sentiment.

Copic Markers: BG000, BG01, BG15, BG05, BG57, V0000, V12, V15


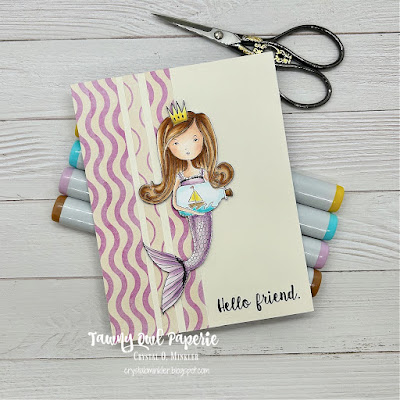
My second card uses three similar strips of pattern paper for a quick card design. I adhered them to a 4-1/4 x 5-1/2" piece of Vintage Cream Card Stock from Papertrey Ink. And then I adhered the card front to a white A2 top fold card base of Stampers Select White Card Stock, also from Papertrey Ink. I stamped the adorable mermaid from the Spirit of a Mermaid stamps using Black Amalgam Ink and I also stamped the sentiment on the card. Sadly, this is one of the retired stamp sets from Unity. I colored up this beauty with my Copic markers and fussy cut her just like I did with the turtle. I added a touch of Sakura White Gelly Roll pen to the whites of her eyes and the frill on her top. And I popped her up on the card using foam tape.

Here's a quick list of the Copic markers I used for the mermaid:
Skin: E000, E00, E11, R00, R20
Hair: E50, E30, E35, E37
Crown: Y11, Y15, Y28
Body / Tail: V0000, V000, V12, V15
Sailboat: Y11, Y15, R12, R05, E30, E35
Waves: BG000, BG01, BG15
Bottle: BG000
Cork: E30, E35, E37


My third card uses four rectangle scraps for an interesting background. I overlapped them just a bit and adhered them all to a white A2 top fold card base. I stamped the fish from the retiring Fishy Philosophy stamps with Black Amalgam ink and fussy cut them. The sentiment I stamped with Peacock Feathers Distress Ink. I added foam tape to the back of these fish and popped them up on the card. And I finished off the card with a few clear drops from my stash.

Copic Markers: Y11, Y15, YR15


My last card also features the cute fish from the Fishy Philosophy stamps. I love this cute stamp set! I had one last large piece of scrap pattern paper from these papers so I just adhered it directly to white A2 top fold card base that I turned on it's side for a landscape card. This was such a simple card! I stamped the fish and the sentiment using the Black Amalgam ink. I fussy cut the fish just like the others and popped it up on the card, too.

Copic Markers: Y11, Y15, R12, R05


I'm so excited to have another paper pack done! Woohoo! What do you think of the card designs this time? Do you have a favorite? I love the simple designs of all of them so it's hard for me to choose a favorite. Well, I'm excited to pick out another pattern paper pack to finish off. I'll definitely pick one out to use with the upcoming Tawny Owl Paperie Inky Inspiration Sketch 24 that will start in a couple of weeks. Have a wonderfully inky week!

Thanks so much for stopping by!
See ya next time.

Inky Hugs,
Crystal


{Please note that comment moderation is on. Your lovely comment will appear once approved.}

Tuesday, July 9, 2024

Tawny Owl Paperie Inky Inspiration Sketch 23 ~ Sammy Girl ~ Unity Stamp Co.

 Hello there crafty friend!
Today I'm sharing a another card for the Tawny Owl Paperie Inky Inspiration Sketch Challenge 23 in the Tawny Owl Paperie Inky Inspiration Facebook group. I'm still using up some of my leftover papers from old card kits from my Scrapping for Less days a few years ago. I made another mermaid card! The papers kind of dictated the theme of this card.


And the papers actually dictated a landscape card rather than a portrait card because of the direction of the images in my scraps. My bottom layer is a little smaller than the sketch calls for but I made it work. I cut mats for the small rectangle pieces because they seemed to get lost in the background papers. I used Tempting Turquoise card stock from Stampin' Up for my mat and card front layers. 


Here's a look at the fun sketch for Tawny Owl Paperie Inky Inspiration Sketch Challenge 23. The sketch, as always, is meant to inspire not require. So let the sketch lead in your design, but don't feel limited by it. A great example is how I turned the sketch for a landscape card.


Sammy Girl is stamped with Black Amalgam ink from Gina K. Designs. I also stamped the sentiment on a scrap of white card stock. I colored up Sammy Girl with my Copic markers and fussy cut her on the line. I used a Memento Tuxedo Black marker to color the edges of the fussy cutting. This helps to make the fussy cutting look nice and neat. I added some texture to my coloring by adding dots of Copic marker and then I added some Sakura White Gelly Roll pen dots too.  

Here's a quick list of the Copic markers I used: 
Skin: E000, E00, E11
Hair: Y21, YR23, E97, E99
Mermaid: B000, B00, B02, B04, V12, V15, Y11, Y15
Shell Necklace: B000, B00, B02, B04


I die cut a circle of vellum card stock using a die from the Scallop & Circles {nesting dies}. All of my layers are adhered directly to the card front. No foam tape for this one. My card front is adhered to a white A2 top fold card base. I finished off the card with a few glitter enamel dots from my stash. I hope you all have fun with this sketch! Have an ink-tastic week!

Thanks so much for stopping by!
See ya next time.

Inky Hugs,
Crystal


{Please note that comment moderation is on. Your lovely comment will appear once approved.}

Tuesday, July 2, 2024

Tawny Owl Paperie Inky Inspiration Sketch 23 ~ Sea Babies ~ Avery Elle

 Hello there crafty friend!
Today I'm sharing a couple more cards for the Tawny Owl Paperie Inky Inspiration Sketch Challenge 23 in the Tawny Owl Paperie Inky Inspiration Facebook group.  I had a look through my old card kits from my Scrapping for Less days a few years ago. These are the kits I've been pulling my leftover papers from and I grabbed a cute kit that had a decent amount of paper. But what I was really drawn to was the adorable mermaid. I didn't create anything for Mer-May so I'm late but I'm excited I finally made a mermaid card... actually two! 


I cut my papers to the measurements on the sketch except for the small rectangles on the pink mermaid card {right side}. Those rectangles were scraps and I just went with them. I adhered my background papers together and then adhered them to a 4-1/4 x 5-1/2" card front of Island Indigo card stock from Stampin' Up. After copic coloring the mermaids and fish. I fussy cut the fish on the line and cleaned up my cutting by coloring the edges of the fish with a Memento Tuxedo Black marker. I adhered the fish to the focal panel and adhered the focal panel to the small rectangles. And then I added foam tape to the back of the whole thing, including little pieces for the fish tails.


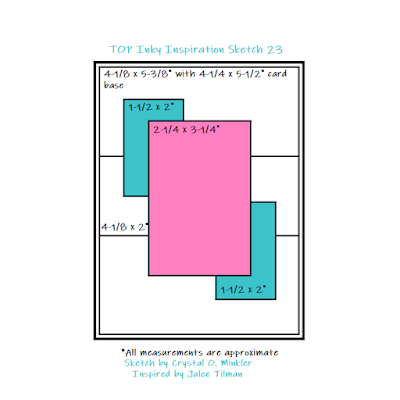
Here's a look at the fun sketch for Tawny Owl Paperie Inky Inspiration Sketch Challenge 23. The sketch, as always, is meant to inspire not require. So let the sketch lead in your design, but don't feel limited by it. 


I adhered the fish to the focal panel and adhered the focal panel to the small rectangles. And then I added foam tape to the back of the whole thing, including little pieces for the fish tails. I removed the backing from the foam tape and popped them up on the card. 

Here's a quick list of the Copic markers I used: 
Skin: E000, E00, E11
Hair: Y21, E95, E97
Purple Mermaid: V000, V12, V05, RV0000, RV10, RV11
Pink Mermaid: RV0000, RV10, RV11, V000, V12, V05
Yellow/Orange Fish: Y11, Y06, Y15, YR21, YR15, YR16
Orange Fish: YR21, YR15, YR16


I added a couple flat back pearls to the cards to finish them up. These were in the kits so I'm not really sure where they are from. My card fronts are adhered to a white A2 top fold card base. I hope you all have fun with this sketch! I can't wait to see what you create with it. Have an ink-tastic week!

Thanks so much for stopping by!
See ya next time.

Inky Hugs,
Crystal


{Please note that comment moderation is on. Your lovely comment will appear once approved.}

Tuesday, June 18, 2024

More 'Scraps' Cards ~ Pissy Party Plus a Few More Stamps ~ Unity Stamp Co.

 Hello there crafty friend!
I found some time to finish up the latest batch of 'scraps' cards I've been mentioning. Yay! I had enough scraps to make three cards and a tag. It feels so good to finish up another pattern paper pack. These are the papers I've been using for some of my TOP Inky Inspiration Sketch 21 and 22 cards. It was starting to feel like these papers would never get finished up!


Here's a look at the three cards and the tag. All very different! I'd love to know if you have a favorite of the batch. If you have a moment, comment below and let me know.


My first card features the adorable Pissy Party kitty. I'm making an effort to once again do a bit of watercoloring each month so this month I watercolored this fun cat. I used a bunch of ZIG Clean Color Real Brush Markers. Here's the list: Light Gray, Mid Gray, Yellow Green, Light Green, Yellow, Pink, Light Carmine, Light Blue, Cobalt Blue and Beige. Oh, and I also used my water pen. I fussy cut the kitty leaving a bit of a white border around him. I added foam tape to the back of the kitty and popped him up on the card. I used two scrap papers for this card. These were my largest pieces. I die cut a scrap of white card stock with a die from the Make a Tag {die set}. I didn't want to leave a lot of white space above the kitty so I used a couple of the tiny scraps and stapled them to the card. To finish off the card, I stamped the sentiment with Black Amalgam ink and die cut it with a die from the Scalloped & Stitched Sentiment Nesting Dies.


My second card features the adorable Planner Gal: Simply Perfect Birthday. This card was actually inspired by the Tawny Owl Paperie Inky Inspiration Sketch 22. It has some elements from the sketch, but it definitely took a left turn at some point! LOL! I really liked the three pattern papers clustered together but I wanted a touch of black behind them so I die cut a piece of True Black card stock from Papertrey Ink using a circle die from the Scallops & Circles {nesting dies} from Unity. Not completely sure I love how that turned out. I do like the contrast of the rectangles with the circle. Here's a quick list of the Copic markers I used to color up the sweet birthday girl:

Skin: E000, E00, E11
Hair: E51, E55, E57
Dress: RV10, RV11
Crown: Y11, Y15, Y28
Flower: Y11, RV10, RV11, YG11, YG23
Cake: C00, C1, C3
Candle: Y11, Y15, B000, B00, B02
Cake Stand: B000, B00, B02


Here's a look at the Tawny Owl Paperie Inky Inspiration Sketch 22. This challenge ends next Monday June 24th!! So get your entries in! I'd love to see what you do with this sketch.


My last card is super CAS and simple! I had one long strip of pattern paper. This is always an easy card design for a quick CAS card. This card features the You're Better itty bitty. I thought this would be a fun birthday card. I'm thinking I need to color in the heart though. What do you think?


My tag features the Hooray it's your Birthday itty bitty stamp. My last couple of scraps really had me stuck for a bit. I just couldn't figure out a card design that I liked and then I saw this tag on my desk. I think the pattern papers look so nice with this tag and then the black circles really make the pile of gifts pop! The black circles were also scraps in my True Black card stock folder so that was a bonus. I found a few enamel dots from my stash to compliment the blues in the papers and to finish off the tag I added a bit of white organdy ribbon. Here's a quick list of the Copic markers I used for the gifts: Y11, Y15, Y28, C00, C1, C3, RV10, RV11, B000, B00, YG11, and YG23. 


So excited to add three more cards and a cute tag to my stash! I'm even more excited to have another paper pack done! Woohoo! What do you think of the card designs this time? Do you have a favorite? I'm leaning towards the kitty card. Well, I'm excited to pick out another paper pack to finish off. I think I'll pick one out to use with the upcoming Tawny Owl Paperie Inky Inspiration Sketch 23 that will start next Tuesday. Have a wonderfully inky week!

Thanks so much for stopping by!
See ya next time.

Inky Hugs,
Crystal


{Please note that comment moderation is on. Your lovely comment will appear once approved.}

Thursday, April 11, 2024

'Scraps' Birthday Cards {Take 2} ~ Possible, Not Easy Plus a Few More Stamps ~ Unity Stamp Co.

 Hello there crafty friend!
I finally had some time to finish up the 'scraps' cards I've mentioned over the last couple of weeks. This time I only had enough scraps to make three cards. It feels so good to finish up another pattern paper pack. These are the papers I used for a few Easter cards last month for TOP Inky Inspiration Sketch 19. I'm excited to pick out another leftover paper pack and finish it off too!


For my first card, I used just two scraps on a yellow card front measuring 4 x 5-1/4". A super simple design. The beautiful coneflower from the Possible, Not Easy stamps from Unity are just perfect on top of a vellum circle I die cut using a scalloped circle die from the Scallops & Circles {nesting dies}, also from Unity.

Here's a quick list of the Copic markers I used:

Petals: Y11, Y15, Y35
Flower Center: E21, E23, E25, E29
Stem / Leaves: YG11, YG03


For all three cards today I used the 'happy birthday' sentiment from the awesome Feline Funny stamps from Unity. I stamped them with Black Amalgam ink on a scrap of Stampers Select White card stock and then cut them into strips. The sentiment on this card is popped up with foam tape while everything else is adhered directly to the card base.


I had one skinny strip of polka dot paper so I adhered it inside the card. A great way to use those skinny strips and also add a pretty touch to the inside of the card.


For my second card I used four little scraps... it just made sense to make a step pattern. It's different, but I kind of like it. I couldn't wait to ink up Feline Funny! I love this cat! And I used the coordinating Feline Funny die to die cut him out.


This time the sentiment is adhered to the red card front while the kitty is popped up with foam tape. I used just a handful of Copic markers to color up this kitty: C00, C1, C3, R00, R20, YG11, YG03.


For my third and last card, I used my last three scraps. Two are on the front of the card in a similar design as my first card. And I inked up the adorable giraffe from the Darling Menagerie stamps from Unity. I die cut the giraffe using another circle die from the Scallops & Circles {nesting dies}. I used just a few markers to color up the giraffe... YR21, YR15, YR68, YR24 and then used C3 and C00 for the outline around the giraffe. 


I trimmed the sentiment down for this card and adhered it directly over the pattern papers. And this time I popped up the giraffe using foam tape.


My last scrap went inside the card and it wasn't long enough to fit across so I cut a little fishtail on the one end. Done. These cards are so easy peasy and they were quick once I figured out what I was going to do. So excited to add three more cards to my stash and have another paper pack done! Woohoo! What do you think of the simple designs? Yay or nay? Well, I'm excited to pick out another paper pack to finish off. I'm hoping to find one that will work with the Tawny Owl Paperie Inky Inspiration Sketch 20. And I'll be back here on Tuesday with inspiration for the sketch challenge! Have a wonderful week!

Thanks so much for stopping by!
See ya next time.

Inky Hugs,
Crystal


{Please note that comment moderation is on. Your lovely comment will appear once approved.}

Thursday, February 15, 2024

'Scraps' Birthday Cards ~ Grin & Purr Plus a Few More Stamps ~ Unity Stamp Co.

 Hello there crafty friend!
I finally finished up the 'scraps' cards I've been working on using up all the leftover papers I've mentioned the last couple of weeks. I was able to make four more birthday cards using strips and pieces of the pattern papers leftover from the TOP Inky Inspiration cards I created earlier this month. Next week I'll be sharing one last card for the Tawny Owl Paperie Inky Inspiration Sketch 18 and I'm going to pick another pack of papers that will be my focus to finish up. Have you used up any of your pattern paper scraps? I hope you're inspired to join me and finish up all these paper scraps we have taking up space.


My first two cards. These are all very simple designs.


For my first card I was able to add blocks of pattern paper to a 4 x 5-1/4" piece of thin white card stock. I did have a couple bits and pieces hang off of the card stock that I'll admit I cut off and threw away. They were too small to do anything with and it actually felt good to allow myself to let them go. To cover up the line in the middle of the card I die cut a ric rac piece from white card stock and adhered it. I think it works well for covering up that ugly line and it adds a little something to the card. For this card, I stamped the awesome new Grin & Purr stamp that just released over at Unity. I LOVE this cat! Oh my gosh! And the sentiments are so purr-fect!! LOL!

Here's a quick list of the Copic markers I used to color up the kitty: 

Ears: R00, R20
Eyes: C00, C1, C3
Fur: W00, W1, W3
Bow Tie: V12, V15, V17 and white gel pen


My second card was created using up a bunch of the strips of the pattern paper. This was so fun to put together. I tried a few different arrangements of the papers but settled on this one. I like the contrast of the papers. I adhered all the strips to a 4-1/4 x 5" piece of a thin white card stock. Trimmed off the excess from the edges (which wasn't a lot, actually) and tossed them in the trash. Yup! So freeing! I adhered the card front to a white A2 top fold card base. I didn't want to cover up the papers so I stamped the Bevy of Balloons background stamp just focusing on the larger middle balloon. I blended some Wilted Violet Distress Oxide around the balloon. I stamped the sentiment from the Cheers & Confetti set. And then just fussy cut it out. Added some white baker's twine and popped up the balloon on the card with some foam tape.


My next two cards. Also simple designs.


My third card finished up the larger scraps I had. I actually cut the larger polka dots paper to adhere on either side of the other paper strips. Again, I adhered all the papers to a 4-1/4 x 5-1/2" card front of thin white card stock that I trimmed down to 4 x 5-1/4" and adhered to a white A2 top fold card base. Now, for this card I didn't want to cover up much of the papers so I chose Winnie the Pooh: Pooh Just Knew. It wasn't too big and the balloon worked well with the balloons in the papers. I die cut Pooh and Piglet using the coordinating die (doesn't look like it's in stock right now). The sentiment is from the Rainbow Birthday stamps... love these stamps! Great sentiments, too!

Here's a quick list of the Copic markers I used to color Pooh & Piglet:

Pooh: Y11, Y15
Piglet: RV10, RV13, RV04
Balloon: V000, V12, V15
Butterfly: BG11, BG32, Y15


And my last card... a hodgepodge of the papers I had left. These didn't quite fit on a full card front. I adhered them to a white A2 top fold card base. I chose the adorable Life's a Party Gnome. Isn't he just the cutest?! I colored him up using colors from the papers. I didn't want to cover up all the papers in the background so I die cut an oval using the Oval Frames Die Set from Newton's Nook Designs. I fussy cut the gnome leaving a skinny white border around him. Adhered him to the vellum and then adhered the vellum oval to the card by applying glue just behind the gnome. To finish off this card, I added a few yellow enamel dots from the Wish Upon a Star Enamel Dots from Echo Park Paper.

Here's a quick list of the Copic markers I used to color up the gnome:

Skin: E000, E00, E11
Beard: C00, C1, C3
Shoes: N1, N3, N5
Cake Hat: E21, E23, E25
Frosting: BG11, BG32, RV13, Y15
Candle: Y11, Y15, YR16
Banner: RV10, RV13

Four more birthday cards for my stash! Woohoo! What do you think of the simple designs? I think they turned out nice. So happy to have finished off a pack of papers though!! Excited to pick out another one and get creative. I hope you've been inspired to pull out some of those papers scraps and finish off some paper packs. Have a wonderful week!

Thanks so much for stopping by!
See ya next time.

Inky Hugs,
Crystal


{Please note that comment moderation is on. Your lovely comment will appear once approved.}