Showing posts with label #winniethepooh. Show all posts

Thursday, February 15, 2024

'Scraps' Birthday Cards ~ Grin & Purr Plus a Few More Stamps ~ Unity Stamp Co.

 Hello there crafty friend!
I finally finished up the 'scraps' cards I've been working on using up all the leftover papers I've mentioned the last couple of weeks. I was able to make four more birthday cards using strips and pieces of the pattern papers leftover from the TOP Inky Inspiration cards I created earlier this month. Next week I'll be sharing one last card for the Tawny Owl Paperie Inky Inspiration Sketch 18 and I'm going to pick another pack of papers that will be my focus to finish up. Have you used up any of your pattern paper scraps? I hope you're inspired to join me and finish up all these paper scraps we have taking up space.


My first two cards. These are all very simple designs.


For my first card I was able to add blocks of pattern paper to a 4 x 5-1/4" piece of thin white card stock. I did have a couple bits and pieces hang off of the card stock that I'll admit I cut off and threw away. They were too small to do anything with and it actually felt good to allow myself to let them go. To cover up the line in the middle of the card I die cut a ric rac piece from white card stock and adhered it. I think it works well for covering up that ugly line and it adds a little something to the card. For this card, I stamped the awesome new Grin & Purr stamp that just released over at Unity. I LOVE this cat! Oh my gosh! And the sentiments are so purr-fect!! LOL!

Here's a quick list of the Copic markers I used to color up the kitty: 

Ears: R00, R20
Eyes: C00, C1, C3
Fur: W00, W1, W3
Bow Tie: V12, V15, V17 and white gel pen


My second card was created using up a bunch of the strips of the pattern paper. This was so fun to put together. I tried a few different arrangements of the papers but settled on this one. I like the contrast of the papers. I adhered all the strips to a 4-1/4 x 5" piece of a thin white card stock. Trimmed off the excess from the edges (which wasn't a lot, actually) and tossed them in the trash. Yup! So freeing! I adhered the card front to a white A2 top fold card base. I didn't want to cover up the papers so I stamped the Bevy of Balloons background stamp just focusing on the larger middle balloon. I blended some Wilted Violet Distress Oxide around the balloon. I stamped the sentiment from the Cheers & Confetti set. And then just fussy cut it out. Added some white baker's twine and popped up the balloon on the card with some foam tape.


My next two cards. Also simple designs.


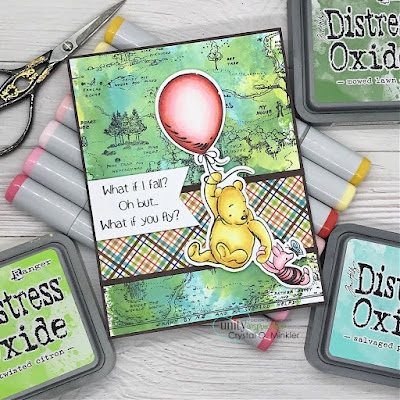
My third card finished up the larger scraps I had. I actually cut the larger polka dots paper to adhere on either side of the other paper strips. Again, I adhered all the papers to a 4-1/4 x 5-1/2" card front of thin white card stock that I trimmed down to 4 x 5-1/4" and adhered to a white A2 top fold card base. Now, for this card I didn't want to cover up much of the papers so I chose Winnie the Pooh: Pooh Just Knew. It wasn't too big and the balloon worked well with the balloons in the papers. I die cut Pooh and Piglet using the coordinating die (doesn't look like it's in stock right now). The sentiment is from the Rainbow Birthday stamps... love these stamps! Great sentiments, too!

Here's a quick list of the Copic markers I used to color Pooh & Piglet:

Pooh: Y11, Y15
Piglet: RV10, RV13, RV04
Balloon: V000, V12, V15
Butterfly: BG11, BG32, Y15


And my last card... a hodgepodge of the papers I had left. These didn't quite fit on a full card front. I adhered them to a white A2 top fold card base. I chose the adorable Life's a Party Gnome. Isn't he just the cutest?! I colored him up using colors from the papers. I didn't want to cover up all the papers in the background so I die cut an oval using the Oval Frames Die Set from Newton's Nook Designs. I fussy cut the gnome leaving a skinny white border around him. Adhered him to the vellum and then adhered the vellum oval to the card by applying glue just behind the gnome. To finish off this card, I added a few yellow enamel dots from the Wish Upon a Star Enamel Dots from Echo Park Paper.

Here's a quick list of the Copic markers I used to color up the gnome:

Skin: E000, E00, E11
Beard: C00, C1, C3
Shoes: N1, N3, N5
Cake Hat: E21, E23, E25
Frosting: BG11, BG32, RV13, Y15
Candle: Y11, Y15, YR16
Banner: RV10, RV13

Four more birthday cards for my stash! Woohoo! What do you think of the simple designs? I think they turned out nice. So happy to have finished off a pack of papers though!! Excited to pick out another one and get creative. I hope you've been inspired to pull out some of those papers scraps and finish off some paper packs. Have a wonderful week!

Thanks so much for stopping by!
See ya next time.

Inky Hugs,
Crystal


{Please note that comment moderation is on. Your lovely comment will appear once approved.}

Thursday, March 16, 2023

Winnie the Pooh: Pooh's Bunny Hop ~ March Sketch Challenge ~ Unity Stamp Co.

 Hello there crafty friend!
Today I'm sharing more inspiration for the Unity March Sketch Challenge that I'm hosting in the Unity Show & Tell Facebook group. I'm sharing another Easter card but this time I'm featuring two new releases that will hit the Unity website later today!! Yay!!


First up... notice the plaid in my background?! Unity is releasing an awesome Plaid Builder {layering stencil}!! It's so easy to use and the possibilities are endless. So many color combinations!! And then, of course, a new adorable Winnie the Pooh stamp. This one is called Winne the Pooh: Pooh's Bunny Hop. Love it!


To create the plaid background I blended Kitsch Flamingo, Salvaged Patina, Twisted Citron and Mustard Seed Distress Oxide inks over the plaid stencils. I trimmed the background to 4 x 5-1/4" and adhered it to a pink card front. The panel was then adhered to a white A2 top fold card base.


Winnie the Pooh was stamped with Black Amalgam ink on white card stock. I also stamped the sentiment inside the egg with the same black ink. Here's a quick list of the Copic markers I used to color up this cute stamped image:

Pooh ~ Y11, Y15
Pooh's Ears ~ C00, C1, C3, RV000, RV10, RV13
Pooh's Basket ~ YG11, YG23
Eggs ~ Y11, Y15, RV000, RV10, RV13, V000, V12, V17, BG000, BG10, BG23
Flowers ~ RV10, RV13, Y11, Y15, YG11, YG23
Grass ~ YG11, YG23
Sky ~ BG000, BG10, BG01


The sketch calls for a rectangle but I thought a circle would be a fun change so I die cut Winnie the Pooh with the Scallops & Circles {nesting dies}. And then I die cut a piece of aqua card stock with the largest die from the same die set. Adhered the circle layers together and then cut the edge off. Next I adhered the circle layers to the plaid background. I finished off the card with a few pretty flatback pearls from my stash.


Here's another look at the sketch! Please know that the sketch is meant to inspire and not require. Feel free to alter it to work for your creation just as I did for mine today. Most importantly have some inky fun! I can't wait to see what you create! Be sure to share your cards in the Unity Show & Tell group and also add them to the sketch challenge album in the group to be entered for a prize!! I'll see you back here next Thursday with more inspiration for this month's sketch challenge.

Thanks so much for stopping by!
See ya next time.

Inky Hugs,
Crystal


{Please note that comment moderation is on. Your lovely comment will appear once approved.}

Saturday, March 4, 2023

~ Friends of Unity March 2023 Blog Hop ~

 Hello there crafty friend!
It's the first Saturday of March which means it's time for our Friends of Unity Blog Hop!! I've been so excited for this month's cue... 


because it's Winnie the Pooh!! I love Pooh Bear and can't wait to see what our friends created to share with us all. So fun! I had a fun idea to share all four seasons of Pooh Bear so I actually have four cards to share. There's a bunch of photos so I'll try to keep the chatter down to a minimum. :)


First up is Spring with the adorable Winnie the Pooh: How Do You Spell Love?
I paired this cute stamp up with a pretty paper pad filled with Spring colors... called Spring Fling by Echo Park Paper Co. 


Here's a quick list of the Copic Markers I used:

Pooh Bear ~ Y11, Y15, Y35
Piglet ~ RV10, RV21, RV14
Dandelions ~ C00, C2, YG11, G14
Grass ~ YG11, G14


I trimmed all my papers and adhered them to a white A2 top fold card base that I turned on its side. I trimmed two 1/8" strips of white card stock to adhere on either side of the daisy papers. The main panel was die cut with the smallest die from the Scallops & Rectangles {nesting dies}. I heat embossed the sentiment on one of the pattern papers with white pigment ink and white embossing powder. I trimmed and adhered the sentiment to the bottom of the main panel and then added foam tape to both and popped them up on the card.


Up next is Summer with the sweet Winnie the Pooh: Pooh Just Knew.
I went with a CAS design for this one. I stamped my sentiment on a card front measuring 4-1/4 x 5-1/2". And then I ink blended a bit of Wilted Violet Distress Oxide inks over the Cloud and Wave stencil being careful not to ink over the sentiment. I die cut the card front with the largest die from the Scallops & Rectangles {nesting dies} and adhered it to a Kraft A2 top fold card base.


I stamped Pooh and Piglet on a piece of white card stock and colored them up with Copic Markers. I then die cut the colored image with the Pooh Just Knew die set and adhered it directly to the card.


Here's a quick list of the Copic Markers I used for this card:

Pooh Bear ~ Y11, Y15, Y35
Piglet ~ RV10, RV21, RV14
Balloon ~ R000, R20, R14, R27
Butterfly ~ B000, B91, B93, Y15


For my Fall card I chose the sweet Winnie the Pooh: A Splendid Place.
And I just had to go with Kraft card stock for this one. I love copic coloring on Kraft for Fall images... the muted colors just scream Fall!


Here's a quick list of the Copic Markers I used for this card:

Pooh Bear ~ Y11, Y15, Y35
Pooh's Scarf ~ R20, R14, R27
Piglet ~ RV10, RV21, RV14
Piglet's Scarf ~ B91, B93, B97
Tree ~ E21, E23, E25
Leaves ~ Y06, YR15, YR68, YR27
Bees ~ Y15
Bee Hive ~ Y11, Y18, Y38
Grass ~ YG91, YG93, YG97
Sky ~ B000


Similar to my second card I did a bit of ink blending with the Cloud and Wave stencil. This time using the Tumbled Glass Distress Oxide ink. I didn't mask anything. I was just careful not to ink over the tree, Pooh or Piglet. I did get a bit on the tree... but it's barely noticeable. I trimmed my colored panel with the Tim Holtz Deckle Torn Edge Trimmer. Adhered it to a mat of Chocolate Chip card stock from Stampin Up. I then die cut a card front of Kraft card stock with the largest die from the Postage Stamp {nesting dies}. I adhered all my layers to a Kraft A2 top fold card base. The sentiment was heat embossed with white pigment ink and white embossing powder on Chocolate Chip card stock. I trimmed it and adhered it to the card.


Last but not least... it's actually my favorite of them all... Winter with the Winnie the Pooh: Feel the Merry. I stamped all of the WTP stamps using Black Amalgam ink from Gina K Designs. I fussy cut this one leaving a bit of a border around and the edges. I adhered the heat embossed sentiment over the image and popped it up on the card with a thin foam tape.


Here's a quick list of the Copic Markers I used for this card:

Pooh Bear ~ Y11, Y15, Y35
Pooh's Scarf ~ G40, G14
Pooh's Honey Pot ~ R20, R14, R27, Y11, Y18, Y38
Boy's Skin ~ E000, E00, E11, E04
Boy's Hair ~ E21, E23, E25
Boy's Jacket ~ R20, R14, R27, B91, B93, B97, B99
Boy's Scarf ~ N2, N4
Jeans ~ B91, B93, B97
Shoes ~ N2, N4, N6, N8
Book ~ C00, C2
Tree ~ YG11, G24, G46
Bench ~ E21, E23, E25
Grass ~ YG91, YG93, YG97


My card design was inspired by the {BYSHC} Sketch 1... I did alter the sketch a bit to make it work with this large image but I really love how this turned out. I paired up this sweet stamp with the My Favorite Christmas 6x6 papers from Echo Park Paper Co. My red card front is Pure Poppy card stock from Papertrey Ink.


All four Seasons of Winnie the Pooh. 
I had so much fun making these cards!! I hope you enjoyed them too. And I hope you're inspired to ink up your Winnie the Pooh stamps. If you do be sure to share your creations in the Unity Show & Tell. We would love to see what you create! And if you don't have any Winnie the Pooh in your collection yet now is the time to shop over at Unity Stamp Co. because all of the WTP stamps are on sale!! Woohoo! I love a good sale!

Now before we get to the hopping, I chose a lucky winner from the comments on last month's hop to win a fun prize and the lucky winner is...


... Meg Crawford!! Congratulations Meg!!
Please email me at crystalominkler@gmail.com to claim your prize. 
Prize must be claimed within two weeks. 

Well, that's it for me this time! Please hop along and enjoy some more inspiration from the Friends of Unity! I'm so excited to see all the creations from our friends!! I will be doing another fun giveaway this month!! Be sure to hop along and comment for a chance to win. {When you comment please leave your name just in case it posts as anonymous.} I'll announce the winner next month! 


Let's get to the hopping...


Crystal <--- you're here

up next ---> Amber


Thanks so very much for supporting our little hop!
We appreciate you!!

See ya next time.

Inky Hugs,
Crystal


{Please note that comment moderation is ON. Your comment will appear shortly.}


Friday, October 21, 2022

Falling for the Holidays 2022 {BYSHC} Linky Party ~ Winnie the Pooh: Feel the Merry ~ Unity Stamp Co.

Hello there crafty friend!
I'm so excited to share my first card for the Falling for the Holidays 2022 {BYSHC} Linky Party!! For my first card I'm featuring the wonderful Winnie the Pooh: Feel the Merry stamps from Sponsor Unity Stamp Co. Unity just released a bunch of really cute new Winnie the Pooh stamps and I have to have them all! Love Winnie the Pooh!! I couldn't wait to color up this beautiful stamp.


I paired this sweet stamp up with the lovely Holly Jolly 6x8 paper pad from Simple Stories. I had colored up the stamp before picking out my papers and these actually went really well with the mix of colors in the image. Which was such a relief! I adhered my layers to a white A2 top fold card base using the iCraft UltraBond Adhesive from new Sponsor Therm O Web.


Here's a quick list of the Copic Markers I used:

Winnie the Pooh ~ Y11, Y15, Y38, R20, R14, R27, C00, C2, C3
Skin ~ E000, E00, E11
Hair / Bench ~ E53, E55, E57 
Jacket / Scarf ~ B0000, B34, B06, B37, R20, R14, R27
Pants ~ E51, E53, E55
Book ~ W00, W3
Boots ~ E53, E55, E57, E59, N2, N4, N6
Tree ~ YG11, G24, G46
Ground ~ C00, C3


I die cut the colored image with the smallest scalloped rectangle die from the Scallops & Rectangles {nesting dies} from Unity. I also die cut one of the pattern papers and then I adhered them together. I stamped the sentiment with Black Amalgam ink from Sponsor Gina K. Designs. Trimmed it and adhered it to the scalloped layers. And then I covered the back with a bunch of iCraft 3D Foam Squares from Therm O Web. I love the dimension the foam gives to the card! To finish it off, I added a couple red enamel dots from my stash.


My card was inspired by the current {BYSHC} Sketch 27! This sketch has become a favorite! It works really well with larger stamps!  Have you visited the Build Your Stash Holiday Cardmakers Facebook group? We host a fun sketch challenge each month to inspire our holiday cardmaking all year long. I love revisiting the sketches and will likely be sharing a few during the Linky Party.


Yay!! I'm also a Sponsor for the Falling for the Holidays 2022 {BYSHC} Linky Party and this is the fabulous prize package that I am offering for one lucky winner. For a chance to win this fun prize make a Christmas card and link it up to the linky party blog post on the Build Your Stash Holiday Cardmakers blog.


Before you leave, be sure to stop by Sponsor Unity Stamp Co... they just released a bunch of new Winnie the Pooh stamps!! And if you haven't already, stop by the Falling for the Holidays 2022 {BYSHC} Linky Party to check out all the wonderful Holiday inspiration from our Sponsors and the {BYSHC} Design Team!! I'm so excited to continue building my stash of holiday cards for 2022... I hope you'll join in the fun and play along! Let's build our stash of holiday cards this week!!


Thanks so much for stopping by!
See ya next time.

Inky Hugs,
Crystal


{Please note that comment moderation is ON. Your comment will appear shortly.}

Wednesday, October 19, 2022

Fall 2022 Series ~ Winnie the Pooh: Fallish Days ~ Unity Stamp Co.

 Hello there crafty friend!
Last month I started a Fall inspired collaboration with my friend Teresa from Fresh and Renewed with Teresa and unfortunately due to health issues we had to cancel the collaboration. Well, I still have the prize that I set aside for the collaboration so I decided to do a little Fall 2022 Series myself. Today I'm sharing my final Fall inspired card for this series, here and on my YouTube channel. I'll be picking a name for the winner from the comments on my YouTube videos. That includes the video that I did with Teresa for the start of our collaboration. So be sure to check that video out if you haven't already. You can check that out here. And if you missed my video last week, you can check out that one here.


So today I'm playing with the adorable new Winnie the Pooh: Fallish Days from Unity Stamp Co. This super cute stamp was just released along with a few more Winnie the Pooh stamps! I couldn't wait to color up this sweet Fall image!


Isn't it the cutest?! And those fun pumpkins... I just love coloring up pumpkins! They have been my favorite image to color with Copic Markers since I started really learning to color with them. I'm still learning all the time, but I wanted to share how I color pumpkins. It's really easy to do.


Here's a quick list of the Copic markers I used:

Winnie the Pooh ~ Y11, Y15, Y35
Orange Pumpkin ~ YR21, YR15, YR68, YR27
Light Orange Pumpkin ~ YR21, YR15
Green Pumpkin ~ YG23, YG93, YG95, YG97


I paired up this cute Winnie the Pooh stamp with the Simple Vintage Autumn Splendor 6x8 paper pad from Simple Stories. I die cut the Pooh bear image with the largest stitched square die from the new Scallops & Squares {nesting dies} from Unity. The Kraft layer is also die cut using the largest scalloped stitched square die. And I finished off the card with a couple green enamel dots from the Fall Break collection from Carta Bella Paper Co. You can check out my copic coloring and process in making this card here... Fall 2022 Series | Winnie the Pooh: Fallish Days | Unity Stamp Co.


 Be sure to visit my YouTube Channel and comment on my video for a chance to win my giveaway! I'll be back next week with the winner of my giveaway!


Thanks so much for stopping by!
See ya next time.

Inky Hugs, 
Crystal


{Please note that comment moderation is on. Your lovely comment will appear shortly.}

Thursday, June 30, 2022

Sweet Mini Slimline ~ Winnie The Pooh: I Think It's Called Love ~ Unity Stamp Co.

 Hello there crafty friend!
Today I'm sharing a cute mini slimline card with an adorable new release from Unity Stamp Co. called Winnie the Pooh: I Think It's Called Love. I can't get enough of the Winnie the Pooh stamps from Unity! If you haven't already stopped by the Unity website to see the latest additions to the Winnie the Pooh line of stamps, you really should go and check them out!!


Isn't this adorable trio just the sweetest stamp ever!! I love them! And I thought rather than coloring them up with Copics I'd play with my ZIG Clean Color Real Brush watercolor markers. I forgot how fun they were to blend with!


I used the following ZIG Clean Color Real Brush markers to color up this adorable trio:

Pooh ~ 050 Yellow, 052 Bright Yellow
Piglet ~ 026 Light Pink, 021 Light Carmine, 025 Pink
Eeyore ~ 036 Light Blue, 034 Dull Blue, 082 Purple, 028 Pale Pink, 071 Flesh Colour
Grass ~ 053 Yellow Green, 041 Light Green, 047 May Green
Flowers ~ 083 Lilac, 031 Cobalt Blue, 052 Bright Yellow


I paired up this cute colored image with the Cute & Crafty paper pad from Doodlebug Design. The colors in the papers wee just perfect for this image... though my pictures don't do it justice. In person, they really do coordinate well. I went with a 6-1/2 x 3-1/2" mini slimline so my card base measures 6-1/2 x 7"; scored at 3-1/2".


I cut my plaid pattern paper to 6 x 3-1/2" and then cut it in half to use on either side of the card base for my background. I cut a strip of scrap card stock to adhere in the middle of those pieces and then I adhered my 3/4 x 3-1/2" piece of pretty floral paper on top. I die cut my colored trio with the Big Little Chain Mini Slimline die from Gina Marie Designs leaving lots of white space on the left side.


 I stamped and trimmed the sentiment and adhered it underneath the trio and then I sat looking at my card for a bit trying to decide what to do with the left side. LOL! I started looking through my dies and found the Stitched Beautiful Bows dies from My Favorite Things. How stinking cute is that bow!! It was so easy to make, too. I sure love how this card turned out! I hope you like it, too!


Thanks so much for stopping by!
See ya next time.

Inky Hugs,
Crystal


{Please note that comment moderation is ON. Your lovely comment will appear shortly.}

Wednesday, June 22, 2022

Collaboration with Fresh and Renewed with Teresa | TOP Inky Inspiration Sketch 1 | Winnie the Pooh Card

Hello there crafty friend!
I'm so excited to be doing a collaboration with my sweet friend Teresa from Fresh and Renewed with Teresa. So I recently started sharing sketches in my Tawny Owl Paperie Inky Inspiration Facebook group... well, I've shared one so far. LOL! Teresa and I both love sketches so I thought it would be fun for us to do a little collab and share a card using the sketch. 


I've been absolutely loving the new line of Winnie the Pooh stamps that Unity Stamp Co. has been releasing so it was a no brainer to use one of these cuties for my card.


I chose the Pooh Just Knew stamps and coordinating dies... I had planned on keeping 100% true to the sketch but I had the idea to have Pooh bear and Piglet flying over the awesome Hundred Acre Wood background stamp.


And I didn't want to cover up that sweet background... so classic and adorable Winnie the Pooh! I used Salvaged Patina, Twisted Citron and Mowed Lawn Distress Oxide inks to ink smoosh my background and then I stamped the adorable background with Ranger Jet Black Archival ink.


Here's a quick list of the Copic Markers I used:

Winnie the Pooh ~ Y11, Y15
Piglet ~ RV0000, RV10, RV21, RV14
Balloon ~ R000, RV0000, RV10, R20, R14, R27, Colorless Blender


If you're interested in seeing my process video you can check it out here... Collaboration with Fresh and Renewed with Teresa | TOP Inky Inspiration Sketch 1 | Winnie the Pooh.


Here's a look at the sketch... my background follows the sketch completely but I flipped the banner to the other side to use with my sentiment and I used the die cut Winnie the Pooh in place of the rectangle focal piece. My motto for sketches is always that they should inspire, not require! I think my card is a good example of that motto.


I popped up Winnie the Pooh and Piglet with lots of foam tape! I also popped up the sentiment with foam tape. It adds a nice bit of dimension to the card. Well, that's it for me. I hope you'll consider joining the fun in my Tawny Owl Paperie Facebook group. I just started sharing sketches but I also share tips for card making and eventually I hope to start doing live videos in the group too. Have a great inky day!

Thanks so much for stopping by!
See ya next time.

Inky Hugs,
Crystal


{Please note that comment moderation is ON. Your comment will appear shortly.}