Showing posts with label #springcard. Show all posts

Monday, April 1, 2024

Inky Paws Challenge #220 ~ Polka Dot Theme Challenge

Hello there crafty friend!
It's time for a new Inky Paws Challenge... a super fun Polka Dot Theme Challenge! So fun! I sure hope that you'll play along with us using your Newton's Nook Designs products! You have until Friday, April 12th to get your entries in for the #220 Polka Dot Theme Challenge and a chance to win a $20 store credit to Newton's Nook Designs!


How fun is this theme!? I can't wait to see all the entries for this one. So fun!


This time I started with my papers. I knew I had to use one of the new paper pads and I was leaning towards a Spring card so Pastel Basics 6x6 Paper Pad was my choice. I wanted to use all the colors {well, nearly... I think I used all but one}. I first die cut the green pattern paper using the largest die from the Frames & Tags Die Set. And then I die cut the purple, yellow, pink and teal papers using the center die with the windows. With all of these papers all die cut I actually considered making more than one card, but I ran out of time. I do still have the die cut papers in my stash so I'm sure I'll be using them soon!


I stamped the adorable pile of critters from the Spring Pile Up Stamp Set using Memento Tuxedo Black ink and colored them up with my Copic markers. I then die cut the cuties using the coordinating Spring Pile Up Die Set. I added foam tape to the back and popped those cuties up on the card. 

Here's a quick list of the Copic markers I used:

Chick: Y11, Y15, YR16
Bunny: C00, C1, C3, R00, R20
Tulips: V000, V12, V15, YG11, YG23
Sheep: C00, C1, C3, N0, N2, N4, R00, R20
Basket: E21, E23, E27
Eggs: R20, RV91, RV93, RV95, V000, V12, V15, BG000, BG11, BG34


I die cut a tag from white card stock using a tag die from the Frames & Tags Die Set. I also die cut just the top portion of the tag die using a scrap of the green pattern paper. I stamped the sentiment using the same black ink. Tore the green pattern paper and adhered it to the tag. I wrapped a piece of white twine around the papers and thread the twine through the hole of the tag. I added foam tape to the back of the tag and popped it up on the card and then tied a bow pulling the twine nice and tight around the papers. I adhered the papers to a white A2 top fold card base.


Now it's your turn to get your paws inky with your Newton's Nook Designs products and create a project with a Polka Dot theme. Be sure to link up to the Inky Paws Challenge! Can't wait to see your projects!


Thanks so much for stopping by!
See ya next time.

Inky Hugs,
Crystal


{Please note that comment moderation is on. Your lovely comment will appear once approved.}

Thursday, January 25, 2024

Fun Fold with a Fix ~ Ribbons & Ruffles ~ Unity Stamp Co.

Hello there crafty friend! 
Today I'm sharing a cute fun fold card featuring the adorable new Ribbons & Ruffles stamp from Unity Stamp Co. This stamp is just too cute!! I couldn't wait to play with her and had a spontaneous idea for a fun fold card so I didn't record my whole process, but just the assembling of the card with the fun fold element and, of course, the fix I needed to do to make it work.


Isn't this sweetie just darling!? So precious and sweet! I could use all the adjectives for this one! LOL! Anywho, as I mentioned above this is a fun fold card but you can't actually see how it works in the photos. So I hope you'll check out my video. But the floral layer is actually just a card front. The fold is in the center... so fun! *wink wink*

You can check out my short video showing the fun fold element of this card and how I had to fix it right here... Fun Fold Card with a Fix | Ribbons & Ruffles | Unity Stamp Co.


I stamped the Ribbons & Ruffles sweetie with Black Amalgam ink on Stampers Select White card stock from Papertrey Ink and colored her up with my Copic markers to coordinate with the pretty papers I had pulled for this card. So happy when I remember to find my papers before actually coloring my image! I die cut the baby girl using the largest stitched circle die from the Scallops & Circles {nesting dies}.

Here's a quick list of the Copic Markers I used:

Skin: E000, E00, E11 
Hair: E70, E87, E74
Blankie: RV91, RV93, Y26
Ribbon: Y23, Y26
Bassinet: Y23, Y26, BG70, BG72, BG75, RV91, RV93
Teddy Bear: N0, N1, N3, N5
Butterfly: Y23, BG72


 I paired up Ribbons & Ruffles with the Hello Darling paper pad from The Paper Studio {Hobby Lobby}. My card stock layers are Smokey Shadow from Papertrey Ink. And the enamel dots that just happened to coordinate with the papers is the Celebrate Autumn Enamel Dots from Echo Park Paper Co. Have an ink-tastic day!

Thanks so much for stopping by!
See ya next time.

Inky hugs,
Crystal

{Please note that comment moderation is on. Your lovely comment will appear shortly.}

Friday, January 19, 2024

Wishes Come True ~ Wishing and Wishing ~ Unity Stamp Co.

Hello there crafty friend! 
I got some inky time with an adorable mouse from Wishing and Wishing from Unity. I even had some time to do a video sharing some ink smooshing and copic coloring for this card. I hope you'll check it out! 


I love ink smooshing! I didn't want to go too crazy with the colors just doing a nice yellow and light orange for a pretty Spring card. I ink smooshed Mustard Seed and Spiced Marmalade Distress Oxide inks and stamped the fun Spring in Your Step Background using Crushed Olive Distress Oxide ink.


I stamped the sweet mouse directly on the front of my white A2 top fold card base. I was a bit concerned the copic coloring would bleed through but it wasn't bad at all.

Here's a quick list of the Copic Markers I used:

Mouse: R00, R20, W00, W1, W3, W5
Dandelion: C00, C1, C3
Stem: G12, G14, YG93


I heat embossed the sentiment in white on Prairie Grass Card Stock from Papertrey Ink. I used TE Anti Static Powder to prep the card stock. Stamped with Sugar Cube Pigment ink from Taylored Expressions. I added some Alabaster White Embossing Powder from Brutus Monroe and then melted the powder using a Wagner Precision Heal Tool.

You can check out my process in making this card here... Wishes Come True | Wishing and Wishing | Unity Stamp Co.


That's it for me today! I hope you've found some inspiration for this wonderful combination of stamps. Have an ink-tastic day!

Thanks so much for stopping by!
See ya next time.

Inky hugs,
Crystal

{Please note that comment moderation is on. Your lovely comment will appear shortly.}

Tuesday, May 9, 2023

Distress Crayon Background ~ Technique Tuesday ~ Unity Stamp Co.

 Hello there crafty friend!
I'm back with another Technique Tuesday! On the 2nd Tuesday of each month I'll be sharing a bit of inspiration and a video featuring a fun technique. I hope that you'll be inspired to get inky and play along with some of the techniques that I share.


Today's technique is all about quick and fun backgrounds with Distress Crayons!! I was chatting with a crafty friend about Distress Crayons and how we HAD to have them but we haven't played with them much, at all! So I thought, what better time to play with them and have some fun than for Technique Tuesday!


And they were so much fun! AND quick!! That's the key word when you're in need of a card ASAP. Am I right?


For my first card I made a Spring version using Mustard Seed, Kitsch Flamingo and Salvaged Patina Distress Crayons. These are my go-to colors for Spring.


I stamped the lovely silhouette stamp from the Meadow of Hope {April 2023 Whit Kit} with VersaFine Onyx Black ink. It's a tiny smidge crooked... but the crafty friend I'm sending it to won't mind. An easy fix would be to trim the panel and adhere it to a white base. Or cut a skinny strip of black card stock to run across that bottom. But I left it as is. 


I just love the font on this sentiment. Stamped so beautifully!


For my second card I made a Winter version... I know. I know. Enough with Winter. I can't help myself. I love Winter. I'd much rather snuggle up in a blanket by a fire to stay warm during the Winter than to lay absolutely still under the ceiling fan just to get some relief from the heat of Summer. Hahaha... but that's just little ole me.


For this background I used Seedless Preserves, Shaded Lilac, Tumbled Glass, and Chipped Sapphire Distress Crayons. Love love love this combo!! I will be using this combo again.


I used the gorgeous Shake Your Flakes {Front & Center stamps} for this card. One of my favorite Winter kits. I smudged this one up when I adhered it to the card base. I was devastated! Check out how I fixed it in my video down below.


These Distress Crayon backgrounds were SO much fun! If you give this fun technique a try, I'd love to see what you create so please share your cards in the Unity Show & Tell group and tag me. Have an ink-tastic day!

Thanks so much for stopping by!
See ya next time.

Inky Hugs,
Crystal


{Please note that comment moderation is on. Your lovely comment will appear once approved.}

Monday, April 10, 2023

Inky Paws Challenge #195 ~ Sketch Challenge Reminder

 Hello there crafty friend!
 There's still time to play along with the Inky Paws Challenge #195 Sketch Challenge!! You have until Friday, April 14th to get your entries in for this fun challenge and a chance to win a $20 store credit to Newton's Nook Designs!


I had a super fun and creative idea for my second card for the current Sketch Challenge over at Inky Paws Challenge. I created a scene card using papers from the new Spring Blooms 6x6 paper pad along with the Sky Scene Builder die set. Here's a quick list of the Copic markers I used to color up the sun and clouds ~ Y11, Y06, Y35, Colorless Blender, BG000


And my card features the adorable bicycle girl from the Loads of Blooms stamp set. I stamped her up with Memento Tuxedo Black ink and colored her up with the following Copic markers:

Skin ~ E000, E00, E11
Dress / Shoes / Leaves ~ YG11, G14
Flowers ~ C00, C1, C3, Y11, Y06, RV10, RV13, RV14
Flower Centers ~ Y11, Y06, Y35, YR04
Bicycle ~ B000, B02, B05
Tires / Pedals / Handles ~ N0, N2, N4, N6
Basket ~ RV10, RV13, RV14


This time I mat each of my pattern paper blocks. The square pattern paper measures 2-3/8" squared with 2-1/2" squared white mats. And the rectangle pattern paper measures 1-1/8 x 2-3/8" with 1-1/4 x 2-1/2" white mats. I adhered them all to a green pattern paper from the paper pad and then adhered my card front to a white A2 top fold card base measuring 4-1/4 x 11"; scored at 5-1/2".


I stamped the sentiment on a scrap of white card stock. Trimmed the edges and cut a flag on the right side. Before adhering the sun and clouds to each other I laid them out on the card and marked the one cloud on the right so I could I trim it with my cutter. I die cut a piece of vellum using a circle die from the Circle Frames die set. I wanted the bicycle girl to be the focal image and I think the vellum helps to bring her to the front.


Now it's your turn to get your paws inky with your Newton's Nook Designs products and create a project using the fun sketch. Be sure to link up to the Inky Paws Challenge! Can't wait to see your projects!


Thanks so much for stopping by!
See ya next time.

Inky Hugs,
Crystal


{Please note that comment moderation is on. Your lovely comment will appear once approved.}

Monday, April 3, 2023

Inky Paws Challenge #195 ~ Sketch Challenge

 Hello there crafty friend!
Who's up for a new challenge?! It's time to get our paws inky with a fun sketch challenge! I had a blast with this sketch! I can't wait to see the entries for this one. You have until Friday, April 14th to get your entries in for the #195 Sketch Challenge and a chance to win a $20 store credit to Newton's Nook Designs!


Another great sketch just perfect for pretty pattern papers!! And so fun... I played with some new Spring release goodies. Doesn't this card just scream Spring!


I used the brand new Spring Blooms 6x6 Paper Pad for my paper layers!! Eeep! Loving the pretty Spring colors and flowers in this paper pad! My paper choices contrast enough on their own so I didn't mat any of my papers. The tulips papers measure 2-1/2" squared. And the cute yellow daisy papers measure 1-1/4 x 2-1/2".


I stamped the sentiment with Wilted Violet Distress Oxide ink. I stamped the beautiful truck, tulip and butterflies from the Spring Haul Stamp Set on white card stock with Memento Tuxedo Black Ink. And colored it up with the following Copic markers:

Truck ~ BG000, BG10, BG01, E51, E55, E57, N0, N2
Brake Lights ~ R20, R14, R27
Tires ~ N0, N2, N4, N6
Blanket ~ YG11, G14, Y000, Y13, Y18
Plant Pots ~ E51, E55, E57, E17
Watering Can ~ N0, N2
Daffodils ~ Y000, Y13, Y18
Tulips ~ V20, V22, V17
Daisies ~ RV10, RV13
Leaves ~ YG11, G14
Butterflies ~ RV10, RV13, V20


I die cut the truck, tulip and butterflies using the coordinating Spring Haul Die Set. I adhered all of my paper layers to the bottom purple pattern paper. I wrapped the panel with some burlap string a few times and tied a pretty bow. And then I adhered it to a white A2 top fold card base. 


Now it's your turn to get your paws inky with your Newton's Nook Designs products and create a project using the sketch. Be sure to link up to the Inky Paws Challenge! Can't wait to see your projects!


Thanks so much for stopping by!
See ya next time.

Inky Hugs,
Crystal


{Please note that comment moderation is on. Your lovely comment will appear once approved.}

Monday, March 20, 2023

Inky Paws Challenge #194 ~ Color Challenge

Hello there crafty friend!
It's time for another fun Inky Paws Challenge... a Color Challenge! 
I sure hope that you'll join in the fun and play along with us with your Newton's Nook Designs products! You have until Friday, March 31st to get your entries in for the #194 Color Challenge and a chance to win a $20 store credit to Newton's Nook Designs!

How beautiful are these colors... Bubblegum Pink, Lilac, Spring Green and White


I do love the look of a Clean & Simple {CAS} card with a lot of white and even though this card has a lot of white I don't think it's considered a true CAS card because of all the layers. Still... it works for our current color challenge. 


A white A2 card base measuring 4-1/4 x 11"; scored at 5-1/2" for my bottom layer. Another white layer that was die cut with the largest postage stamp die from the Framework Die Set. My main white panel measures 3-1/4 x 4-1/2" and I die cut some white clouds with a die from the Sky Borders Die Set. Just a touch of the pink and purple and a pop of green with some die cut grass using the Land Borders Die Set


I stamped the sweet critters from the Spring Pile Up stamp set with Memento Tuxedo black ink. I colored them up very simply with my Copic Markers and then die cut them with the coordinating Spring Pile Up Die Set. Here's a quick list of the Copic Markers I used to color up the sweet critters:

Birdie ~ V000, V12, V17, YR15
Bunny ~ C00, C1, C3, RV000, RV10, RV13, RV14
Tulips ~ RV000, RV10, RV13, RV14, YG11, YG23
Sheep ~ C00, C1, C3, N0, N2, N4, RV000, RV10, RV13
Basket ~ E21, E23, E27
Eggs ~ RV000, RV10, RV13, RV14, V000, V12, V17, YG11, YG23

You can check out my process video here... Hippity Hoppity Easter | Spring Pile Up | Newton's Nook Designs.


Now it's your turn to get your paws inky with your Newton's Nook Designs products and create a project using the color combo of Bubblegum Pink, Lilac, Spring Green, and White. Be sure to link up to the Inky Paws Challenge! Can't wait to see your projects!


Thanks so much for stopping by!
See ya next time.

Inky Hugs,
Crystal


{Please note that comment moderation is on. Your lovely comment will appear once approved.}

Monday, March 13, 2023

Inky Paws Challenge #193 ~ Spring Theme Challenge Reminder

  Hello there crafty friend!
There's still time to play along with the Inky Paws Challenge #193 - a Spring theme challenge! You have until this coming Friday, March 17th to get your entries in for the #193 Spring Theme Challenge and a chance to win a $20 store credit to Newton's Nook Designs!

Changing things up today with a flower stamp! Daisies are my favorite flower.


I just adore these sweet daisies from the Dainty Daisies stamp set from Newton's Nook Designs. I am also in love with the detail in the coordinating Dainty Daisies die set... oh my gosh! It even cuts out those itty bitty spots between the flowers. Love! Here's a quick list of the Copic markers I used to color up the daisies:

Pink Daisy ~ RV000, RV10, RV13
Purple Daisy ~ V01, V12, V15
White Daisies ~ C00, C1, C3
Daisy Centers ~ Y11, Y15, Y35
Leaves & Stems ~ YG11, YG13


I was so excited to see Spring colors in the Love & Chocolate Paper Pad. I hadn't played with these papers yet so I was happy to finally use a few for my card. I also used the wonderful Frames Squared Die Set to die cut all my pattern paper layers. The sentiment was also die cut using the largest circle die in the Frames Squared Die Set.


All my paper layers are adhered together and then adhered to a 5 x 10" card base scored at 5" for a 5" square card base. I adhered the two white daisies on the left to the sentiment circle and then I added foam tape to both pieces. I then popped them both up on the card.


Now it's your turn to get your paws inky with your Newton's Nook Designs products and create a project with a Spring theme. Be sure to link up to the Inky Paws Challenge! Can't wait to see your projects!


Thanks so much for stopping by!
See ya next time.

Inky Hugs,
Crystal


{Please note that comment moderation is on. Your lovely comment will appear once approved.}

Monday, March 6, 2023

Inky Paws Challenge #193 ~ Spring Theme Challenge

 Hello there crafty friend!
It's time to get our paws inky with a fun Spring themed challenge! I don't know about you, but I am ready for Spring! I took inspiration for my Spring themed card from the beautiful challenge badge below. You have until Friday, March 17th to get your entries in for the #193 Spring Theme Challenge and a chance to win a $20 store credit to Newton's Nook Designs!


I love rain boots!! They are so cute. 
I just had to use the Newton's Rain Boots stamp set for my first card for this challenge.


How sweet is this stamp?! And the sentiment is so perfect. These boots remind me of a pair my daughter had when she was little. I chose a cute Spring inspired palette for my colors with mostly pastel colors. I think the cute calico kitty is a nice contrast to all the pastel.


I ink blended Tumbled Glass Oxide ink over the Petite Clouds Stencil leaving white space around the edges. The card front was then die cut with the largest die from the Framework Die Set. I adhered the die cut background to a card front of pattern paper from the sweet Springtime Paper Pad


I stamped the sweet kitty from the Newton's Rain Boots Stamp Set with Memento Tuxedo black ink and die cut it with the coordinating Newton's Rain Boots Die Set. And then I colored it up with the following Copic markers:

Calico Kitty ~ RV10, RV21, YR15, YR27, N0, N2, N4, N8, C00
Boots ~ V000, V01, V12, V15, RV10, RV21
Duck ~ Y06, Y11, Y15, YR15, YR68
Daisy ~ YR15, YR68, Y11, C00, C1, C3
Tulips ~ B0000, B00, B02, BG10
Leaves / Stems ~ YG11, YG23

You can check out my process video here... Spring CAS Card | Inky Paws Challenge 193 | Newton's Nook Design.


Now it's your turn to get your paws inky with your Newton's Nook Designs products and create a project with a Spring theme. Be sure to link up to the Inky Paws Challenge! Can't wait to see your projects!


Thanks so much for stopping by!
See ya next time.

Inky Hugs,
Crystal


{Please note that comment moderation is on. Your lovely comment will appear once approved.}

Saturday, March 4, 2023

~ Friends of Unity March 2023 Blog Hop ~

 Hello there crafty friend!
It's the first Saturday of March which means it's time for our Friends of Unity Blog Hop!! I've been so excited for this month's cue... 


because it's Winnie the Pooh!! I love Pooh Bear and can't wait to see what our friends created to share with us all. So fun! I had a fun idea to share all four seasons of Pooh Bear so I actually have four cards to share. There's a bunch of photos so I'll try to keep the chatter down to a minimum. :)


First up is Spring with the adorable Winnie the Pooh: How Do You Spell Love?
I paired this cute stamp up with a pretty paper pad filled with Spring colors... called Spring Fling by Echo Park Paper Co. 


Here's a quick list of the Copic Markers I used:

Pooh Bear ~ Y11, Y15, Y35
Piglet ~ RV10, RV21, RV14
Dandelions ~ C00, C2, YG11, G14
Grass ~ YG11, G14


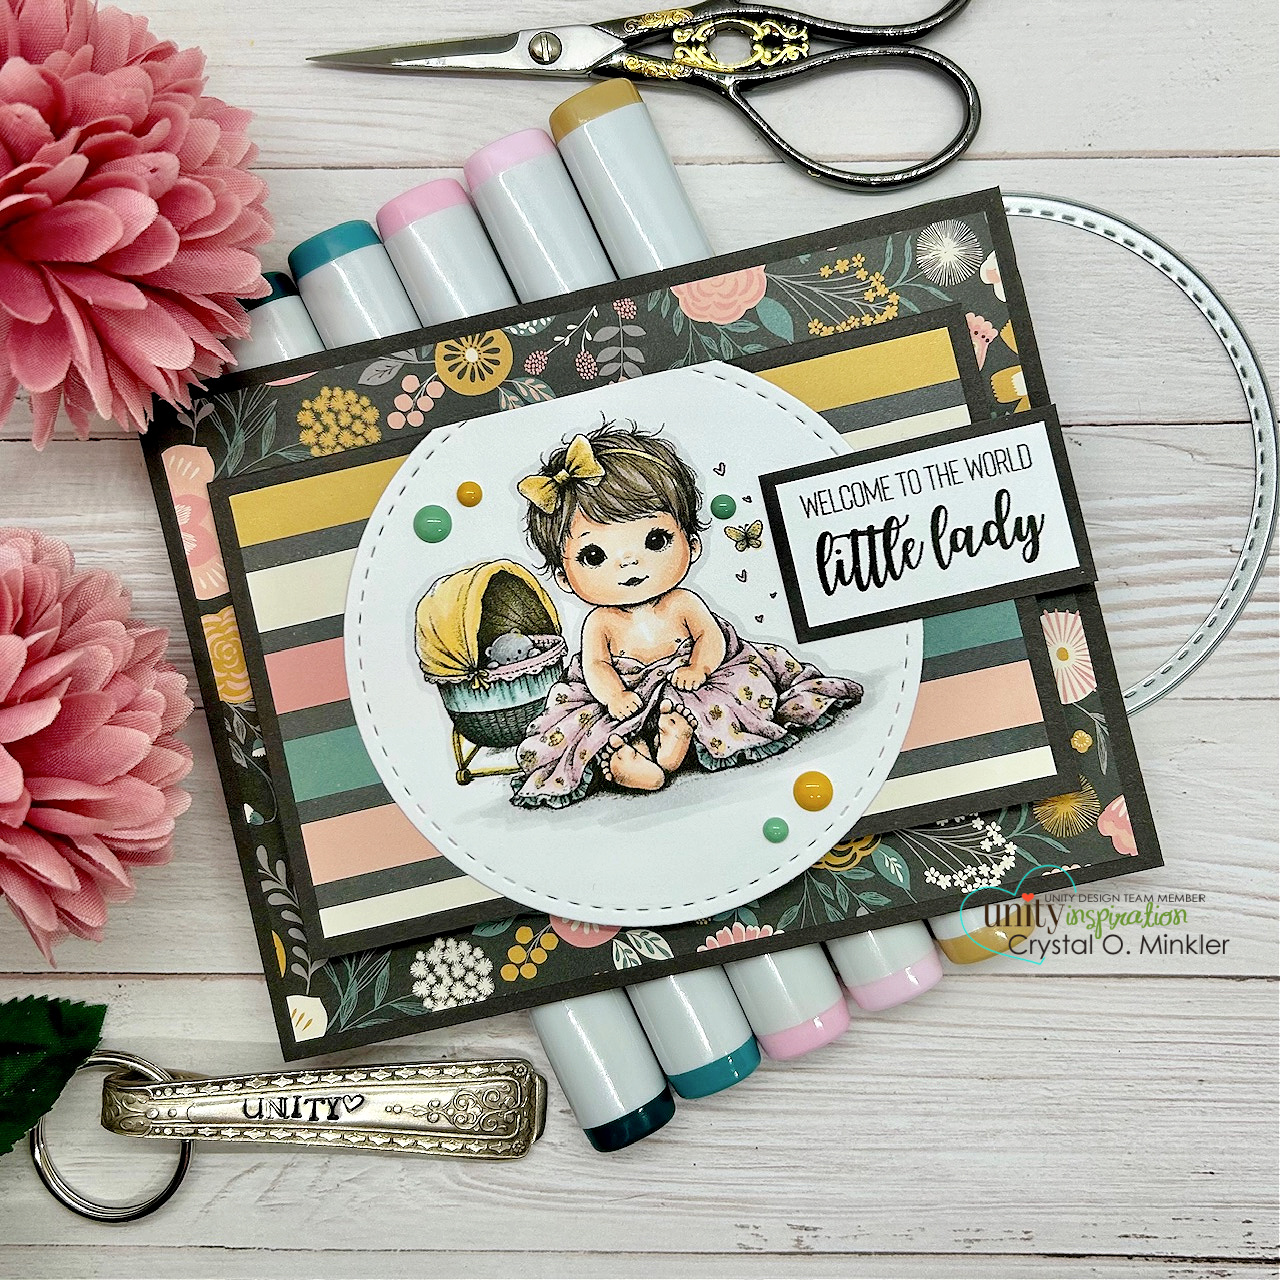
I trimmed all my papers and adhered them to a white A2 top fold card base that I turned on its side. I trimmed two 1/8" strips of white card stock to adhere on either side of the daisy papers. The main panel was die cut with the smallest die from the Scallops & Rectangles {nesting dies}. I heat embossed the sentiment on one of the pattern papers with white pigment ink and white embossing powder. I trimmed and adhered the sentiment to the bottom of the main panel and then added foam tape to both and popped them up on the card.


Up next is Summer with the sweet Winnie the Pooh: Pooh Just Knew.
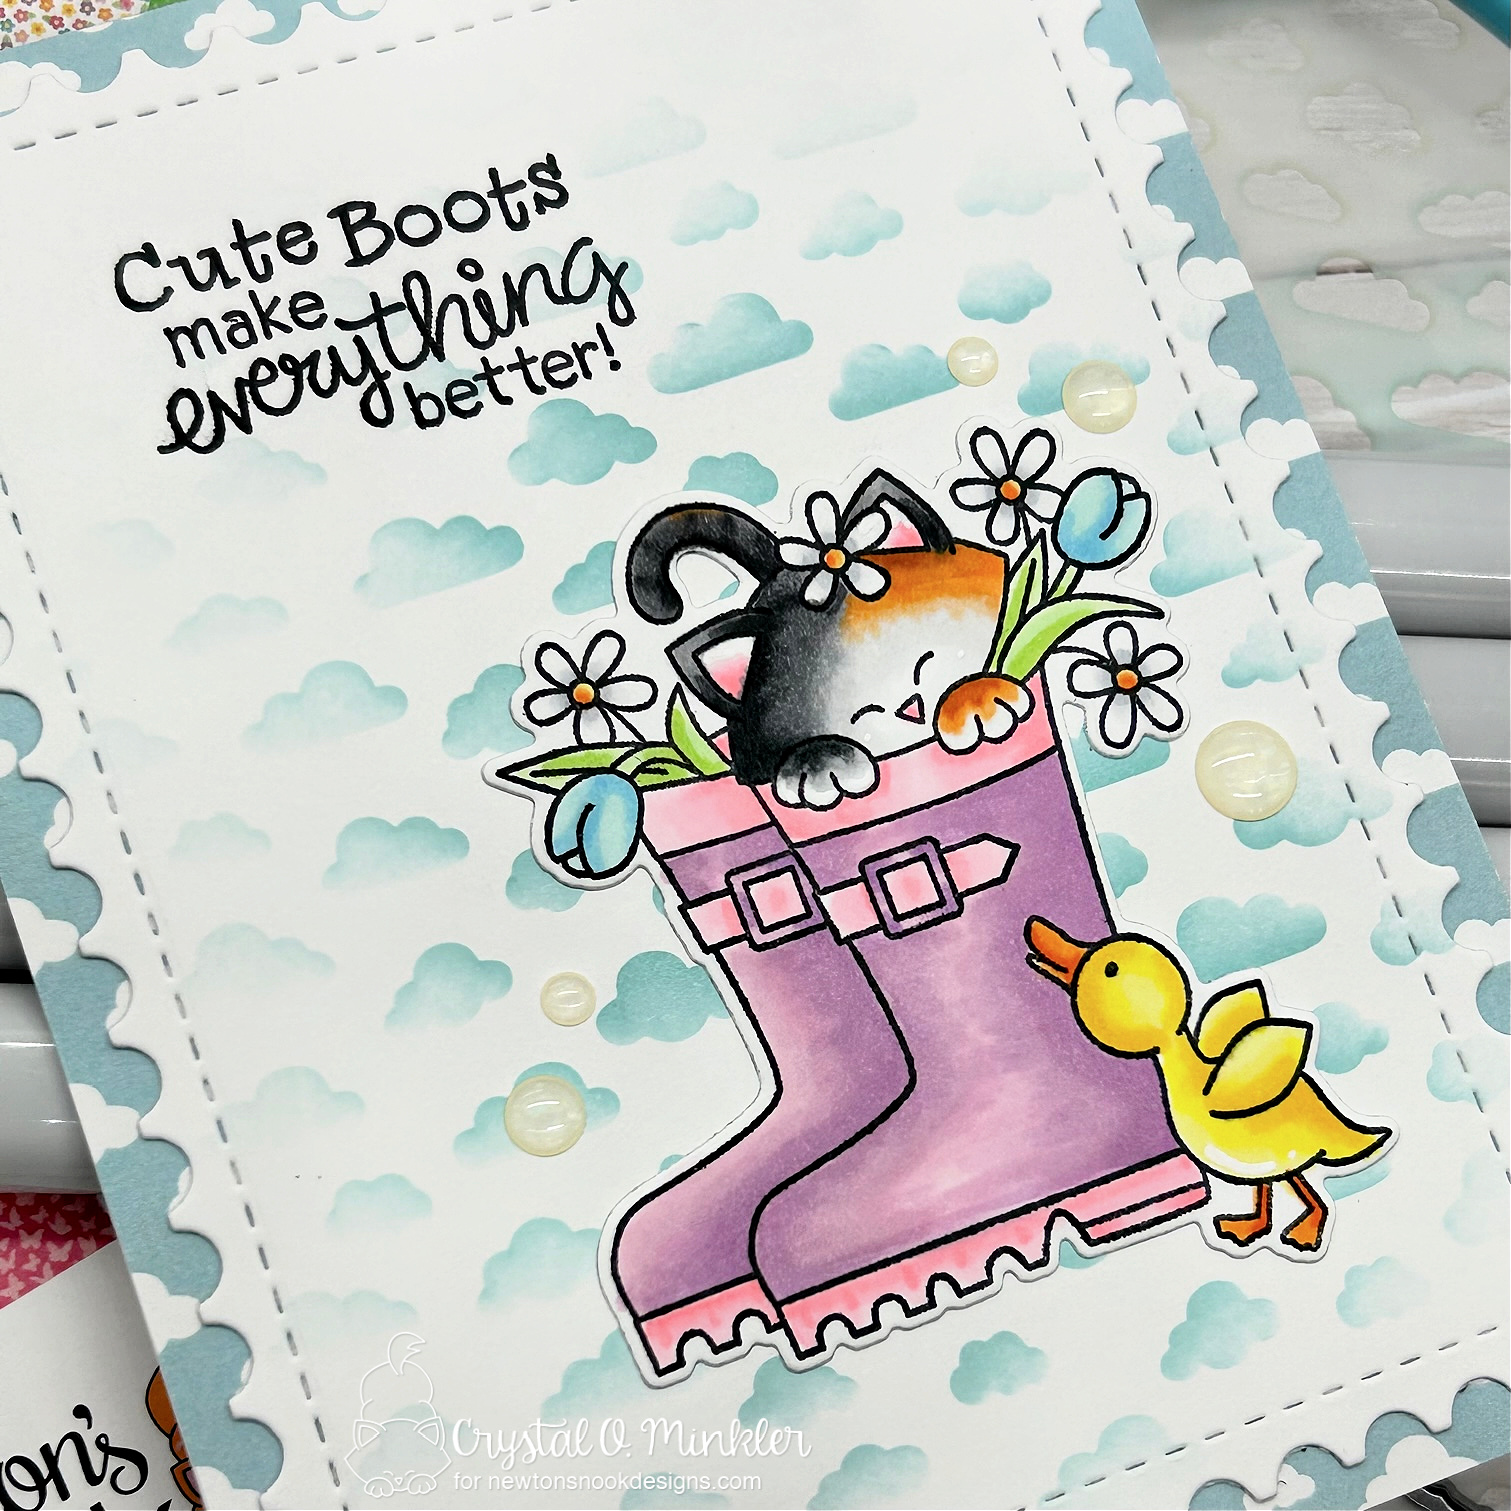
I went with a CAS design for this one. I stamped my sentiment on a card front measuring 4-1/4 x 5-1/2". And then I ink blended a bit of Wilted Violet Distress Oxide inks over the Cloud and Wave stencil being careful not to ink over the sentiment. I die cut the card front with the largest die from the Scallops & Rectangles {nesting dies} and adhered it to a Kraft A2 top fold card base.


I stamped Pooh and Piglet on a piece of white card stock and colored them up with Copic Markers. I then die cut the colored image with the Pooh Just Knew die set and adhered it directly to the card.


Here's a quick list of the Copic Markers I used for this card:

Pooh Bear ~ Y11, Y15, Y35
Piglet ~ RV10, RV21, RV14
Balloon ~ R000, R20, R14, R27
Butterfly ~ B000, B91, B93, Y15


For my Fall card I chose the sweet Winnie the Pooh: A Splendid Place.
And I just had to go with Kraft card stock for this one. I love copic coloring on Kraft for Fall images... the muted colors just scream Fall!


Here's a quick list of the Copic Markers I used for this card:

Pooh Bear ~ Y11, Y15, Y35
Pooh's Scarf ~ R20, R14, R27
Piglet ~ RV10, RV21, RV14
Piglet's Scarf ~ B91, B93, B97
Tree ~ E21, E23, E25
Leaves ~ Y06, YR15, YR68, YR27
Bees ~ Y15
Bee Hive ~ Y11, Y18, Y38
Grass ~ YG91, YG93, YG97
Sky ~ B000


Similar to my second card I did a bit of ink blending with the Cloud and Wave stencil. This time using the Tumbled Glass Distress Oxide ink. I didn't mask anything. I was just careful not to ink over the tree, Pooh or Piglet. I did get a bit on the tree... but it's barely noticeable. I trimmed my colored panel with the Tim Holtz Deckle Torn Edge Trimmer. Adhered it to a mat of Chocolate Chip card stock from Stampin Up. I then die cut a card front of Kraft card stock with the largest die from the Postage Stamp {nesting dies}. I adhered all my layers to a Kraft A2 top fold card base. The sentiment was heat embossed with white pigment ink and white embossing powder on Chocolate Chip card stock. I trimmed it and adhered it to the card.


Last but not least... it's actually my favorite of them all... Winter with the Winnie the Pooh: Feel the Merry. I stamped all of the WTP stamps using Black Amalgam ink from Gina K Designs. I fussy cut this one leaving a bit of a border around and the edges. I adhered the heat embossed sentiment over the image and popped it up on the card with a thin foam tape.


Here's a quick list of the Copic Markers I used for this card:

Pooh Bear ~ Y11, Y15, Y35
Pooh's Scarf ~ G40, G14
Pooh's Honey Pot ~ R20, R14, R27, Y11, Y18, Y38
Boy's Skin ~ E000, E00, E11, E04
Boy's Hair ~ E21, E23, E25
Boy's Jacket ~ R20, R14, R27, B91, B93, B97, B99
Boy's Scarf ~ N2, N4
Jeans ~ B91, B93, B97
Shoes ~ N2, N4, N6, N8
Book ~ C00, C2
Tree ~ YG11, G24, G46
Bench ~ E21, E23, E25
Grass ~ YG91, YG93, YG97


My card design was inspired by the {BYSHC} Sketch 1... I did alter the sketch a bit to make it work with this large image but I really love how this turned out. I paired up this sweet stamp with the My Favorite Christmas 6x6 papers from Echo Park Paper Co. My red card front is Pure Poppy card stock from Papertrey Ink.


All four Seasons of Winnie the Pooh. 
I had so much fun making these cards!! I hope you enjoyed them too. And I hope you're inspired to ink up your Winnie the Pooh stamps. If you do be sure to share your creations in the Unity Show & Tell. We would love to see what you create! And if you don't have any Winnie the Pooh in your collection yet now is the time to shop over at Unity Stamp Co. because all of the WTP stamps are on sale!! Woohoo! I love a good sale!

Now before we get to the hopping, I chose a lucky winner from the comments on last month's hop to win a fun prize and the lucky winner is...


... Meg Crawford!! Congratulations Meg!!
Please email me at crystalominkler@gmail.com to claim your prize. 
Prize must be claimed within two weeks. 

Well, that's it for me this time! Please hop along and enjoy some more inspiration from the Friends of Unity! I'm so excited to see all the creations from our friends!! I will be doing another fun giveaway this month!! Be sure to hop along and comment for a chance to win. {When you comment please leave your name just in case it posts as anonymous.} I'll announce the winner next month! 


Let's get to the hopping...


Crystal <--- you're here

up next ---> Amber


Thanks so very much for supporting our little hop!
We appreciate you!!

See ya next time.

Inky Hugs,
Crystal


{Please note that comment moderation is ON. Your comment will appear shortly.}