Showing posts with label kitty. Show all posts

Friday, September 12, 2025

{BYSHC} Sketch Challenge 61 ~ Meowy Kittymas ~ Crafty Stamp Co.

Hello there crafty friend!
I'm back with a little inspiration for the {BYSHC} Sketch Challenge 61 hosted in the Build Your Stash Holiday Cardmakers Facebook group! Today I'm sharing a cute card featuring a fun stenciled background and stamp from our fabulous Sponsor, Crafty Stamp Co.


I started with my background layers for this card. I blended Sugar Cube Pigment White ink over the Let it Snow Stencil. I did this on a 5-1/2 x 4-1/4" card front and a strip of Kraft card stock. I added a 1/8" strip of white card stock on the top of my Kraft strip which breaks up the pattern of the snowflakes a bit. I tried a few different things for the fishtail banner. I tried white card stock and it was too much white. I tried stenciling the Kraft again with the Let it Snow Stencil. And it just seemed like too much. So I flipped it over and I like the plain Kraft fishtail banner. I think it's a great background for the kitties.


I stamped the fun kitties from the Meowy Kittymas Stamp Set using Memento Tuxedo Black ink and colored it up with Copic markers. And then I fussy cut it leaving a border. 

Here's a quick list of the Copic markers I used:
Orange Kitty: YR20, YR15, YR27, R00, R20
White Kitty: C0, C2, R00, R20
Calico Kitty: N0, N2, N4, YR20, YR15, R00, R20
Truck: R20, R14, R27, N0, N2, N4, N6, C0, C2, Y11, Y15, B000, B00
Gifts: E30, E31, E33, R14, R27
Tree: YG11, G24, G46, E51, E23, E25
Stars: Y11, Y15


I heat embossed the sentiment using the Sugar Cube White Pigment ink from Taylored Expressions with Alabaster White Embossing Powder from Brutus Monroe. I ended up matting it with white card stock because I felt like it was getting lost in all the Kraft layers. The white border makes it pop. I added foam tape to the back of the kitties and the sentiment and I popped them both up on the card. I finished off the card with a few white enamel dots from my stash.


Here's a look at {BYSHC} Sketch Challenge 61 for the month of September. If you're interested in seeing a bit more inspiration for this sketch, check out the amazing inspiration from the design team over on the {BYSH} Cardmakers blog! The design team, as always, rocked this sketch!

Thanks so much for stopping by!

Inky hugs,
Crystal

Wednesday, August 13, 2025

Birthday Girl Anya ~ Preview Day 3 ~ The Greeting Farm

 Hello there crafty friend!
It's the final day of previews at The Greeting Farm for the August release! Today we're introducing BIRTHDAY GIRL ANYA... today's super sweet stamp set includes the adorable Anya with a cute kitty and a cake and some other cute accessory stamps! All so fun!


I stamped Anya, the cake, the table, and kitty with Memento Tuxedo Black ink and colored them with Copic markers. Fussy cut each of them on the line and then colored the edges with a Memento Tuxedo Black marker making the edges nice and neat.

Here's a quick list of the Copic markers I used:
Skin: E000, E00, E11
Freckles: E33
Hair: Y21, E33, E35
Hair Accessories: YG21, YG11, RV10, RV02, RV14, YR20, YR15, B000, B00
Dress: B000, B00, RV10, RV02
Kitty: C0, C2, R00, R20
Gift Bag: B000, B00
Cake: YG21, YG11, YG03, YR20, YR15, RV10, RV02, RV14
Table Cloth: RV10, RV02
Table: C0, C2


I paired up Anya with some old papers from Stampin' Up that's been in my stash for quite awhile. I think the party theme of the papers really worked nicely with these stamps. I die cut the background layer with the largest die from the Postage Stamp {nesting dies} and the garland paper was die cut using a die from the Scallops & Rectangles {nesting dies}, both from Unity.


I stamped and trimmed the sentiment and adhered it directly to the card. I popped up the kitty with foam tape. And then I finished off the card with three rhinestones from the Frosty Rhinestones from Gina Marie Designs.


The release goes live in the store tomorrow the 15th at 12am EST! Woohoo! Be sure to come back tomorrow for the release Blog Hop!! One lucky winner will receive a $50 gift card to The Greeting Farm. All you have to do is comment on the hop! Yay!

Thanks so much for stopping by!

Inky Hugs,
Crystal


Friday, July 11, 2025

{BYSHC} Sketch Challenge 59 ~ Lovely Latte ~ Lawn Fawn

Hello there crafty friend!
I'm back with a little inspiration for the {BYSHC} Sketch Challenge 59 hosted in the Build Your Stash Holiday Cardmakers Facebook group! Today I'm sharing a fun holiday card featuring a cute die and stamp from our fabulous Sponsor, Lawn Fawn.


I started with my background for this card. I pulled out my retired Perfectly Plaid Christmas 6x6 Paper Pack and trimmed the background layer to 4 x 5-1/4". The teal paper was a scrap. It measures 4 x 1-3/4". I adhered those layers to a red A2 top fold card base of Pure Poppy card stock from Papertrey Ink.


I die cut the pieces for the cup using the Lovely Latte dies. The face and handle were die cut from Pure Poppy card stock. The coffee was die cut from Kraft card stock from Papertrey Ink. The lighter part of the coffee, the inner (green) portion of the cup, and the face/cheeks were die cut from Stampers Select White card stock and I colored them with Copics.

Here's a quick list of the Copic markers I used:
Green: YG11, G24, G46
Coffee: E51
Cheeks: R00, R20
Kitty: R00, R20, YR20, YR15, N0, N2, N4
Bell: Y15, Y28
Eyes / Mouth: 100 (black)


I die cut a circle from vellum card stock using a die from the Large Cross-Stitched Circle Stackables dies. I adhered the cup to the vellum and then adhered the vellum to the card by only applying liquid glue behind the cup. I stamped the adorable kitty from the Say What? Holiday Critters. I colored her like my sweet Quinn and die cut her with the coordinating Say What? Holiday Critters dies. I popped her up on the card with foam tape. I stamped the sentiment from the Thanks a Latte stamp set. I trimmed it and adhered it directly to the card.


Here's a look at {BYSHC} Sketch Challenge 59 for the month of July. If you're interested in seeing a bit more inspiration for this sketch, check out the amazing inspiration from the design team over on the {BYSH} Cardmakers blog! The design team, as always, rocked this sketch!

Thanks so much for stopping by!

Inky hugs,
Crystal

Sunday, May 11, 2025

Space Kitties ~ Preview Day 1 ~ The Greeting Farm

 Hello there crafty friend!
It's the first day of previews at The Greeting Farm for the May release! This month's release is fantastic!! It's filled with OHHHs and AHHHs! Be sure to check out The Greeting Farm blog each day this week!


I stamped all of the adorable images and the sentiment from the Space Kitties with Memento Tuxedo black ink and colored the images up with Copic Markers. I fussy cut them all on the line and colored the edges of the fussy cutting with a Memento Tuxedo Black marker. There was one exception with the ring around the green planet. I fussy cut a white border around the ring so the ring wouldn't get lost in the background.

Here's a quick list of the Copic markers I used:
White Kitty: C00, C2, C3, R00, R20
Orange Kitty: YR21, YR15, YR27, R00, R20
Gray Kitty: N0, N2, N4
Space Suits: C00, C2, C3, R20, R14, Y11, Y15, BG0000, BG10, BG01, N2, N4
Stars: Y11, Y15
Yellow / Pink Planet: Y11, Y15, RV10, RV04
Purple Planet: V000, V12, V15
Spaceship: Y11, Y15, YR15, R14, RV10, RV04, BG10, BG01, N0, N2, N4, C00, C2
Falling Star: Y11, Y15, YG21, YG23, RV10, RV04, BG10, BG01
Green Planet: YG21, YG23


I had a blast ink smooshing and blending a fun galaxy background for today's card. I started by ink smooshing Mustard Seed, Picked Raspberry, and Chipped Sapphire Distress Inks. I then blended Chipped Sapphire Distress Ink over the background with a blending brush. I covered most of the pink and yellow in the background so there were just a few 'bursts' of color. I blended around the edges and through the middle with Black Soot Distress Ink. 


Once the background was dry {or nearly dry... I'm an impatient cardmaker! LOL!}, I spattered the background with white acrylic paint that I thinned out with a spritz of water. I let the background dry overnight. When I came back to it the next day, I trimmed the galaxy background to 4 x 5-1/4" and adhered it to a black top fold card base measuring 4-1/4 x 11"; scored at 5-1/2". 


I played around a bit with placement for all the fun images and once I was happy with them, I adhered them to the card. I just love how this turned out! Release goes live in the store on the 15th at 12am EST.

Thanks so much for stopping by!
See ya next time.

Inky Hugs,
Crystal


{Please note that comment moderation is on. Your lovely comment will appear once approved.}


Friday, February 21, 2025

Curlers & Catitude Pissy Kitty ~ Unity Stamp Co. ~ Coffee Loving Papercrafters

 Hello there crafty friend!
 I'm so excited to share another fun coffee themed card as a guest designer for Coffee Loving Papercrafters


Today I'm sharing a sassy kitty card featuring the adorably snarky Curlers & Catitude Pissy Kitty. I absolutely adore this kitty stamp from Unity Stamp Co.


I stamped the kitty with Black Amalgam ink from Gina K. Designs and colored her up with Copic markers. Here's a quick list of the Copic markers I used to color up the kitty:
Kitty: YR21, YR15, N0, N2, N4, C00, R00, R20
Eyes: YG11, G14, C00, C2
Curlers: BG10, BG01, BG72
Mug: R000, R83, R37, E21


I paired up the snarky kitty with the Perk Me Up {paper pack} also from Unity. It has a fun vintage vibe that I love! I die cut the kitty and distressed the edges with a bit of Vintage Photo and Ground Espresso Distress Ink.


I stamped, trimmed and also distressed the edges of the sentiment. I adhered it to the bottom of the die cut circle and popped them both up with foam tape. Lots of fun to make this one! Hope you've been inspired to get inky this weekend with some caffeine themed goodies!

Thanks so much for stopping by!
See ya next time.

Inky hugs,
Crystal

{Please note that comment moderation is on. Your lovely comment will appear once approved.}

Sunday, January 19, 2025

Have My Heart Card ~ Reluctant Love Pissy Kitty ~ Unity Stamp Co.

Hello there crafty friend! 
I'm back with another fun Valentine's Day card this time using the amazing Reluctant Love Pissy Kitty stamps from Unity's January release. I can't get enough of this sweet kitty!


I stamped the fun kitty using Black Amalgam ink and colored her up with some Copic markers. I die cut the panel using the largest die from the Postage Stamp {nesting dies}.

Here's a quick list of the Copic markers:
Kitty: T0, T2, T4, T6
Heart: RV10, RV11, RV14


I wanted to add some more hearts so I grabbed the Heart Confetti Stencil {sadly, it's not available anymore} and I blended very lightly with my pink blending brush. In fact, I didn't add any ink to my brush so I could keep it light on purpose. I adhered the panel to a card base of Pale Peony card stock from Papertrey Ink.


I stamped the sentiments, trimmed them up and mat them with Pale Peony card stock. And then I adhered them directly to the card. I finished off the card with a few rhinestones from my stash.

Thanks so much for stopping by!
See ya next time.

Inky hugs,
Crystal

{Please note that comment moderation is on. Your lovely comment will appear shortly.}

Monday, January 6, 2025

Inky Paws Challenge #236 ~ Color Challenge {Week 1}

Hello there crafty friend!
It's time for a new Inky Paws Challenge! We're playing with a fun mix of colors this month for a Color Challenge! I sure hope that you'll join us and play along with your Newton's Nook Designs products! Don't forget... our challenges are a whole month long so there's lots of time to play along! Yay! You have until Friday, January 31st to get your entries in for the #236 Color Challenge and a chance to win a $20 store credit to Newton's Nook Designs!


Our beautiful colors are... Cherry Red, Dreamy Turquoise, Buttery Brown, and White!! Love this combo!


I made a simple background using an older TOPII Sketch 19. When I'm stuck for an idea, I like to look through my past sketches to see what will inspire me. It works every time!


I stamped the adorable kitty from Newton's Heart Stamp Set with Memento Tuxedo Black ink and colored the kitty with Copic Markers. I die cut the kitty using the coordinating Newton's Heart Die Set.

Here's a quick list of the Copic markers I used for the kitty and heart:
Kitty: R00, R20, W00, W1, W3, W5
Heart: R20, R14, R27


I created my background layers using pattern papers from the Love & Meows 6x6 Paper Pad and Kraft card stock from Papertrey Ink. I popped the kitty up on the card using foam tape. And finished off the card with a few red enamel dots from the I Am Mom Enamel Dots from Echo Park Paper Co.


Now it's your turn to get your paws inky with your Newton's Nook Designs products and create a project using the color combo of Cherry Red, Dreamy Turquoise, Buttery Brown, and White. Be sure to link up to the Inky Paws Challenge! Can't wait to see your projects!


Thanks so much for stopping by!
See ya next time.

Inky Hugs,
Crystal


{Please note that comment moderation is on. Your lovely comment will appear once approved.}

Monday, December 2, 2024

Inky Paws Challenge #235 ~ Year End Cards Theme Challenge {Week 1}

 Hello there crafty friend!
Who's up for a new challenge?! It's time to get our paws inky with a fun theme challenge! I'm excited to see the variations of card entries for this challenge! You have until Friday, December 20th to get your entries in for the #235 Year End Cards Theme Challenge and a chance to win a $20 store credit to Newton's Nook Designs!


This will be a fun challenge! For my first card, I've created a Christmas card.


I used the adorable Cat Christmas Tree Stamp Set for my first card for this challenge. I stamped it with Memento Tuxedo Black Ink and colored it up with Copic markers. It's die cut using the coordinating Cat Christmas Tree Die Set

Here's a quick list of the Copic markers I used to color up the stamps:
Star: Y11, Y15
Christmas Lights: YG11, G24, B0000, B00, Y11, Y15, R20, R14
Cool Gray Cats: C00, C1, C3
Neutral Gray Cats: N0, N2, N4, N5
Orange Cats: YR21, YR15
Green Ornament: YG11, G24, G46
Red Ornament: R20, R14, R27


I paired up the cute cat Christmas tree with pretty papers from the Christmas Time 6x6 Paper Pad. I die cut the scraps of pattern paper using the A2 Card Layout Die Set. I also die cut a piece of True Black card stock from Papertrey Ink for the frame. The middle piece of pattern paper with the wreaths is actually a smaller piece of paper that didn't fill the space, but I covered up the opening with the cat tree.


I adhered all the layers to a white A2 top fold card base that I turned on its side for a landscape card. I die cut a banner of white card stock using the banner die from the Frames & Flags Die Set. And then I stamped the sentiment using the same black ink.


Now it's your turn to get your paws inky with your Newton's Nook Designs products and create a project using this fun theme. Be sure to link up to the Inky Paws Challenge! Can't wait to see your projects!


Thanks so much for stopping by!
See ya next time.

Inky Hugs,
Crystal


{Please note that comment moderation is on. Your lovely comment will appear once approved.}

Tuesday, September 24, 2024

Tawny Owl Paperie Inky Inspiration Sketch 26 ~ {Clearly Unity} Purr-Fect Time ~ Unity Stamp Co.

 Hello there crafty friend!
It's time for a new sketch challenge! Today I'm sharing my first card for the Tawny Owl Paperie Inky Inspiration Sketch Challenge 26 in the Tawny Owl Paperie Inky Inspiration Facebook group. I think this sketch will be another great one for scraps! I inked up the adorable {Clearly Unity} Purr-Fect Time stamp set from Unity! Have you ventured into the photopolymer stamps now available at Unity?! I love them! I've added a few to my stash and was excited to ink this one up!


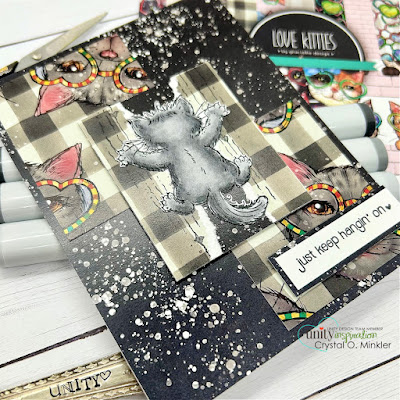
I still have a few bits and pieces of scraps from the leftover papers I've been trying to finish off. I actually started making cards with those and didn't have pieces to work with for this sketch. So I saw this cute stamp by my desk and thought I'd pair it up with the adorable Love Kitties {paper pack}.


Here's a look at the fun sketch for Tawny Owl Paperie Inky Inspiration Sketch Challenge 26. The sketch, as always, is meant to inspire not require. So let the sketch lead in your design, but don't feel limited by it. I had a few scraps in my paper pack but I ended up trimming them to 2-1/4 x 2-3/4".


 I stamped the adorable {Clearly Unity} Purr-Fect Time kitty using Memento Tuxedo Black ink onto a scrap of Stampers Select White card stock. I Copic colored up the kitty with N2, N4, and N6. I fussy cut the kitty and then stamped it again onto the pattern paper. I tore the pattern papers and adhered them to the 2-1/4 x 2-3/4" piece of spattered black pattern paper. I adhered all of my layers to a white A2 top fold card base, except for my focal panel. I added foam tape to the back of that and popped it up on the card.


I adhered the kitty directly to the papers. I thought about popping him up with some foam tape but didn't want to make the card too bulky. I stamped the sentiment, mat it with a scrap of the pattern paper and popped it up on the card too. This was such a fun card to make!

 I hope you all have fun with this sketch! I can't wait to see what you create with it. 
Have an ink-tastic week!

Thanks so much for stopping by!
See ya next time.

Inky Hugs,
Crystal


{Please note that comment moderation is on. Your lovely comment will appear once approved.}

Monday, September 23, 2024

Inky Paws Challenge #232 ~ Cozy Fall Theme Challenge Reminder

Hello there crafty friend!
There's still time to play along with the Inky Paws Challenge #232 - Cozy Fall Theme Challenge! You have until this coming Friday, September 27th to get your entries in for this fun challenge and a chance to win a $20 store credit to Newton's Nook Designs!


Such a fun theme!! I got so excited because our weather was cooling off and now we have a 90 degree day with the heat index putting us in the 100s. Ugh. I can't wait for Fall!


I started with my background using the Falling Leaves Stencil. I blended Mustard Seed, Carved Pumpkin, and Vintage Photo Distress Inks over the stencil onto Kraft card stock. I also splattered a bit of Vintage Photo Distress Ink over the background. I die cut the background using the largest die from the Framework Die Set. Adhered it to a 4-1/8 x 5-3/8" piece of Dark Chocolate card stock from Papertrey Ink. I also die cut a scalloped frame using a die from that same set. I adhered the leaf panel to a Kraft A2 top fold card base measuring 4-1/4 x 11"; scored at 5-1/2".


I stamped the cute book reading kitty from Newton's Reading List Stamp Set using Memento Tuxedo Black ink. And then I had fun coloring it up with Copic markers. Once I was happy with my coloring I die cut the kitty using the coordinating Newton's Reading List Die Set. I also stamped one of the cute mugs from the Cup of Cocoa Stamp Set, colored it up and then die cut it using the coordinating Cup of Cocoa Die Set that just arrived with my order! Yay for new crafty goodies! I used a sentiment from the Cup of Cocoa Stamp Set for the book cover. I love how it ties the images together!


I adhered the mug to the kitty and books. And then I adhered the ensemble to the frame. I added a whole bunch of foam tape to the back of the kitty ensemble and frame and then popped it up on the card. All that was left was a fall sentiment. So I went looking through the awesome new Autumn Reads Stamp Set and found the perfect sentiment. I heat embossed the sentiment on the same Dark Chocolate card stock that I had die cut using a die from the Framework Die SetI prepped the card stock with the TE Anti-Static Powder Tool from Taylored Expressions. I stamped the sentiments using Sugar Cube White Pigment ink, also from Taylored Expressions. I then dusted the ink with Alabaster White Embossing Powder from Brutus Monroe and melted the powder with a Wagner Precision Heat Tool. Once it was cooled, I wiped off the remaining anti static powder using a microfiber cloth. I added foam to the back of the sentiment around the frame and then popped it up on the card.


Now it's your turn to get your paws inky with your Newton's Nook Designs products and create a project with a Summer theme. Be sure to link up to the Inky Paws Challenge! Can't wait to see your projects!


Thanks so much for stopping by!
See ya next time.

Inky Hugs,
Crystal


{Please note that comment moderation is on. Your lovely comment will appear once approved.}

Monday, May 20, 2024

Inky Paws Challenge #223 ~ Friendship Theme Challenge Reminder

Hello there crafty friend!
There's still time to play along with the Inky Paws Challenge #223 - Friendship Theme Challenge! You have until this coming Friday, May 24th to get your entries in for this fun challenge and a chance to win a $20 store credit to Newton's Nook Designs!


This has been such a fun theme and I just had to use my favorite stamp set for my reminder card!


I stamped the friends from the Sips & Stories Stamp Set using Memento Tuxedo Black ink. And then I had a blast coloring them up with Copic markers. It's so fun to pull colors from the papers and try to balance them out. I did pretty good until I colored the blonde's hair the same as her pillow. Oh well! Once I was happy with my coloring I die cut the friends using the coordinating Sips & Stories Die Set.


Here's the list of the Copic markers I used:

Skin: E000, E00, E11
Blonde Hair: Y02, Y21, Y26
Brunette Hair: E42, E43, E44
Yellow Shirt / Pillow: Y11, Y15, Y35
Grey Sweater: N0, N1, N3
Jeans: B91, B93, B95, B97
Chair / Slippers / Hair Band: V000, V12, V15
Blue & White Pillows / Blanket: C00, C1, C3, BG000, BG02, BG45, BG57
Grey Kitty: R00, R20, N0, N1, N3
Coffee: E21, E23, E25
Mugs: BG000, BG02, BG45, BG57, C00, C1, C3
Books: V12, V15, C00, C1, E21, E23, E25


I paired the friends with the awesome Coffee House Stories 6x6 Paper Pad. I had so much fun mixing and matching the papers to build a scene for this card. I die cut the books papers using the largest die from the Frames & Flags Die Set. I also die cut the flags for the sentiment and the green polka dots paper using dies from that same die set. The circle for the scene I created for the friends was die cut using a die from the Circle Frames Die Set. I die cut the hearts paper and then die cut a scrap of the blue striped paper. All of my layers are adhered to a white A2 top fold card base.


Now it's your turn to get your paws inky with your Newton's Nook Designs products and create a project with a Friendship theme. Be sure to link up to the Inky Paws Challenge! Can't wait to see your projects!


Thanks so much for stopping by!
See ya next time.

Inky Hugs,
Crystal


{Please note that comment moderation is on. Your lovely comment will appear once approved.}