Showing posts with label plaid. Show all posts

Thursday, September 4, 2025

Pumpkin Spice Season ~ Miss Anya Coffee Break ~ The Greeting Farm

 Hello there crafty friend! 
I am so ready for Fall and all the pretty colors that come with it!! The temperatures are teasing of the upcoming cooler days and it can't come quick enough for me. In my continual effort of inking up stamps that haven't seen ink yet, I inked up one of the adorable Miss Anya's from Miss Anya Coffee Break.


I found this adorable stamp in my stash and she just needed to see some ink! Unfortunately, I can't seem to find Miss Anya Coffee Break on the website. But if you'd like to add her to your collection, you can check out thFarmers Market and submit a request via email... maybe she'll be available for the next Farmers Market. Fingers crossed!


I inked up the adorable Miss Anya with Memento Tuxedo Black ink and colored her up with Copic markers. I fussy cut her on the line and then I used a Memento Tuxedo Black marker to color the edges of my fussy cutting. This makes the fussy cutting look nice and neat. I also stamped the stack of cups and later decided to add a pumpkin because I wanted to use a sentiment that was more fitting for Fall. I chose the super sweet Pumpkin Spice Season stamp set for the pumpkin and the sentiment. Unfortunately, this cute set is also not available right now. {Here's the >>> Farmers Market <<< link again just in case you want to submit a request for this one!} I colored up the pumpkin and fussy cut it and then I adhered Miss Anya to the pumpkin and added foam tape to the back of both of them. I also popped up the stack of cups and the sentiment using foam tape.

Here's a quick list of the Copic markers I used:
Skin: E000, E00, E11, R00, R20
Hair: N0, N2, N4
Bow: YR20, YR15
Coat: C0, C2, YR20, YR15
Dress: YR20, YR15, YR68, R14, E21, E23
Boots: E21, E23
Cups: C0, C2, BG000, BG01, BG72, E000, E00
Pumpkin: YR20, YR15, YR68, E21, E23


I paired up Miss Anya Coffee Break with some fun plaid papers from my stash. Aren't they just wonderful for a Fall card?! Adding the mat in between my plaids separates them enough that they look nicely together. I cut my bottom layer to 4 x 5-1/4" and the top plaid layer measures 2-3/4 x 4-1/4". The white mat measures 3 x 4-1/2" and the brown strip across the card measures 4-1/4 x 1-1/4". All my layers are adhered to a dark brown A2 top fold card base measuring 4-1/4 x 11"; scored at 5-1/2".


Have you had a pumpkin spice drink yet? I haven't just yet but I did find some yummy pumpkin spice almonds. So good! I finished off the card by adding a few copper sequins from my stash. I sure hope I've inspired you to get inky!

Thanks so much for stopping by!

Inky Hugs,
Crystal

Friday, July 11, 2025

{BYSHC} Sketch Challenge 59 ~ Lovely Latte ~ Lawn Fawn

Hello there crafty friend!
I'm back with a little inspiration for the {BYSHC} Sketch Challenge 59 hosted in the Build Your Stash Holiday Cardmakers Facebook group! Today I'm sharing a fun holiday card featuring a cute die and stamp from our fabulous Sponsor, Lawn Fawn.


I started with my background for this card. I pulled out my retired Perfectly Plaid Christmas 6x6 Paper Pack and trimmed the background layer to 4 x 5-1/4". The teal paper was a scrap. It measures 4 x 1-3/4". I adhered those layers to a red A2 top fold card base of Pure Poppy card stock from Papertrey Ink.


I die cut the pieces for the cup using the Lovely Latte dies. The face and handle were die cut from Pure Poppy card stock. The coffee was die cut from Kraft card stock from Papertrey Ink. The lighter part of the coffee, the inner (green) portion of the cup, and the face/cheeks were die cut from Stampers Select White card stock and I colored them with Copics.

Here's a quick list of the Copic markers I used:
Green: YG11, G24, G46
Coffee: E51
Cheeks: R00, R20
Kitty: R00, R20, YR20, YR15, N0, N2, N4
Bell: Y15, Y28
Eyes / Mouth: 100 (black)


I die cut a circle from vellum card stock using a die from the Large Cross-Stitched Circle Stackables dies. I adhered the cup to the vellum and then adhered the vellum to the card by only applying liquid glue behind the cup. I stamped the adorable kitty from the Say What? Holiday Critters. I colored her like my sweet Quinn and die cut her with the coordinating Say What? Holiday Critters dies. I popped her up on the card with foam tape. I stamped the sentiment from the Thanks a Latte stamp set. I trimmed it and adhered it directly to the card.


Here's a look at {BYSHC} Sketch Challenge 59 for the month of July. If you're interested in seeing a bit more inspiration for this sketch, check out the amazing inspiration from the design team over on the {BYSH} Cardmakers blog! The design team, as always, rocked this sketch!

Thanks so much for stopping by!

Inky hugs,
Crystal

Friday, May 5, 2023

Happy Father's Day ~ BBQ Gnome ~ Unity Stamp Co.

 Hello there crafty friend!
I have a cute mini slimline Father's Day card to share today using a super cute new stamp that just released over at Unity Stamp Co. I kept the design simple for this one... pretty much CAS {Clean & Simple} but with a bit of color in the background.


I just adore this new BBQ Gnome from Unity. He's so cute with his spatula and BBQ sauce. And so much fun to color!


Here's a quick list of the Copic markers I used to color up the cute gnome:

Skin ~ E000, E00, E11, E04
Beard / Hat ~ C00, C1, C3
Oven Mitt ~ N4, N6, R20, R17, R27
Spatula ~ C00, C1, N0, N2, N4, N6
Grill ~ N0, N2, N4, N6, E42, E44, E49
BBQ Sauce / Kebabs ~ E42, E44, E49
Grass ~ YG11, YG23
Sky ~ B0000, B00


I die cut the panel using the Wonky Stitched Mini Slimline Die from Gina Marie Designs. I cut a piece of plaid pattern paper from the Let Your Soul Wander {paper pack} to 5-3/4 x 3-3/8" and adhered it to a to the right side of a 6-1/2 x 3-1/2" black card front. Next, I adhered it to a white mini slimline card base measuring 7 x 6-1/2"; scored at 3-1/2".


A simple and pretty quick Father's Day card. Be sure to stop by Unity for their big birthday sale and new release!! Lots of wonderful new goodies!

Thanks so much for stopping by!
See ya next time.

Inky hugs,
Crystal


{Please note that comment moderation is on. Your lovely comment will appear once approved.}

Thursday, March 16, 2023

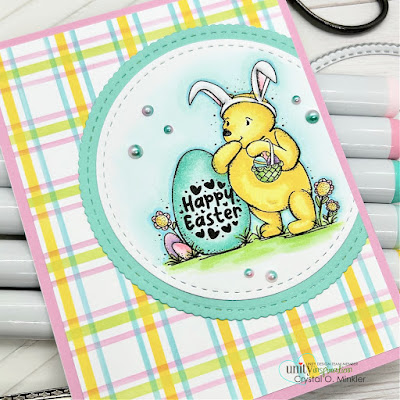
Winnie the Pooh: Pooh's Bunny Hop ~ March Sketch Challenge ~ Unity Stamp Co.

 Hello there crafty friend!
Today I'm sharing more inspiration for the Unity March Sketch Challenge that I'm hosting in the Unity Show & Tell Facebook group. I'm sharing another Easter card but this time I'm featuring two new releases that will hit the Unity website later today!! Yay!!


First up... notice the plaid in my background?! Unity is releasing an awesome Plaid Builder {layering stencil}!! It's so easy to use and the possibilities are endless. So many color combinations!! And then, of course, a new adorable Winnie the Pooh stamp. This one is called Winne the Pooh: Pooh's Bunny Hop. Love it!


To create the plaid background I blended Kitsch Flamingo, Salvaged Patina, Twisted Citron and Mustard Seed Distress Oxide inks over the plaid stencils. I trimmed the background to 4 x 5-1/4" and adhered it to a pink card front. The panel was then adhered to a white A2 top fold card base.


Winnie the Pooh was stamped with Black Amalgam ink on white card stock. I also stamped the sentiment inside the egg with the same black ink. Here's a quick list of the Copic markers I used to color up this cute stamped image:

Pooh ~ Y11, Y15
Pooh's Ears ~ C00, C1, C3, RV000, RV10, RV13
Pooh's Basket ~ YG11, YG23
Eggs ~ Y11, Y15, RV000, RV10, RV13, V000, V12, V17, BG000, BG10, BG23
Flowers ~ RV10, RV13, Y11, Y15, YG11, YG23
Grass ~ YG11, YG23
Sky ~ BG000, BG10, BG01


The sketch calls for a rectangle but I thought a circle would be a fun change so I die cut Winnie the Pooh with the Scallops & Circles {nesting dies}. And then I die cut a piece of aqua card stock with the largest die from the same die set. Adhered the circle layers together and then cut the edge off. Next I adhered the circle layers to the plaid background. I finished off the card with a few pretty flatback pearls from my stash.


Here's another look at the sketch! Please know that the sketch is meant to inspire and not require. Feel free to alter it to work for your creation just as I did for mine today. Most importantly have some inky fun! I can't wait to see what you create! Be sure to share your cards in the Unity Show & Tell group and also add them to the sketch challenge album in the group to be entered for a prize!! I'll see you back here next Thursday with more inspiration for this month's sketch challenge.

Thanks so much for stopping by!
See ya next time.

Inky Hugs,
Crystal


{Please note that comment moderation is on. Your lovely comment will appear once approved.}

Wednesday, April 27, 2022

Spring into Christmas 2022 {BYSHC} Linky Party ~ Destination Christmas ~ Newton's Nook Designs

 Hello there crafty friend!
It's day 6 of the Spring into Christmas 2022 {BYSHC} Linky Party and today I'm sharing a cute card using some products from Sponsor Newton's Nook Designs!! I just love this adorable truck full of Christmas goodies from the Destination Christmas stamp set!! Isn't it the cutest!!


Now that's not the only product I used from Sponsor Newton's Nook Designs... you see that awesome plaid background?! I used the Plaid Stencil Set to create that plaid background. I blended over the plaid stencils on the red card stock with Hickory Smoke Distress Ink and Black Soot Distress Ink for a really pretty holiday plaid.


I die cut the plaid background with the stitched rectangle die from the Scallops & Rectangles {nesting dies} from Sponsor Unity Stamp Co. I used the largest stitched scallops die to die cut a piece of True Black card stock. I adhered these two layers together and wrapped them with a piece of True Black Luxe Satin Ribbon from Papertrey Ink.


I colored up the cute truck with the following Copic markers:

Truck ~ R20, R14, R27, R89, E55, E57, R59, N2, N4, N6
Window ~ B000, B00 
Headlight ~ Y06, Y35
Tires ~ N2, N4, N6, C00, C3
Tree ~ YG11, G24, G46
Kraft/Red Present ~ E30, E33, R20, R14, R27
Pink/Purple Present ~ RV0000, RV11, RV21, V12, V15, V17
Blue Present ~ B000, B00, B02


I die cut a piece of white card stock with the X Stitched Circle die {sadly, it looks like it's out of stock} from Sponsor Gina Marie Designs and I actually die cut a second one for my hill that the truck is resting on. I added a bit of blue 'sky' to my circle using a blending brush and Tumbled Glass Distress Oxide ink. I fussy cut the truck with my EK Success Cutter Bee scissors and cleaned up the edges by coloring them with a Memento Tuxedo black marker. I adhered all my layers for the circle focal together and adhered them to a True Black circle that I die cut with a die from the Additional Circles die from Waffle Flower.


I sure hope you'll head on over to the  Spring into Christmas 2022 {BYSHC} Linky Party to see all the fabulous inspiration being shared so far! Even if you're not able to play along, I hope you'll stop by and check out all the sweet inspiration being shared! So many beautiful cards!!


Thanks so much for stopping by!
See ya next time.

Inky Hugs,
Crystal


{Please note that comment moderation is ON. Your comment will appear shortly.}