Showing posts with label Distress Crayons. Show all posts

Saturday, August 2, 2025

~ Friends of Unity August 2025 Blog Hop ~

Hello there crafty friend!
It's time for our Friends of Unity Blog Hop!! This month's cue is a lot of fun! 


Technique is such a broad scope for a cue... it took me a while to figure out what I wanted to make. I decided to play with my Distress Crayons again. It's been awhile.


I masked my 4-1/4 x 5-1/2" panels with iCraft Removable Pixie Tape from Therm O Web. And then I colored the masked off area with three distress crayons. For my first card, I chose Fossilized Amber, Mustard Seed, and Spiced Marmalade. I used a baby wipe to blend those colors and then removed the tape. I swiped my white pigment ink pad across the raised part just to add a touch of white.


I wanted to add some texture to my panels so I ran this one through my Big Shot with the Dot Matrix embossing folder from Tim Holtz/Sizzix. I paired up this fun background with an adorable bee from the  July 2025 Uniquely Unity Bee-Hold stamps. The die cut hexagons are cut out using the Hexagon Frames from Newton's Nook Designs.

Copic markers used: Y11, Y15, B000, C0, C2


I masked off my second panel at a diagonal. For this one I used Picked Raspberry, Spun Sugar, and Kitsch Flamingo distress crayons. I blended them with a baby wipe and then ran this one through my Big Shot with the Tattered Poinsettia embossing folder also from Tim Holtz/Sizzix.


I paired up my second panel with the beautiful Seasons of Life stamp. The sentiment is from Deck the Halls. I fussy cut the girl and adhered her and the sentiment to the card.

Copic markers used for this card:
Skin: E000, E00, E11
Hair: Y11, E43, E44
Hat / Scarf / Mittens: G000, G82, C0, C2
Coat: E21, E33, E25, R20, R22


I've kinda been on a roll with the Christmas cards so... I made another! For this one I masked the paper horizontally and I used Peacock Feathers, Salvaged Patina, and Mermaid Lagoon distress crayons. And I used a snowflake embossing folder that I believe is Tim Holtz but there's no brand name on it so I'm not sure.


I paired up this fun wintry background with the awesome Sending Christmas Smiles stamps. I adore this snowman! I fussy cut him and adhered him to the card. 

Here's a quick list of the Copic markers I used:
Snowman: C0, C2
Nose: Y11, YR20, YR15, YR68
Arm: E00, E59
Hat: N2, N4, N6
Scarf / Hat Band: R20, R14, R27

Now before we get to the hopping, I chose a lucky winner from the comments on last month's hop to win a fun prize and the lucky winner is...


... Becca Yahrling!! Congratulations, Becca!!
Please email me at crystalominkler@gmail.com to claim your prize. 
Please claim the prize before September 3rd, 2025. 

Well, that's it for me this time! It's a short hop this month with just six of us sharing our makes. Be sure to hop along and enjoy some more inspiration! I can't wait to see how our friends were inspired by this month's cue. I will be doing another fun giveaway this month!! Be sure to hop along and comment for a chance to win. {When you comment please leave your name just in case it posts as anonymous.} I'll announce the winner next month! 


Let's get to the hopping...

Crystal <--- you're here

up next ---> Jenni


Dawn


Thanks so very much for supporting our little hop!
We appreciate you so much!!

Inky Hugs,
Crystal


Wednesday, April 16, 2025

Membership Wednesday ~ April 2025 BOM Mod Bloom ~ Unity Stamp Co.

Hello there crafty friend!
Happy Membership Wednesday! Today I'm sharing a card featuring this month's fab background stamp from the April 2025 Background of the Month membership from Unity called Mod Blooms. 


I wanted to try a fun technique with Distress Crayons where I colored the rubber stamp, spritzed the stamp with a bit of water and then stamped the image. It worked pretty well. I went back in with the crayons to add a bit of detail.


I used Abandoned Coral, Picked Raspberry, Mustard Seed, Wild Honey, and Twisted Citron Distress Crayons. And then I used a Tumbled Glass Distress Crayon to watercolor around the flower.


I die cut the flower using a stitched rectangle die from the Scallops & Rectangles {nesting dies}. I die cut a piece of white card stock using the largest die from the Postage Stamp {nesting dies}. And then I adhered all of my layers to a white A2 top fold card base.


Here's a quick look at this month's Background of the Month membership! So many fun ideas for this stamp! Well, that's it for me today! I hope you've been inspired to play with your membership stamps! Have an INKredible day!


Thanks so much for stopping by!
See ya next time.

Inky Hugs,
Crystal


{Please note that comment moderation is on. Your lovely comment will appear once approved.}

Wednesday, May 17, 2023

Membership Wednesday ~ May 2023 Whit Kit ~ Unity Stamp Co.

 Hello there crafty friend!
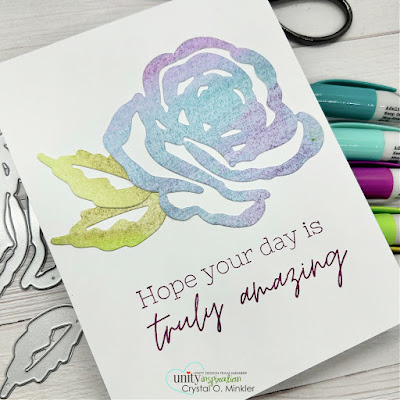
Today I'm sharing a super CAS card using the lovely Petal Play dies from the wonderful May 2023 Whit Kit membership along with the sentiment from the Petal Play stamps, also included in this month's card kit from Unity. I just couldn't help but play a bit more with my Distress Crayons. They've been so fun!


I hadn't planned on going quite so CAS with this one, but sometimes the card just dictates the design and this one was very loud. LOL! 


I created the background for the die cut using a handful of Distress Crayons and then die cut it with the beautiful Petal Play dies. The sentiment is stamped with the Seedless Preserves Distress Oxide ink directly on a white A2 top fold card base.


I used liquid glue to adhere the die cuts so that I could lift the flower easily and adjust the leaves as I needed to get them how I wanted. Another option would be to add a double sided tape to the distress crayon background before die cutting the flower and leaves. You could then adhere the leaves to the back of the flower before adhering them both to the card.

You can check out my process video here... Distress Crayon CAS Card | May 2023 Whit Kit | Unity Stamp Co.


Here's a look at the wonderful Whit Kit for May!! Gorgeous! This wonderful card kit is available for only $42.99. That includes shipping! You also get a $6.95 discount on every order from Unity over $45. Members are also able to purchase past Whit Kit stamp sets for just $14 and past Whit Kit paper packs for $2 off!! So awesome!!! 

That's it for me today! I'll be back next week with another card {or two!} using the May 2023 Whit Kit!! Loving this month's card kit!


Thanks so much for stopping by!
See ya next time.

Inky Hugs,
Crystal


{Please note that comment moderation is on. Your lovely comment will appear once approved.}

Tuesday, May 9, 2023

Distress Crayon Background ~ Technique Tuesday ~ Unity Stamp Co.

 Hello there crafty friend!
I'm back with another Technique Tuesday! On the 2nd Tuesday of each month I'll be sharing a bit of inspiration and a video featuring a fun technique. I hope that you'll be inspired to get inky and play along with some of the techniques that I share.


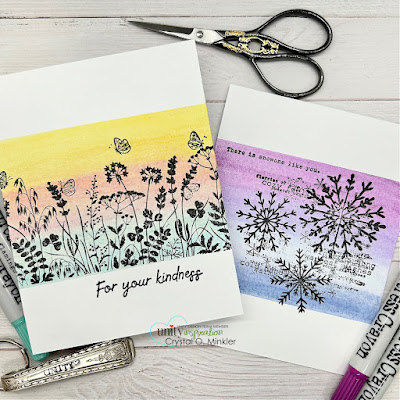
Today's technique is all about quick and fun backgrounds with Distress Crayons!! I was chatting with a crafty friend about Distress Crayons and how we HAD to have them but we haven't played with them much, at all! So I thought, what better time to play with them and have some fun than for Technique Tuesday!


And they were so much fun! AND quick!! That's the key word when you're in need of a card ASAP. Am I right?


For my first card I made a Spring version using Mustard Seed, Kitsch Flamingo and Salvaged Patina Distress Crayons. These are my go-to colors for Spring.


I stamped the lovely silhouette stamp from the Meadow of Hope {April 2023 Whit Kit} with VersaFine Onyx Black ink. It's a tiny smidge crooked... but the crafty friend I'm sending it to won't mind. An easy fix would be to trim the panel and adhere it to a white base. Or cut a skinny strip of black card stock to run across that bottom. But I left it as is. 


I just love the font on this sentiment. Stamped so beautifully!


For my second card I made a Winter version... I know. I know. Enough with Winter. I can't help myself. I love Winter. I'd much rather snuggle up in a blanket by a fire to stay warm during the Winter than to lay absolutely still under the ceiling fan just to get some relief from the heat of Summer. Hahaha... but that's just little ole me.


For this background I used Seedless Preserves, Shaded Lilac, Tumbled Glass, and Chipped Sapphire Distress Crayons. Love love love this combo!! I will be using this combo again.


I used the gorgeous Shake Your Flakes {Front & Center stamps} for this card. One of my favorite Winter kits. I smudged this one up when I adhered it to the card base. I was devastated! Check out how I fixed it in my video down below.


These Distress Crayon backgrounds were SO much fun! If you give this fun technique a try, I'd love to see what you create so please share your cards in the Unity Show & Tell group and tag me. Have an ink-tastic day!

Thanks so much for stopping by!
See ya next time.

Inky Hugs,
Crystal


{Please note that comment moderation is on. Your lovely comment will appear once approved.}

Friday, September 13, 2019

Scrapping for Less ~ Stamping Bella ~ Tumbleblossom Cluster

Hello there crafty friends! 
Today, I'm sharing a wonderful watercolor card using a medium that I don't use often enough and that is Distress Crayons! It has been a long time since I've used my distress crayons and actually, it's been a good long while since I've watercolored so I thought why not do it now! 


So to start, I stamped the gorgeous Tumbleblossoms Cluster stamp by Stamping Bella four times over a 4-1/2 x 5-1/2" piece of Canson XL watercolor paper with VersaMark watermark ink and then heat embossed a fine white embossing powder. I then scribbled Mustard Seed, Spiced Marmalade, Rusty Hinge, Festive Berries, Fired Brick, Peeled Paint, and Walnut Stain Distress Crayons on my Tim Holtz Glass Media Mat. I was then able to use my watercolor pen and grab the pigment with my pen and watercolor the panel. I had so much fun!


 I started with the lightest color (Mustard Seed) and actually colored a bunch of the flowers with just that color and then I went back in with the Spiced Marmalade and the Festive Berries to add some rich, darker tones that felt more Fall-ish to me. I used the Walnut Stain to color in the open spaces and I just love the way it makes the flowers pop on the panel. To finish off the panel I added some white gel pen to the tiny little flowers and berries. Once I was done watercoloring, I die cut the panel with a stitched rectangle die and then mat it with a gorgeous reddish orange card stock that I found in my stash. Now the Tumbleblossoms Cluster stamp set doesn't have a sentiment so I dug through some of my Fall stamps and found a gem... the Teresa Talks Fall stamp set!! I love this set and the "fall greetings" sentiment was absolutely perfect for this card! I stamped the sentiment on that same card stock with VersaMark watermark ink and I embossed it with a fine white embossing powder. I trimmed it down and then popped up the sentiment. My first thought when finishing up this card was to find a neutral card base... maybe white or kraft (my go to's!!) but then I got to thinking... I really want that Mustard Seed yellow to pop on this card so I dug through my stash of card stock and found this perfect yellow card stock. Bam! It was perfect! I trimmed it down to a 4-1/4 x 5-1/2" piece and then adhered that to a white card base.


Surprise! I was able to make another simple card using the leftover panel. I used the same yellow and reddish orange card stocks from my stash (both are from past card kits... I'm honestly not sure which colors though) and then I added a strip of some kraft card stock that was also in my stash and had just enough left over for a 4-1/4 x 5-1/2" piece for my card front. I then adhered it to a white card base. To finish this one off, I just stamped and heat embossed the same sentiment. Done!


Here's a picture of both cards using the one watercolored panel. I have another small piece left over from the panel that I'll set aside and I hope to use it on another project. I had so much fun making these cards to share with you today! I hope you're inspired to pull out those neglected mediums in your crafty stash and get some fun crafty time!! 

Thanks so much for stopping by! 
See ya next time.

Inky Hugs,
Crystal

Friday, September 28, 2018

Scrapping for Less ~ September 2018 Flavor of the Month ~ Happy Fall Y'all Card Kit


Thankful, Grateful, Blessed! 
My favorite fall saying. 

Pumpkin Spice! My favorite fall flavor.
Shorter Days! My favorite fall time.
Soup is on! My favorite food to eat when it’s cool.
Sweaters and football! My favorite time of the year. 
Everything about fall is my favorite. What is yours? 

If it is all about crafting check out this fabulous and
fantastic fall kit Scrapping for Less has this month. 
Jump in and hop along for some great inspiration.


For my first card I used Sketch #1 with Collection One.
I started with a black card front adhered to a white card base and I added a layer of Lemon Drop card stock on top. I layered a piece of the diagonal striped patterned paper from the Let's Talk Bees patterned paper by Scrapping for Less onto a black mat, also part of the paper pack. I adhered that to the card base along with a strip of black patterned paper and set the card aside.
I stamped the adorable Bumblebee Marci stamp using Gina K.'s Amalgam black ink so that I could color the image with Copic markers and watercolor with Distress Crayons. The Banana Split subscription includes a few sheets of Tim Holtz Distress Watercolor sheets and either a Mustard Seed or Wild Honey Distress Crayon. For my card, I used both the Wild Honey and Mustard Seed distress crayons. I also used the following Copic markers ~ N1, N3, N5, N7, E0000, E000, E00, E55, E57, E74, R20, G14.
I die cut the image/sentiment with a stitched rectangle die and popped it up on the card. I added a few sequins and called this one done. 


For my second card I used Sketch #2 with Collection Two.
For this card I really wanted to include a lot of pieces of the patterned paper.. I just love the rich colors! I cut the patterned papers from the Fall Breeze paper pack by Photo Play and mat them all on Hot Fudge card stock. I adhered all of my layers to a Tangy Orange card base and set it aside. 
I stamped this awesome Scarecrow Marci stamp, made exclusively for Scrapping for Less by La-La Land Crafts, on Neenah card stock and colored her in with the following Copic markers ~ Hair - YR23, YR24, E99; Clothes - BG45, BG72, BG75, YR07, YR27; Flowers - YR15, Y35, E17; Boots - YR27, E17, E74; Bird - N3, N5, N7, YR68; Skintone - E0000, E000, E00, R20.
I die cut the focal image with a circle die and sponged a bit of brown ink around the edges. I stamped the sentiment and die cut it with a banner die. I then die cut another banner using a slightly larger banner die and mat the sentiment. I popped up the focal image and the sentiment on the card using foam tape. I trimmed off the edge of the banner sentiment so it was flush with the edge of the card and there you have card #2.


For my third card I used Sketch #3 with Collection Three.
For this card I die cut the fun coffee print patterned paper from the Stay Awhile patterned paper pack by Bo Bunny. I mat the patterned paper on a piece of Hot Fudge card stock that I adhered to a white card base. I added a strip of the pretty floral patterned paper (sadly, not much of it shows). I then stamped the beautiful girl image from the exclusive Teresa Talks Fall stamp set by Scrapping for Less in Memento tuxedo black ink and colored it in with the following Copic markers ~ Hair - E40, E43, YR30, YR31; Sweater - V91, V95, V99; Pants - B37, B97; Skintone - E0000, E000, E51, RV21 (lips); Cup - E81, YR15, YR68; Outlining of Image - W00, W1.
I trimmed down the focal image and mat it on a piece of Tangy Orange card stock. I popped it up on the card using foam tape and set the card aside. This collection includes a few round kraft tags and I thought it would be fun to use that for the sentiment. I stamped it in VersaMark ink and then heat embossed a fine black embossing powder. I borrowed the twine from Collection Two to tie a double bow that I adhered to the top of the tag. I popped up the tag on the card and then adhered the beautiful Petaloo purple flower using a combination of glue dots and multi medium matte. To finish the card off I added a little a sequin to the center of the flower.


For my fourth card I used Sketch #4 with Collection Four.
The stamp set for Collection Four is my absolute favorite! It's another exclusive Scrapping for Less stamp set called Give a Hoot? It includes a couple owls, a few flowers, a partial tree or branch, and some really adorable Owl pun sentiments. I used this set for a Sneak Peek card earlier in the week (you can check that out here, if you missed it). 
When I saw the soft colors of the Amber Moon papers by Prima that are included in this collection, I just knew I want to make a bit of a scene with the tree and the smallest owl. I used my last card front piece of Hot Fudge card stock to add my layers of patterned paper and Tangy Orange card stock. I then stamped the tree and owl on a scrap piece of Neenah card stock. I wanted the tree to be taller in my card so I masked the bottom portion of the tree and drew longer lines using a Memento tuxedo black dual marker. I colored the tree using the following Copic markers ~ E43, E47, E49, R05, R08, R14, R37, YR15, YR68, Y06, Y17. I then fussy cut it out and colored the flower using the same reds, yellows, and oranges that I used in the leaves of the tree. I fussy cut the flower and adhered a sequin to the center. I then stamped the little owl using the following Copic markers ~ YR0000, YR21, YR24, YR27, YR31, E21, E23, E25. I fussy cut him out and set him aside with the tree and the flower. Using a Fiskars Fingertip Precision knife I cut around the bottom portion of the patterned paper that includes some foliage, a pumpkin, and a bird. Every once in a while I would tuck the tree in there to see how far I needed to cut. Once I had that piece ready, I adhered the tree using a liquid glue and then I adhered the whole piece onto a mat of Whip Cream card stock. I adhered the owl and the flower to the piece and then noticed the little gold leaves in the package of sequins. I added more than a few of those to the tree and a couple on the 'ground'. I then stamped the sentiment and die cut it using a banner die. I die cut another banner just slightly larger and mat the sentiment. I trimmed the sentiment piece down and popped it up on the card. My final touch for this card was a couple of gold leafs on the sentiment banner. I just adore this card! I hope you do, too!

Here's a look at the Double Dip Sundae subscription.


Here's a look at the Banana Split subscription.


I hope you enjoyed the cards I shared today. I had so much fun creating them to share with you all.
Let's get to hopping and see what the other members of the design team created!

Up next on the hop is Desiree

After checking out the hop, make sure to join the Rafflecopter back on the SFL blog to have 
a chance to win an awesome prize!! 


Thanks for stopping by!

See ya next time.
~ Crystal