Showing posts with label Balloons. Show all posts

Tuesday, February 18, 2025

February Scraps Cards ~ Ween Party Crew ~ Unity Stamp Co.

 Hello there crafty friend!
Today I'm sharing a trio of birthday cards I created to finish up my latest pack of scrap papers! Woohoo! Another one bites the dust... LOL! I couldn't resist inking up the adorable weens from the Ween Party Crew from Unity. Love these cuties!


I had exactly 11 pieces of paper scraps and boy was I ever happy to find that I could use them for three fun cards! I stamped the cutes partying weens three times and colored them up with Copic markers.

Here's a quick list of the Copic markers I used:
Red Ween: E21, E13, E17
Green Balloon: YG11, G14
Black Ween: E21, E13, N0, N1, N3, N5
Pink Balloon: RV10, RV02
Tan Ween: E40, E21
Blue Balloon: B000, B02


First up I used the strips for this card. They are close to same width and all are 4" long. I alternated the stripe patterns with the confetti patterns for a nice eye-pleasing background.


Next up, I used the largest green scrap with three similarly sized squares. Again, alternating the stripe patterns makes it more pleasing to the eye. Also coloring one of the balloons green helps to balance the colors on the card.


And lastly, I had three rectangle scraps left. I adhered those to a mat and then adhered them to the white A2 card base. Placing the green polka dot paper in the center to balance the busy-ness of the other two patterns. 


I fussy cut the pups leaving a thin white border around the images. And I popped them up on the cards with foam tape. I stamped the sentiments, trimmed them up and adhered them directly to the card bases. I found some enamel dots in my stash in a nice blue that works with the blue of the papers and the blue of the balloons... I think it adds a little something to the cards. I'm ecstatic to have another paper pack done. Yay! I hope you have an inkredible week!

Thanks so much for stopping by!
See ya next time.

Inky Hugs,
Crystal


{Please note that comment moderation is on. Your lovely comment will appear once approved.}

Wednesday, February 12, 2025

Party Animals ~ Preview Day 2 ~ The Greeting Farm

 Hello there crafty friend!
It's Day 2 of previews at The Greeting Farm for the February release. Today we're celebrating a birthday with the Party Animals!


I created a sweet scene using stamps from the Party Animals stamp set. I stamped the critters a second time on masking paper and then stamped the balloons. All the other accessories I stamped out and fussy cut being sure to tidy up my fussy cutting by coloring the edge with a Memento Tuxedo Black marker.  


I stamped all the images with Memento Tuxedo black ink and colored them up with Copic Markers. I used a bunch of markers so the list is a bit long this time:
Bunny: C00, C2, R00, R20
Bear: E30, E31, E35, E37, E39, N0, N2, N4, N6
Bird: Y11, Y15, B0000, B000, B00, YR15
Fox: E51, E13, E95, E97, YR27, N2, N4, N6
Goose: C00, C2, YR21, YR15
Raccoon: N0, N2, N4, N6
Owl: C00, C2, W00, W1, W3, YR21, YR15
Hedgehog: C00, C1, E53, E55, E57, R00, R20
Deer: E51, E21, E23, E25, E27, N0, N2, N4, N6, Colorless Blender
Squirrel: W00, W1, W3
Crown: Y11, Y15, Y28
Party Hats / Balloons: R000, R20, V000, V12, Y11, Y06
Cake: E30, E31, R000, R20, Y11, YR21, YR15
Plates: V000, V12
Crumbs: E30, E31
Gift: R000, R20
Background: B0000, B000


I paper pieced a table for the party from a fun paper pack in my stash. I die cut the panel with an X Stitched die from Gina Marie Designs.


I adhered the panel to a black A2 top fold card that I turned on it's side for a landscape card. I trimmed up the sentiment and mat it with black card stock and then popped it up with foam tape. Such a fun card to make! I enjoyed coloring all the critters and accessories for the scene. The release goes live in the store on the 15th at 12am EST.

Thanks so much for stopping by!
See ya next time.

Inky Hugs,
Crystal


{Please note that comment moderation is on. Your lovely comment will appear once approved.}


Friday, August 23, 2024

August Scraps Cards {Take Two} ~ Queen Girl & Some Other Stamps ~ Unity Stamp Co.

 Hello there crafty friend!
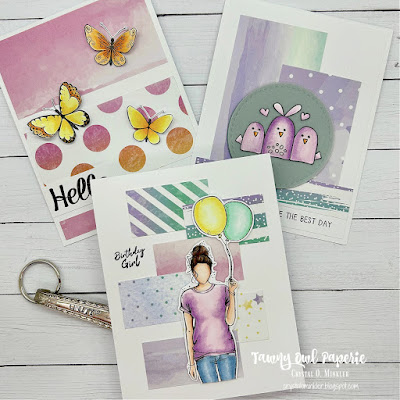
Today I'm sharing a trio of cards I created using up the rest of the leftover scraps I've been trying to finish up this month. SO excited to be done with another pack of scraps! Woohoo!! I also inked up some very neglected and untouched stamps from Unity Stamp Co. including the gorgeous Queen Girl.


Here's a look at the three cards all together. All so sweet and fun! I'd love to know if you have a favorite of the three... mine is probably Queen Girl, but I do love how they all turned out.


I went with a simple background for my first card. I had two larger panels and a small strip of pattern paper so I adhered them as shown leaving some white space of my white card base showing. Such a fun and simple card design. The beautiful butterflies are from a retired set of stamps called 3 Little Butterflies. I got these a long time ago and finally inked them up! So sad to discover that they are no longer available at Unity. They are so pretty!


 I stamped them with Black Amalgam ink and colored them up with the following Copic markers: Y11, Y15, Y38, YR21, YR15, YR16. I fussy cut the butterflies and colored the edges using a Memento Tuxedo Black marker. I bent the wings up a bit and adhered the butterflies to the card just at the base of the their little bodies. I love the dimension this gives to the card! They look like they are just stopping by for a quick visit. I stamped the sentiment from the same set, trimmed it up and adhered it directly to the card.


My second card uses up three more pieces of pattern paper. They all had similar colors so it just made sense to pair these ones up. I also found a circle scrap that was die cut from Ocean Tide card stock from Papertrey Ink. It's the perfect shade for the greeny-blues in the pattern paper. I did die cut another circle from Vellum card stock also from Papertrey Ink to adhere over it just to soften the color a little bit. The pattern papers are adhered to 4 x 5-1/4" piece of Stampers Select White card stock from Papertrey Ink. And then I adhered the panel to a white A2 top fold card base. All of my white papers are almost always Stampers Select White card stock.


Inspiration for this card came from the Tawny Owl Paperie Inky Inspiration Sketch 22. Such a great sketch for these random pieces of pattern paper! It was perfect for these three pieces!


I stamped the adorable birds from the Many Happy Birdies... which is also retired. So sad! Just like the butterflies, I had never inked these cuties up so I'm glad I finally did. I colored up the birdies... OH MY. I just realized I didn't color the middle birdies dots! LOL!! Well, imagine they are white because that's what I planned on coloring them... anywho, I colored up the birdies with the following Copic markers: V0000, V000, V01, V12, V15, YR21, YR15, RV52. Also just like the butterflies, I fussy cut the birdies and colored the edges with a black marker. I adhered them to the vellum circle and then added glue to the vellum just behind the birdies. I popped up the circle layer with foam tape and stamped the sentiment. So easy peasy and cute!


My third and last card today uses up the last of my scraps. All of these six little rectangles are about the same size. I thought it would be fun to do a wonky stairs design with them. I really love how it turned out. And I think having the girl touch all six pieces of the pattern paper really brings the whole design together. All six pattern papers are just adhered to a white A2 top fold card base. No extra layers here.


I stamped the gorgeous Queen Girl and colored her with my Copic markers. I fussy cut her leaving a white border around the edges. Before I popped her up on the card with foam tape, I stamped the sentiment directly onto the card base. I am really loving this card and the fun design. I think I might turn it into a sketch... whatcha think?

I used the following Copic markers for Queen Girl:
Skin: E000, E00, E11
Hair: E33, E35, E37
Shirt: V0000, V000, V01, V12, V15
Jeans: B91, B93, B95
Balloons: Y000, Y11, Y13, G000, G00, G02


 I am so ecstatic to have another paper pack totally done! I'm going to look through my papers and see if there's a Fall themed one maybe for next month. There's just a few more days left to play along with the Tawny Owl Paperie Inky Inspiration Sketch Challenge 24. I'll be back on Tuesday of next week with a brand spanking new sketch challenge!! Woohoo! I hope you have a wonderfully inky weekend!

Thanks so much for stopping by!
See ya next time.

Inky Hugs,
Crystal


{Please note that comment moderation is on. Your lovely comment will appear once approved.}

Thursday, February 15, 2024

'Scraps' Birthday Cards ~ Grin & Purr Plus a Few More Stamps ~ Unity Stamp Co.

 Hello there crafty friend!
I finally finished up the 'scraps' cards I've been working on using up all the leftover papers I've mentioned the last couple of weeks. I was able to make four more birthday cards using strips and pieces of the pattern papers leftover from the TOP Inky Inspiration cards I created earlier this month. Next week I'll be sharing one last card for the Tawny Owl Paperie Inky Inspiration Sketch 18 and I'm going to pick another pack of papers that will be my focus to finish up. Have you used up any of your pattern paper scraps? I hope you're inspired to join me and finish up all these paper scraps we have taking up space.


My first two cards. These are all very simple designs.


For my first card I was able to add blocks of pattern paper to a 4 x 5-1/4" piece of thin white card stock. I did have a couple bits and pieces hang off of the card stock that I'll admit I cut off and threw away. They were too small to do anything with and it actually felt good to allow myself to let them go. To cover up the line in the middle of the card I die cut a ric rac piece from white card stock and adhered it. I think it works well for covering up that ugly line and it adds a little something to the card. For this card, I stamped the awesome new Grin & Purr stamp that just released over at Unity. I LOVE this cat! Oh my gosh! And the sentiments are so purr-fect!! LOL!

Here's a quick list of the Copic markers I used to color up the kitty: 

Ears: R00, R20
Eyes: C00, C1, C3
Fur: W00, W1, W3
Bow Tie: V12, V15, V17 and white gel pen


My second card was created using up a bunch of the strips of the pattern paper. This was so fun to put together. I tried a few different arrangements of the papers but settled on this one. I like the contrast of the papers. I adhered all the strips to a 4-1/4 x 5" piece of a thin white card stock. Trimmed off the excess from the edges (which wasn't a lot, actually) and tossed them in the trash. Yup! So freeing! I adhered the card front to a white A2 top fold card base. I didn't want to cover up the papers so I stamped the Bevy of Balloons background stamp just focusing on the larger middle balloon. I blended some Wilted Violet Distress Oxide around the balloon. I stamped the sentiment from the Cheers & Confetti set. And then just fussy cut it out. Added some white baker's twine and popped up the balloon on the card with some foam tape.


My next two cards. Also simple designs.


My third card finished up the larger scraps I had. I actually cut the larger polka dots paper to adhere on either side of the other paper strips. Again, I adhered all the papers to a 4-1/4 x 5-1/2" card front of thin white card stock that I trimmed down to 4 x 5-1/4" and adhered to a white A2 top fold card base. Now, for this card I didn't want to cover up much of the papers so I chose Winnie the Pooh: Pooh Just Knew. It wasn't too big and the balloon worked well with the balloons in the papers. I die cut Pooh and Piglet using the coordinating die (doesn't look like it's in stock right now). The sentiment is from the Rainbow Birthday stamps... love these stamps! Great sentiments, too!

Here's a quick list of the Copic markers I used to color Pooh & Piglet:

Pooh: Y11, Y15
Piglet: RV10, RV13, RV04
Balloon: V000, V12, V15
Butterfly: BG11, BG32, Y15


And my last card... a hodgepodge of the papers I had left. These didn't quite fit on a full card front. I adhered them to a white A2 top fold card base. I chose the adorable Life's a Party Gnome. Isn't he just the cutest?! I colored him up using colors from the papers. I didn't want to cover up all the papers in the background so I die cut an oval using the Oval Frames Die Set from Newton's Nook Designs. I fussy cut the gnome leaving a skinny white border around him. Adhered him to the vellum and then adhered the vellum oval to the card by applying glue just behind the gnome. To finish off this card, I added a few yellow enamel dots from the Wish Upon a Star Enamel Dots from Echo Park Paper.

Here's a quick list of the Copic markers I used to color up the gnome:

Skin: E000, E00, E11
Beard: C00, C1, C3
Shoes: N1, N3, N5
Cake Hat: E21, E23, E25
Frosting: BG11, BG32, RV13, Y15
Candle: Y11, Y15, YR16
Banner: RV10, RV13

Four more birthday cards for my stash! Woohoo! What do you think of the simple designs? I think they turned out nice. So happy to have finished off a pack of papers though!! Excited to pick out another one and get creative. I hope you've been inspired to pull out some of those papers scraps and finish off some paper packs. Have a wonderful week!

Thanks so much for stopping by!
See ya next time.

Inky Hugs,
Crystal


{Please note that comment moderation is on. Your lovely comment will appear once approved.}

Thursday, August 24, 2023

Colorful Balloon Card ~ Balloon Layering Stencils ~ Unity Stamp Co.

 Hello there crafty friend!
Today I have one more card featuring the new Balloon Layering Stencil and Cheers & Confetti stamps from Unity! So many possibilities with this fun new stencil!


I've been on a bit of a CAS card kick {Clean & Simple Card, for those not familiar}. They are quick and easy and I just LOVE all the white space. I partially stenciled some of the balloons using both of the balloon stencils in the stencil set... just focusing on the top portion of the card.


I've been trying to mix up my color choices. I seem to always grab the same colors so I challenged myself to grab a few colors I wouldn't normally. I already had Kitsch Flamingo on my desk from my No Layer Cards I shared the other day. I also grabbed Mustard Seed, Cracked Pistachio, and Abandoned Coral Distress Oxide inks.


I stamped the birthday sentiment using Black Amalgam ink. I die cut the panel using the Deckle & Stitches Nesting Dies... these dies are quickly becoming my favorite! I adhered the panel to a white A2 top fold card base. 

You can check out my short process video here... Colorful Balloons Card | Balloon Layering Stencil | Unity Stamp Co.


  Unity Stamp Co. has so many wonderful new releases but I think the new Bevy of Balloons Bundle is amazing! I haven't even played with the awesome new Bevy of Balloons Background stamp. I hope to this week if I have time. Stop by Unity to check out all the amazing new releases for the month of August! You won't regret it!

Thanks so much for stopping by!
See ya next time.

Inky hugs,
Crystal


{Please note that comment moderation is on. Your lovely comment will appear once approved.}

Tuesday, August 22, 2023

No Layer Cards with Stencils ~ Balloon Layering Stencil ~ Unity Stamp Co.

 Hello there crafty friend!
Today I'm sharing two fun and quick CAS cards with NO layers using the new Balloon Layering Stencil along with the Star Confetti Stencil and the Heart Confetti Stencil... all from Unity! Unfortunately, the Star Confetti and Heart Confetti Stencils are out of stock but the Falling Confetti Layering Stencil would be awesome with this technique!


As I mentioned above these CAS cards have NO layers. I blended over the stencils directly onto the front of the white A2 card bases. Easy peasy AND quick!


I blended Kitsch Flamingo Distress Oxide ink over the largest balloon in the Balloon Layering Stencil. And then I placed the Heart Confetti Stencil over the balloon stencil and blended Picked Raspberry Distress Oxide ink. 


I finished off the card by stamping the sentiment from the awesome new Cheers & Confetti stamps and adding a string for the balloon with a black Copic Multiliner Brush Small Marker.


For my second card, I blended Salvaged Patina Distress Oxide ink over the largest balloon in the Balloon Layering Stencil. I then blended Peacock Feathers over the Star Confetti Stencil.


And finished off this card in the same way by stamping a sentiment from the Cheers & Confetti stamps and drawing a string using a Copic Multiliner Brush Small Marker.


You can check out my short process video here... No Layer Cards with 2 Stencils | Balloon Layering Stencil | Unity Stamp Co.


 Stop by Unity Stamp Co. and check out all the amazing new releases for the month of August!

Thanks so much for stopping by!
See ya next time.

Inky hugs,
Crystal


{Please note that comment moderation is on. Your lovely comment will appear once approved.}

Monday, June 5, 2023

Inky Paws Challenge #199 ~ Rainbow Theme Challenge Reminder

  Hello there crafty friend!
There's still time to play along with the Inky Paws Challenge #199 - a fun Rainbow Theme challenge! You have until this coming Friday, June 9th to get your entries in for the Rainbow Theme challenge and a chance to win a $20 store credit to Newton's Nook Designs!


I am enjoying the awesome entries being shared so far for the Rainbow theme challenge. I just love rainbow cards! I had a fun idea for pretty paper layers for my second card.


The Birthday Party 6x6 Paper Pad has a rainbow theme in the papers just minus one color - violet (and technically indigo, but I often skip that one). I thought it would be fun to play with a mix of the pattern papers and some card stock to balance out the colors. I die cut my pattern paper layers using the Frames & Flags Die Set. I then adhered my layers to a Real Red card front from Stampin' Up measuring 4-1/4 x 5-1/2". The yellow mat under the green present pattern paper measures 3-3/8 x 4-5/8". And then my purple paper layer is Winter Wisteria card stock from Papertrey Ink and it's die cut with the 2-1/2" decorative square die from the Frames Squared Die Set.


I stamped the sweet kitty from Newton's Birthday Balloons Stamp Set using Memento Tuxedo Black ink, colored it up with my copic markers and then I fussy cut it leaving a bit of a border. The Newton's Birthday Balloons Die Set would have been really handy but I don't have that yet. It's on my wishlist!
Here's a quick list of the Copic markers I used to color up the sweet kitty:

Kitty ~ C00, C1, C3, R00, R20, Colorless Blender
Present / Balloons ~ V0000, V000, V12, V15, Colorless Blender


All of my paper layers are just adhered directly to each other except the sentiment and Newton... those two are popped up with foam tape. I really had fun with this rainbow card! There's still time to play along with the challenge... I sure hope you can find some time to play!


Now it's your turn to get your paws inky with your Newton's Nook Designs products and create a project with a Rainbow theme. Be sure to link up to the Inky Paws Challenge! Can't wait to see your projects!


Thanks so much for stopping by!
See ya next time.

Inky Hugs,
Crystal


{Please note that comment moderation is on. Your lovely comment will appear once approved.}

Thursday, March 23, 2023

Queen Girl Birthday ~ March Sketch Challenge ~ Unity Stamp Co.

 Hello there crafty friend!
Today I'm sharing more inspiration for the Unity March Sketch Challenge that I'm hosting in the Unity Show & Tell Facebook group. I'm sharing a sweet birthday card featuring another new release called Queen Girl. So excited for a new Angie Girl!!


I just had to pair up the beautiful Queen Girl with the pretty Birthday Party {paper pack}. They were made for each other and combined with the March Sketch this was a super easy card to create.


The background of balloons is a pretty pattern paper from the paper pack that I die cut with the largest rectangle die from the Scallops & Rectangles {nesting dies}. It's adhered to a pretty purple card front measuring 4-1/4 x 5-1/2".


Queen Girl was stamped with Black Amalgam ink and then colored up with Copic markers. Here's a quick list of the Copic markers I used to color up this beautiful new girl:

Skin ~ E000, E00, E11, E04
Hair ~ E21, E23, E27
Purple Balloon ~ V000, V12, V22
Pink Balloon ~ RV000, RV10, RV13, RV14, R81, R85
Shirt ~ Y000, Y11,Y06, C00, C1, C3


This time I used a square die for my focal image but it was way too big and would have covered most of the pretty balloon papers so I cut it. Pretty much making it a rectangle and keeping with the sketch. I did omit the rounded corners though since I used the Scallops & Squares {nesting dies} to die cut my panel layers.


Also sharing a BONUS card!! For this one I used the adorable new bunny stamp called Hoppy Notes and I paired it up with the beautiful Kindness is Magic {paper pack}. I also used the Scallops & Circles {nesting dies} to die cut my main panels. Rather than doing a sentiment strip across the card I just stamped my sentiment under the image. I think it turned out pretty cute. 


Here's another look at the sketch! Please know that the sketch is meant to inspire and not require. Feel free to alter it to work for your creation just as I did for mine today. Most importantly have some inky fun! I can't wait to see what you create! Be sure to share your cards in the Unity Show & Tell group and also add them to the sketch challenge album in the group to be entered for a prize!! I'll see you back here next Thursday with my last card for this month's sketch challenge.

Thanks so much for stopping by!
See ya next time.

Inky Hugs,
Crystal


{Please note that comment moderation is on. Your lovely comment will appear once approved.}

Thursday, July 27, 2017

CASology 5-Year Anniversary Blog Hop!

First of all, Happy Birthday CASology!! Congratulations on 5 fabulous years!!


To celebrate this fabulous anniversary, CASology has the cue card Balloon. How fun is that!?


I knew as soon as I saw it that I just had to use this adorable owl from a brand new sentiment kit from Unity Stamp Company. I decided to go super CAS with this card and let the sweet owl with balloons get all the love.


I find it so hard sometimes to transition from one medium to the next... do you do that too? 
I've been working with watercolor more lately and it took me awhile to get this little owl colored how I wanted him with the copics. I do like how the card turned out, though.

Here are the products I used for this card:
Card Stock: White (PTI)
BG11 (Oozak)


Go check out the challenge over at CASology... there's still some time to play along!!
Thanks for stopping by!

See ya next time.

~ Crystal