Showing posts with label CAS. Show all posts

Thursday, August 24, 2023

Colorful Balloon Card ~ Balloon Layering Stencils ~ Unity Stamp Co.

 Hello there crafty friend!
Today I have one more card featuring the new Balloon Layering Stencil and Cheers & Confetti stamps from Unity! So many possibilities with this fun new stencil!


I've been on a bit of a CAS card kick {Clean & Simple Card, for those not familiar}. They are quick and easy and I just LOVE all the white space. I partially stenciled some of the balloons using both of the balloon stencils in the stencil set... just focusing on the top portion of the card.


I've been trying to mix up my color choices. I seem to always grab the same colors so I challenged myself to grab a few colors I wouldn't normally. I already had Kitsch Flamingo on my desk from my No Layer Cards I shared the other day. I also grabbed Mustard Seed, Cracked Pistachio, and Abandoned Coral Distress Oxide inks.


I stamped the birthday sentiment using Black Amalgam ink. I die cut the panel using the Deckle & Stitches Nesting Dies... these dies are quickly becoming my favorite! I adhered the panel to a white A2 top fold card base. 

You can check out my short process video here... Colorful Balloons Card | Balloon Layering Stencil | Unity Stamp Co.


  Unity Stamp Co. has so many wonderful new releases but I think the new Bevy of Balloons Bundle is amazing! I haven't even played with the awesome new Bevy of Balloons Background stamp. I hope to this week if I have time. Stop by Unity to check out all the amazing new releases for the month of August! You won't regret it!

Thanks so much for stopping by!
See ya next time.

Inky hugs,
Crystal


{Please note that comment moderation is on. Your lovely comment will appear once approved.}

Tuesday, August 22, 2023

No Layer Cards with Stencils ~ Balloon Layering Stencil ~ Unity Stamp Co.

 Hello there crafty friend!
Today I'm sharing two fun and quick CAS cards with NO layers using the new Balloon Layering Stencil along with the Star Confetti Stencil and the Heart Confetti Stencil... all from Unity! Unfortunately, the Star Confetti and Heart Confetti Stencils are out of stock but the Falling Confetti Layering Stencil would be awesome with this technique!


As I mentioned above these CAS cards have NO layers. I blended over the stencils directly onto the front of the white A2 card bases. Easy peasy AND quick!


I blended Kitsch Flamingo Distress Oxide ink over the largest balloon in the Balloon Layering Stencil. And then I placed the Heart Confetti Stencil over the balloon stencil and blended Picked Raspberry Distress Oxide ink. 


I finished off the card by stamping the sentiment from the awesome new Cheers & Confetti stamps and adding a string for the balloon with a black Copic Multiliner Brush Small Marker.


For my second card, I blended Salvaged Patina Distress Oxide ink over the largest balloon in the Balloon Layering Stencil. I then blended Peacock Feathers over the Star Confetti Stencil.


And finished off this card in the same way by stamping a sentiment from the Cheers & Confetti stamps and drawing a string using a Copic Multiliner Brush Small Marker.


You can check out my short process video here... No Layer Cards with 2 Stencils | Balloon Layering Stencil | Unity Stamp Co.


 Stop by Unity Stamp Co. and check out all the amazing new releases for the month of August!

Thanks so much for stopping by!
See ya next time.

Inky hugs,
Crystal


{Please note that comment moderation is on. Your lovely comment will appear once approved.}

Sunday, May 16, 2021

CAS Sending Good Vibes ~ May 2021 KOM Summer Vibes ~ Unity Stamp Co.

 Hello there crafty friend!
I still had the May 2021 Kit of the Month called Summer Vibes from Unity Stamp Co. on my desk and got to thinking the flip flops would be fun to ink up. AND I happened to see that the cue over at Casology is Outside... so here I am with a fun CAS flip flop card.


A very clean and simple card... I stamped the flip flops and sentiment on a white card front with Memento Tuxedo black ink and colored up the flip flops with the following Copic markers:

Flip Flop #1 ~ RV04, RV23, Y06, Y15
Flip Flop #2 ~ BG10, BG13, BG23
Flip Flop #3 ~ YG11, YG13, RV23, RV25


I used a B000 to outline the flip flops... giving them a tiny bit of dimension on the card. I trimmed the card front to 4-1/8 x 5-3/8" and adhered it to a white A2 top fold card base. Easy and peasy... done!


Be sure to head over and see the fun cards being shared on the CASology blog!! Such a fun cue!


Thanks so much for stopping by!
See ya next time.

Inky Hugs,
Crystal


{Please note that comment moderation is ON. Your lovely comment will appear shortly.}

Wednesday, December 30, 2020

Peekaboo Snow Globe Card ~ Dec. 2020 Whit Kit Winter Shake Up ~ Unity Stamp Co.

 Hello there crafty friend!

I'm back to share one last card using the fantastic December 2020 Whit Kit called Winter Shake Up! I think I've saved the best for last... well, at least this is my favorite of the three cards that I've shared. When I saw the fun stamps in the Winter Shake Up stamp set, I instantly thought of this card design. I just love making peekaboo cards and how fun to create with a snow globe as the peekaboo element!! I just love how it turned out!


I left the front very CAS on purpose... I think it makes the peekaboo element more fun!
I'll be honest, this card was a little bit of work... but overall it's a pretty easy card to make.


Here you can see the lights reflect off of the acetate sheet I used for a faux shaker element.


And the inside!!! How stinkin' cute is that! Eeep! I love it!
The sentiment inside the card is from the Christmas Wishes set... a Graciellie Design stamp available at Unity Stamp Co. Love love love the sentiments in this set!


Here's a quick run down of the Copic Markers that I used for this card:

Snow Globe Base ~ G21, G46
Snow Globe Glass ~ B0000, B00
Tree ~ G21, G46, E55, E59
Car ~ R000, R14, R27, C00, C2, N0, N1, N2, N3, N5
Grounding ~ N0, N1

I invite you to please check out my video sharing how I created this card. You can check it out here... Peekaboo Snow Globe Card | DEC 2020 Whit Kit | Unity Stamp Co. or you can click on the video below.


One more look at this cute card... I think this just may be my last Christmas card for 2020.
I hope you've enjoyed seeing some inspiration using the December 2020 Whit Kit... I sure have had fun creating these cards to share with you!

Thanks so much for stopping by!
See ya next time.

Inky Hugs,
Crystal

Tuesday, January 28, 2020

Polka Dot Orchard ~ CAS Card ~ Trust Your Journey

Hello there crafty friends!
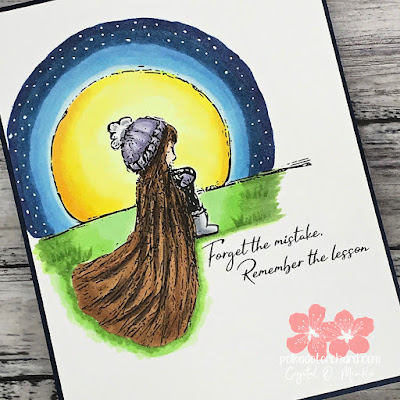
Today, I'm sharing a CAS card using the adorable digi set called Trust Your Journey by Polka Dot Orchard. I just adore this sweet digi set and the sentiments included in this digi set have such deep meaning. I especially love the one I used for my card today... 'Forget the mistake, Remember the lesson.' This is definitely a meaningful sentiment... one that I take to heart.

Now if you're not familiar with CAS cards, the acronym CAS stands for Clean And Simple... so a CAS card is a card that is clean and simple. And CAS cards are my jam! I love them! Sometimes they come together super quick but other times, even though they are clean and simple, they aren't necessarily easy. But I have found while working with digi stamps that digi stamps are perfect for CAS cards. I can easily combine images together in a Word Document and print off a card front. For the card I created to share today, I combined the image of the girl with the moon and combined it with the sentiment... both I kept higher up on the card front. I then printed it off.


I trimmed the card front to 4-1/8 x 5-3/8" and got to coloring! Since I wanted a CAS card, I only did a limited amount of coloring focusing on the direct area of the image and a little bit around it.


I used the following copic markers:
Skin ~ E000, E00
Hair ~ E35, E37, E47
Clothes ~ BV000, BV02, BV11, C00, C1, C3
Moon ~ Y000, Y02, Y06, Y15, Y35
Sky ~ B0000, B12, B21, B37, B39
Grass ~ YG05, YG11, YG17


Once I was done blending and coloring the image, I added a few stars to the darker part of the sky with white gel pen. I adhered the card front to a Night of Navy card base and called this CAS card done! I love how this turned out!


I sure hope that you love it too! If you love this sweet image, you can check it out here ---> Trust Your Journey digi set. If you're curious about digi stamps and want to see some of the other images available by the fabulous artists of Polka Dot Orchard, check out this link ---> Polka Dot Orchard.

Thanks so much for stopping by!
See ya next time.

Inky Hugs,
Crystal

Thursday, December 13, 2018

Brutus Monroe ~ Snow Friends Watercolor

Hello! I'm sharing a pretty quick CAS card that I created for the CASology challenge Cue Card: North. When I saw the cue card for this challenge I just had to play along.


My design for this card was really simple. I stamped the snowman and the sentiment from Brutus Monroe's Snow Friends stamp set using Brutus Monroe Raven Detail Ink on Canson XL watercolor paper and heat set it with my heat tool so it was fully dry before I started watercoloring. I pulled out my neglected ZIG Clean Color Real Brush pens to watercolor the image picking some fun colors. Once I had the image colored as I wanted, I added some Snow Marker around the bottom of the snowman and heat it up with my heat gun to make it all puffy.
I trimmed the watercolor paper down to 4-1/8 x 5-3/8" and adhered it to a white card base. Really simple... and I love it! I hope you do too!


There's still a few days to play along with the CASology challenge. If you have some time, I encourage you to get inky and play along.

Thanks so much for stopping by!
See ya next time.

Inky Hugs!
~ Crystal


{Supplies}

Affiliate links are used:


Tuesday, July 10, 2018

Possibilities Await ~ Capture Your Story!

Hello! I'm sharing a CAS card I made for the CASology Challenge #307 - Cue Card: Zoom.
When I was younger I used to take pictures ALL the time! Photography was a huge part of my life. So when I saw the cue was Zoom... I just had to use this image from Unity Stamp Company's Moments Between Moments Kit of the Month.
I love this gal with the camera!


I wanted to continue working with my ZIG Clean Color Real Brush pens so I stamped the image with VersaMark Watermark ink and heat embossed a fine black embossing powder and colored the image in. I also stamped and heat embossed the sentiment from the Possibilities Await set on a scrap of the same watercolor paper.


I die cut the image with a scalloped rectangle die and added a couple bits of washi before adhering it to the card base. I popped up the sentiment and then adhered the little wooden camera that I watercolored with the ZIGs as well. That's it for this card!


Be sure to check out the challenge... since it's summer time this challenge is going for 2 whole weeks, so there's still time to play along. :)

Thanks for stopping by!

See ya next time.
~ Crystal


Tuesday, July 3, 2018

Inspired By Challenge ~ Home is Where They Love You!

Hello! I'm sharing a fun CAS card with a bit of watercoloring today.
The Inspired By Challenge featured a sweet little camper and I just had to play along.


Isn't that just the sweetest inspirational picture?! I knew I had one or two camper stamps from Unity Stamp Company that would be perfect for this card. So I decided to use the Love at Home Itty Bitty stamp set because it had the trees.


I've been having some fun making CAS {Clean & Simple} cards for the challenge in the Unity Show & Tell facebook group so I thought I'd have a go at making a CAS watercolor card. It was kind of hard to keep the watercolor in that one part of the card to keep the rest of the card 'clean', but I think it turned out ok. But back to my initial inspiration... I pulled the yellows and blue/turquoise color from the inspiration to use on the camper. Since the scene included the moon and stars, I just had to make a night sky which challenged me to work on my lighting. I tend to just keep my light source to the right in all of my coloring so it was interesting to work with the light source being the moon/stars and also the lights from inside the camper. A challenge but also a fun learning experience... can't get much better than that! 

Thanks for stopping by!

See ya next time.
~ Crystal


Wednesday, March 21, 2018

Scrapping for Less ~ Lawn Fawn ~ Sunny Studio ~ Fun CAS Cards!

Hello! Today I'm sharing a couple of CAS cards using Distress Oxide inks. This is such a simple design that can be used for so many different cards with a variety of stamps!


For my first card, I started by smooshing Lucky Clover, Twisted Citron, and Squeezed Lemonade distress oxide inks on my craft mat. I dabbed the card stock into the inks drying in between colors to layer them. I kept the ink smooshing to one area to keep the focus where I would stamp my images. Now, onto these little aliens from Lawn Fawn's Beam Me Up stamp set... Oh My Goodness! How cute are they?! I stamped them with Memento tuxedo black ink using the Misti so that I could get a nice clean image. I stamped the beam from the spaceship using Lucky Clover distress oxide ink and then I painted some 'ground' in a semi-circle using the same ink. I stamped the aliens on a scrap piece of white card stock and colored them in with copics {V09, V15, BV000}. I fussy cut them out and adhered them to the die cut card front. I stamped the stars and planets randomly on the card and then mat the piece on a coordinating piece of card stock. I stamped the sentiments one die cut banners using VersaMark ink and heat embossed an ultra fine white embossing powder. I adhered the panel to a white card base and then popped up the sentiments and trimmed the banners. My final touch for this card was adding some glaze to the spaceship. I had a blast making this card so I decided to make another one with a similar design.


For my second card, I smooshed Worn Lipstick, Vintage Photo, and Gathered Twigs Distress Oxide inks on my craft mat. I dabbed the card stock into the inks drying in between colors to layer them the way I wanted. I then stamped these sweet images from Sunny Studio's Breakfast Puns stamp set on a piece of scrap paper and colored them using copics {RV10, RV13, E31, E33}. I die cut the ink smooshed panel and mat it on a coordinating piece of card stock. I stamped the hearts randomly using Worn Lipstick distress oxide ink and then I stamped the ampersand symbol in black ink using the Misti to get a nice crisp image. I adhered the panel to a white card base and then adhered the coffee and donut images. I stamped the sentiment using the same ink and embossing powder as the first card. I popped up the sentiment and then trimmed the banner. I also added a bit of glaze to the donut on this card... I had to, it's a donut! Ha! That's it for me this time. 
I hope you like the cards I shared today. Both of the stamp sets I used are in the shop just waiting for a new home ---> you can get them here.

Thanks for stopping by!

See ya next time.
~ Crystal


Thursday, November 9, 2017

The Small Stuff

Hello! It's been awhile since I've played along with the CASology challenge. I happened to see the current challenge cue card is Tiny. I got curious and decided to check out the challenge. I was inspired by Anna's card...


 I loved the simple but sweet image and sentiment inside of the stitched rectangle. So for my card, I decided to emboss the Wonky Rectangle from My Favorite Things on my white card base. I stamped the little Charlie Brown tree and sentiment from Unity's Small Stuff Christmas kit using a dark brown ink. I colored the image in using my Crayola colored pencils... they were handy on my desk. I just love this little tree... a simple and quick Christmas card!


Go check out the challenge over at CASology... hope you'll play along!!
Thanks for stopping by!

See ya next time.

~ Crystal

Thursday, August 3, 2017

~ Hello Friend! ~

I've just been waiting for a chance to ink up this fun bunch of fruit and I think the CASology Cue Card: Juicy was the perfect inspiration! 


I stamped the image using Memento Tuxedo Black ink on a white card base and then colored it in with copics. I added a few highlights with a white gel pen. I stamped the sentiment in VersaMark and heat embossed white embossing powder on a strip of True Black card stock. I cut it into a banner and popped it up on the card. Bam! Love how this one turned out!


Here are the products I used for this card:
Card Stock: WhiteTrue Black (PTI)
Tools: Heat Tool (SU!)


Go check out the challenge over at CASology!!
Thanks so much for stopping by!

See ya next time.

~ Crystal

Thursday, July 27, 2017

CASology 5-Year Anniversary Blog Hop!

First of all, Happy Birthday CASology!! Congratulations on 5 fabulous years!!


To celebrate this fabulous anniversary, CASology has the cue card Balloon. How fun is that!?


I knew as soon as I saw it that I just had to use this adorable owl from a brand new sentiment kit from Unity Stamp Company. I decided to go super CAS with this card and let the sweet owl with balloons get all the love.


I find it so hard sometimes to transition from one medium to the next... do you do that too? 
I've been working with watercolor more lately and it took me awhile to get this little owl colored how I wanted him with the copics. I do like how the card turned out, though.

Here are the products I used for this card:
Card Stock: White (PTI)
BG11 (Oozak)


Go check out the challenge over at CASology... there's still some time to play along!!
Thanks for stopping by!

See ya next time.

~ Crystal


Monday, July 10, 2017

~ You Have a Pizza My Heart ~

I was inspired by the CASology cue card Pizza to ink up this adorable stamp set from Lawn Fawn called Pizza My Heart. I just adore this set! 


I created the fun little background behind the pizza by using Stampin' Up!'s Gorgeous Grunge set which I'm shocked to discover, they retired! I love this set! I'm so glad that I bought it a long time ago! I stamped each of the stamps in the set using different distress inks layering them here and there. I then stamped the heart pizza and all the toppings on a scrap piece of card stock and used the coordinating die to cut it out. I stamped the sentiment on True Black card stock using VersaMark ink and then heat embossed fine white embossing powder. I then trimmed the black strip and adhered it to the card. I popped up the heart pizza using stampin' dimensionals. I love the way this turned out!


Here are the products I used for this card:
Stamps: Pizza My Heart (LF), Gorgeous Grunge (retired SU!)
Card Stock: White, True Black (PTI)


Go check out the challenge over at CASology!!
Thanks so much for stopping by!

See ya next time.

~ Crystal