Showing posts with label #ginakdesign. Show all posts

Thursday, July 25, 2024

Christmas in July 2024 {BYSHC} Linky Party ~ Wishing You Mini ~ Gina K. Designs

 Hello there crafty friend!
It's day 7 of the Christmas in July 2024 {BYSHC} Linky Party!! I'm super excited to share another sweet card that I've made to add to my holiday stash this week! I am a huge fan of snowflake stamps and I've had the Wishing You Mini stamp set from Gina K. Designs in my stash for a good long while. I love this cute stamp set!


I finally played with the awesome Postage Collage Die and Postage Collage Coloring Stencil from our amazing Sponsor Waffle Flower. I just adore snowflakes in blue! I die cut a piece of white card stock using the Postage Collage Die. And then I cracked open my 5.5 x 8.5" Grip Mat also from Waffle Flower. Another fabulous tool that's been in my stash for awhile but I haven't gotten around to using until now. And I'm very happy with it. Glad I finally tried it out! I placed the die cut panel on the grip mat and blended Tumbled Glass Distress Ink over the first stencil in the Postage Collage Coloring Stencil set. Keeping the stencil over my panel, I then stamped the Wishing You Mini snowflakes using Tumbled Glass, Salty Ocean, and Chipped Sapphire Distress Inks; and then stamped the stars with Black Soot Distress Ink. I used the fabulous Pressure Pal from our awesome Sponsor Twiddler's Nook when I stamped the snowflakes and stars in my mini misti.


I messed up two of the rectangles {left middle and bottom right} so I redid them using the same steps. I stamped the 'A Happy Holiday' sentiment on the longer rectangle. And then I trimmed them both and added foam tape called iCraft 3D Foam Tape Jumbo Roll (white) from our lovely Sponsor Therm O Web. I heat embossed the 'wishing you' sentiment on black card stock. I prepped my black card stock with the TE Anti-Static Powder Tool from our wonderful Sponsor Taylored Expressions. I stamped the sentiment using the Sugar Cube White Pigment ink, also from Taylored Expressions, and added Alabaster White Embossing powder from Brutus Monroe. I then melted the embossing powder using my Wagner Precision Heat Tool. After letting the melted powder cool a bit, I rubbed my card stock with a microfiber cloth to remove the anti static powder. I fussy cut the sentiment and adhered it directly to the rectangle.


I removed the backing from the foam tape and popped up the two pieces. You can see the dimension it gives the card in this photo. Love it! Who knew I'd end up loving that I messed up the panel! Haha! I adhered the postage layer to a 3-7/8 x 5-1/8" mat of black card stock and then adhered it to a white A2 top fold card base. All of my layers are adhered using iCraft UltraBond Adhesive from Therm O Web. I used a Sakura White Gelly Roll pen to add dots of snow to the background. And then I finished off the card with a few white rhinestones from the Frosty Rhinestones from our fabulous Sponsor Gina Marie Designs. 


Just a few more days to play along with the Christmas in July 2024 {BYSHC} Linky Party!! I have thoroughly enjoyed the inspiration being shared! I hope you'll join in the fun! Have an ink-tastic day!


Thanks so much for stopping by!
See ya next time.

Inky Hugs,
Crystal


{Please note that comment moderation is ON. Your comment will appear shortly.}

Tuesday, August 1, 2023

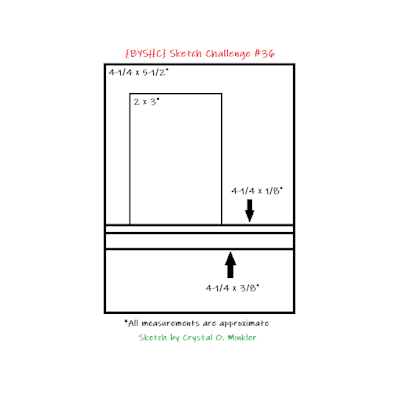
{BYSHC} Sketch Challenge 36 ~ Snowflake Border Die ~ Gina Marie Designs

Hello there crafty friend!
It's time for a new sketch challenge over in the Build Your Stash Holiday Cardmakers Facebook group! Today I'm sharing a Christmas card using a leftover piece from one of my linky party cards. If you're interested, you can check out the linky party card here. I also used the beautiful Snowflake Border die from Gina Marie Designs. I had purchased this die in hopes of using it for the linky party but never did use it. I'm so glad I was finally able to. I love it!


A fairly simple card for Sketch 36. I went back and forth with the idea of running the Cool Caribbean card front through my Big Shot with a snowflake embossing folder but I really wanted to go with more of a CAS design. I also considered adding a white mat behind the stenciled panel, but decided against it. I think if I was to remake this one, I might add that mat. What do you think? 


As I mentioned, the focal panel is a leftover from a card I made for the linky party. I used Seedless Preserves and Broken China Distress Oxide inks over the Snowflake Net Stencil from A Colorful Life Design. I had blended the inks over a 6 x 6" piece of white card stock so it was fun to be able to use this piece for this card. I added a white glitter enamel dot from the Winter Sparkle Glitter Style enamel dots, also from Gina Marie Designs.


To keep with the color combo, I added a strip of white card stock. That's a scrap that I literally just pulled out of my storage. No idea how wide it is but it's 4-1/4" long. I die cut a piece of Orchid Opulence card stock from Stampin' Up for the Snowflake Border die. I trimmed the top and adhered it under the white strip. The sentiment is from Gina K Designs and it's called Wishing You Mini Stamp Set. I still had this on my desk from the last week. I wasn't quite brave enough to stamp the sentiment on the white strip so I stamped it on a scrap, trimmed it up and adhered it under the focal panel. It's the tiniest bit wider than the white strip but I think it's ok.


Here's a look at {BYSHC} Sketch Challenge 36 for the month of August. I hope you'll join us and play along with the sketch! If you're interested in seeing a bit more inspiration for this sketch, check out the amazing inspiration from the design team over on the {BYSH} Cardmakers blog!


Thanks so much for stopping by!
See ya next time.

Inky hugs,
Crystal


{Please note that comment moderation is ON. Your lovely comment will appear shortly.}

Friday, October 21, 2022

Falling for the Holidays 2022 {BYSHC} Linky Party ~ Winnie the Pooh: Feel the Merry ~ Unity Stamp Co.

Hello there crafty friend!
I'm so excited to share my first card for the Falling for the Holidays 2022 {BYSHC} Linky Party!! For my first card I'm featuring the wonderful Winnie the Pooh: Feel the Merry stamps from Sponsor Unity Stamp Co. Unity just released a bunch of really cute new Winnie the Pooh stamps and I have to have them all! Love Winnie the Pooh!! I couldn't wait to color up this beautiful stamp.


I paired this sweet stamp up with the lovely Holly Jolly 6x8 paper pad from Simple Stories. I had colored up the stamp before picking out my papers and these actually went really well with the mix of colors in the image. Which was such a relief! I adhered my layers to a white A2 top fold card base using the iCraft UltraBond Adhesive from new Sponsor Therm O Web.


Here's a quick list of the Copic Markers I used:

Winnie the Pooh ~ Y11, Y15, Y38, R20, R14, R27, C00, C2, C3
Skin ~ E000, E00, E11
Hair / Bench ~ E53, E55, E57 
Jacket / Scarf ~ B0000, B34, B06, B37, R20, R14, R27
Pants ~ E51, E53, E55
Book ~ W00, W3
Boots ~ E53, E55, E57, E59, N2, N4, N6
Tree ~ YG11, G24, G46
Ground ~ C00, C3


I die cut the colored image with the smallest scalloped rectangle die from the Scallops & Rectangles {nesting dies} from Unity. I also die cut one of the pattern papers and then I adhered them together. I stamped the sentiment with Black Amalgam ink from Sponsor Gina K. Designs. Trimmed it and adhered it to the scalloped layers. And then I covered the back with a bunch of iCraft 3D Foam Squares from Therm O Web. I love the dimension the foam gives to the card! To finish it off, I added a couple red enamel dots from my stash.


My card was inspired by the current {BYSHC} Sketch 27! This sketch has become a favorite! It works really well with larger stamps!  Have you visited the Build Your Stash Holiday Cardmakers Facebook group? We host a fun sketch challenge each month to inspire our holiday cardmaking all year long. I love revisiting the sketches and will likely be sharing a few during the Linky Party.


Yay!! I'm also a Sponsor for the Falling for the Holidays 2022 {BYSHC} Linky Party and this is the fabulous prize package that I am offering for one lucky winner. For a chance to win this fun prize make a Christmas card and link it up to the linky party blog post on the Build Your Stash Holiday Cardmakers blog.


Before you leave, be sure to stop by Sponsor Unity Stamp Co... they just released a bunch of new Winnie the Pooh stamps!! And if you haven't already, stop by the Falling for the Holidays 2022 {BYSHC} Linky Party to check out all the wonderful Holiday inspiration from our Sponsors and the {BYSHC} Design Team!! I'm so excited to continue building my stash of holiday cards for 2022... I hope you'll join in the fun and play along! Let's build our stash of holiday cards this week!!


Thanks so much for stopping by!
See ya next time.

Inky Hugs,
Crystal


{Please note that comment moderation is ON. Your comment will appear shortly.}

Thursday, April 28, 2022

Spring into Christmas 2022 {BYSHC} Linky Party ~ Coffee Therapy and Pine Needle Sprig ~ Gina K. Designs and Gina Marie Designs

 Hello there crafty friend!
Today I'm sharing a card that has been in my mind from the start of the Spring into Christmas 2022 {BYSHC} Linky Party!! I love when a card idea comes to fruition!! And it's even better when it turns out pretty! LOL! I used products today from a few of our wonderful Sponsors of the Spring into Christmas Linky Party... Gina Marie Designs, Gina K. Designs, and Twiddler's Nook!!!


The wonderful pine sprigs from the Pine Needle Sprigs dies from Gina Marie Designs really started off the whole card. My coffee cup ornaments are from the Coffee Therapy stamp set from Gina K. Designs... so cute!


The beautiful sentiment is also a die - the Cursive Merry Christmas dies from Gina Marie Designs. You may remember this die from my Framed Silhouette card that I shared a few days ago. My kraft background is embossed with the Snowflake Swirl embossing folder by Darice and I lightly rubbed the raised snowflakes with my Picket Fence Distress Ink pad. I die cut my snowflake embossed background with a large stitched rectangle die from My Favorite Things called Blueprints #15.


My sweet little coffee cup ornaments are stamped with Pure Poppy ink from Papertrey Ink. I fussy cut them leaving a very skinny white border. I used my 1/8" hole punch for just under the handles and adhered the pretty twine just behind the cups with some tear tape. Each of the ornaments are popped up on the card with foam tape.


I added sweet tiny red rhinestones from Twiddler's Nook to each of the coffee cup ornaments. And also added a few green rhinestones in the centers of some snowflakes. Here you can see some of the dimension of the card. The sentiment is raised by die cutting it three times from red card stock and then I adhered them all together. The coffee cups and the snowflake background are all popped up with lots of foam tape.


I adhered the bottom layer of pine needle sprigs directly to the snowflake background but all the other sprigs are just adhered at the very top... under the kraft scalloped strip. This allows some of the sprigs to give dimension to the card. The ornament strings are adhered behind the snowflake background with tear tape. I die cut a piece of red card stock and a piece of kraft card stock with the stitched scalloped die from Stitched Scalloped Basic Edges dies from My Favorite Things. I adhered them together and then adhered them on top of the sprigs with liquid glue.


We're nearing the end of the Spring into Christmas 2022 {BYSHC} Linky Party! I hope you'll try to play along with us... there's some lovely prizes up for grabs!! Even if you're not able to play along, I hope you'll stop by and check out all the sweet inspiration being shared! So many beautiful cards!! I'll see you tomorrow with my last card for the Linky Party!


Thanks so much for stopping by!
See ya next time.

Inky Hugs,
Crystal


{Please note that comment moderation is ON. Your comment will appear shortly.}