Showing posts with label postage. Show all posts

Friday, July 25, 2025

Christmas in July 2025 {BYSHC} Linky Party ~ {BYSHC} Sketch Challenge 59 ~ Jolly Christmas Tree ~ Lawn Fawn

Hello there crafty friend!
I'm back with one more card I made for the Christmas in July 2025 {BYSHC} Linky Party and one last card for the {BYSHC} Sketch Challenge 59 hosted in the Build Your Stash Holiday Cardmakers Facebook group! Today I'm sharing a sweet rainbow holiday card featuring a fun die, stamp and papers from our fab Sponsor Lawn Fawn.


I had a fun idea for a rainbow theme for this one so naturally I grabbed the retired Really Rainbow Christmas 6x6 paper pack from Lawn Fawn. I wish they would bring these papers back... they are just too cute! I thought the trees would look cute behind the awesome Jolly Christmas Tree die. I die cut the tree from green papers from the rainbow pack and then the rest of the tree was die cut from white card stock. I colored the star, trunk, and the baubles with Copic markers.


I stamped the adorable unicorn from the Winter Unicorn stamp set and I fussy cut it but if you're not one for fussy cutting there is a Winter Unicorn lawn cuts available for die cutting. I actually die cut mine, but the die slipped in my Big Shot so it was super wonky. So I just fussy cut it. Always remember to secure your dies with washi tape {or something similar}. I usually do, but for some reason I didn't for this cutie. Oh well... it all worked out.

Here's a quick list of the Copic markers I used:
Unicorn: C0, C1, C5, R00, R20, BV00, BV02, B000, B00, R20, R14, R27, Y11, Y15
Tree Topper / Yellow Baubles: Y11, Y15
Red Baubles: R20, R14, R27
Orange Baubles: YR20, YR15
Green Baubles: YG11, YG03
Blue Baubles: B000, B00, B02
Purple Baubles: BV00, BV02
Tree Trunk: E21, E25, E57


I chose a small sentiment since the paper has sentiments all over it. The sentiment is from the Say What? Holiday Critters stamp set. I just stamped it with black ink, trimmed it, and adhered it to the card. I adhered the unicorn to the tree and popped them up with iCraft 3D Foam Tape Jumbo Roll (white) from our lovely Linky Party Sponsor Therm O Web. 


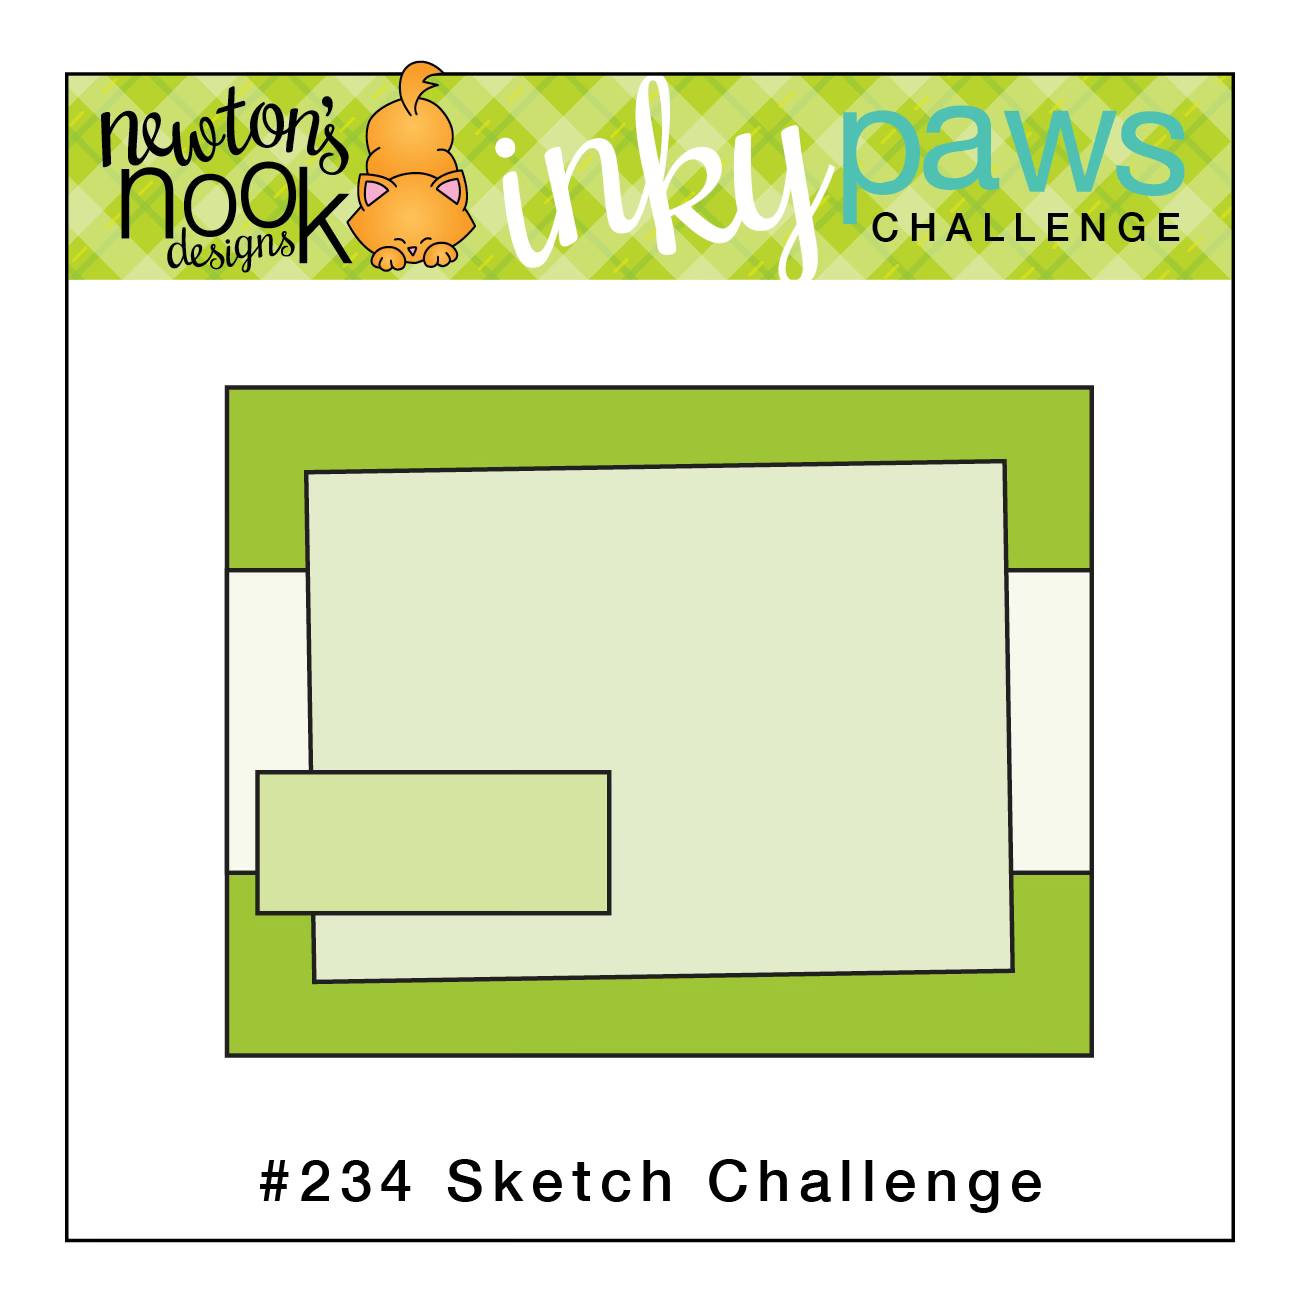
Here's a look at {BYSHC} Sketch Challenge 59 for the month of July. There's just a few days left to enter the challenge! If you're interested in seeing a bit more inspiration for this sketch, check out the amazing inspiration from the design team over on the {BYSH} Cardmakers blog! I'm always blown away by the creations from the DT... they are amazingly talented cardmakers!


As I mentioned above, I'm also playing along with the Christmas in July 2025 {BYSHC} Linky Party. Have you stopped by to check out all the wonderful holiday inspiration being shared?! I sure hope you'll stop by and check it out! Have a wonderful day!

Thanks so much for stopping by!

Inky hugs,
Crystal

Wednesday, July 23, 2025

Here For You On Those Ruff Days ~ Ruff Ruff Ruff ~ Unity Stamp Co.

Hello there crafty friend! 
Taking a small break from making Christmas cards. I inked up the adorable new duo from Unity called Ruff. Ruff. Ruff. These two cuties remind me of our sweet pup and kitty... though I colored them differently. LOL


I went with a soft palette for this card. The Cozy Textiles {paper pack} seemed like the perfect fit for these two. I used larger scraps from my paper pack and covered a white A2 top fold card base. 


I stamped the cuties and the sentiment with Black Amalgam ink and colored them up with Copic markers. I then die cut them using a die from the Postage Stamp {nesting dies}. I die cut the sentiment using a die from the Scalloped & Stitched Sentiment Nesting Dies.

Here's a quick list of the Copic markers I used:
Pup: N2, N4, N6, Colorless Blender
Eyes: C0, C2
Kitty: YR20, YR15, YR27
Ground: B000


I tucked a white doily behind the main panel for some texture and adhered all of my layers directly to the card. No foam tape this time. I finished up the card with a few pieces of white glossy confetti.

Thanks so much for stopping by!

Inky hugs,
Crystal

Friday, July 18, 2025

Happy Birthday NND! ~ 12 Year Celebration ~ Newton's Nook Designs

Hello there crafty friend! 
We're celebrating 12 AMAZING Years of Newton's Nook Designs products with a fun Instagram Hop! Yay! I'm sharing details for my cards below. 


Be sure to stop by the Instagram Hop for a chance to win a $25 voucher to Newton's Nook Designs!


I stamped the cute kitty from the Cat Birthday Party stamps and die cut it using the coordinating Cat Birthday Party dies. I mat it with a die cut circle from vellum card stock using a die from the Circle Frames Die Set.

Here's a quick list of the Copic markers I used:
Kitty: C0, C2, R00, R20
Hat: B02, B24, B28, RV10, RV52, C0, C2
Cake: E21, E25, E29, YR20, YR15
Plate: BG000, BG01


I paired up the adorable Cat Birthday Party stamp with the sweet Birthday Time 6x6 Paper Pad. I die cut the pattern papers from the Birthday Time 6x6 Paper Pad using the Card Layout 3 die. I cut individual pieces of the pattern paper to fit each of the spots and die cut them. I didn't die cut a frame and just adhered the pieces to a white A2 top fold card base that I turned on the side for a landscape card.


I die cut a piece of white card stock using the banner die from the Frames & Tags Die Set and then stamped the sentiment. I trimmed the sentiment and adhered it to the card. I adhered the kitty to the vellum and then adhered the vellum to the card only applying glue behind the kitty.


My second card was pretty quick and easy. I stamped the cute cupcake and present from the Birthday Postage Sampler stamps, along with another cute kitty from the Cat Birthday Party stamps on leftover pieces I had die cut using the Postage Stamp Layout die

Copic markers used:
Cupcake: RV10, RV52, BG000, BG01, G000, G21, YR20, YR15
Present: RV10, RV52, G000, G21
Kitty: YR20, YR15, R00, R20, C0, C2
Kitty's Cupcake: Y06, BG000, BG01, B02, B24, B28


I die cut a piece of pattern paper from the Birthday Time 6x6 Paper Pad using the large postage stamp die from the Framework Die Set. Adhered it to a white A2 top fold card base and then adhered my birthday postage pieces.


I stamped the sentiment on a scrap of white card stock, trimmed it and adhered it directly to the card. Be sure to check out the Instagram Hop to see all the fabulous inspiration from the design teams and guests.


Thanks so much for stopping by!

Inky hugs,
Crystal

Friday, June 27, 2025

{BYSHC} Sketch Challenge 58 ~ Layered Holly with Fancy Merry Christmas ~ A Colorful Life Designs

Hello there crafty friend!
I'm back with one last card for the {BYSHC} Sketch Challenge 58 hosted in the Build Your Stash Holiday Cardmakers Facebook group! Today I'm sharing a vintage style holiday card featuring a couple of great stencils from our wonderful Sponsor, A Colorful Life Designs.


I started by laying down a postage stencil from the Marvelous Masks Postage Stamp Stencil A over a card front of Kraft card stock from Papertrey Ink. I then laid the holly leaf stencil overtop of the postage stencil. I used a piece of iCraft Removable Pixie Tape to diagonally mask the other half of the card front and then blended Mowed Lawn Distress Ink over the holly stencil. I replaced the holly for the berry stencil. Also replacing the pixie tape mask and blended Candied Apple Distress Ink. The holly and berries stencils are from the Layered Holly Stencil


I removed the stencil and laid the Fancy Merry Christmas Stencil. I again used the pixie tape to mask the card this time covering the holly and berries. I blended Vintage Photo over the whole stencil being more heavy in the center and a lighter touch around the edges. I then blended Walnut Stain Distress Ink over the Merry Christmas sentiment. 


I trimmed the stenciled panel to 4 x 5-1/4" and adhered it to an A2 card base of Dark Chocolate card stock from Papertrey Ink. I finished off the card with a few confetti pieces from the Hologram Red Card Bling.


Here's a look at {BYSHC} Sketch Challenge 58 for the month of June. There's just a few days left to enter the challenge! If you're interested in seeing a bit more inspiration for this sketch, check out the amazing inspiration from the design team over on the {BYSH} Cardmakers blog! I'm always blown away by the creations from the DT... they are amazingly talented cardmakers!


Thanks so much for stopping by!
See ya next time.

Inky hugs,
Crystal


{Please note that comment moderation is ON. Your lovely comment will appear shortly.}

Monday, April 21, 2025

Inky Paws Challenge #239 ~ Color Challenge {Week 3}

Hello there crafty friend! Happy Easter!
 Sharing some more inspiration for the Inky Paws Challenge #239 - Color Challenge! You have until Friday, May 2nd to get your entries in for the challenge and a chance to win a $20 store credit to Newton's Nook Designs!


Such a gorgeous color combo for any occasion but this time I had to make an Easter card. Our colors for the challenge are Dusty Violet, Spring Green, Sunshine Yellow, and Cocoa Brown!! 


I stamped the cute images from the Easter Postage Sampler Stamp Set using Memento Tuxedo Black ink. Colored them up with my Copic markers and then I die cut them using the coordinating die from the Easter Postage Sampler Die Set.

Here's a quick list of the Copic markers I used:
Bunny: E21, E23, E25, C00, C2
Eggs: YG11, YG03, YG63, V000, V12, V15, Y11, Y15
Tulip: V000, V12, V15, YG11, YG03, YG63


I used some scraps leftover from a previous card that I had die cut using the Postage Stamp Layout Dies. I blended lightly with Vintage Photo Distress Ink over the little rectangle pieces. And then I cut three slightly larger rectangles and adhered the little postage pieces together. This gave them a little more stability. I adhered the cute images to the postage pieces and set them aside.


I blended a fun background on the front of a white A2 top fold card base using the Bunny Tails Stencil Set. I blended the bunny outlines with Villainous Potion keeping it light. And then I blended the little bunny tails with Wilted Violet Distress Ink. I die cut the beautiful sentiment from the Happy Easter Die three times from Kraft card stock. I adhered them all together to give the sentiment some dimension. I die cut the shadow layers from white card stock. I played around with the placement of all of the pieces for way too long... LOL... until I settled on the above. I really love how this turned out!


Now it's your turn to get your paws inky with your Newton's Nook Designs products and create a project using the color combo of Dusty Violet, Spring Green, Sunshine Yellow, and Cocoa Brown. Be sure to link up to the Inky Paws Challenge! Can't wait to see your projects!


Thanks so much for stopping by!
See ya next time.

Inky Hugs,
Crystal


{Please note that comment moderation is on. Your lovely comment will appear once approved.}

Wednesday, April 9, 2025

Boba Pandas ~ Preview Day 1 ~ The Greeting Farm

 Hello there crafty friend!
It's the first day of previews at The Greeting Farm for the April release! This month we're introducing 3 fantastic clear stamp sets. This release is AMAZING!!


It was so fun to create a scene card using these adorable new pandas from the new Boba Pandas stamp set! Lots of fun coloring these cuties and all the fun accessories in the set.


I stamped all the sweet images with Memento Tuxedo black ink and colored them up with Copic Markers. I fussy cut them all on the line and colored the edges of the fussy cutting with a Memento Tuxedo Black marker.

Here's a quick list of the Copic markers I used:
Pandas: C00, C2, N0, N2, N4, N6
Boba Cups: R14, R37, BG10, BG34, R20, R43
Boba Pearls: E55, E57, E29
Boba Stand: C00, C2, Y11, Y15, BG10, BG34, R20, R43, E53, E55, E57, E59, YG11, YG23, B0000, B000
Stump: E51, E53, YG11, YG23
Tulips: R00, R20, YG11, YG23
A-Frame Sign: E51, E53, E55, E57
Bow: Y11, Y15
Hat / Apron: Y11, Y15, BG10, BG34
Butterfly: Y11, Y15, R14, R37


I created a fun background using the Postage Collage Die and coordinating stencil from Waffle Flower. I stenciled the backgrounds with Tumbled Glass and Mowed Lawn Distress Inks. And then I adhered all of my fun critters. I had a little open space above the stand so I also stamped, colored and fussy cut a butterfly from the Regency Couple stamp set that released last month.


I added a bunch of foam tape behind the panel being sure to avoid the holes and then I popped it up on a black A2 top fold card base. I stamped the sentiment, trimmed it and adhered it to the card. I just love how this turned out! Release goes live in the store on the 15th at 12am EST.

Thanks so much for stopping by!
See ya next time.

Inky Hugs,
Crystal


{Please note that comment moderation is on. Your lovely comment will appear once approved.}


Monday, November 25, 2024

Inky Paws Challenge #234 ~ Sketch Challenge {Week 4}

Hello there crafty friend!
 There's just a few more days to play along with the Inky Paws Challenge #234 - Sketch Challenge! You have until this coming Friday, November 29th to get your entries in for the challenge and a chance to win a $20 store credit to Newton's Nook Designs!


This has been such a fun sketch! I hope you have a chance to play along with us if you haven't already! There's just a few days left to play!


I decided to make another birthday card. This time using the Newton's Birthday Delights Stamp Set. I stamped the adorable kitty and cake using Memento Tuxedo Black ink and colored up the sweet image with my Copic markers. I die cut it using the coordinating Newton's Birthday Delights Die Set.

Here's a quick list of the Copic markers I used:
Orange Kitty: R00, R20, YR21, YR15, YR16
Siamese Kitty: R00, R20, W00, W1, W3, W4, W6, W7, 100 Black
Candle: Y11, Y15, YG11, YG23
Cake: C00, C1, C3, YG11, YG23, Y11, Y15, R20, R14, R27
Plate: BG000, BG01, BG45


I paired up the cute kitties and cake with the super colorful and fun Birthday Party 6x6 Paper Pad. I love the mix of colors and images in these papers! So perfect for birthday fun!


My background of fun papers was created using the Postage Stamp Layout Die. I used scraps of the pattern papers with the die to create my fun background. I also die cut a scrap of white card stock using a die from the Frames & Flags Die Set. And then I stamped the sentiment using Memento Tuxedo Black ink.


Now it's your turn to get your paws inky with your Newton's Nook Designs products and create a project using the fun sketch. Be sure to link up to the Inky Paws Challenge! Can't wait to see your projects!


Thanks so much for stopping by!
See ya next time.

Inky Hugs,
Crystal


{Please note that comment moderation is on. Your lovely comment will appear once approved.}

Thursday, July 25, 2024

Christmas in July 2024 {BYSHC} Linky Party ~ Beautiful Poinsettia Stencil ~ A Colorful Life Designs

 Hello there crafty friend!
I couldn't help myself I'm back again today to share a couple more cards I made for the Christmas in July 2024 {BYSHC} Linky Party! I've been so inspired by the cards shared over at the Linky Party... I just HAD to get inky! 


And my order from our amazing Sponsor A Colorful Life Designs did just arrive so I really wanted to play with a couple new stencils. Yay! I ended up inking up both the Beautiful Poinsettia Stencil and the Merry Christmas Stencil. I wanted to see what these beautiful stencils would look like on Kraft card stock from Papertrey Ink.


 I once again used the awesome 5.5 x 8.5" Grip Mat from Sponsor Waffle Flower. I placed my 4-1/4 x 5-1/2" piece of Kraft card stock in the center of the grip mat and placed the Beautiful Poinsettia Stencil over it. I blended Candied Apple, Fired Brick and Worn Lipstick Distress Oxide inks over the inner leaves of the poinsettia.


I blended Mustard Seed Distress Oxide ink over the center of the poinsettia. And then I blended Twisted Citron and then some Pine Needles Distress Oxide inks over the ends of the leaves. I replaced the panel with a new piece of Kraft card stock and then placed the Merry Christmas Stencil over the panel. For this second stencil I just blended Candied Apple and a bit of Fired Brick Distress Oxide inks.


I die cut both panels using the Postage Stamp {nesting dies} from Sponsor Unity Stamp Co. I cut the panels from corner to corner using my Tim Holtz Tonic Guillotine Comfort Paper Trimmer. I cut one panel first and then I laid the left corner piece on the other full panel as a guide. I made sure it was line up right on the edge and then I cut the second panel. I hope that makes sense. It really made it easy for the two panels to line up together on the card bases.


I distressed the outer edges using Vintage Photo Distress Oxide ink. I love the vintage vibe it gives the card stock. I placed the two triangle pieces {one Merry Christmas and the opposite poinsettia} back in the die and then adhered them together with a scrap of thin card stock. It was just a scrap maybe 2" wide that covered the center line from behind. I adhered the panels to a red A2 top fold card base of Pure Poppy Card Stock from Papertrey Ink. I adhered all my layers using iCraft UltraBond Adhesive from Therm O Web.


And then I splattered the cards using Apple Barrel White Acrylic paint that I spritzed with a tiny bit of water. I debated adding a strip of card stock across the card where the two triangles meet but I decided against it. I didn't want to take away from the stenciled backgrounds. What do you think? Should I have added a strip of card stock across?


 All that was left was the sentiments. I applied some anti static powder using the TE Anti-Static Powder Tool from Sponsor Taylored Expressions to a scrap piece of Kraft card stock. I stamped the beautiful sentiment from the Sketched Poinsettia Stamp Set from Waffle Flower using Sugar Cube White Pigment Ink from Taylored Expressions. I then added some Alabaster White Embossing Powder from Brutus Monroe. I melted the powder using a Wagner Precision Heat Tool. I used the fabulous Pressure Pal from our awesome Sponsor Twiddler's Nook when I stamped the sentiments. Once the sentiments had cooled I wiped off the anti static powder using a microfiber cloth. I distressed the edges of the sentiments with the Vintage Photo Distress Oxide ink. Trimmed the sentiments and then popped them up with iCraft 3D Foam Tape Jumbo Roll (white) from our lovely Sponsor Therm O Web.


I hope you'll stop by the Christmas in July 2024 {BYSHC} Linky Party to check out all the wonderful Holiday inspiration being shared! I've been inspired by so many of the cards! I sure hope you'll stop by and check it out! Have an ink-tastic day!


Thanks so much for stopping by!
See ya next time.

Inky Hugs,
Crystal


{Please note that comment moderation is ON. Your comment will appear shortly.}

Christmas in July 2024 {BYSHC} Linky Party ~ Wishing You Mini ~ Gina K. Designs

 Hello there crafty friend!
It's day 7 of the Christmas in July 2024 {BYSHC} Linky Party!! I'm super excited to share another sweet card that I've made to add to my holiday stash this week! I am a huge fan of snowflake stamps and I've had the Wishing You Mini stamp set from Gina K. Designs in my stash for a good long while. I love this cute stamp set!


I finally played with the awesome Postage Collage Die and Postage Collage Coloring Stencil from our amazing Sponsor Waffle Flower. I just adore snowflakes in blue! I die cut a piece of white card stock using the Postage Collage Die. And then I cracked open my 5.5 x 8.5" Grip Mat also from Waffle Flower. Another fabulous tool that's been in my stash for awhile but I haven't gotten around to using until now. And I'm very happy with it. Glad I finally tried it out! I placed the die cut panel on the grip mat and blended Tumbled Glass Distress Ink over the first stencil in the Postage Collage Coloring Stencil set. Keeping the stencil over my panel, I then stamped the Wishing You Mini snowflakes using Tumbled Glass, Salty Ocean, and Chipped Sapphire Distress Inks; and then stamped the stars with Black Soot Distress Ink. I used the fabulous Pressure Pal from our awesome Sponsor Twiddler's Nook when I stamped the snowflakes and stars in my mini misti.


I messed up two of the rectangles {left middle and bottom right} so I redid them using the same steps. I stamped the 'A Happy Holiday' sentiment on the longer rectangle. And then I trimmed them both and added foam tape called iCraft 3D Foam Tape Jumbo Roll (white) from our lovely Sponsor Therm O Web. I heat embossed the 'wishing you' sentiment on black card stock. I prepped my black card stock with the TE Anti-Static Powder Tool from our wonderful Sponsor Taylored Expressions. I stamped the sentiment using the Sugar Cube White Pigment ink, also from Taylored Expressions, and added Alabaster White Embossing powder from Brutus Monroe. I then melted the embossing powder using my Wagner Precision Heat Tool. After letting the melted powder cool a bit, I rubbed my card stock with a microfiber cloth to remove the anti static powder. I fussy cut the sentiment and adhered it directly to the rectangle.


I removed the backing from the foam tape and popped up the two pieces. You can see the dimension it gives the card in this photo. Love it! Who knew I'd end up loving that I messed up the panel! Haha! I adhered the postage layer to a 3-7/8 x 5-1/8" mat of black card stock and then adhered it to a white A2 top fold card base. All of my layers are adhered using iCraft UltraBond Adhesive from Therm O Web. I used a Sakura White Gelly Roll pen to add dots of snow to the background. And then I finished off the card with a few white rhinestones from the Frosty Rhinestones from our fabulous Sponsor Gina Marie Designs. 


Just a few more days to play along with the Christmas in July 2024 {BYSHC} Linky Party!! I have thoroughly enjoyed the inspiration being shared! I hope you'll join in the fun! Have an ink-tastic day!


Thanks so much for stopping by!
See ya next time.

Inky Hugs,
Crystal


{Please note that comment moderation is ON. Your comment will appear shortly.}