Showing posts with label #acolorfullifedesigns. Show all posts

Thursday, July 25, 2024

Christmas in July 2024 {BYSHC} Linky Party ~ Beautiful Poinsettia Stencil ~ A Colorful Life Designs

 Hello there crafty friend!
I couldn't help myself I'm back again today to share a couple more cards I made for the Christmas in July 2024 {BYSHC} Linky Party! I've been so inspired by the cards shared over at the Linky Party... I just HAD to get inky! 


And my order from our amazing Sponsor A Colorful Life Designs did just arrive so I really wanted to play with a couple new stencils. Yay! I ended up inking up both the Beautiful Poinsettia Stencil and the Merry Christmas Stencil. I wanted to see what these beautiful stencils would look like on Kraft card stock from Papertrey Ink.


 I once again used the awesome 5.5 x 8.5" Grip Mat from Sponsor Waffle Flower. I placed my 4-1/4 x 5-1/2" piece of Kraft card stock in the center of the grip mat and placed the Beautiful Poinsettia Stencil over it. I blended Candied Apple, Fired Brick and Worn Lipstick Distress Oxide inks over the inner leaves of the poinsettia.


I blended Mustard Seed Distress Oxide ink over the center of the poinsettia. And then I blended Twisted Citron and then some Pine Needles Distress Oxide inks over the ends of the leaves. I replaced the panel with a new piece of Kraft card stock and then placed the Merry Christmas Stencil over the panel. For this second stencil I just blended Candied Apple and a bit of Fired Brick Distress Oxide inks.


I die cut both panels using the Postage Stamp {nesting dies} from Sponsor Unity Stamp Co. I cut the panels from corner to corner using my Tim Holtz Tonic Guillotine Comfort Paper Trimmer. I cut one panel first and then I laid the left corner piece on the other full panel as a guide. I made sure it was line up right on the edge and then I cut the second panel. I hope that makes sense. It really made it easy for the two panels to line up together on the card bases.


I distressed the outer edges using Vintage Photo Distress Oxide ink. I love the vintage vibe it gives the card stock. I placed the two triangle pieces {one Merry Christmas and the opposite poinsettia} back in the die and then adhered them together with a scrap of thin card stock. It was just a scrap maybe 2" wide that covered the center line from behind. I adhered the panels to a red A2 top fold card base of Pure Poppy Card Stock from Papertrey Ink. I adhered all my layers using iCraft UltraBond Adhesive from Therm O Web.


And then I splattered the cards using Apple Barrel White Acrylic paint that I spritzed with a tiny bit of water. I debated adding a strip of card stock across the card where the two triangles meet but I decided against it. I didn't want to take away from the stenciled backgrounds. What do you think? Should I have added a strip of card stock across?


 All that was left was the sentiments. I applied some anti static powder using the TE Anti-Static Powder Tool from Sponsor Taylored Expressions to a scrap piece of Kraft card stock. I stamped the beautiful sentiment from the Sketched Poinsettia Stamp Set from Waffle Flower using Sugar Cube White Pigment Ink from Taylored Expressions. I then added some Alabaster White Embossing Powder from Brutus Monroe. I melted the powder using a Wagner Precision Heat Tool. I used the fabulous Pressure Pal from our awesome Sponsor Twiddler's Nook when I stamped the sentiments. Once the sentiments had cooled I wiped off the anti static powder using a microfiber cloth. I distressed the edges of the sentiments with the Vintage Photo Distress Oxide ink. Trimmed the sentiments and then popped them up with iCraft 3D Foam Tape Jumbo Roll (white) from our lovely Sponsor Therm O Web.


I hope you'll stop by the Christmas in July 2024 {BYSHC} Linky Party to check out all the wonderful Holiday inspiration being shared! I've been inspired by so many of the cards! I sure hope you'll stop by and check it out! Have an ink-tastic day!


Thanks so much for stopping by!
See ya next time.

Inky Hugs,
Crystal


{Please note that comment moderation is ON. Your comment will appear shortly.}

Wednesday, July 24, 2024

Christmas in July 2024 {BYSHC} Linky Party ~ November 2023 KOM Festive Flair ~ Unity Stamp Co.

 Hello there crafty friend!
I can't believe how fast the time is going by! We are nearing the end of the Christmas in July 2024 {BYSHC} Linky Party! It's always so sad to reach the end, but I'm super happy to be adding so many cards to my stash! I hope you've been inspired to play along with us. My card today features a couple of stamps from the November 2023 Kit of the Month called Festive Flair from our amazing Sponsor Unity Stamp Co. It's Membership Wednesday... a fun day to share inspiration for the awesome memberships over at Unity! I decided to play with an older KOM this time and make another holiday card for my stash!


I had a fun idea for a simple one layer card that kind of took a left turn. I blended over the cool Reindeer Games Stencil from our fabulous Sponsor A Colorful Life Designs using my red TE Blender Brush from another fab Sponsor, Taylored Expressions. I actually didn't add any ink to my brush but I'm pretty sure it has some Candied Apple Distress Ink on it. I kept it very light.


 And then I stamped the beautiful trees from the November 2023 KOM using Iced Spruce Distress Ink. I then applied some anti static powder using the TE Anti-Static Powder Tool from Taylored Expressions. I stamped the beautiful reindeer using Wow Clear Embossing Ink and then added some Raven Embossing Powder from Brutus Monroe. This is a fun black embossing powder with glitter in it. It's really beautiful in person. I melted the powder using a Wagner Precision Heat Tool. As always, I used the fabulous Pressure Pal from our awesome Sponsor Twiddler's Nook when I stamped the trees and the reindeer in my Stamp Platform. Love this tool!


 Once I had all the elements on the panel, it just didn't look right as a one layer card. I trimmed off the front panel of the card base and cut the panel down to 5-1/16 x 3-3/4". And then I die cut a piece of True Black card stock from Papertrey Ink using the largest die from the Postage Stamp {nesting dies} from Unity. I found a card front of Ocean Tides card stock from Papertrey Ink in my stash. I scored the 8-1/2 x 5-1/2" card stock at 4-1/4" for an A2 card. Stamped the sentiment on a scrap of white card stock, trimmed it and mat it with a scrap of black card stock. I adhered all of my layers using the iCraft UltraBond Adhesive from Sponsor Therm O Web. I finished off the card with two glittery red enamel dots from the Holiday Glitter Enamel Dots from Sponsor Gina Marie Designs. Unfortunately, I can't seem to find them on the website but these are a favorite of mine... Red & Green Foil Mirror Enamel Dots.


I hope you'll stop by the Christmas in July 2024 {BYSHC} Linky Party to check out all the wonderful Holiday inspiration being shared! I've been inspired by so many of the cards! I sure hope you'll stop by and check it out! Have an ink-redible day!


Thanks so much for stopping by!
See ya next time.

Inky Hugs,
Crystal


{Please note that comment moderation is ON. Your comment will appear shortly.}

Wednesday, April 24, 2024

Spring into Christmas 2024 {BYSHC} Linky Party ~ Pick Me Up ~ Not 2 Shabby

 Hello there crafty friend!
I'm back with another fun holiday card for the Spring into Christmas 2024 {BYSHC} Linky Party! My card today features cute stamps from the Pick Me Up Clear Stamp set from our wonderful Sponsor Not 2 Shabby. If you follow my blog, you know I love truck stamps! This one was a must-have!!


I had a fun idea for a CAS-ish style card this time. Paired the stamps up with the Driven Snow stencil from our lovely Sponsor A Colorful Life Designs. Such a beautiful stencil! I masked the bottom portion of my card front using a piece of iCraft Removable Pixie Tape from our fabulous Sponsor Therm O Web. Without adding ink to my TE Blender Brush from our awesome Sponsor Taylored Expressions, I blended with my blue brush being sure to have a light touch around the outer edges.


I stamped the pretty trees using Twisted Citron Distress ink first. I used my mini misti so I could get it stamped with good coverage. I then used Pine Needles Distress ink only this time I pulled the ink pad down which gave the trees some texture and let the lighter green peek through in spots. I also stamped the cute truck in my mini misti and used the fabulous Pressure Pal from return Sponsor Twiddler's Nook


I colored up the truck using my Copic markers and then die cut the truck and the trees using the Pick Me Up Shabby Snips dies. I adhered the trees to the card base and added a few white glitter enamel dots from the Winter Sparkle Glitter Style Enamel Dots from our wonderful Sponsor Gina Marie Designs. I popped up the truck using 3D Foam Squares from Sponsor Therm O Web. I really love how this CAS-ish card turned out!

Here's a quick list of the Copic Markers I used:

Truck: R20, R14, R46, N0, N1, N3, N5, C1
Tree: YG11, G24, G46
Sentiment: E21, E23, E25


I hope you'll stop by the Spring into Christmas 2024 {BYSHC} Linky Party to check out all the wonderful Holiday inspiration being shared! I've been inspired by so many of the cards! I sure hope you'll stop by and check it out! Have an ink-tastic day!


Thanks so much for stopping by!
See ya next time.

Inky Hugs,
Crystal


{Please note that comment moderation is ON. Your comment will appear shortly.}

Sunday, October 22, 2023

Falling for the Holidays 2023 {BYSHC} Linky Party ~ Holiday Owls ~ Not 2 Shabby

 Hello there crafty friend!
I'm back for Day 3 of the Falling for the Holidays 2023 {BYSHC} Linky Party! Today's card is super CAS and super quick... but I think it turned out pretty cute!


I used the adorable owl from the Holiday Owls stamp set from Sponsor Not 2 Shabby. I don't see this cute set on the website which is super sad. I think it was from one of Not 2 Shabby's box of the month subscriptions last year. If you love a fun surprise delivered to your door each month, check out the awesome subscriptions over at Not 2 Shabby! I inked up this sweet owl with Memento Tuxedo Black ink and colored it up with the following Copic Markers:

Santa hat: R20, R14, R46, C00, C1, C3
Holly & Berries: R14, R46, YG11, G24
Owl: YR21, YR15, YR24, W00, W1, W3, W5, E55, E57


I paired up this sweet owl with the awesome Dotted Wreath Stencil from Sponsor A Colorful Life Design. When I need a quick card I love to reach for a fun stencil and I've been wanting to play with this one for awhile. I blended Twisted Citron and Mowed Lawn Distress Oxide inks over the Dotted Wreath Stencil directly onto the front of my white A2 card base.


I stamped the sentiment directly on the card front using Memento Tuxedo Black ink. I fussy cut the owl on the line and made it look all nice and neat by coloring the edge black with a Memento Tuxedo Black marker. I added some foam squares to the back of the owl using the Bearly Art Cubies: The Polar Collection from our Brand New Sponsor Bearly Art. Love the dimension it adds to the card!


Before you leave be sure to stop by Not 2 Shabby and check out the fun new release that's available today... Jamie shared some super cute sneak peeks of some of the new goodies on the Not 2 Shabby blog at the start of the Linky Party. You don't want to miss out on this one! And Jamie also shared a 10% OFF code for us to use while shopping the Not 2 Shabby shop - BYSHC10. Also stop by A Colorful Life Designs and Bearly Art and check out their awesome products! If you haven't already, stop by the Falling for the Holidays 2023 {BYSHC} Linky Party to check out all the wonderful holiday inspiration being shared!!


Thanks so much for stopping by!
See ya next time.

Inky Hugs,
Crystal


{Please note that comment moderation is ON. Your comment will appear shortly.}

Friday, October 6, 2023

Hug in a Mug ~ Christmas Quilt ~ A Colorful Life Designs

 Hello there crafty friend!
I had started another card for my guest designing gig with A Colorful Life Designs last month, but time got away from me and I didn't get it completed until now. So today I'm sharing a fun Winter card featuring a lovely stencil from A Colorful Life Designs. Have you checked out the selection of stencils over at A Colorful Life Designs yet? All so AMAZING! AND they just released a crazy amount of new holiday stencils! OMG!! You have to go take a look! 


I had a fun idea while playing with the Christmas Quilt Stencil from A Colorful Life Designs. I wondered how it would look if I shifted it using two different colors. I did it originally on a scrap of white card stock and I really liked it. So I decided for this card, I wanted to give it a go on Kraft card stock. I blended Lumberjack Plaid Distress Oxide ink over the stencil. I shifted the stencil so the design would overlap and I blended Rustic Wilderness over top. I love it! 


These fun ladies are from an exclusive STAMPtember stamp set, a collaboration from Art Impressions and Simon Says Stamp called Hug in a Mug. This exclusive set from 2021 is no longer available, unfortunately. But I'm super happy that I finally inked it up! Here's a quick list of the Copic markers I used to color up these ladies:

Skin: E000, E00, E11, E04
Brown Hair: E51, E53, E55
Green Hat: YG11, G24, G46, E51, E53, E55, C00, C1, C3
Teal Hoodie: BG70, BG72, BG75
Jeans: B91, B95, B97
Black Boots: N0, N1, N3, N5, N7
Tan Glove: E53, E55, BG72, BG75
Red Mug: R20, R14, R46
Straw: G24, G46
White Hair: C00, C1, C3
Red Hat: C00, C1, C3, R20, R14, R46
Red Scarf: R20, R14, R46
Ivory Sweater: E81, E43
Black Pants: N0, N1, N3, N5, N7
Brown Boots: E51, E53, E55, E57, E59
Blue Gloves: BG70, BG72
Green Mug: YG11, G24, G46


I heat embossed the sentiment using Sugar Cube Pigment ink, Alabaster White embossing powder and my heat tool on Kraft card stock from Papertrey Ink that I had die cut using the Land Border Die Set from Newton's Nook Designs. I trimmed the stenciled panel and adhered the sentiment. Trimmed off the excess and adhered the whole panel onto a white A2 top fold card base.

You can check out my process video here... Hug in a Mug | Christmas Quilt Stencil | A Colorful Life Designs.


 Be sure to head over to A Colorful Life Designs and check out their amazing selection of stencils. Since I'm no longer a guest designer for them my code doesn't work, but my sweet friend Von Marie is on the design team so you can use code VonFan10 for 10% OFF your order! Have a wonderful weekend friends!

Thanks so much for stopping by!
See ya next time.

Inky hugs,
Crystal


{Please note that comment moderation is on. Your lovely comment will appear once approved.}

Sunday, September 24, 2023

Friends Warm the Heart ~ Cozy Knit Stencil ~ A Colorful Life Designs

 Hello there crafty friend!
Today I'm so excited to share a fun Winter card as a guest designer for A Colorful Life Designs. Have you checked out the selection of stencils over at A Colorful Life Designs yet? All so AMAZING! There is literally something for every occasion!! Before we get to my card, please use code Crystal10 for 10% OFF your order over at A Colorful Life Designs and tell them Crystal sent you over!


Today I'm sharing a very simple Winter card featuring the Cozy Knit Stencil from A Colorful Life Designs. It makes such a pretty background! I love, love, love this stencil! I blended Tumbled Glass and Wilted Violet Distress Oxide inks over the stencil leaving white space around the edges.


The adorable girl and snowman (and the bunny further down in the pictures) is from the STAMPtember stamp set collaboration from The Greeting Farm and Simon Says Stamp called Warm the Heart. This is an exclusive set that, unfortunately, is no longer available. I'm so glad I was able to get it and super excited that I could play with it already. Here's a quick list of the Copic markers I used to color up these cute images:

Skin: E000, E00, E11, E04, R00, R20
Hair: YR31, E43, E44
Hat: B000, B00, B02, B04, V000, V12, C00, C1, C3
Coat / Button: V000, V12, V15, V17, B000, B00, B02
Pants: B000, B00, B02, B04
Shoes: N0, N1, N3
Snowball: C00, C1, C3
Snowman: C00, C1, C3, YR21, YR15
Snowman Hat: B000, B00, B02, B04, N0, N1, N3, N5
Snowman Buttons: B000, B00, B02, B04
Bunny: W00, W1, W3, R00, R20 V000, V12, V15, C00, C1, C3


Since I did my ink blending directly on the front of my card base, all I had to do was adhere the cute die cut images to the card. I heat embossed the sentiment using Sugar Cube Pigment ink, Alabaster White embossing powder and my heat tool on True Black card stock from Papertrey Ink. I trimmed the sentiment and popped it up on the card using foam tape.

You can check out my process video here... Friends Warm the Heart | Cozy Knit Stencil | A Colorful Life Designs.


 Be sure to head over to A Colorful Life Designs and check out their amazing selection of stencils. And don't forget to use code Crystal10 for 10% OFF your order! Have a wonderful weekend friends!

Thanks so much for stopping by!
See ya next time.

Inky hugs,
Crystal


{Please note that comment moderation is on. Your lovely comment will appear once approved.}

Saturday, September 16, 2023

Hocus Pocus ~ Halftone Circle Stencil ~ A Colorful Life Designs

 Hello there crafty friend!
Today I'm so excited to share another cute Halloween card as a guest designer for A Colorful Life Designs. Have you checked out the selection of stencils over at A Colorful Life Designs yet? All so AMAZING! There is literally something for every occasion!! Before we get to my card, please use code Crystal10 for 10% OFF your order over at A Colorful Life Designs and tell them Crystal sent you over!


Today I'm sharing a very simple Halloween card featuring the Halftone Circle Stencil from A Colorful Life Designs. It makes the perfect background! I can imagine so many different fun images with this stencil. I used a palette knife from my stash and applied Unicorn Horn Glitter Glaze from Brutus Monroe all over the stencil onto a card front of True Black card stock from Papertrey Ink.


The adorable witch is from the Hocus Pocus stamp set from The Greeting Farm. I don't see it currently on their website. But I did find Hallo Witch - she's a fun digital stamp and she's also on a broom. Here's a quick list of the Copic markers I used to color up this cute witch:

Skin: E000, E00, E11, E04
Eyes: YG11, YG23, C00, C1
Mouth: E04, E000
Hair: YR14, YR18, E09, E29
Dress / Boots / Hat: YG11, YG23, YR21, YR15, YR16, N0, N1, N3, N5, N7
Broom: E51, E55, E57, E59, YR21, YR15, YR16
Gecko / Leaves: YG21, YG11, YG23, YG63


I adhered the stenciled background to a white A2 top fold card base measuring 4-1/4 x 11"; scored at 5-1/2". I added foam tape to the back of the fussy cut witch and popped her up on the card. I heat embossed the sentiment using Sugar Cube Pigment ink, Alabaster White embossing powder and my heat tool. I trimmed the sentiment and popped it up on the card also using foam tape.

You can check out my process video here... Hocus Pocus | Halftone Circle Stencil | A Colorful Life Designs.


 Be sure to head over to A Colorful Life Designs and check out their amazing selection of stencils. And don't forget to use code Crystal10 for 10% OFF your order! Have a wonderful weekend friends!

Thanks so much for stopping by!
See ya next time.

Inky hugs,
Crystal


{Please note that comment moderation is on. Your lovely comment will appear once approved.}

Friday, September 8, 2023

Here for the Boos ~ Ghost Squad Stencil ~ A Colorful Life Designs

 Hello there crafty friend!
Today I'm so excited to share a cute Halloween card as a guest designer for A Colorful Life Designs. The amazing selection of stencils over at A Colorful Life Designs are well, AMAZING! A whole slew to pick from and there's something for every occasion!! Before we get to my card, please use code Crystal10 for 10% OFF your order over at A Colorful Life Designs and tell them Crystal sent you over!


Today my card features the coolest ghosts in town! I used the Ghost Squad Stencil. Aren't they just the cutest?! And those glasses! I can't get enough of them.

I ink smooshed a fun background for the ghosts using Villainous Potion and Kitsch Flamingo Distress Oxide inks. I then blended the same oxide inks over the Ghost Squad Stencil. I masked the ghosts as I went across the stencil just so the blends wouldn't get messed up. I really just wanted the pink in the middle and it was easier to mask and just blend each one separately.


I also added a bit of glittery goodness to the ghosts and splattered some Liquid Pixie Dust while the stencil was still over the ghosts. I had a couple splatters bleed through but that's okay. The glitter is so fun! I love it!


I die cut the ghosts and the ink smooshed panel using two dies from the Big and Little Chain Rectangle Die Set from Gina Marie Designs. Added a bunch of foam tape to the back of the ghosts and popped them up on the ink smooshed panel. I adhered the whole panel onto a white A2 top fold card base. The cute sentiment is from the Brooms & Boos Stamp Set from Newton's Nook Designs. Isn't it just perfect with these fun ghosts?! 


I couldn't help but add a ghost inside the card... so fun!


 Be sure to head over to A Colorful Life Designs and check out their amazing selection of stencils. And don't forget to use code Crystal10 for 10% OFF your order! Hope you have a wonderful weekend!

Thanks so much for stopping by!
See ya next time.

Inky hugs,
Crystal


{Please note that comment moderation is on. Your lovely comment will appear once approved.}

Tuesday, September 5, 2023

Java Merry Christmas ~ Christmas Deer Stencil ~ A Colorful Life Designs

 Hello there crafty friend!
Today I'm so excited to share a fun holiday card as a guest designer for A Colorful Life Designs. I am just smitten with the amazing selection of stencils over at A Colorful Life Designs. So many options and for every occasion!! I was so happy to be asked to guest design for them this month. Before we get to my card, please use code Crystal10 for 10% OFF your order over at A Colorful Life Designs and tell them Crystal sent you over!


Now, on to my card... featuring the adorable and sweet Christmas Deer Stencil. I have seen a bunch of cards using the sweet Christmas Deer Stencil it was an absolute MUST HAVE for my stencil collection!! You all know I love making Christmas cards!! 


I blended Mowed Lawn and Forest Moss Distress Oxide inks over the trees and Vintage Photo and Ground Espresso Distress Oxide inks over the deer. I die cut a post it note using a small circle die to mask the deer and used the negative as well for blending the deer. You can see what I mean in my process video below.


I stamped the sweet Latte Santa and sentiments from Unity and colored up Santa with the following Copic markers:

Skin: E000, E00, E11, E04
Mustache / Beard: C00, C1, C3
Hat: C00, C1, C3, YG11, G24, G46
Shirt: YG11, G24, G46, R20, R14, R46
Pants: R20, R14, R46, E21, E23, E25
Mug: R20, R14, R46, E21, E23, E25

The stenciled background was die cut using the Scallops & Rectangles Nesting Dies from Unity. The sentiment was die cut using the Banner Nesting Dies, also from Unity, but out of stock. And the sentiment inside the card {down below} was also die cut using the Scalloped & Stitched Sentiment Nesting Dies from Unity.


I absolutely love this sentiment and had to use it for the inside of the card. And how sweet is that little deer in the corner?! Love it!


 Be sure to head over to A Colorful Life Designs and check out their amazing selection of stencils. And don't forget to use code Crystal10 for 10% OFF your order! Also, drop by Unity Stamp Co. to check out all the amazing new releases for the month of September... including Latte Santa!

Thanks so much for stopping by!
See ya next time.

Inky hugs,
Crystal


{Please note that comment moderation is on. Your lovely comment will appear once approved.}

Tuesday, August 1, 2023

{BYSHC} Sketch Challenge 36 ~ Snowflake Border Die ~ Gina Marie Designs

Hello there crafty friend!
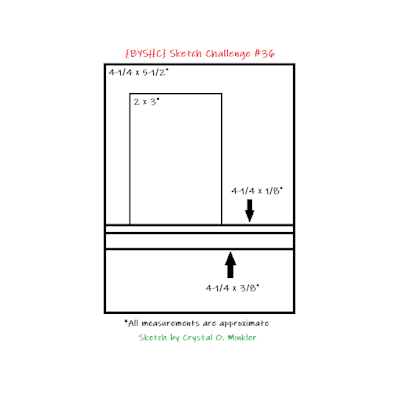
It's time for a new sketch challenge over in the Build Your Stash Holiday Cardmakers Facebook group! Today I'm sharing a Christmas card using a leftover piece from one of my linky party cards. If you're interested, you can check out the linky party card here. I also used the beautiful Snowflake Border die from Gina Marie Designs. I had purchased this die in hopes of using it for the linky party but never did use it. I'm so glad I was finally able to. I love it!


A fairly simple card for Sketch 36. I went back and forth with the idea of running the Cool Caribbean card front through my Big Shot with a snowflake embossing folder but I really wanted to go with more of a CAS design. I also considered adding a white mat behind the stenciled panel, but decided against it. I think if I was to remake this one, I might add that mat. What do you think? 


As I mentioned, the focal panel is a leftover from a card I made for the linky party. I used Seedless Preserves and Broken China Distress Oxide inks over the Snowflake Net Stencil from A Colorful Life Design. I had blended the inks over a 6 x 6" piece of white card stock so it was fun to be able to use this piece for this card. I added a white glitter enamel dot from the Winter Sparkle Glitter Style enamel dots, also from Gina Marie Designs.


To keep with the color combo, I added a strip of white card stock. That's a scrap that I literally just pulled out of my storage. No idea how wide it is but it's 4-1/4" long. I die cut a piece of Orchid Opulence card stock from Stampin' Up for the Snowflake Border die. I trimmed the top and adhered it under the white strip. The sentiment is from Gina K Designs and it's called Wishing You Mini Stamp Set. I still had this on my desk from the last week. I wasn't quite brave enough to stamp the sentiment on the white strip so I stamped it on a scrap, trimmed it up and adhered it under the focal panel. It's the tiniest bit wider than the white strip but I think it's ok.


Here's a look at {BYSHC} Sketch Challenge 36 for the month of August. I hope you'll join us and play along with the sketch! If you're interested in seeing a bit more inspiration for this sketch, check out the amazing inspiration from the design team over on the {BYSH} Cardmakers blog!


Thanks so much for stopping by!
See ya next time.

Inky hugs,
Crystal


{Please note that comment moderation is ON. Your lovely comment will appear shortly.}