Showing posts with label #owlcard. Show all posts

Tuesday, May 28, 2024

Tawny Owl Paperie Inky Inspiration Sketch 22 ~ Owl Rather Be With You ~ Gerda Steiner Designs

 Hello there crafty friend!
It's time for a fun new sketch over in the Tawny Owl Paperie Inky Inspiration Facebook group. Today I'm sharing my first card for the Tawny Owl Paperie Inky Inspiration Sketch Challenge 22. Another birthday card! Woohoo! You may recognize this card design. Just like last month's Sketch 21, I used another 'scraps' card as my inspiration for this month's sketch. This was such a great sketch for those larger pieces of scraps. I thought it would be perfect as I'm trying to finish off the leftover papers I found in my stash in April. I can't believe it's taking me this long to finish off these papers!


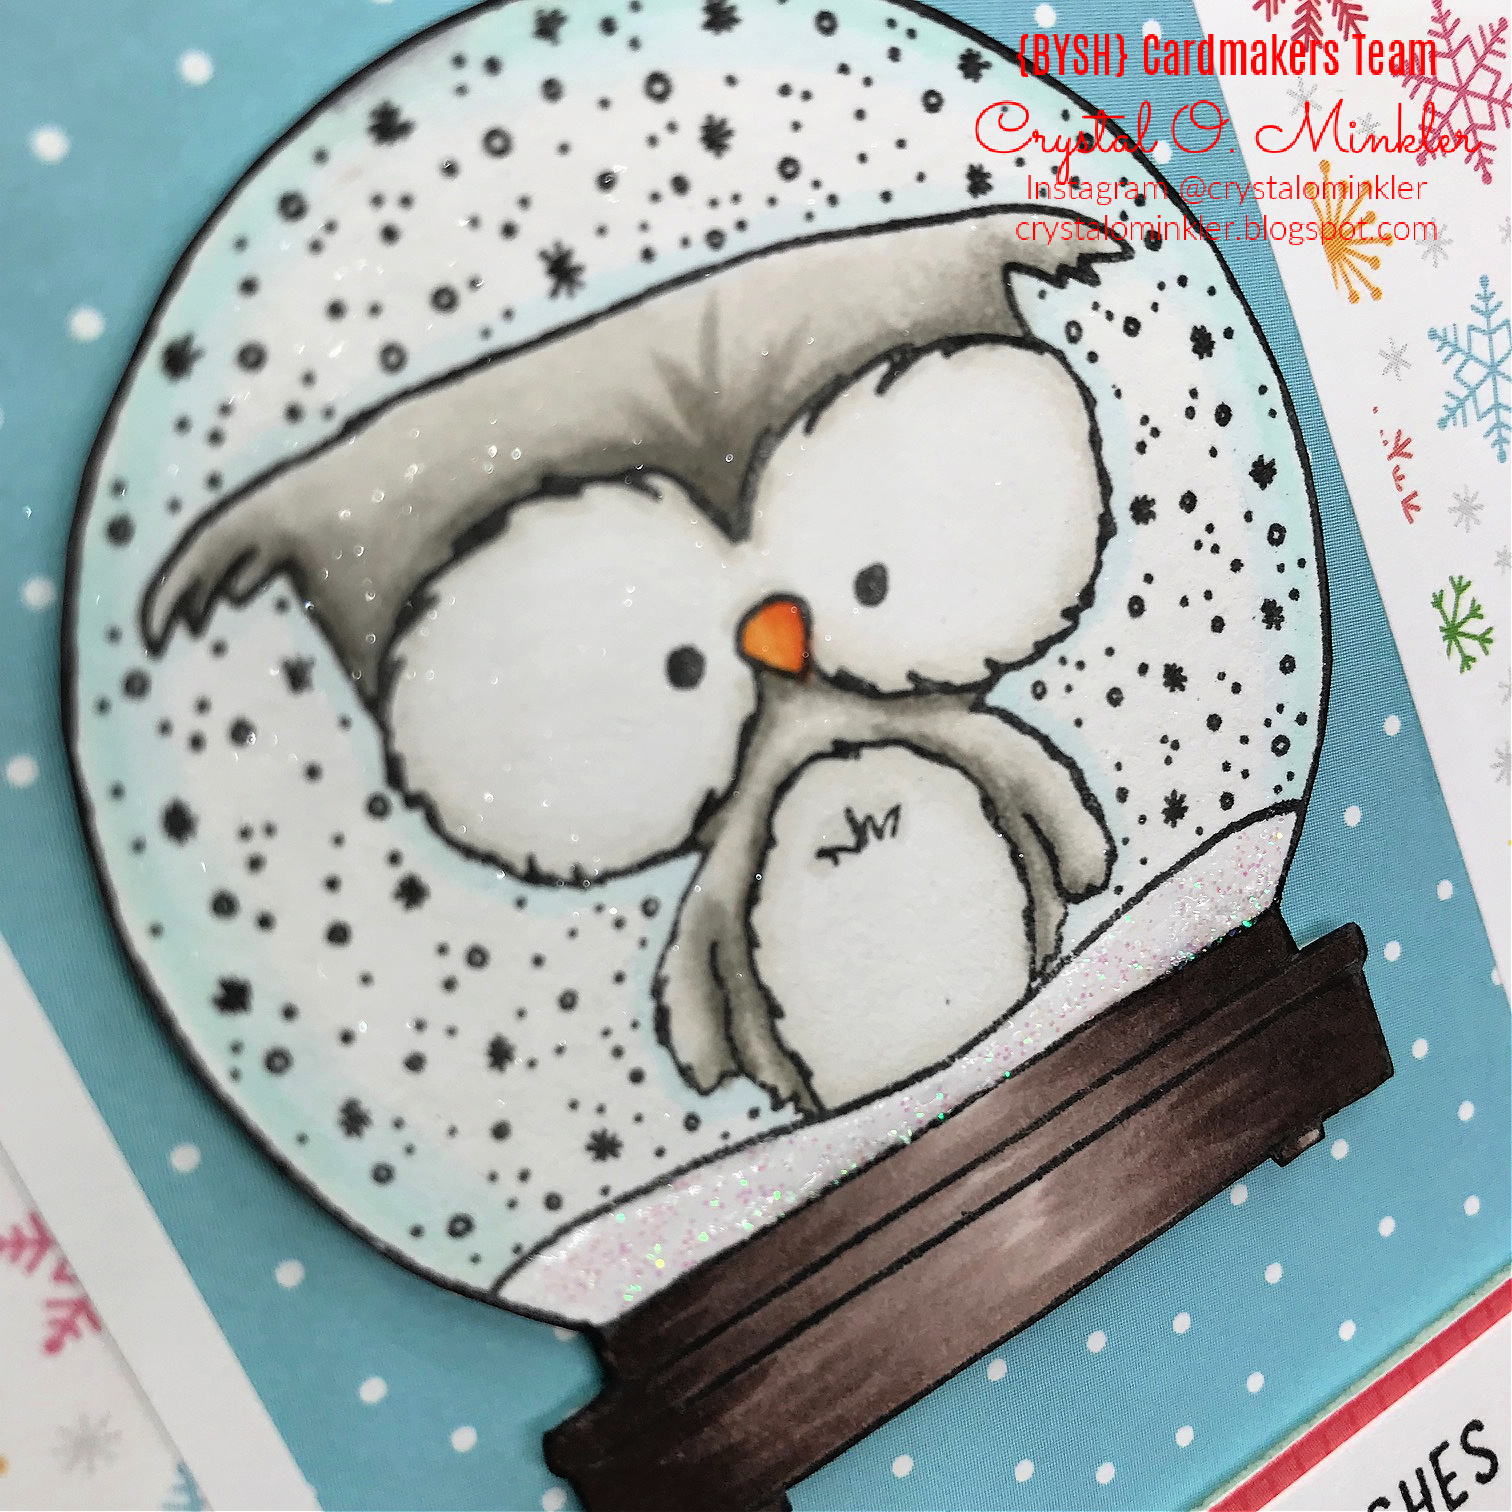
Anywho, for this card I only used two pieces of leftover papers. I didn't have a full sheet to use as my background so I went with a card stock that is also a leftover from my Scrapping for Less days. I trimmed the card stock to 4 x 5-1/4" and adhered the pattern papers near the top center. I stamped the adorable owl and branch from the Owl Rather Be With You stamp set from Gerda Steiner Designs on scraps of Stampers Select White Card Stock from Papertrey Ink using Memento Tuxedo Black Ink. This adorable stamp set has been in my stash for awhile but this is the first time I've inked it up! Yay! 


 I found this stitched rectangle on my desk that the owl fit in just perfectly. It's a die cut from the awesome Frames & Tags Die Set from Newton's Nook Designs. I colored up the owl and branch using my Copic markers. Fussy cut them both on the line (excluding the tufts on the owls head - I left a bit of a white border) and then colored the edges of my cutting using a Memento Tuxedo Black marker making the cutting look all nice and neat.

Here's a quick list of the Copic markers I used: 

Owl Eyes: W00, W1, W2
Owl Beak / Feet: YR21, YR15, YR14
Owl Feathers: W00, W1, W2, W3, W5
Branch: E55, E57, E59


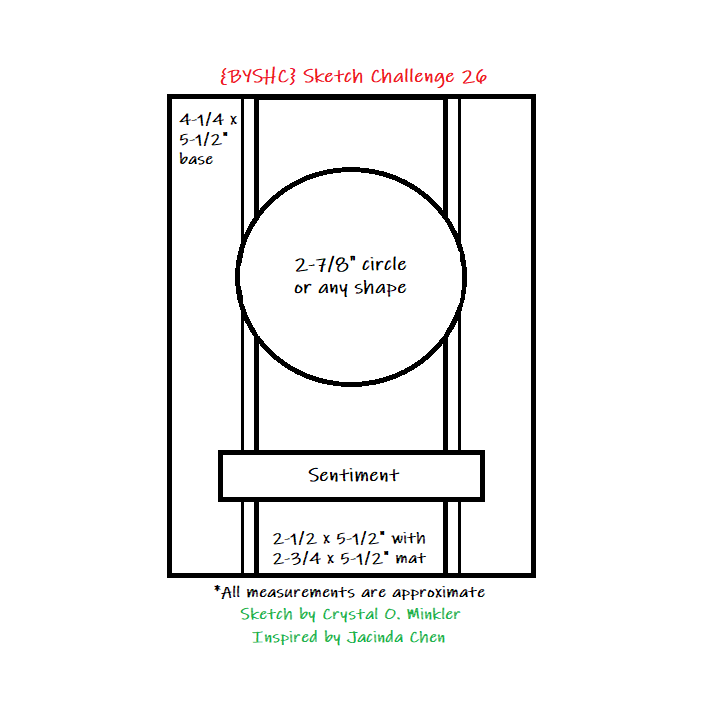
Here's a look at the fun sketch for Tawny Owl Paperie Inky Inspiration Sketch Challenge 22. The sketch, as always, is meant to inspire not require. So let the sketch lead in your design, but don't feel limited by it. I didn't add dimensions for the pattern paper scraps as I'm sure we all have different sized scraps in our stash. The polka dot paper on my card is kind of long so I lowered the sentiment strip across the card. I think I actually covered up a portion of the polka dot paper with the sentiment. A good example of letting the sketch lead but not limiting the design.


I heat embossed the sentiments. I prepped my card stock first using the TE Anti-Static Powder Tool. Stamped the sentiment using Sugar Cube White Pigment Ink from Taylored Expressions. Added some Alabaster White Embossing Powder from Brutus Monroe. And melted the powder using a Wagner Precision Heat Tool. I trimmed up the sentiments and adhered all of my layers to a white A2 top fold card base. I hope you all have fun with this sketch! I can't wait to see what you create with it. Have an ink-tastic week!

Thanks so much for stopping by!
See ya next time.

Inky Hugs,
Crystal


{Please note that comment moderation is on. Your lovely comment will appear once approved.}

Tuesday, February 27, 2024

Tawny Owl Paperie Inky Inspiration Sketch 19 ~ Epstein and Garfield ~ Rubbernecker Stamps

 Hello there crafty friend!
Today I'm sharing a brand new sketch for the Tawny Owl Paperie Inky Inspiration Facebook group. I had to much fun that I ended up making two cards to share! I'm still working on some birthday cards to build up my stash. And I'm still trying to use up those leftover papers from my days on the Scrapping for Less Design Team. These leftover papers have just been sitting there taking up room in my studio for over 3 years now. I challenged myself last month to start using them all up!! So, I'll be sharing the cards I create throughout the month. Some will be using the new TOPII sketch and others will just be ideas I came up with using the last few scraps. I hope you're inspired to not only play along with this month's sketch, but also use up those scraps right along with me!


My two cards for TOPII Sketch 19 featuring owl stamps from Rubbernecker Stamps. I thought these cuties would be perfect for this sketch! I used Epstein and Garfield... I can't seem to find them on the website now, but they do have a fun Have a Hoot stamp set that includes Epstein and a stamp that is kinda similar to Garfield. Always happy to enable crafty friends!


First up is the adorable Epstein owl from Rubbernecker Stamps. Isn't he just the cutest?! I stamped him up using Black Amalgam ink from Gina K. Designs. I think I might need to add some ink to my ink pad though. I just couldn't get a crisp stamping of his eyes. I will likely color them in black with my Memento Tuxedo Black marker. 


I used up a bunch of the pattern papers last week with my three cards for Sketch 18 so I decided to just use a strip of the pattern paper for my cards today. These strips measure 1-3/4 x 5-1/4". I also used some leftover card stock for my red card front and for the white scallops strips. So I don't actually know what brand of card stock these are.


I didn't want to cover up the pretty pattern paper so I die cut a vellum circle using a die from the Scallops & Circles {nesting dies} from Unity. I adhered the owls to the vellum circle and then adhered the vellum circle by just adding glue behind the owls so none of the glue would show through the vellum.

Here's a quick list of the Copic markers I used to color Epstein up:

Feathers: W00, W1, W3, W5, E84, E87, E89
Eyes: Y11, Y15, Y26
Beak / Feet: YR15, YR27
Heart: R20, R14, R46 


Here's a look at the fun new sketch for Tawny Owl Paperie Inky Inspiration Sketch 19. I think this'll be a good sketch for those larger leftover pieces. The sketch, as always, is meant to inspire not require. So let the sketch lead in your design, but don't feel limited by it. I have a few fun ideas for this sketch and I hope to play some more with it during the next few weeks.


My second card featuring the cute Garfield owl from Rubbernecker Stamps.
I used another scrap for this card along with a fun yellow card front from my stash. I love how the yellow background makes Garfield's eyes and cup pop on the card.


I used an old scallop edge punch from Stampin' Up with some scraps of white card stock to make the fun white scallop edges. I punched them and then trimmed the edges... I'd say they're about 1/2" wide so I could just adhere them to the pattern paper strip before adhering the strips to the card fronts.

Here's a quick list of the Copic markers I used to color up Garfield:
 
Feathers: W00, W1, W3, W5, E84, E87, E89
Eyes / Cup: Y11, Y15, Y26
Beak / Feet: YR15, YR27 


The sentiment is from the Gotta Love Sentiments from Unity Stamp Co. I trimmed them and popped them up with foam tape. So happy with how these cards turned out and they didn't take very long either! I hope you're inspired to play along with the sketch... and maybe even use up some of those paper scraps and/or paper pads! Have a wonderful week!

Thanks so much for stopping by!
See ya next time.

Inky Hugs,
Crystal


{Please note that comment moderation is on. Your lovely comment will appear once approved.}

Friday, February 16, 2024

{BYSHC} Sketch Challenge 42 ~ Pattern Papers with Ephemera ~ Not 2 Shabby

Hello there crafty friend!
I'm back sharing inspiration for the sketch challenge over in the Build Your Stash Holiday Cardmakers Facebook group! Today I'm sharing three super quick cards using the coordinating paper pads and ephemera from Not 2 Shabby! I love the papers and ephemera from Not 2 Shabby! They coordinate so well and they're always so beautiful! Don't forget we're changing things up for 2024 and Not 2 Shabby is Sponsoring our {BYSHC} Sketch Challenge 42! Jamie has generously offered up a super fun-filled Christmas prize package for one lucky winner! Yay! Thank you so much, Jamie!


Here's a look at all three cards together! Aren't they just too cute!?


First up is the adorable owl papers and ephemera from the Deck the Owls 6x6 paper pad and the coordinating ephemera. Love the beautiful owls in these papers! I also love the glitter paper... it's so sparkly but doesn't have any of the gritty feel of actual glitter. Which also means no glittery mess! 


I used the measurements from the sketch for this card. I paired up two ephemera pieces for this one. I stamped a sentiment from the Holiday Owls stamp set using Rustic Wilderness Distress Oxide ink. I trimmed up the sentiment and adhered them all together and then added foam tape to the back.


For my second card I used the gorgeous Winter Magic 6x6 paper pad and coordinating ephemera. The papers in this paper pad are absolutely gorgeous!! I just had to use a couple of the glitter papers for this one too! 


I stamped the sentiment from the Nutcracker Dolls stamp set using Saltwater Taffy Distress Oxide ink. It looks so nice with the ephemera! I combined a couple ephemera for this card too. I adhered the ephemera with the sentiment and added foam tape to the back of all three pieces and popped them up on the card.


My third and last card featuring the adorable Gingerbread Kisses 6x6 paper pad and coordinating ephemera. Now the paper strips for this one are a bit smaller because I just used pieces that were already cut in the pack. 


No need to combine ephemera for this one. All the cute images were combined on one piece of ephemera! Love it! I stamped the sentiment from the Gingerbread Hugs stamp set using Kitsch Flamingo Distress Oxide ink. I adhered the sentiment to the ephemera and added foam tape to the back. I love the dimension that the popped up ephemera gives to the cards.


Here's a look at {BYSHC} Sketch Challenge 42 for the month of February. Loving this fun sketch! I hope you'll join us and play along with the sketch! If you're interested in seeing a bit more inspiration for this sketch, check out the amazing inspiration from the design team over on the {BYSH} Cardmakers blog! The design team made some really beautiful cards! Have an ink-tastic day!


Thanks so much for stopping by!
See ya next time.

Inky hugs,
Crystal


{Please note that comment moderation is ON. Your lovely comment will appear shortly.}

Saturday, January 13, 2024

{BYSHC} Sketch Challenge 41 ~ Love Owl with Stitched Star Background ~ Angie Blom Digital Designs

Hello there crafty friend!
I'm back with another Christmas card for the {BYSHC} Sketch Challenge 41 for the Build Your Stash Holiday Cardmakers Facebook group. Today I'm featuring the brand new Love Owl and Stitched Star Background digital stamps from our wonderful challenge sponsor Angie Blom Digital Designs.


I combined and resized the Stitched Star Background and the Love Owl in a Word Document. I also added a sentiment from the Christmas Shop digital stamps and resized it. I ink smooshed a piece of white card stock using Squeezed Lemonade, Mustard Seed, and Wild Honey Distress Oxide inks being sure to keep the inks on the top half of the card stock. Dried the background with my heat tool and then I printed the combination of digital stamps onto the card stock.


I trimmed the Stitched Star Background and adhered it to a 5-1/4 x 4" piece of True Black card stock and then adhered my panel to a Stampers Select White card stock A2 card base. I colored up the sweet and adorable Love Owl using a handful of Copic markers. I fussy cut it and cleaned up the lines by coloring the edges with a Memento Tuxedo Black marker.

Here's a quick list of the Copic markers I used:
Owl: E53, E55, E57, BG0000, BG000, BG02, YR15, YR27, Y11, Y15
Scarf: Y11, Y15, Y35
Branch: E53, E55
Pine Needles: YG11, G24, G46
Berries: R20, R14


I die cut a piece of vellum card stock using the X Stitched Circle die from Gina Marie Designs. I trimmed off the bottom edge of the die cut circle which I think grounds the owl. It just didn't look right with the complete circle. I adhered the owl to the vellum circle and then adhered the circle to the card by just applying glue behind the owl. I trimmed up the sentiment and adhered it to the card. To finish off the card I added a few enamel dots.


Here's another look at {BYSHC} Sketch Challenge 41 for the month of January. If you're interested in seeing a bit more inspiration for this sketch, check out the amazing inspiration from the design team over on the {BYSH} Cardmakers blog!


Thanks so much for stopping by!
See ya next time.

Inky hugs,
Crystal


{Please note that comment moderation is ON. Your lovely comment will appear shortly.}

Monday, December 18, 2023

Advent Calendar Day 18 ~ Unity Stamp Co.

Hello there crafty friend!
It's time for Day 18 of the 2023 Advent Calendar from Unity!! And it just so happens to be my birthday! I'm revealing the Advent Calendar stamp on my YouTube channel each day and also have a short blog post. I am just tickled pink about today's stamp!!


A sweet owl stamp is the next Advent Calendar stamp! It's so perfect for my birthday! I love owls! Yay! I stamped the cute owl with Vintage Photo Distress Ink on a circle die cut I cut from white card stock using a die from the Scallops & Circles {nesting dies}. I also die cut a mat circle from Garden Green card stock from Stampin' Up using the next largest circle die from the dies.


Inspiration for today's card comes from the {BYSHC} Sketch Challenge 38. Now, you may be thinking I'm nuts... but this sketch really inspired my card. I omitted the four panels and turned the sketch. I wasn't able to fit the sentiment across with the circle so I placed it under the circle. I just couldn't cover up these gorgeous papers with the four panels.


I paired today's Advent Calendar stamp with the gorgeous Festive Christmas {paper pack}. You're probably tired of hearing it but these are seriously another favorite holiday paper pack! Just stunning!


I heat embossed the sentiment using the TE Anti Static Powder tool and Sugar Cube Pigment ink from Taylored Expressions. {I just realized I didn't wipe off the anti static powder so it looks a little dull - ooops!} I also used Alabaster White Embossing Powder from Brutus Monroe. And melted the ep using a Wagner Precision Heat Tool.

You can check out my video revealing the Advent Calendar Day 18 stamp and my process in making this card here... Advent Calendar Day 18 | Unity Stamp Co.


Pretty sure there's still some Advent Calendars available if you didn't order one yet. I can't help but enable, my friends! I'll be back tomorrow for Day 19 of the 2023 Advent Calendar from Unity! Have an ink-tastic day!


Thanks so much for stopping by!
See ya next time.
 
Inky Hugs,
Crystal


{Please note that comment moderation is on. Your lovely comment will appear once approved.}

Sunday, October 22, 2023

Falling for the Holidays 2023 {BYSHC} Linky Party ~ Holiday Owls ~ Not 2 Shabby

 Hello there crafty friend!
I'm back for Day 3 of the Falling for the Holidays 2023 {BYSHC} Linky Party! Today's card is super CAS and super quick... but I think it turned out pretty cute!


I used the adorable owl from the Holiday Owls stamp set from Sponsor Not 2 Shabby. I don't see this cute set on the website which is super sad. I think it was from one of Not 2 Shabby's box of the month subscriptions last year. If you love a fun surprise delivered to your door each month, check out the awesome subscriptions over at Not 2 Shabby! I inked up this sweet owl with Memento Tuxedo Black ink and colored it up with the following Copic Markers:

Santa hat: R20, R14, R46, C00, C1, C3
Holly & Berries: R14, R46, YG11, G24
Owl: YR21, YR15, YR24, W00, W1, W3, W5, E55, E57


I paired up this sweet owl with the awesome Dotted Wreath Stencil from Sponsor A Colorful Life Design. When I need a quick card I love to reach for a fun stencil and I've been wanting to play with this one for awhile. I blended Twisted Citron and Mowed Lawn Distress Oxide inks over the Dotted Wreath Stencil directly onto the front of my white A2 card base.


I stamped the sentiment directly on the card front using Memento Tuxedo Black ink. I fussy cut the owl on the line and made it look all nice and neat by coloring the edge black with a Memento Tuxedo Black marker. I added some foam squares to the back of the owl using the Bearly Art Cubies: The Polar Collection from our Brand New Sponsor Bearly Art. Love the dimension it adds to the card!


Before you leave be sure to stop by Not 2 Shabby and check out the fun new release that's available today... Jamie shared some super cute sneak peeks of some of the new goodies on the Not 2 Shabby blog at the start of the Linky Party. You don't want to miss out on this one! And Jamie also shared a 10% OFF code for us to use while shopping the Not 2 Shabby shop - BYSHC10. Also stop by A Colorful Life Designs and Bearly Art and check out their awesome products! If you haven't already, stop by the Falling for the Holidays 2023 {BYSHC} Linky Party to check out all the wonderful holiday inspiration being shared!!


Thanks so much for stopping by!
See ya next time.

Inky Hugs,
Crystal


{Please note that comment moderation is ON. Your comment will appear shortly.}

Friday, July 21, 2023

Christmas in July 2023 {BYSHC} Linky Party ~ Decorate My Life ~ Unity Stamp Co.

Hello there crafty friend!
I'm so excited to share my first card for the Christmas in July 2023 {BYSHC} Linky Party hosted by the Build Your Stash Holiday Cardmakers Facebook group! This is our fourth annual Christmas in July Linky Party. I can't believe how fast time seems to fly by! Even though were in the middle of Summer the linky party is focused on Christmas and wintry holiday cards. It's a great way to get ahead on those holiday cards to relieve some of the stress later on in the year during the holidays. I am super excited to add a few more holiday cards to my Christmas card stash and I sure hope that you'll join in the fun!


For my first card I'm featuring the super sweet Decorate my Life Itty Bitty stamp from Sponsor Unity Stamp Co. I also used the sentiment from the Poinsettia Wishes Itty Bitty stamp, also from Unity. I paired these stamps up with papers from the Vintage Christmas paper pad from The Paper Studio. I adhered all my layers to a white A2 top fold card base using the iCraft UltraBond Adhesive from our wonderful Sponsor Therm O Web.


I stamped the sweet owl using Black Amalgam ink from returning Sponsor Gina K Designs. I love this ink! I can use it for Copic coloring or for watercoloring... so easy peasy. Here's a quick list of the Copic Markers I used to color up the sweet owl:

Owl ~ N0, N1, N3, N5, YR21, YR16, YR14
Coat / Hat ~ YG11, G24, G46, R20, R17, R27
Scarf ~ YG11, G24, G46, R20, R17, R27, C00, C1, C3
Bell ~ Y06, Y28
Boots ~ N0, N2, N4, N6
Heart ~ R20, R17, R27


I trimmed the colored panel and adhered the strip of green plaid pattern paper to the bottom grounding the owl. I rounded the corners using a corner rounder from my stash. I used my handy dandy Crop-a-dile to punch a couple holes in the plaid paper and popped in a couple of brads. I love brads! I should really use them more often. I have a ton in my stash! I adhered the owl panel to the striped pattern paper that was adhered to a white A2 top fold card base. I then stamped the sentiment from the Poinsettia Wishes stamp using Sugar Cube Pigment ink from Sponsor Taylored Expressions onto a scrap of red cardstock. I added some white embossing powder to the white ink and melted the powder with a heat tool - heat embossing it. I trimmed the sentiment and adhered it directly to the card.


My card was inspired by the current {BYSHC} sketch... Sketch 35! Have you visited the Build Your Stash Holiday Cardmakers Facebook group? We host a fun sketch challenge each month to inspire our holiday cardmaking all year long. I love using sketches for my cards... makes designing the cards so easy! I'll definitely be sharing a few past sketches during the Linky Party.


I'm also a Sponsor for the Christmas in July 2023 {BYSHC} Linky Party!! I have a wonderful prize set aside for one lucky winner. I didn't get a chance to take a picture of the prize so I guess it'll be a fun surprise. For a chance to win my fun prize make a Christmas card and link it up to the linky party blog post on the Build Your Stash Holiday Cardmakers blog. The winner will be announced on the {BYSHC} blog on Monday, July 31st.

Before you leave, be sure to stop by Sponsors Unity Stamp Co., Therm O WebGina K. Designs and Taylored Expressions websites to see the latest releases and sales happening right now. And if you haven't already, stop by the Christmas in July 2023 {BYSHC} Linky Party to check out all the wonderful Holiday inspiration from our Sponsors and the {BYSHC} Design Team!! I'm so excited to continue building my stash of holiday cards for 2023... I hope you'll join in the fun and play along!


Thanks so much for stopping by!
See ya next time.

Inky Hugs,
Crystal


{Please note that comment moderation is ON. Your comment will appear shortly.}

Friday, March 10, 2023

{BYSHC} Sketch Challenge 31 ~ Owl Bundle Up ~ Unity Stamp Co.

 Hello there crafty friend!
I'm sharing another Christmas card for the {BYSHC} Sketch Challenge 31 for the Build Your Stash Holiday Cardmakers Facebook group. I just adore the sweet owls illustrated by Lisa Arana for Unity Stamp Co. The adorably sweet owl from the Owl Bundle Up stamps was just perfect for my card today.


I paired him up with the Snowy Winter Greetings {paper pack} also from Unity. The snowflakes in the pattern paper compliment the snowflakes on the sweet owl's sweater.


The owl was stamped on Stampers Select White card stock from Papertrey Ink {my go-to white card stock!} using Black Amalgam ink from Gina K Designs. I used the following Copic markers to color up my image:

Owl ~ E21, E23, E25, C00, C1, C3, YR21, YR15, YR27
Sweater ~ B000, B91, B95
Ground ~ C00, C1, C3


My main panel was die cut with a stitched circle die from the Scallops & Circles {nesting dies}. I popped it up on my card with foam tape. The sentiment is trimmed up and just adhered to the card. And I finished up the card with a few enamel dots from my stash... I'm really just trying to use these up!! I have SO many. It's ridiculous.


Here's a look at {BYSHC} Sketch 31 for the month of March!
I hope you'll join us and play along with the sketch! If you're interested in seeing a bit more inspiration for this sketch, check out the amazing inspiration from the design team over on the {BYSH} Cardmakers blog!


Thanks so much for stopping by!
See ya next time.

Inky hugs,
Crystal


{Please note that comment moderation is ON. Your lovely comment will appear shortly.}

Friday, September 16, 2022

{BYSHC} Sketch Challenge 26 ~ Shakin' Things Up ~ Unity Stamp Co.

 Hello there crafty friend!
I'm back with my weekly Christmas card for the {BYSHC} Sketch Challenge 26 and this time I'm using one of my most favorite stamps from Unity called Shakin' Things Up! The adorable owls from Unity have been some of my most favorite stamps and I collect snow globes so this one was a must!! I just adore it! And it's not super Christmassy so really it could be used for different occasions.


I chose to go with a wintry Christmas card for this one. I happened to color it up before picking my papers but with so little color other than neutrals I decided to focus on the blue I colored around the edge of the globe. I went searching through my papers and thought the Really Rainbow Christmas paper pack from Lawn Fawn was perfect!  


I cut the rainbow snowflakes paper to 4-1/4 x 5-1/2" and adhered it to a white A2 top fold card base. I then adhered the 2-1/2 x 5-1/2" blue with white polka dot paper in the center and then I used a little trick I like for a faux mat. I cut two 1/8" strips of white card stock and adhered them on either side of the blue pattern paper. It breaks up the pattern papers like a mat does but it doesn't have the same bulk.


I fussy cut the snow globe and cleaned up the edges by coloring them with a Memento Tuxedo black marker. It gives the image a nice black edge. I trimmed up the sentiment and adhered it to a scrap of red pattern paper. I popped up both the snow globe and the sentiment on the card with foam tape.


Before I had fussy cut the snow globe I added some glitter. I used a Nuvo Aqua Shimmer Glitter Gloss pen to add glitter to the top portion of the snow globe. You can see a bit of the glitter around the owls eyes.


And then for the bottom portion of the snow globe where the snow would sit in the snow globe, I used Nuvo White Blizzard Glitter drops to just color in the space. It dried clear and left it all pretty and sparkly! You can see some more of the glitter on the owl in this picture.


Here's a look at {BYSHC} Sketch 26 for the month of September!
I hope you'll join us and play along with the sketch! If you're interested in seeing a bit more inspiration for this sketch, check out the amazing inspiration from the design team over on the  {BYSH} Cardmakers blog! I'll be back next week with my weekly Christmas card using this fun sketch!


Thanks so much for stopping by!
See ya next time.

Inky hugs,
Crystal


{Please note that comment moderation is ON. Your lovely comment will appear shortly.}