Showing posts with label #gingerbreadcard. Show all posts

Friday, March 29, 2024

{BYSHC} Sketch Challenge 43 ~ Gingerbread Men Clay Embellishments ~ Twiddler's Nook

Hello there crafty friend!
Today I'm sharing one last card for the current sketch challenge over in the Build Your Stash Holiday Cardmakers Facebook group! A sweet gingerbread card! I used the adorable Gingerbread Men Clay Embellishments from our wonderful sponsor, Twiddler's Nook


I paired the sweet gingerbread men clay bits with the adorable Gingerbread Kisses 6x6 Paper Pad and ephemera from Not 2 Shabby. Sadly, it looks like these both are out of stock, but you can sign up to be put on the wait list for the papers when they come back.


All my papers are trimmed to the sketch measurements except the squares. I used the Scallops & Squares {nesting dies} from Unity Stamp Co. to die cut the pattern paper and a red mat from Real Red Card Stock from Stampin' Up. How cute are those little gingerbread men! They are having a party on the card! Hee hee!


To add a bit of dimension to the card, I added foam tape to the back of the ephemera and popped it up on the card. The cute sentiment is from the Gingerbread Hugs stamp set from Not 2 Shabby. Bummer... I am not seeing this cute set on the website anymore. Such a shame... it's just too cute! I prepped the card stock using the TE Anti-Static Powder Tool. Stamped the sentiment in my Mini Misti using the awesome Pressure Pal also from Twiddler's Nook. This handy tool isn't too heavy for my hand and it helps me to get even pressure on the stamp when I'm using my Mini Misti. I highly recommend it! Anywho, I heat embossed the sentiment with Sugar Cube Pigment ink from Taylored Expressions, Alabaster White Embossing Powder from Brutus Monroe on Real Red Card Stock from Stampin' Up and melted with a Wagner Precision Heat Tool. I like to use a Swiffer Dry Sweeping Cloth to wipe off the powder once I'm done embossing but definitely wait until it's cooled. It doesn't take long to cool... this step may save you from having to redo the heat embossing. Good advice from someone who has made the mistake of smudging up a heat embossed image! LOL!


Here's a look at {BYSHC} Sketch Challenge 43 for the month of March. Loving all the layers in this fun sketch! There's just a few more days to play along! I hope you'll join us. If you're interested in seeing a bit more inspiration for this sketch, check out the amazing inspiration from the design team over on the {BYSH} Cardmakers blog! Lots of beautiful inspiration this month from the design team.


Thanks so much for stopping by!
See ya next time.

Inky hugs,
Crystal


{Please note that comment moderation is ON. Your lovely comment will appear shortly.}

Friday, February 16, 2024

{BYSHC} Sketch Challenge 42 ~ Pattern Papers with Ephemera ~ Not 2 Shabby

Hello there crafty friend!
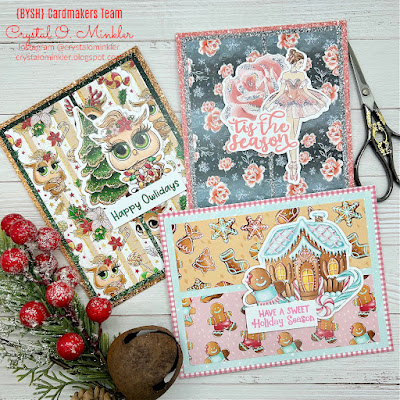
I'm back sharing inspiration for the sketch challenge over in the Build Your Stash Holiday Cardmakers Facebook group! Today I'm sharing three super quick cards using the coordinating paper pads and ephemera from Not 2 Shabby! I love the papers and ephemera from Not 2 Shabby! They coordinate so well and they're always so beautiful! Don't forget we're changing things up for 2024 and Not 2 Shabby is Sponsoring our {BYSHC} Sketch Challenge 42! Jamie has generously offered up a super fun-filled Christmas prize package for one lucky winner! Yay! Thank you so much, Jamie!


Here's a look at all three cards together! Aren't they just too cute!?


First up is the adorable owl papers and ephemera from the Deck the Owls 6x6 paper pad and the coordinating ephemera. Love the beautiful owls in these papers! I also love the glitter paper... it's so sparkly but doesn't have any of the gritty feel of actual glitter. Which also means no glittery mess! 


I used the measurements from the sketch for this card. I paired up two ephemera pieces for this one. I stamped a sentiment from the Holiday Owls stamp set using Rustic Wilderness Distress Oxide ink. I trimmed up the sentiment and adhered them all together and then added foam tape to the back.


For my second card I used the gorgeous Winter Magic 6x6 paper pad and coordinating ephemera. The papers in this paper pad are absolutely gorgeous!! I just had to use a couple of the glitter papers for this one too! 


I stamped the sentiment from the Nutcracker Dolls stamp set using Saltwater Taffy Distress Oxide ink. It looks so nice with the ephemera! I combined a couple ephemera for this card too. I adhered the ephemera with the sentiment and added foam tape to the back of all three pieces and popped them up on the card.


My third and last card featuring the adorable Gingerbread Kisses 6x6 paper pad and coordinating ephemera. Now the paper strips for this one are a bit smaller because I just used pieces that were already cut in the pack. 


No need to combine ephemera for this one. All the cute images were combined on one piece of ephemera! Love it! I stamped the sentiment from the Gingerbread Hugs stamp set using Kitsch Flamingo Distress Oxide ink. I adhered the sentiment to the ephemera and added foam tape to the back. I love the dimension that the popped up ephemera gives to the cards.


Here's a look at {BYSHC} Sketch Challenge 42 for the month of February. Loving this fun sketch! I hope you'll join us and play along with the sketch! If you're interested in seeing a bit more inspiration for this sketch, check out the amazing inspiration from the design team over on the {BYSH} Cardmakers blog! The design team made some really beautiful cards! Have an ink-tastic day!


Thanks so much for stopping by!
See ya next time.

Inky hugs,
Crystal


{Please note that comment moderation is ON. Your lovely comment will appear shortly.}